Downgrade from macOS Ventura to Monterey without Losing Data
![]() Ricky Lin updated on July 10, 2023
Ricky Lin updated on July 10, 2023
Quick Navigation:
- 1. Suggestions before You Downgrade macOS 13 Ventura to macOS Monterey
- 2. How to Downgrade macOS 13 Ventura to macOS Monterey Without Losing Data?
- 3. How to Recover Lost Data after Downgrading from macOS Ventura to Monterey?
You Mac users may be excited about the latest updated macOS 13 operating system - Ventura, and you may be ahead of the others in experiencing its beautiful features, but be aware that this newly designed system also comes with problems that make it uncomfortable to use. These faults are commonly reported as frozen apps, battery depletion, poor response, system freezing and crashing, etc.
Do you regret the upgrade? Do you want to downgrade macOS Ventura to the more stable Monterey without risking data loss? Read on to learn how to safely revert from macOS 13 Ventura to macOS Monterey without losing data.

Suggestions before You Downgrade macOS 13 Ventura to macOS Monterey
Before attempting to restore macOS Ventura to Monterey, some critical preliminary work must be completed, detailed below.
Take a backup of your system data.
All system data will be permanently wiped if macOS Ventura is downgraded to its prior release. So, creating a backup of your existing data is critical to avoiding data loss when the macOS system degrades. It is recommended that you back up Mac using the built-in Time Machine tool, an external USB drive, or an automatic cloud service and manually restore data from the backups. You also can try disk cloning software to help you create a bootable clone backup for your Mac.
Keep your Mac plugged into power.
The degraded Mac should be powered on so that uninstalling macOS Ventura and reinstalling macOS Monterey can be done efficiently and without interruption.
Maintain a good Internet connection.
Ascertain that your Mac is linked to a reliable and somewhat fast Wi-Fi or Ethernet network. This is done to avoid interfering with the downhill from Ventura to Monterey.
How to Downgrade macOS 13 Ventura to macOS Monterey Without Losing Data?
Following the initial preparations, this part will present four viable techniques for downgrading macOS Ventura to Monterey with no data loss. Continue reading to find the best one for your situation.
Fix 1: Using Factory Reset to Downgrade macOS Ventura
If your macOS version is Monterey, the simplest way to downgrade to Ventura is to perform a factory reset. You can restore the OS by factory resetting it to its original state. This procedure applies to both Intel and Apple processors on Mac.
Step 1: Open Apple > System Settings > General > Transfer or Reset.
Step 2: Select “Erase All Content and Settings” and confirm using your Mac password.
Step 3: Click “Continue,” then input your password to sign out of your Apple account. Choose “Erase All Content & Settings” to start the factory reset process.

The downgrading to Monterey will now begin. You can install Monterey when the language interface appears.
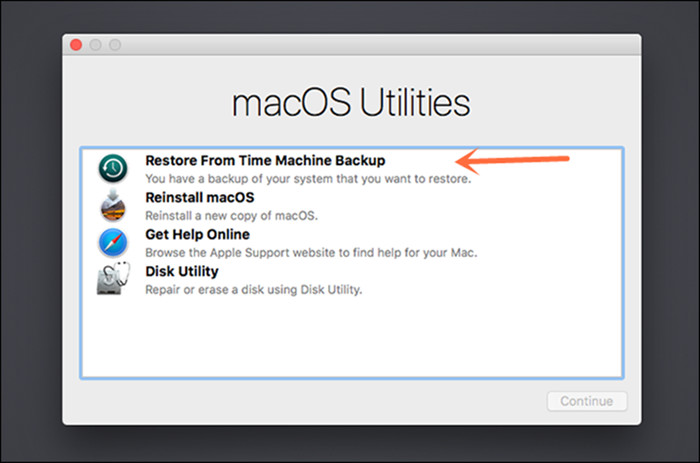
Fix 2: Downgrade macOS Ventura to Monterey with Time Machine Backup
Suppose your operating system was not initially macOS Monterey. You should not perform a factory reset. Another option is to utilize Time Machine to downgrade macOS Ventura to Monterey without losing data. However, there is one caveat to using Time Machine. You can only utilize it if you enable it before upgrading to Venture. Otherwise, proceed with the following two fixes.
Step 1: Connect the external Time Machine backup drive to your Mac, then pick Restart from the Apple menu.
Step 2: Hold the "Power" button until the startup screen appears. Then, select Options > Continue.
Step 4: Select “Restore from Time Machine Backup.” Select the desired backup, and your macOS Ventura will be downgraded.
Fix 3: Reinstall macOS Monterey
The macOS recovery mode will reinstall Ventura to return it to its previous version. You can even restore your macOS to its original state. This procedure is identical for Intel and Apple Silicone-based Mac CPUs. Here's how to use macOS recovery mode to downgrade macOS Ventura:
Step 1: Shut down your Mac and then immediately press one of the following key combinations:

- To reinstall the current version of Ventura on your Mac, use Command+R.
- To reinstall the factory-installed macOS, press Shift+Option(Alt)+Command+R.
- To upgrade to the latest macOS, press Option+Command+R.
Step 2: Enter your password and click Continue > Next > Reinstall macOS.
Step 3: Select the disc and wait for macOS to install automatically.
Fix 4: Use Bootable USB Drive to downgrade macOS Ventura to Monterey
If you don’t have a backup or Monterey macOS on an external device, you can boot your Mac with an installation. The installer has already been copied to a USB or external device.
There are some things to think about before preparing for a macOS downgrade with a bootable drive. They are as follows:
You must have a USB drive with at least 16GB of storage space.
A steady internet connection will aid in the download of macOS Monterey.
Here is how to downgrade macOS Ventura without losing data by using a bootable USB drive:
Step 1: Navigate to the Mac App Store and look for the macOS Monterey installation. Install it on your Mac. It will be saved in the Applications Finder folder on your Mac. Set it aside for later use.
Step 2: Erase the hard drive and ready it for a bootable drive before connecting a USB drive to your Mac device.
Step 3: Launch Disk Utility using Spotlight. Then, on the left side panel, choose the drive under “External” and select “Erase” from the top menu bar.
Step 4: In the dialogue box, select “Mac OS Extended (Journaled)” and press the “Erase” button. Your USB drive will now be created. When a message box displays, click the “Done” button.
Step 5: In the Terminal, type “sudo /Applications/Install macOS Monterey. app/Contents/Resources/createinstallmedia -volume /Volumes/USB -nointeraction”. (The word “USB” symbolizes the name of the USB drive.) You can modify it as needed).
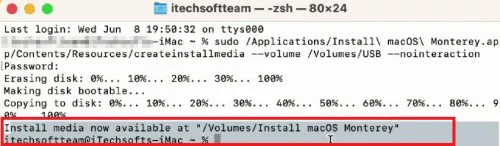
Step 6: Enter your user account password to remove the Mac disc and select “Ok” to enable USB drive access.
Step 7: The macOS Monterey installation files will now be copied to the USB device via the Terminal. Once the operation is finished, close the Terminal. Next, restart your Mac and enter recovery mode.
Step 8: To verify your installer disc, press the “Option” key on an Intel-based Mac. To see the installer CD on an Apple Silicone-based Mac, hit the “Power” button.
Step 9: Click “Continue” after selecting “Install Monterey OS.” After that, select “macOS Beta” and press the “Next” button to input your password.
Step 10: Install macOS Monterey by following the installation instructions provided by your Mac. Your machine will be downgraded from Ventura to Monterey macOS once the installation is complete.
How to Recover Lost Data after Downgrading from macOS Ventura to Monterey?
If you have lost important data during the downgrade process and you don’t have a backup of your Mac, just download a data recovery application and use it to help you scan the Mac hard drive, find erased files.
Do Your Data Recovery for Mac is an easy-to-use Mac data recovery tool. After installing on your Mac, just open it to help you quickly recover lost files.
Select the Mac hard drive to start data recovery.

Click on Scan button.

Preview and recover lost files.

With the three simple steps, you can completely recover lost images, documents, videos and other files from your Mac after downgrading from macOS Ventura to Monterey. It not only can find deleted files, but it also can find the overwritten files and the lost files which were erased by Disk Utility.
Final Words
To downgrade macOS 13 Ventura to macOS Monterey, many methods, such as a Mac factory reset, Time Machine backup, macOS Recovery mode, and a bootable USB drive, can be utilized. The initial backup is critical for doing the downgrade without losing data.
Written & Updated by Ricky Lin
Ricky Lin is an senior editor of DoYourData who lives in Adelaide, Australia. He is interested in writing technology articles related with data recovery, computer issue fixes, disk clone, iPhone data recovery, video edit, Mac optimization, etc. He Joined DoYourData in 2019 and have written 500+ articles to help both Windows users and Mac users to solve data or computer problems.
Hot Articles
- Best Free Data Recovery Software Review
- Best Data Erasure Software Review
- Best Disk Cloning Software Review
- Fix External Hard Drive Not Showing Up on Mac
- Fix RAW External Hard Drive
- Reset A M1 Mac to Factory Settings
- How to Back Up Mac Data
- Uninstall Apps on Mac
- Install Windows-style Start Menu on Mac
- Fix iMac Black Screen and Fix iMac Boot Issue