Quick Navigation:
Selling an old Mac can be a great way to recoup some of your investment and make room for an upgrade. However, before handing over your device to its new owner, it's crucial to ensure that all your personal data is securely erased and the Mac is in good condition. Preparing your Mac properly before selling it not only protects your sensitive information but also enhances the value and appeal of the device to potential buyers.
In this article, we will guide you through the essential steps to take before selling your Mac. We will cover everything from backing up your data to wiping the hard drive clean, signing out of all your accounts, and reinstalling the operating system. Additionally, we will provide tips on physically cleaning the Mac, gathering necessary accessories, and preparing the device for its new owner. By following these steps, you can ensure a smooth transition and peace of mind, knowing that your personal information is secure and the Mac is ready for a fresh start.
#1 Back Up Your Data Before Selling Your Mac
Importance of Backing Up Data
- Protecting Personal Information: Before selling your old Mac, it's vital to back up your data to ensure that your personal information is safeguarded. This step is crucial because your Mac likely contains sensitive information such as personal documents, photos, emails, and financial records. By creating a backup, you can prevent unauthorized access to your personal data once the Mac is in someone else's hands.
- Ensuring Important Files Are Not Lost: Backing up your data also ensures that you do not lose any important files during the transition to a new device. Whether it's cherished family photos, critical work documents, or vital software configurations, having a reliable backup means that you can easily transfer all your necessary files to your new Mac or another device. This process helps maintain continuity and prevents the frustration of losing valuable data.
Methods to Backup Your Data
1. Using Time Machine
Time Machine is Apple's built-in backup feature, making it a convenient and efficient way to back up your Mac. Here's how to use it:
- Connect an External Hard Drive: Plug in an external hard drive to your Mac.
- Set Up Time Machine: Go to System Settings > General > Time Machine (for old macOS versions, go to System Preferences > Time Machine), and select "Select Backup Disk."
- Choose Backup Disk: Select your external hard drive from the list and click "Use Disk."
- Automatic Backups: Time Machine will start backing up your data automatically, capturing hourly, daily, and weekly snapshots of your system.
Time Machine ensures that you have a comprehensive backup of your entire system, allowing for a seamless restoration of files if needed.
2. Cloud Storage Options
iCloud
- Enable iCloud: Go to System Preferences > Apple ID > iCloud.
- Select Items to Backup: Choose the items you want to store in iCloud, such as Photos, Contacts, and Documents.
- Automatic Sync: Ensure that iCloud Drive is enabled to automatically sync your files across all your Apple devices.
Google Drive
- Install Google Drive: Download and install the Google Drive app from the Google website.
- Sign In: Log in with your Google account.
- Backup Files: Drag and drop files into the Google Drive folder on your Mac, which will sync them to the cloud.
Dropbox
- Install Dropbox: Download and install the Dropbox app from the Dropbox website.
- Sign In: Log in with your Dropbox account.
- Backup Files: Move files to the Dropbox folder on your Mac to sync them to your Dropbox account.
Cloud storage options offer the flexibility to access your files from anywhere and provide an additional layer of security by storing your data offsite.
3. External Hard Drives
Backing up data to an external hard drive is a straightforward and reliable method. Here's how to do it:
- Connect External Hard Drive: Plug an external hard drive into your Mac using a USB, Thunderbolt, or FireWire connection.
- Manual Backup: Open Finder and drag and drop the files and folders you want to back up to the external hard drive.
- Organize Files: Create a folder structure on the external hard drive to keep your backups organized.
You can use disk cloning software - such as DoYourClone for Mac to clone everything from your old Mac to an external hard drive and make a bootable clone backup.
Make FULL Bootable Clone Backup for Mac
Clone all data including operating system, apps, settings, user files and other data from the internal disk to the external hard drive, making a full bootable clone backup.
#2 Sign Out of Services and Deauthorize Accounts
1. Sign Out of iCloud
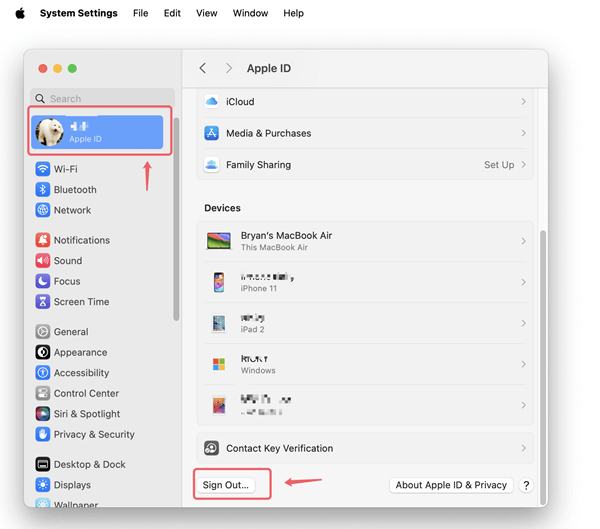
It is easy to sign out of iCloud account on Mac. Just click Apple logo, click System Settings, then click Apple ID (Your Name) in the sidebar, on the right, scroll down and click Sign Out.
![sign out of iCloud]()
For macOS Catalina, Big Sur and Monterey, follow these steps:
- Click Apple menu > System Preferences.
- Click Apple ID.
- Select Overview in the sidebar.
- Click Sign Out.
For earlier versions of macOS, follow these steps:
- Click Apple menu > System Preferences.
- Click iCloud.
- Click Sign Out.
You will be prompted to keep a copy of your iCloud data on your Mac. Decide whether you want to keep a copy of your contacts, calendars, and other data before signing out. This data will remain on your Mac until you erase it later.
2. Sign Out Of iTunes and Apple Music
If using macOS 10.15 Catalina or later, you can skip this step.
Deauthorize the Mac in iTunes
- Open iTunes: Launch iTunes on your Mac. If you're using macOS Catalina or later, open the Music app instead.
- Access Account Settings: In the menu bar at the top of the screen, click on "Account."
- Deauthorize This Computer: Select "Authorizations" and then "Deauthorize This Computer."
- Enter Apple ID: You will be prompted to enter your Apple ID and password. After entering them, click Deauthorize.
Deauthorizing your Mac in iTunes ensures that the new owner cannot access your iTunes purchases and content.
3. Other Services and Accounts
Sign Out of Other Services
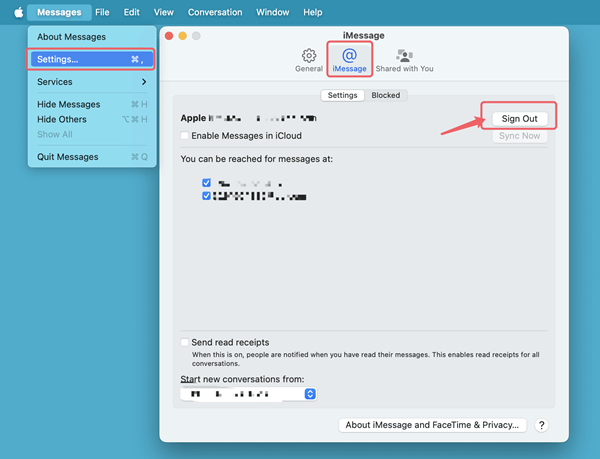
- iMessage
- Open Messages: Launch the Messages app on your Mac.
- Preferences: In the menu bar, click on "Messages" and then Preferences or Settings.
- Accounts: Select the "iMessage" tab.
- Sign Out: Click the "Sign Out" button.
![sign out of iMessage]()
- FaceTime
- Open FaceTime: Launch the FaceTime app on your Mac.
- Preferences: In the menu bar, click on "FaceTime" and then "Preferences."
- Sign Out: Click the "Sign Out" button.
- Mail
- Open Mail: Launch the Mail app on your Mac.
- Accounts: In the menu bar, click on "Mail" and then "Preferences."
- Remove Accounts: Select the "Accounts" tab, choose your email accounts from the list, and click the "-" button to remove them.
- App Store
- Open App Store: Launch the App Store on your Mac.
- Sign Out: In the menu bar, click on "Store" and then "Sign Out."
Remove the Mac from Your List of Devices
- Go to Apple ID Settings: Stay in the Apple ID settings in System Preferences/System Settings.
- Select Devices: In the sidebar, click on "Devices" to view all the devices associated with your Apple ID.
- Remove Your Mac: Find your Mac in the list of devices and click on it. Then, click the "Remove from Account" button that appears. Confirm your decision if prompted.
#3 Erase Startup Disk and Reinstall macOS
Preparation
- Ensure You Have an Internet Connection: Before you begin the process of erasing and reinstalling macOS, make sure your Mac is connected to the internet. This is essential because the macOS installation files will be downloaded from Apple's servers.
- Know Your Apple ID and Password: You'll need your Apple ID and password to reinstall macOS and to sign in to your Apple account during the setup process. Make sure you have this information handy before starting.
Steps to Erase the Hard Drive
Restart in Recovery Mode
- Shut Down Your Mac: Click on the Apple icon in the top-left corner of the screen and select "Shut Down."
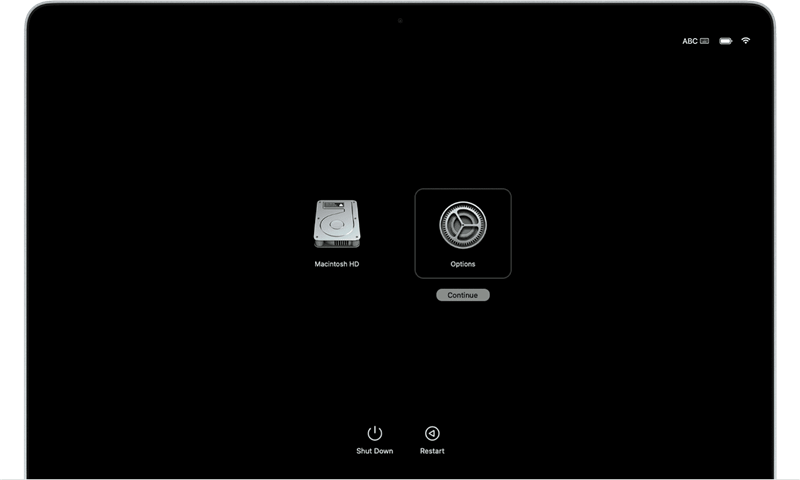
- Enter Recovery Mode: Turn on your Mac and immediately press and hold Command + R (For Intel Mac) until you see the Apple logo or a spinning globe. If you are using a Mac with Apple silicon, press and hold Power button. This will boot your Mac into macOS Recovery Mode. Select Options and click on Continue button.
![wipe Mac startup disk]()
Use Disk Utility to Erase the Hard Drive
- Open Disk Utility: In the macOS Utilities window, select "Disk Utility" and click "Continue."
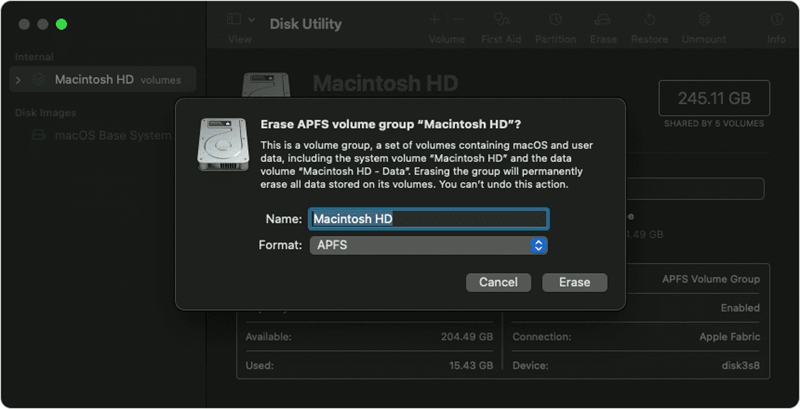
- Select Your Startup Disk: In the Disk Utility sidebar, choose your startup disk (usually named "Macintosh HD").
- Erase the Disk: Click on the "Erase" button at the top of the Disk Utility window.
- Configure Erase Settings: Choose a format (typically "APFS" for newer Macs or "Mac OS Extended (Journaled)" for older Macs) and give the disk a name (e.g., "Macintosh HD"). Click "Erase" to confirm.
![wipe Mac startup disk]()
Reinstall macOS
Reinstall macOS from Recovery Mode
- Return to the macOS Utilities Window: After erasing the disk, close Disk Utility to return to the macOS Utilities window.
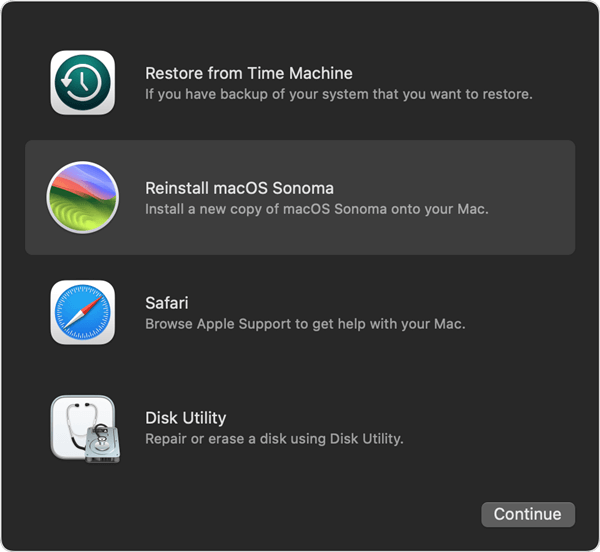
- Select Reinstall macOS: Click on "Reinstall macOS" and then "Continue."
- Follow the On-Screen Instructions: The installer will guide you through the process of reinstalling macOS. Follow the prompts to complete the installation. This will include selecting the disk you just erased as the installation destination.
![wipe Mac startup disk]()
Follow the On-Screen Instructions
- Agree to Terms and Conditions: Read and agree to the software license agreement.
- Install macOS: The installation process will begin. This can take some time as macOS is downloaded and installed.
- Initial Setup: Once the installation is complete, your Mac will restart and display the initial setup screen. At this point, it's best to leave the Mac on this screen for the new owner to complete the setup process.
Note: The data which is erased by Disk Utility is not lost for good and can be recovered by data recovery software. It means it is possible to recover lost data after erasing startup disk and reinstalling macOS. If you want to permanently erase all data before selling your old Mac, just try Mac data erasure software.
![wipe all data before selling Mac]()
#4 Wipe All Deleted/Erased/Lost Data Permanently from the Mac
To prevent the lost data stored on the old Mac from being recovered by the next owner, you should use a data erasure tool to wipe free disk space of the Mac internal drive.
DoYourData Super Eraser for Mac is a powerful, 100% safe and easy-to-use data erasure program which is securely and permanently erase data from HDD/SSD and external storage device. It can help you shred files on Mac, wipe all data from your Mac, wipe deleted/lost data from Mac internal drive, etc.
DoYourData Super Eraser for Mac
- Wipe free disk space of Mac to permanently erase deleted/erased/lost data.
- No trace left, no way to recover the erased data.
- Certified data erasure standards including NIST 800-88, Peter Gutmann's algorithm, DoD 5220.22-M, etc.
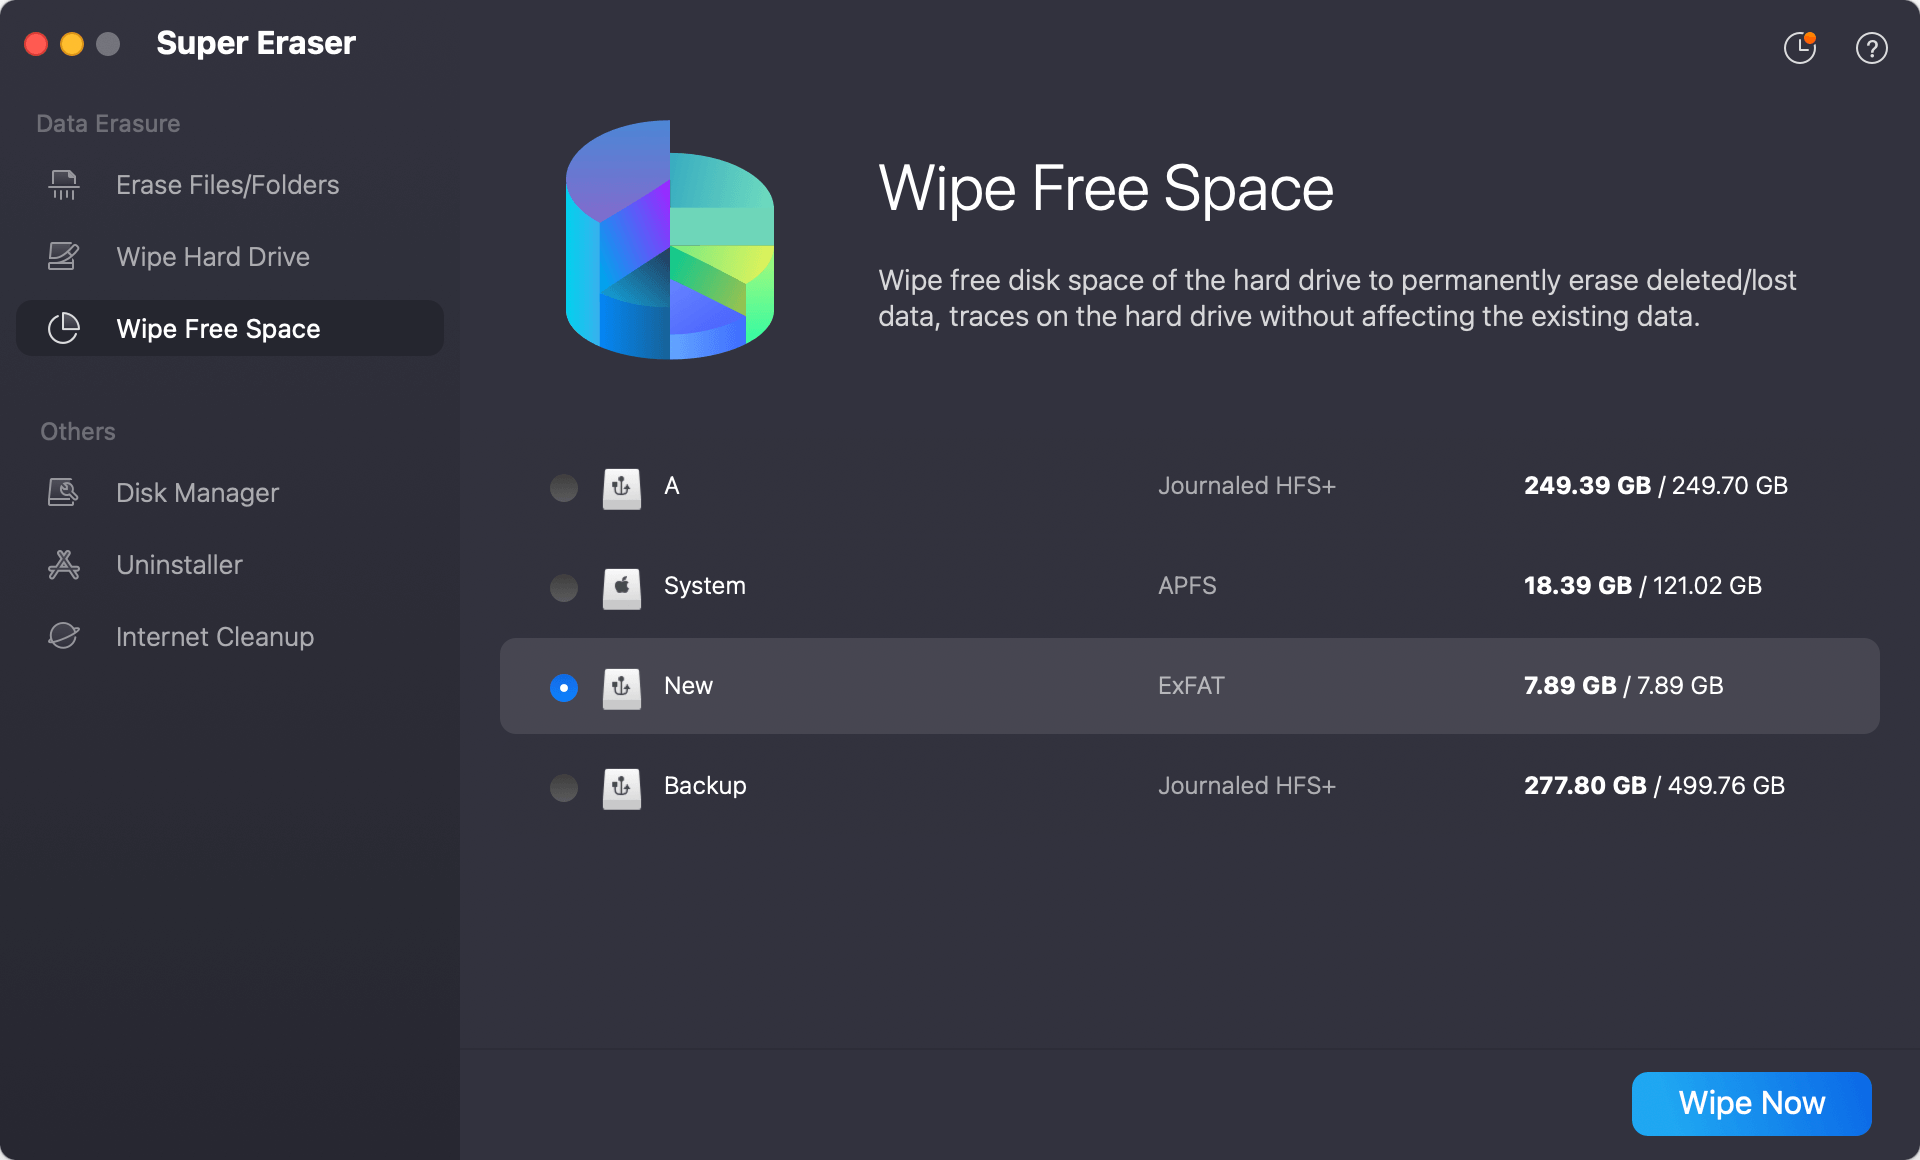
After erasing the Mac startup disk and reinstalling macOS, just download and install DoYourData Super Eraser for Mac on the Mac, open it.
Choose Wipe Free Space mode, then select the internal disk, click on Wipe Now button.
![wipe old Mac before selling]()
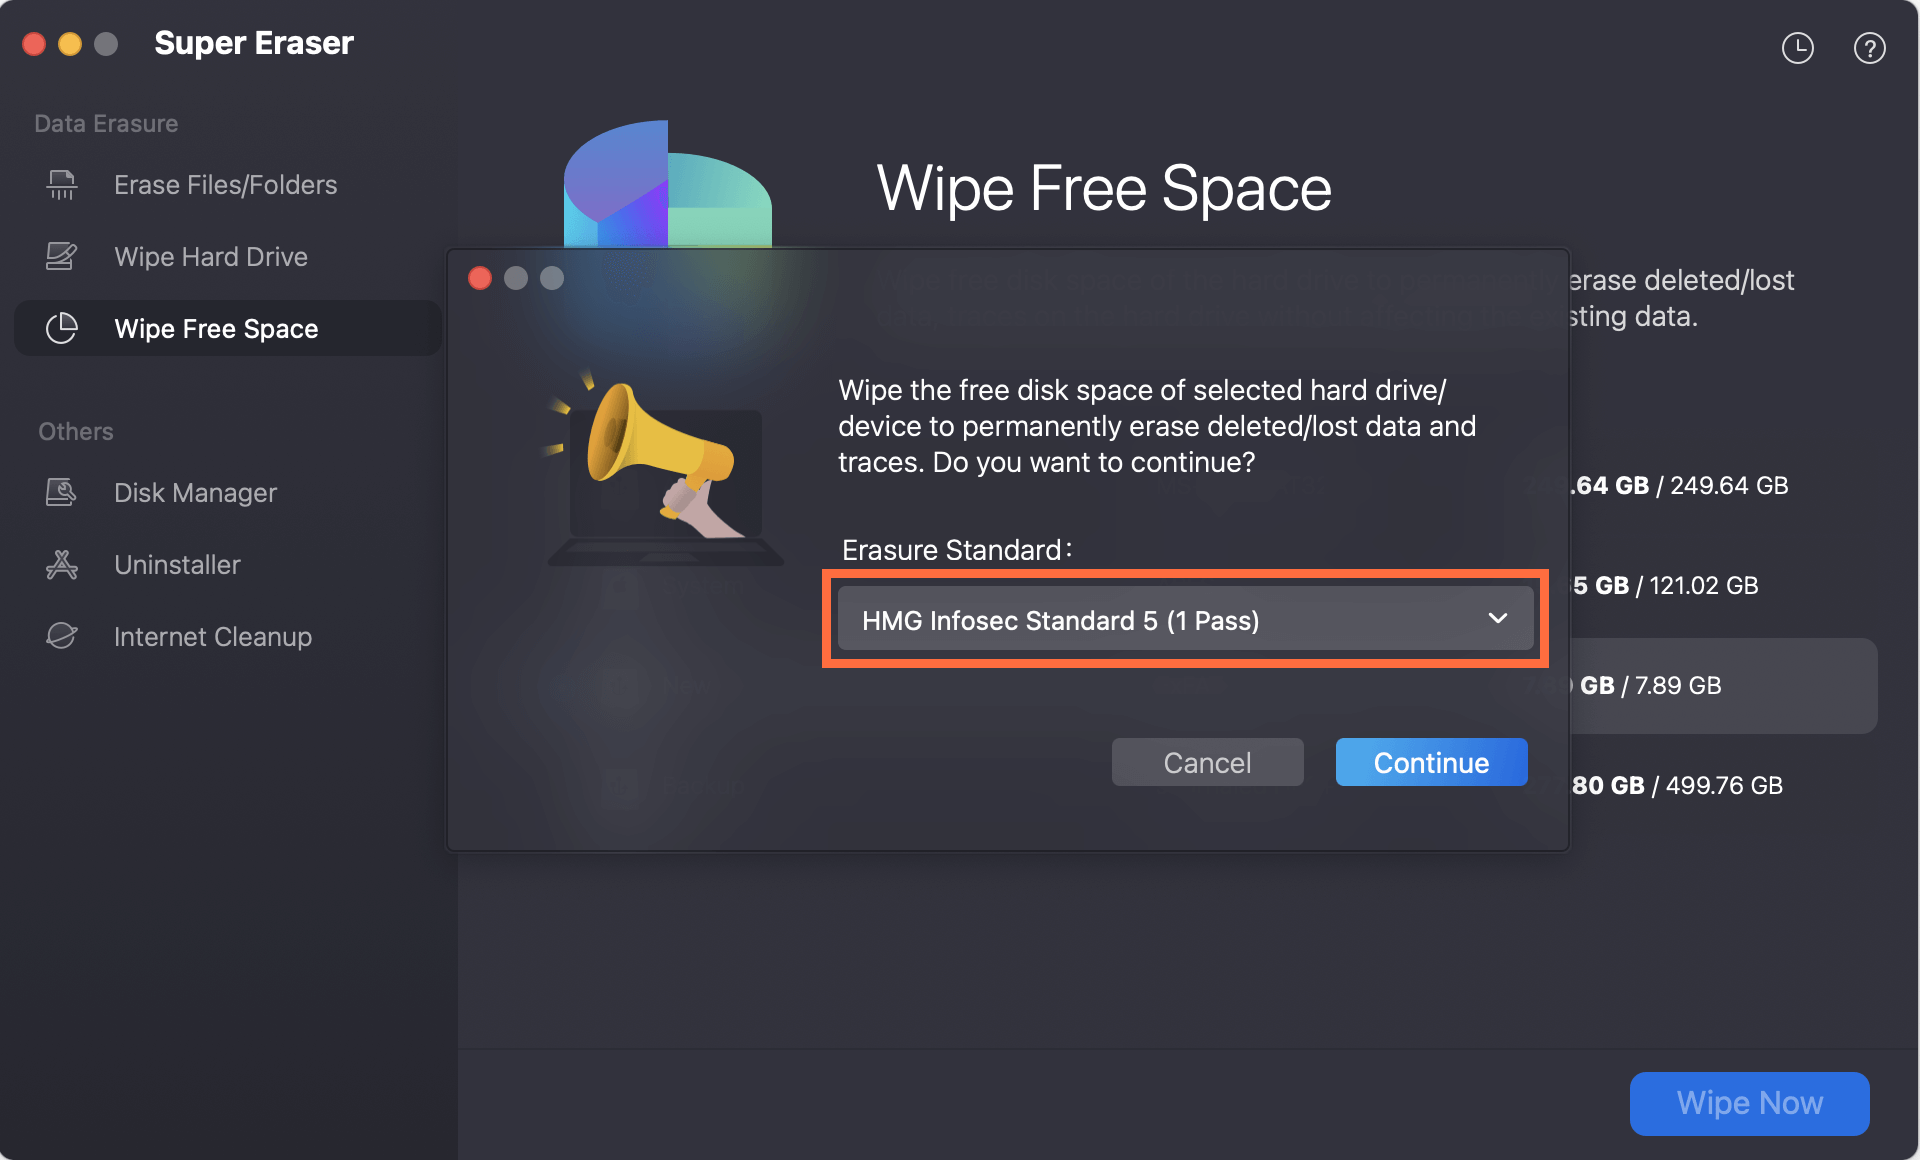
Select a data erasure standard, click on Continue button to securely wipe free disk space of the Mac internal disk and permanently erase all deleted/erased/lost data.
![wipe old Mac before selling]()
#5 Reset NVRAM/PRAM and SMC
Why Reset NVRAM/PRAM and SMC?
To Clear Settings That Remain in Memory
Resetting the NVRAM/PRAM (Non-Volatile Random-Access Memory/Parameter RAM) and the SMC (System Management Controller) helps clear certain settings and configurations that may remain in memory even after erasing the hard drive. These settings can include display resolution, time zone information, and startup disk selection, among others. Resetting these components ensures that the Mac is fully prepared for its new owner with default settings restored.
How to Reset NVRAM/PRAM
Steps to Reset NVRAM/PRAM
- Shut Down Your Mac: Click on the Apple icon in the top-left corner of the screen and select "Shut Down."
- Turn On Your Mac: Turn your Mac back on and immediately press and hold the following keys simultaneously: Option + Command + P + R.
- Hold the Keys: Keep holding these keys for about 20 seconds. During this time, your Mac might appear to restart. If you have a Mac that plays a startup sound, you can release the keys after the second startup sound. For Macs with the T2 Security Chip, release the keys after the Apple logo appears and disappears for the second time.
- Release the Keys: Let go of the keys and allow your Mac to continue starting up as usual.
Resetting the NVRAM/PRAM helps to clear any custom settings and restores default options for certain system settings.
How to Reset SMC
Steps to Reset the SMC
The steps to reset the SMC vary depending on the type of Mac you have.
For MacBooks with T2 Security Chip:
- Shut Down Your Mac: Click on the Apple icon in the top-left corner and select "Shut Down."
- Press and Hold Keys: After the Mac shuts down, press and hold the following keys on the built-in keyboard: Control + Option + Shift.
- Press Power Button: While holding these keys, press and hold the power button as well.
- Hold All Keys: Keep holding all four keys for 10 seconds.
- Release and Restart: Release all keys and then press the power button again to turn on your Mac.
For Desktop Macs with T2 Security Chip:
- Shut Down Your Mac: Click on the Apple icon in the top-left corner and select "Shut Down."
- Unplug Power Cord: After the Mac shuts down, unplug the power cord.
- Wait 15 Seconds: Wait for 15 seconds before plugging the power cord back in.
- Wait and Restart: Wait another 5 seconds, then press the power button to turn on your Mac.
For Older MacBooks (Non-Removable Battery):
- Shut Down Your Mac: Click on the Apple icon in the top-left corner and select "Shut Down."
- Press and Hold Keys: After the Mac shuts down, press and hold the following keys: Shift + Control + Option on the left side of the built-in keyboard.
- Press Power Button: While holding these keys, press the power button as well.
- Hold All Keys: Keep holding all four keys for 10 seconds.
- Release and Restart: Release all keys and then press the power button again to turn on your Mac.
For Older Desktop Macs:
- Shut Down Your Mac: Click on the Apple icon in the top-left corner and select "Shut Down."
- Unplug Power Cord: After the Mac shuts down, unplug the power cord.
- Wait 15 Seconds: Wait for 15 seconds before plugging the power cord back in.
- Wait and Restart: Wait another 5 seconds, then press the power button to turn on your Mac.
#6 Clean the Mac Physically
Exterior Cleaning
Cleaning the Screen and Keyboard
- Power Down: Ensure your Mac is turned off and unplugged from any power source.
- Use a Microfiber Cloth: Use a soft, lint-free microfiber cloth to wipe the screen gently. Avoid using paper towels or rough fabrics that can scratch the surface.
- Lightly Dampen the Cloth: If needed, lightly dampen the cloth with water or a screen-safe cleaner. Never spray liquid directly onto the screen.
- Wipe the Keyboard: Use the same microfiber cloth to wipe down the keyboard and the rest of the exterior. For stubborn grime, you can lightly dampen the cloth with water or use a small amount of isopropyl alcohol.
- Clean Between Keys: Use a can of compressed air or a soft-bristled brush to remove dust and debris from between the keys.
Removing Any Stickers or Residue
- Peel Off Stickers: Carefully peel off any stickers. If they are stubborn, use a plastic scraper or an old credit card to help lift them without scratching the surface.
- Remove Residue: Apply a small amount of rubbing alcohol or a commercial adhesive remover to a cloth and gently rub the sticky residue until it is removed. Be sure to test any cleaning solution on a small, inconspicuous area first to ensure it does not damage the finish.
Interior Cleaning
Optional: Consider Professional Cleaning for Dust Removal
- Understand the Risks: Opening a Mac to clean the interior can void warranties and may be risky if you're not experienced with electronics.
- Professional Cleaning: If your Mac is particularly dusty inside, consider taking it to an Apple Store or authorized service provider for a professional cleaning. This can help maintain optimal performance and prevent overheating.
#7 Collect Accessories and Original Packaging
Gathering Accessories
Power Adapter, Cables, etc.
- Power Adapter: Ensure the power adapter and any necessary cables are included. Clean them if needed, using a cloth lightly dampened with water.
- Other Accessories: Collect any additional accessories that originally came with the Mac, such as adapters, extension cables, and protective sleeves or cases.
Original Packaging
Importance of Including Original Packaging (If Available)
- Enhances Presentation: Including the original packaging can enhance the presentation of your Mac, making it more appealing to buyers.
- Provides Protection: The original packaging offers the best protection for shipping or transport.
- Increases Value: Having the original box, manuals, and packaging materials can increase the resale value of your Mac.
Conclusion:
Preparing your old Mac for sale is a critical process that not only protects your personal data but also ensures the device is in optimal condition for its new owner. By following the steps outlined in this guide, you can make sure your transition is smooth and secure.
First, back up your data using Time Machine, cloud storage, or an external hard drive to safeguard your important files. Then, sign out of iCloud, deauthorize iTunes, and log out of other services like iMessage and FaceTime to ensure your accounts are disconnected.
Next, erase your hard drive and reinstall macOS, effectively wiping all personal information and restoring the system to factory settings. Don't forget to reset the NVRAM/PRAM and SMC to clear any remaining settings.
After handling the software side, give your Mac a thorough physical cleaning, removing any dust, grime, or stickers. Gather all the original accessories and packaging to enhance the appeal of your Mac.
By taking these comprehensive steps, you can provide the new owner with a fresh start, ensuring they receive a clean, well-prepared device. This attention to detail not only maximizes your Mac's resale value but also gives you peace of mind knowing your personal information remains secure.
DoYourData Super Eraser for Mac
DoYourData Super Eraser for Mac is a 100% safe, powerful and easy-to-use data erasure program. It offers certified data erasure standards including Peter Gutmann, U.S. Army AR380-19, DoD 5220.22-M ECE to permanently erase data from Macs and external devices, making data recovery be impossible.