How to Format a Hard Drive to Mac OS Extended (HFS+)?
![]() Ricky Lin updated on August 12, 2024
Ricky Lin updated on August 12, 2024
Quick Navigation:
- Understanding Mac OS Extended
- Types of Mac OS Extended
- Benefits of Mac OS Extended
- Preparing for Formatting
- Formatting a Drive to Mac OS Extended (HFS+) on Mac
- How to Recover Lost Data After Formatting a Drive to Mac OS Extended?
- Conclusion
- FAQs About Formatting a Drive to Mac OS Extended (HFS+)
Formatting a hard drive is a crucial task that many computer users will encounter. Whether you're preparing a new drive for use or reformatting an old one to clear out data, understanding how to properly format a hard drive is essential. For Mac users, the Mac OS Extended format, also known as HFS+, is a popular choice due to its compatibility and feature set tailored for macOS. In this article, we'll guide you through the process of formatting a hard drive to Mac OS Extended, ensuring you have a smooth and successful experience.

Understanding Mac OS Extended
Mac OS Extended, also known as HFS+ (Hierarchical File System Plus), is a file system developed by Apple Inc. It was introduced in 1998 as an improvement over the older HFS (Hierarchical File System). HFS+ was designed to be more efficient and reliable, supporting larger file sizes and volumes, making it suitable for modern computing needs. It became the default file system for Mac OS 8.1 and remained the standard until the introduction of the APFS (Apple File System) in macOS High Sierra in 2017. Despite the advent of APFS, HFS+ remains widely used for compatibility reasons and specific use cases.
HFS+ uses a catalog file to store records about files and folders on the volume. This catalog file allows the file system to locate and access files quickly. Additionally, HFS+ supports features like hard links, symbolic links, and file system journaling, which enhance data integrity and recovery capabilities. The introduction of journaling in HFS+ was a significant step forward, as it helps to prevent file system corruption and speeds up the recovery process in the event of a system crash or power failure.
Types of Mac OS Extended
Mac OS Extended comes in several variations, each designed to meet specific needs and use cases. Understanding these variations will help you choose the most appropriate format for your hard drive:
- Mac OS Extended (Journaled): This is the most common and recommended format for general use. Journaling helps protect the file system by keeping a continuous record of changes not yet committed to the disk. This feature significantly reduces the risk of data corruption in case of unexpected shutdowns or crashes.
- Mac OS Extended (Case-sensitive, Journaled): This variation is similar to the standard journaled format but treats files with names differing only in case (e.g., "file" and "File") as distinct files. This is useful for certain development environments and applications that require case sensitivity.
- Mac OS Extended (Case-sensitive): This format is case-sensitive but does not include journaling. It might be slightly faster in certain scenarios but lacks the added protection of journaling. This format is less commonly used but can be useful for specific applications.
- Mac OS Extended: This is the non-journaled version of the file system. It might offer slightly better performance in some situations but at the cost of increased vulnerability to data corruption. This format is generally not recommended unless you have a specific reason to avoid journaling.
Benefits of Mac OS Extended
Choosing the Mac OS Extended format for your hard drive offers several benefits:
- Compatibility: It is fully compatible with macOS, ensuring seamless operation and support.
- File System Integrity: The journaled versions help maintain file system integrity, reducing the risk of data corruption.
- Performance: It is optimized for macOS, providing good performance for everyday tasks.
- Support for Large Files and Volumes: HFS+ can handle large files and volumes, making it suitable for modern storage needs.
Preparing for Formatting
Backup Your Data:
Before formatting any drive, it is critical to back up your data. Formatting will erase all existing data on the drive, so ensure you have copies of any important files. Here are some methods and tools for backing up your data:
- Time Machine: macOS's built-in backup solution. It allows you to back up your entire system to an external drive, which can be restored if needed.
- External Hard Drives: Manually copy your important files to an external hard drive.
- Cloud Storage: Use cloud services like iCloud, Google Drive, or Dropbox to store your data online.
Check Compatibility:
Ensure that the hard drive you want to format is compatible with Mac OS Extended. Most modern external hard drives are compatible, but it is always good to check the manufacturer's specifications. Additionally, verify that the drive is properly connected and recognized by your Mac.
Formatting a Drive to Mac OS Extended (HFS+) on Mac
To format your hard drive to Mac OS Extended, you'll use Disk Utility, a built-in macOS application for managing disks and volumes. Follow these steps to open Disk Utility:
- Open Finder.
- Go to Applications > Utilities.
- Launch Disk Utility.
Then follow the steps below to format a USB drive, HDD, SSD, SD card, external hard drive to Mac OS Extended on Mac:
Step 1. Select the Drive: Once Disk Utility is open, you need to select the correct hard drive you wish to format. Here's how:
- In Disk Utility, you’ll see a list of available drives on the left-hand side.
- Identify the drive you want to format by its name and capacity. Be cautious to select the correct drive to avoid accidental data loss on other drives.
Step 2. Erase the drive: With the correct drive selected, you're ready to erase it and format it to Mac OS Extended. Follow these detailed steps:
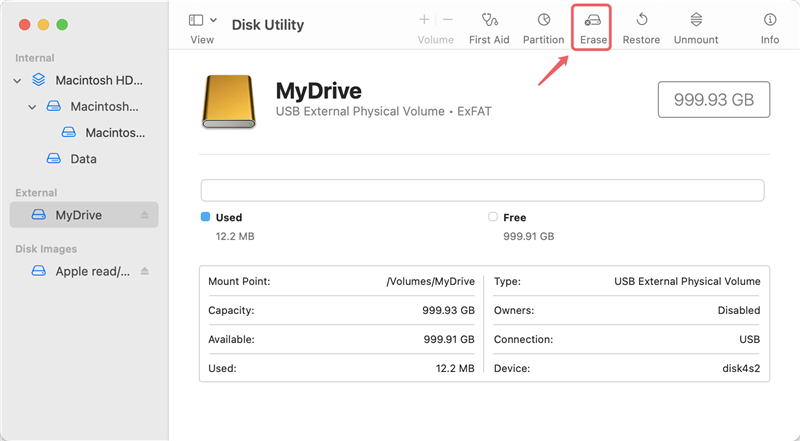
- Click on the Erase button at the top of the Disk Utility window.
- Name your drive as you prefer (e.g., "MyMacDrive").
- Choose the Format: From the drop-down menu, select "Mac OS Extended (Journaled)" or another variation that suits your needs.
- Choose the Scheme: For most users, "GUID Partition Map" is recommended as it is compatible with Intel-based and Apple silicon Macs.
- Click Erase to start the formatting process.
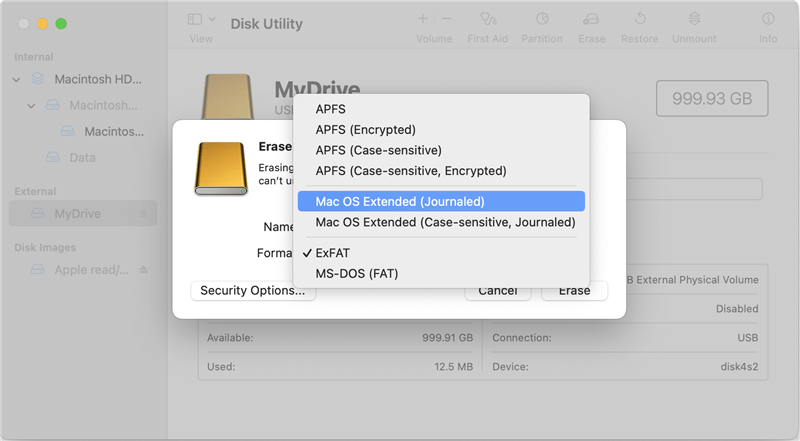
When you are in the Erase menu, it's important to select the correct Mac OS Extended option. Here's a brief overview of the options and when to use them:
- Mac OS Extended (Journaled): Ideal for general use, providing a balance of performance and data integrity.
- Mac OS Extended (Case-sensitive, Journaled): Useful if you need case sensitivity, such as for certain software development tasks.
- Mac OS Extended (Case-sensitive): Use this if you need case sensitivity but do not require journaling.
- Mac OS Extended: Opt for this if you prioritize speed over data integrity features provided by journaling.
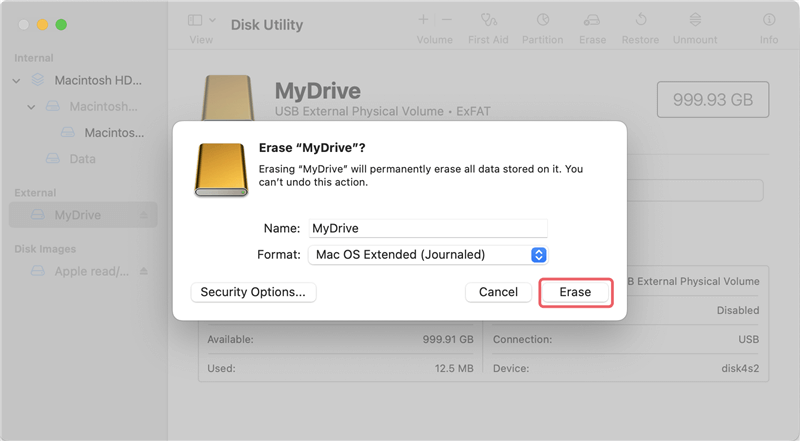
Once you've chosen the appropriate format:
- Click Erase to begin the formatting process.
- Disk Utility will erase the drive and format it to the chosen Mac OS Extended format.
- Wait for the process to complete: This may take a few minutes, depending on the size of the drive.
- Confirmation: Disk Utility will notify you once the formatting is complete.

Note: If you want to format the Mac's internal SSD to Mac OS Extended, you should boot the Mac into macOS Recovery mode, then select Disk Utility to format the internal drive to Mac OS Extended.
Verification
After formatting, it's important to verify that the process was successful:
- Check the drive in Disk Utility: Ensure it is listed with the correct format.
- Mount the drive: If it's not automatically mounted, select the drive and click "Mount".
- Test the drive: Open Finder and navigate to the drive to ensure it's accessible and functioning correctly.
Post-Formatting Steps
Restoring Data:
With the drive now formatted, you can restore any data you backed up earlier:
- Using Time Machine: If you used Time Machine, open the Time Machine application and follow the prompts to restore your backup.
- Manual Copy: If you manually backed up your files, simply copy them back to the newly formatted drive.
- Cloud Storage: Download your files from cloud storage services to your newly formatted drive.
Using the Drive:
Your drive is now formatted and ready for use. Here are a few tips on how to get started:
- Organize your files: Create folders to keep your data organized.
- Set up Time Machine: Consider using Time Machine to regularly back up your Mac to this drive.
- Install Applications: If you plan to run applications from this drive, install them and ensure they function correctly.
Maintaining the Drive:
To maintain the health and performance of your newly formatted drive, follow these best practices:
- Regular Backups: Continuously back up your data to prevent loss.
- Disk Utility Checks: Periodically use Disk Utility to verify and repair the drive if needed.
- Avoid Physical Damage: Handle the drive carefully to prevent physical damage.
- Keep it Cool: Ensure the drive is kept in a cool environment to avoid overheating.
How to Recover Lost Data After Formatting a Drive to Mac OS Extended?
If you have not backed up your data before formatting the drive to Mac OS Extended, you will lose all your data stored on the drive. Don't worry, the formatted data is not lost for good and can be recovered by data recovery software.
Do Your Data Recovery for Mac is a powerful Mac data recovery application. It supports to recover deleted, formatted or lost data from APFS, Mac OS Extended, NTFS, ExFAT, FAT32 or other file systems. Follow the steps to unformat your hard drive and get all lost data back.
Step 1. Download, install and open Do Your Data Recovery for Mac.
Step 2. Select the formatted drive and click on Scan button.

Step 3. This Mac data recovery application will deeply scan the formatted hard drive and find all recoverable files.

Step 4. Once the scan is completed, you can preview all recoverable files. Then select the wanted files and save them.

Conclusion
Formatting a hard drive to Mac OS Extended is a straightforward process that provides several benefits, particularly for Mac users. By following the steps outlined in this article, you can ensure that your drive is properly formatted and ready for use with macOS. Remember to back up your data before formatting, choose the appropriate Mac OS Extended format, and verify the drive after formatting. With these steps, you can enjoy a reliable and efficient storage solution tailored to your needs.
FAQs About Formatting a Drive to Mac OS Extended (HFS+)
1. Why should I format my drive to Mac OS Extended?
Formatting your drive to Mac OS Extended ensures compatibility with macOS and provides features like journaling, which enhances data integrity.
2. Can I format an external hard drive to Mac OS Extended on a Windows PC?
No, formatting to Mac OS Extended requires a Mac. Windows does not natively support this file system.
3. Will formatting erase all data on the drive?
Yes, formatting will erase all data. Ensure you back up any important files before proceeding.
4. How long does the formatting process take?
The time varies based on the size of the drive but typically takes a few minutes.
5. Can I use the formatted drive with both Mac and Windows?
Mac OS Extended is not natively supported by Windows. For cross-platform compatibility, consider using ExFAT or NTFS (with third-party software on macOS).
6. Besides Disk Utility, any other tools can help format a drive to Mac OS Extended?
Yes, there are many tools can help you format a drive to Mac OS Extended, such as:
- Do Your Data Recovery for Mac: It offers Disk Manager can help you mount or format any drive on Mac.
- DoYourData NTFS for Mac: It can easily format a drive to APFS, Mac OS Extended, NTFS, ExFAT, FAT32 on Mac.
- Terminal: eraseDisk command can help you format a drive to Mac OS Extended.
- DoYourData Super Eraser for Mac: It not only can format a drive to Mac OS Extended, but it also can permanently erase all data from a drive on Mac.
Written & Updated by Ricky Lin
Ricky Lin is an senior editor of DoYourData who lives in Adelaide, Australia. He is interested in writing technology articles related with data recovery, computer issue fixes, disk clone, iPhone data recovery, video edit, Mac optimization, etc. He Joined DoYourData in 2019 and have written 500+ articles to help both Windows users and Mac users to solve data or computer problems.
Hot Articles
- Fix External Hard Drive Read-Only Issue on Mac
- How to Wipe Trash Bin on Mac?
- Recover Lost Data from WD (Western Digital) External Hard Drive on Mac
- Fix External Hard Drive Not Showing Up on Mac
- How to Wipe SD Card on Mac?
- Mount and Unmount the External Hard Drive on the Mac
- Run First Aid on Mac to Repair Disks
- Fix Can't Save Files to An External Hard Drive on Mac
- (Solved) External SSD Not Detected in Disk Utility on Mac
- Why Can't Format A Hard Drive To NTFS on Mac? Can We Fix It?