APFS vs. Mac OS Extended (HFS+)
Compare APFS to Mac OS Extended (HFS+), find out why choose APFS as the file system for your hard drive on Mac.
Quick Navigation:
Apple File System (APFS) is Apple's proprietary file system introduced with macOS High Sierra. It brings a variety of improvements over its predecessor, HFS+, including better performance, enhanced data integrity, and space efficiency through features like cloning and snapshots. Formatting a hard drive to APFS can be beneficial for macOS users, providing them with a more robust and efficient file system. This article will guide you through the process of formatting your hard drive to APFS, ensuring a smooth transition with minimal risk of data loss.
APFS is designed to optimize performance on SSDs but also works efficiently on traditional HDDs. Its advanced features, such as instant file and directory cloning, fast directory sizing, and strong encryption, make it an excellent choice for modern macOS environments. Additionally, APFS supports space sharing, allowing multiple file systems to share the same storage space, enhancing flexibility in disk management.

Benefits for Mac Users:
| Features | Description |
|---|---|
Performace |
With its 64-bit architecture, APFS significantly accelerates the processes of copying, moving, and deleting files. |
Reliability |
This format ensures data integrity and experiences fewer crashes compared to its older HFS+ counterpart, thereby reducing the risk of file corruption. |
Dynamic Storage Allocation |
The new and improved file system utilizes containers to store files, enabling the creation of multiple partitions and volumes on a single disk. These volumes can share space dynamically, allocating it based on each one's requirements. |
Security |
APFS external and internal drives can be encrypted and password-protected. Although some HFS+ formats offered encryption, Apple removed this feature with the introduction of APFS. |
APFS reduces the risk of fragmentation |
The file system's space-sharing containers and copy-on-write features help reduce data fragmentation, making APFS an ideal choice for external SSDs. |
These advantages, along with compatibility with macOS and iOS devices (if the drive currently has a Windows-exclusive format), provide compelling reasons to choose APFS for an external drive. Here’s what to do before converting the file system.
APFS vs. Mac OS Extended (HFS+)
Compare APFS to Mac OS Extended (HFS+), find out why choose APFS as the file system for your hard drive on Mac.
Before you begin the process of converting your external hard drive, SSD, USB drive or SD card to the APFS format, it is crucial to take several precautions to ensure that the transition is smooth and that your data remains safe. Here are the steps you should follow:
Check if the system is Compatible: APFS was introduced with macOS 10.13 (High Sierra), which means it is not supported on earlier versions such as macOS 10.12 (Sierra) and previous systems. To ensure that your Mac can handle the APFS format, you need to be running at least macOS 10.13. If your Mac is running an older version, you will need to update it to the newest macOS version available. This compatibility check is essential to avoid any software conflicts or issues during the conversion process.
Create Backup for data: While converting your hard drive to APFS generally does not result in data loss, there is always a risk of something going wrong. To safeguard your data, it is highly recommended to create a complete backup before you begin the conversion. You can use Time Machine, a built-in backup feature of macOS, to back up your data. For the most seamless experience, macOS 11.7 (Big Sur) or newer is recommended, as these versions offer improved support for Time Machine backups. By backing up your data, you ensure that you have a copy of all your important files, which can be restored in case of any unexpected issues during the conversion.
Verify Hard Drive Health: Before you format your external hard drive to APFS, it is a good idea to check the health of the drive. You can use Disk Utility to run a First Aid check on the drive. This process will scan the drive for any potential errors or issues and attempt to repair them. Ensuring that your drive is in good health before conversion helps prevent data corruption and ensures a smoother transition.
Ensure Adequate Power Supply: If you are using a laptop, make sure it is connected to a power source before starting the conversion process. Converting a hard drive can take some time, and you do not want your computer to shut down in the middle of the process due to a low battery. An uninterrupted power supply ensures that the conversion process is completed without any disruptions.
Disconnect Other External Devices: To minimize the risk of accidental data loss or confusion during the conversion process, disconnect any other external drives or devices from your Mac. This helps ensure that you select the correct drive for conversion and reduces the chances of mistakenly formatting or converting the wrong device.
Before proceeding with formatting, it's crucial to back up all your data. Formatting a hard drive will erase all existing data, and without a backup, you risk losing important files. Ensure your macOS device is compatible with APFS. Most recent versions of macOS support APFS, but it's always good to verify your macOS version. You'll also need the Disk Utility application, a built-in tool in macOS for managing disks and volumes. If you are formatting an external hard drive, ensure it is properly connected to your Mac.
No matter you intend to erase, partition, or reformat an external drive to APFS, the following methods will help you avoid data loss and ensure your disk is compatible with macOS.
Disk Utility is the first choice for managing internal and external disks on Mac. Here are the steps to format an external hard disk to APFS with Disk Utility:
Step 1. Connect the external (HDD, SSD, USB drive or SD card) to Mac machine.
Step 2. Open Disk Utility by navigating to "Applications" > "Utilities" > "Disk Utility".
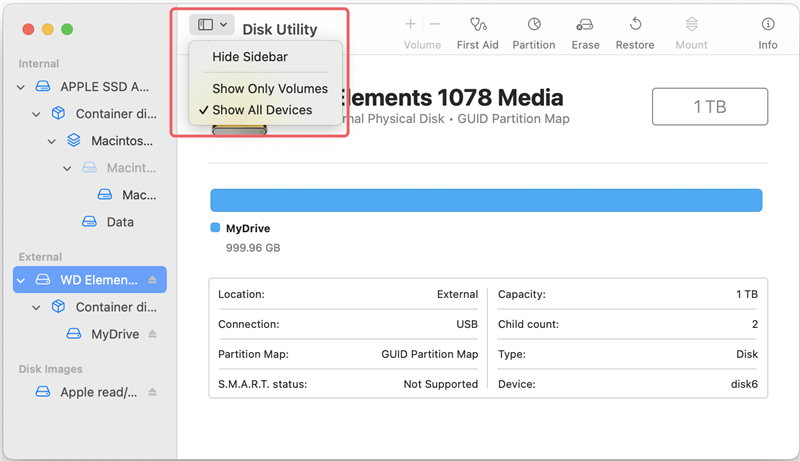
Step 3. Navigate to "View" > "Show All Devices" to display all hard drives connected on the Mac.
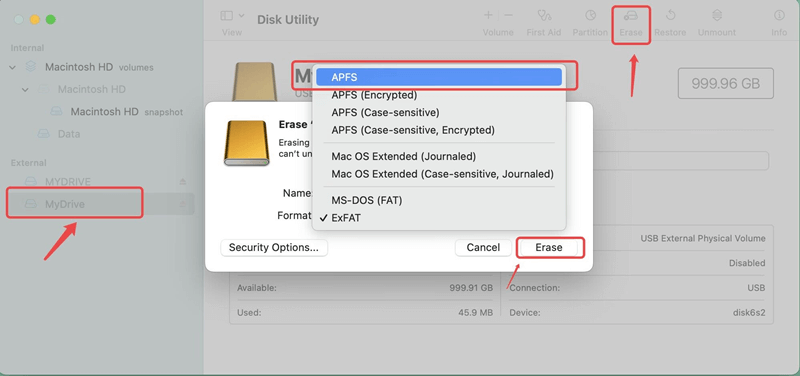
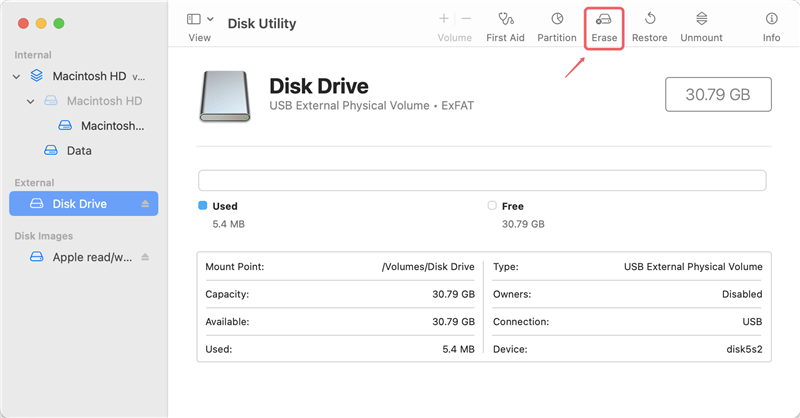
Step 4. In the left side of the panel, select the internal/external hard drive, then click on "Erase" button on the upper right menu.
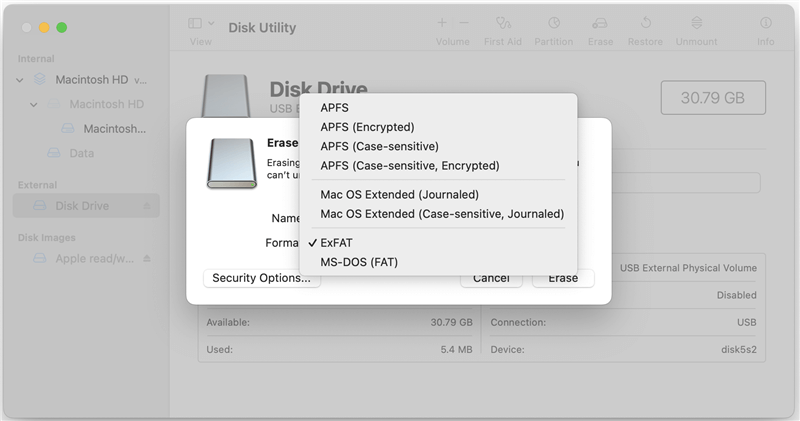
Step 5. Choose APFS as the Format, then click on "Erase" button again.
Step 6. It will format the drive to APFS, then the process gets finished, click on "Done" button.
The APFS format allows you to create multiple partitions on a disk, with each container not requiring a matching file system.
For instance, you can add an APFS partition while retaining the existing HFS+ or ExFAT partition, eliminating the need to reformat the entire disk and ensuring your HFS+ data remains safe.
Here are the steps to partition your external drive and add an APFS containter in Disk Utility:
Step 1. First, connect the internal/external hard drive to Mac computer.
Step 2. Open and get to "Applications" > "Utilities" > "Disk Utility".
Step 3. Select the hard drive which you want to format at the top of the window and click "Partition".
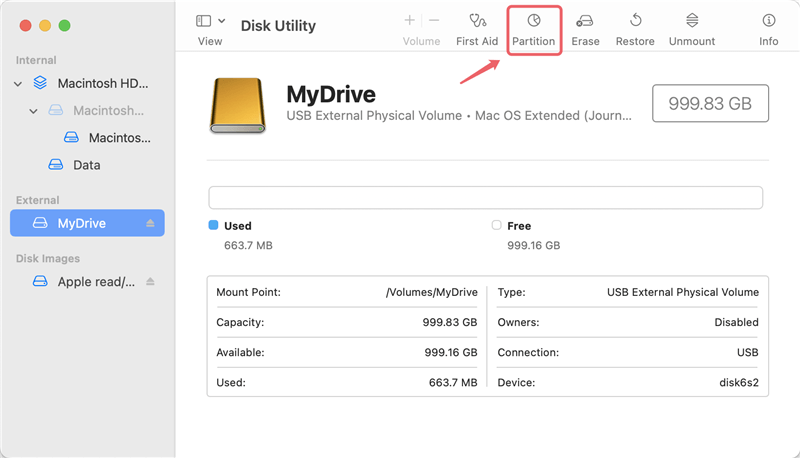
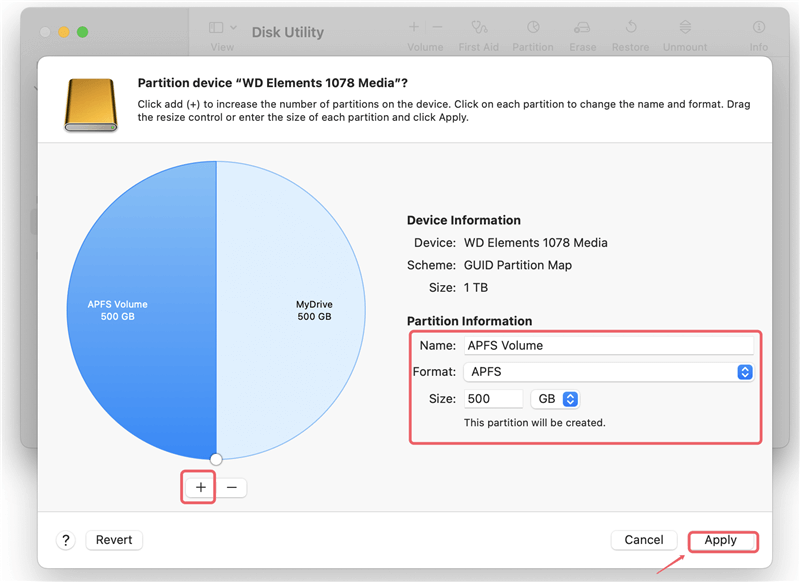
Step 4. Click the "+" button below the pie chart of and hard drive to add a partition, ensure to confirm the choice in the dialog box, like Name it, select the format as APFS, and specify the size in the corresponding fields. You can also drag the round "resize-control" button on the pie chart. At last, ensure to choose the device's scheme as GUID Partition Map, then you can click "Apply" button to process.
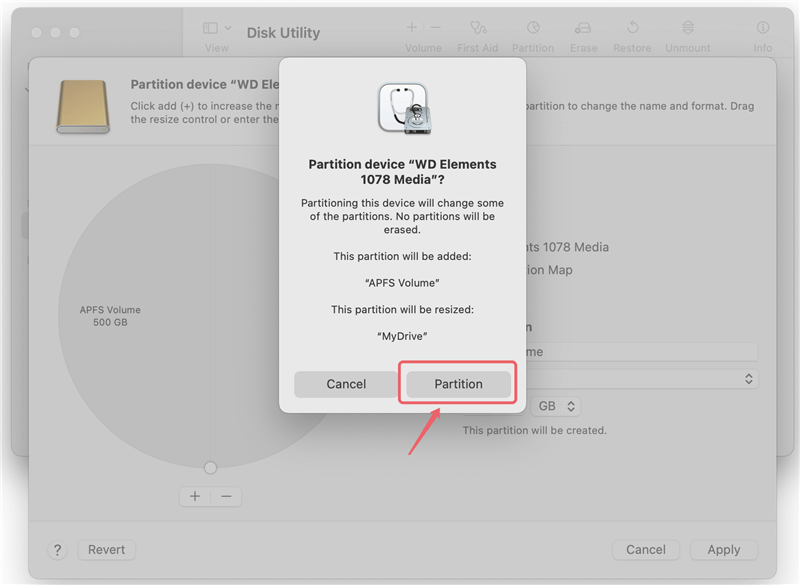
Step 5. Disk Utility will pop up the information that partitioning the hard drive won't erase partitions, and show that the existing partition will be resized and it will and add a new partition. Click "Partition" to continue.
Verifying the Format:
Restoring Backed-Up Data:
Setting Up the Drive for Regular Use:
Hard Drive Not Appearing in Disk Utility:
Errors During the Formatting Process:
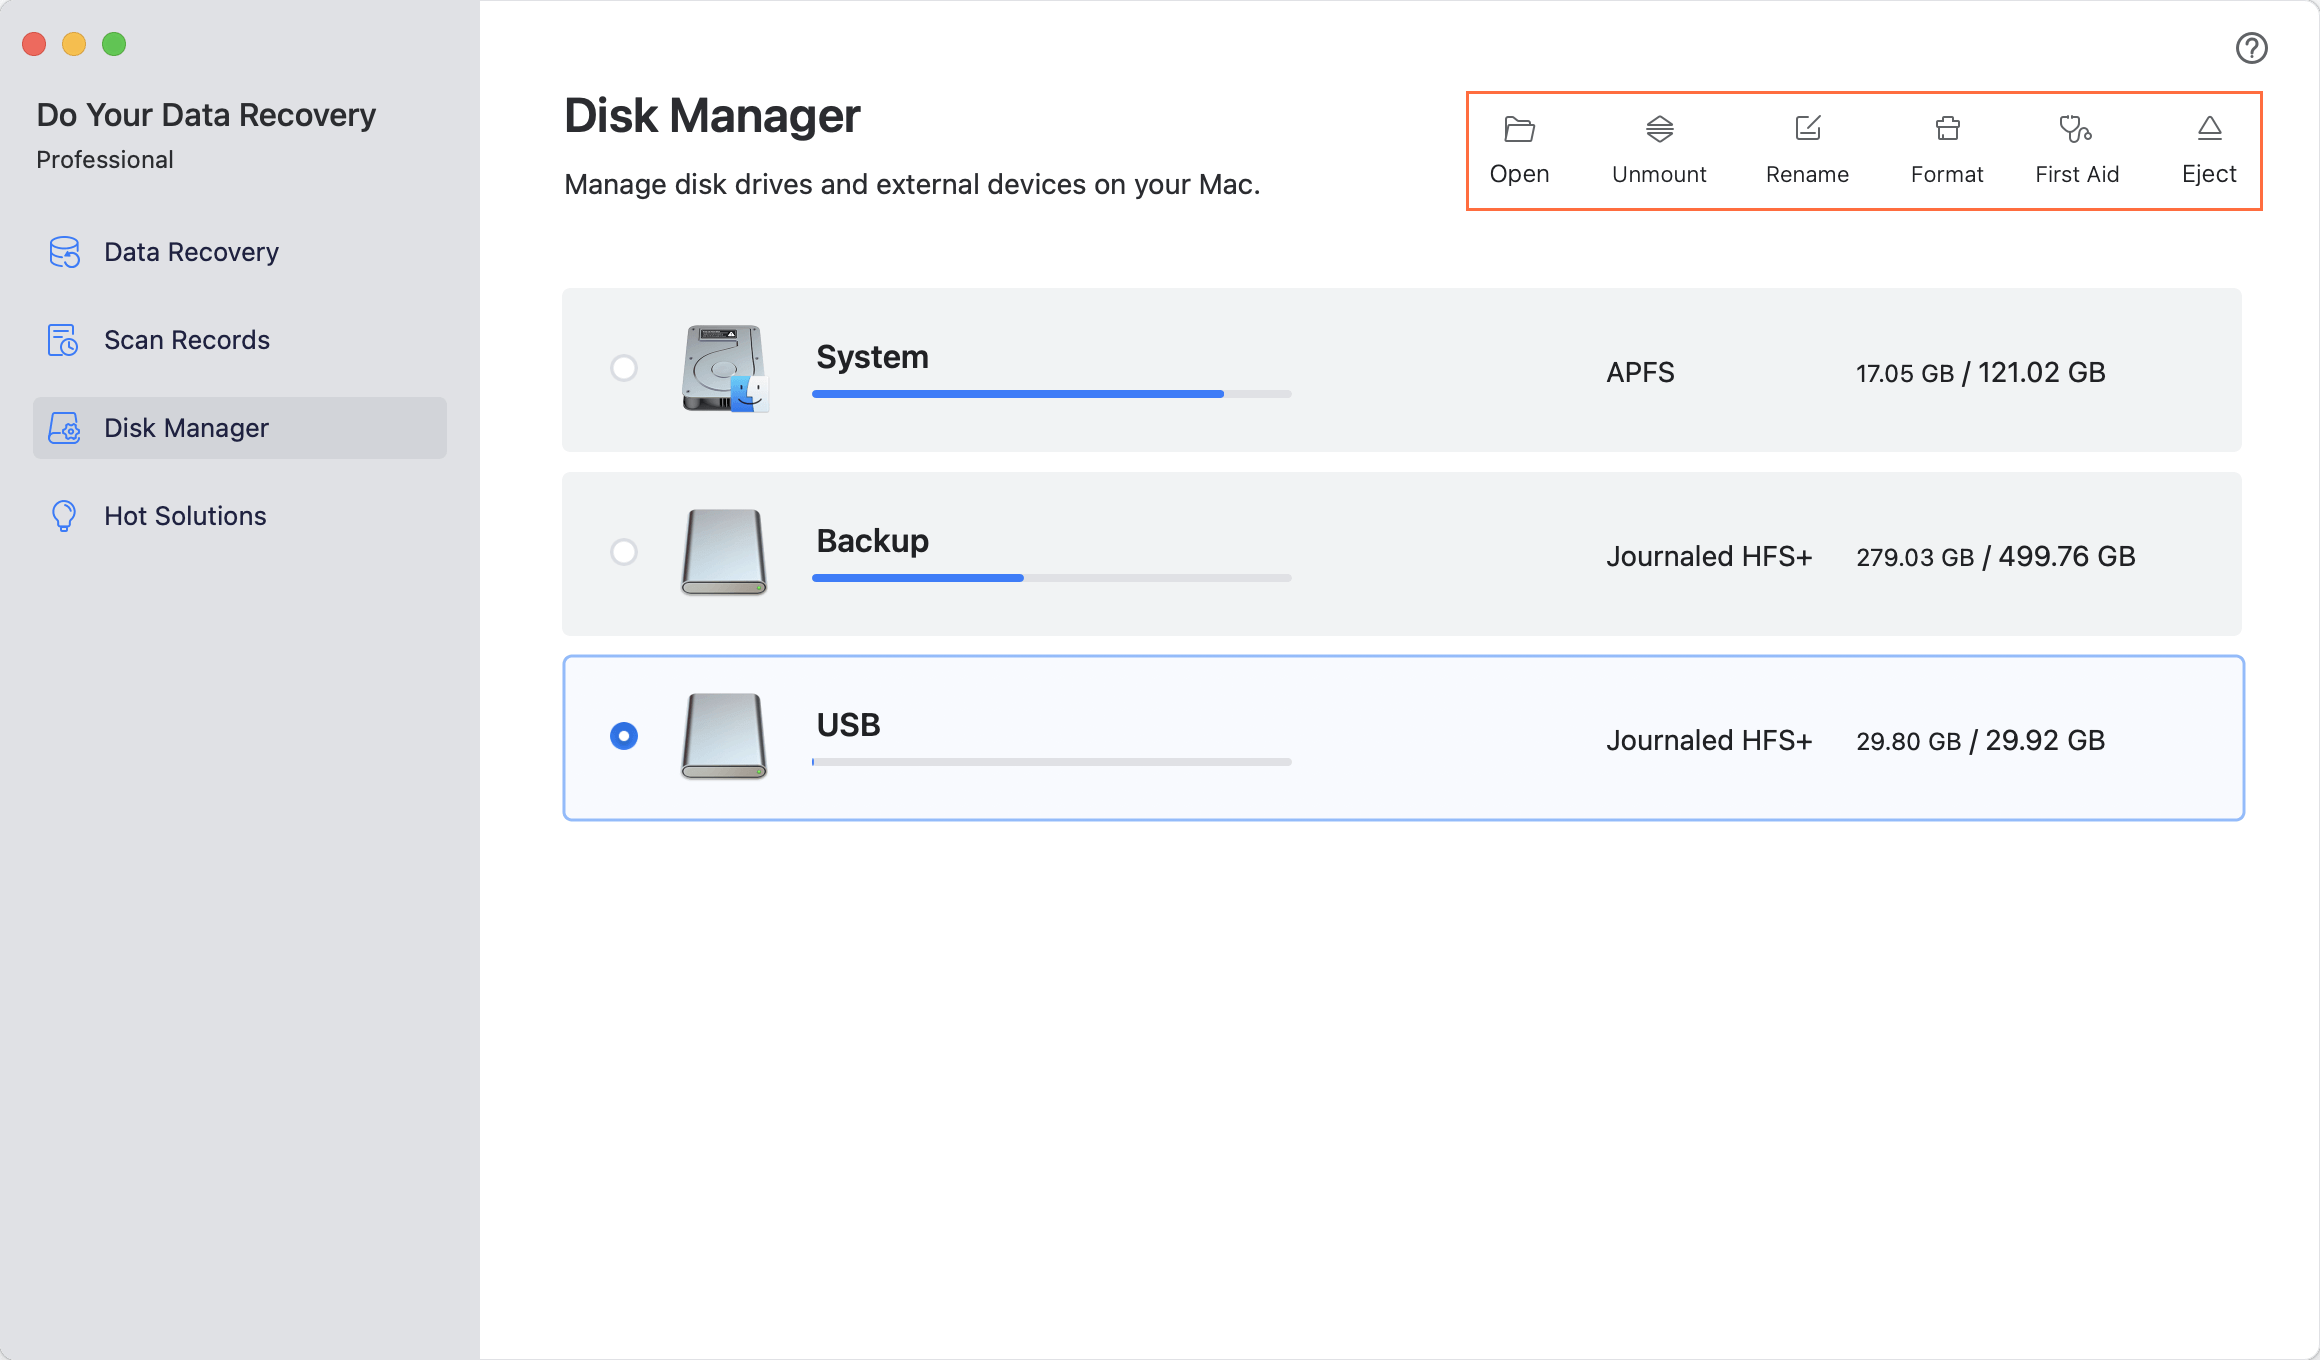
If you lose data due to formatting your hard drive to APFS and you don't have a backup, you can use Mac data recovery software to help you unformat the drive and get all lost data back. Do Your Data Recovery for Mac is a powerful Mac data recovery program. It can deeply scan the formatted APFS drive and find all recoverable files.
Step 1. Download and install Do Your Data Recovery for Mac on your Mac, then open it.
Step 2. Open Do Your Data Recovery for Mac, select the formatted hard drive to start data recovery.

Step 3. Once the scan is completed, you can preview all recoverable files. Then select the wanted files, save them.

Do Your Data Recovery for Mac also can help you mount hard drive on Mac, repair damaged hard drive on Mac, format a hard drive to APFS on Mac, etc.
Formatting a hard drive to APFS offers numerous benefits for macOS users, including improved performance, enhanced data integrity, and efficient space management. By following the outlined methods, you can safely convert, partition, or reformat your external drive to APFS while preserving your data. Remember to back up your data before beginning the process and verify the new file system once the formatting is complete. Regular maintenance and troubleshooting can help you avoid common issues and ensure that your APFS drive operates smoothly. With APFS, you'll enjoy a more robust and efficient file system that enhances your overall macOS experience.
1. How to format a hard drive to APFS?
2. Is it possible to format an ExFAT SD card or USB drive to APFS?
Yes, Mac Disk Utility can easily format your ExFAT SD card or USB flash drive to APFS. Just choose Erase to format it. If Erase button is greyed out, click on Partition button to create a APFS volume.
3. What tool can help format a hard drive to APFS on Mac?
Lost of tools can help you format a hard drive to APFS on Mac, such as:
4. Can I format a drive to APFS on Windows?
No, APFS is not available on Windows. You cannot format a drive to APFS on Windows PC.
5. Is it possible recover lost data from a formatted APFS hard drive?
Yes, whether you have formatted a drive to APFS or formatted your APFS drive to other Formats, you can easily recover lost data from the formatted drive with Mac data recovery software.
Written & Updated by Ricky Lin
Ricky Lin is an senior editor of DoYourData who lives in Adelaide, Australia. He is interested in writing technology articles related with data recovery, computer issue fixes, disk clone, iPhone data recovery, video edit, Mac optimization, etc. He Joined DoYourData in 2019 and have written 500+ articles to help both Windows users and Mac users to solve data or computer problems.
Hot Articles