Create Full Backup of macOS High Sierra
Clone to create full and bootable macOS High Sierra before you wipe private and sensitive data. Read More >>
Quick Navigation:
📋 Summary: There are 3 methods we will introduce in this article to wipe data in macOS High Sierra: Wiping a drive with Securely Option, removing files securely with Terminal, or erasing data permanently with data sanitation tool.
| Erasure Method | Security Level | Ease of Use | Data Wiping Options |
|---|---|---|---|
| Using Disk Utility | Moderate | Moderate | Wipe drive |
| Using Terminal | Moderate | Hard | Shred files, Wipe drive |
| Using Super Eraser | High | Easy | Shred files, Wipe hard drive, Wipe free space |
Erasing all of your info from your Mac is important for keeping your privacy and safety. There are several ways to permanently erase data in macOS High Sierra, whether you want to sell it, throw it away, or make sure it's gone. Permanent data deletion makes sure that your information can't be found again.

It differs from just deleting files, which can often be recovered with the right tools. This guide tells you everything you need to know about the methods and tools you can use to delete private data from your device in macOS High Sierra. If you use these tips, you can ensure your personal information and internet privacy are safe.
Before exploring the options, it's important to know how to delete data in macOS High Sierra. When you normally delete a file, the data isn't erased from the storage device. Instead, the system marks the space as free for new data. Data recovery software can return the original files until the space is filled with the latest data.
On the other hand, permanent data deletion ensures that the data can't be recovered, giving you peace of mind and safety. This guide will show you how to use the tools and methods in macOS High Sierra to delete data completely and permanently, keeping your private data safe from people who shouldn't have access to it.
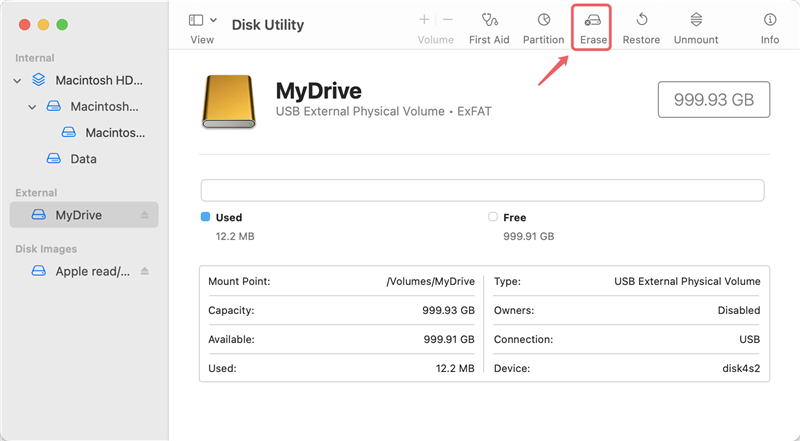
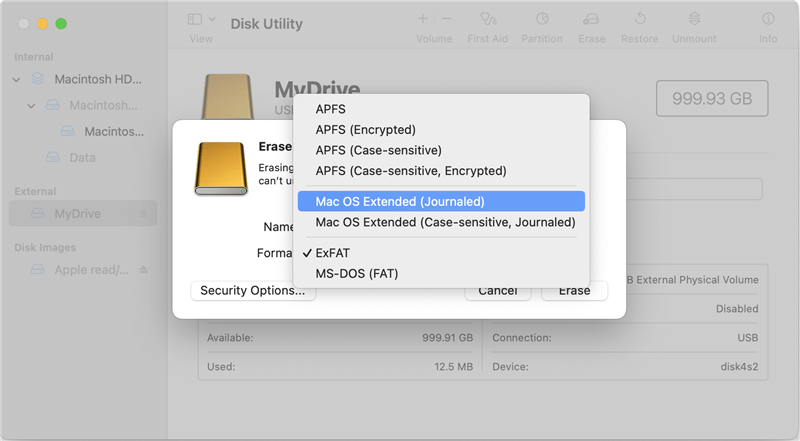
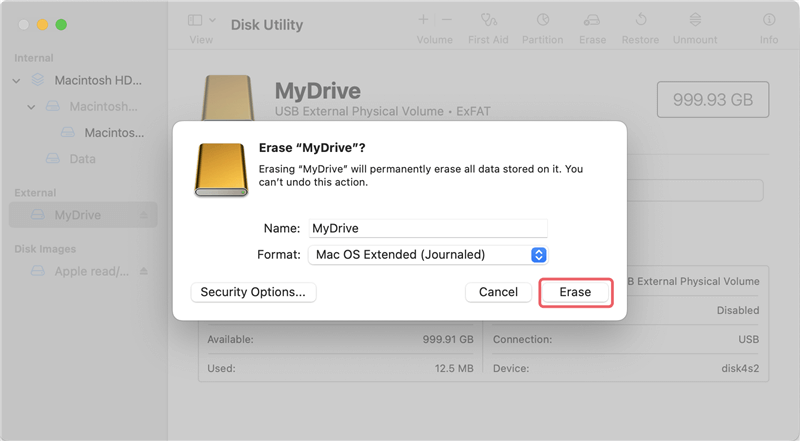
Disk Utility is a built-in tool with macOS and lets you manage disks and volumes with strong tools. To erase a disk completely and permanently, do these things:
Step 1: Backup important data
It is very important to back up all important data before you erase your disk so you don't lose any. Time Machine is the built-in backup tool for macOS. Use it to make a full copy of your system. You could also think about other safe ways to back up your data, like cloud services or hard drives.
Ensuring you have a full backup protects your important files and makes it easy to get them back if needed. Before you delete any data, you should always make sure that your backup is up-to-date and can be reached. It will protect your important data and make it possible to get it back.
Create Full Backup of macOS High Sierra
Clone to create full and bootable macOS High Sierra before you wipe private and sensitive data. Read More >>
Step 2: Open Disk Utility.

Step 3: Erase the disk.

The Terminal has a way to safely delete files with the rm command for people who are used to working with command lines. This program overwrites the file's data, so it can't be recovered. It makes sure that all of your private information is completely erased.
Step 1: Open Terminal
Launch the Terminal by going to Applications > Utilities > Terminal.
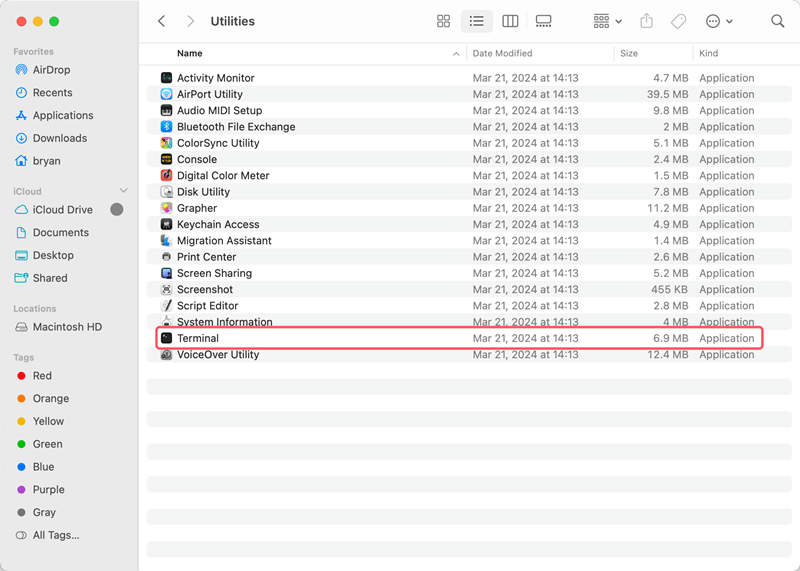
Step 2: Use the rm command
cd /filePath
rm -P fileName
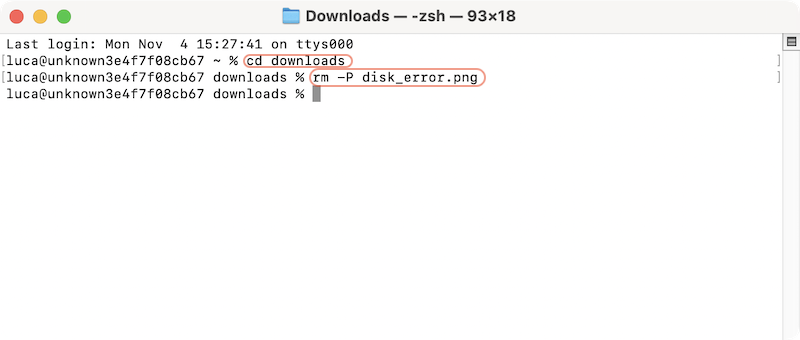
The rm command is very useful because it overwrites the file data several times, making it hard for data recovery tools to get it back. This method works for safely deleting single files or full directories, ensuring your private information is gone from your Mac.
With the Terminal, you can also erase a drive securely. You can do as follows to wipe a hard drive with Terminal:
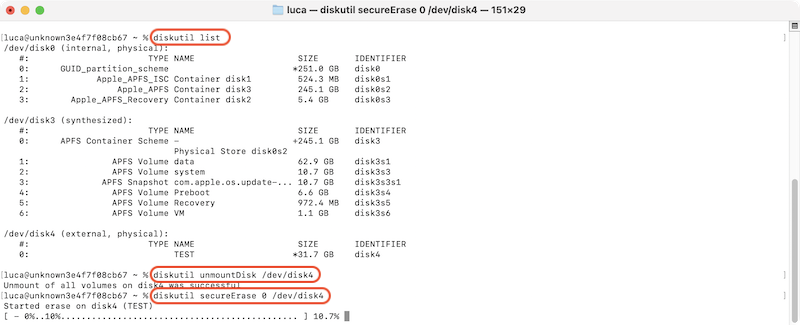
Even though macOS has powerful built-in tools for deleting data, third-party software can give you more options and make the process easier while keeping your data safe. DoYourData Super Eraser for Mac is a third-party program that comes for this job.
Super Eraser is a complete program that helps you keep your Mac running smoothly. The "Shredder" tool is one of its many features. It lets you delete files and folders safely and permanently. When you need to get rid of sensitive data, this tool ensures that the data is erased and can't be recovered.
Step 1. Download and install: Before you try to wipe the data in macOS High Sierra permanently, you need to download and install the data wiping software on your Mac.
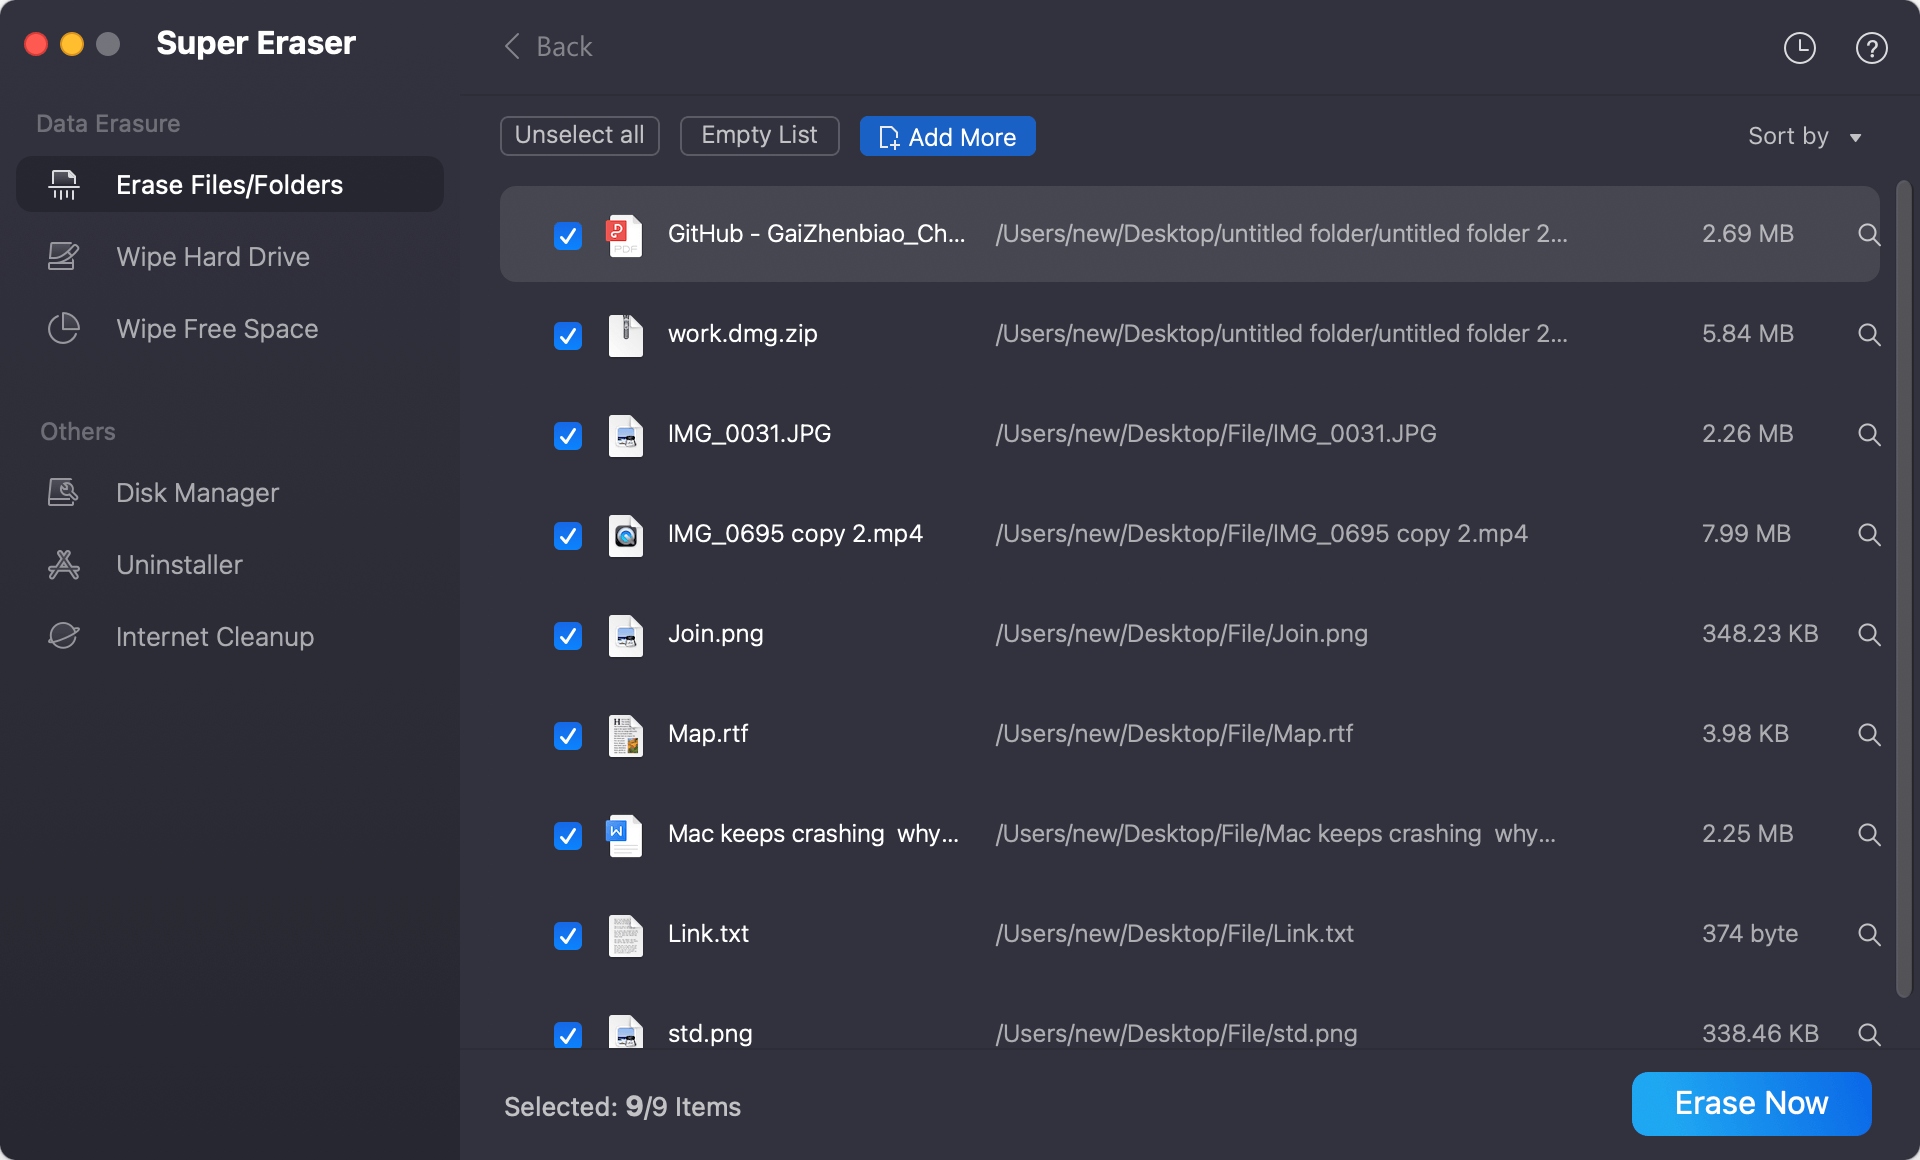
Step 2. Open the data wiping software: Start Super Eraser and choose "Erase Files/Folders" mode from the list of options on the left.
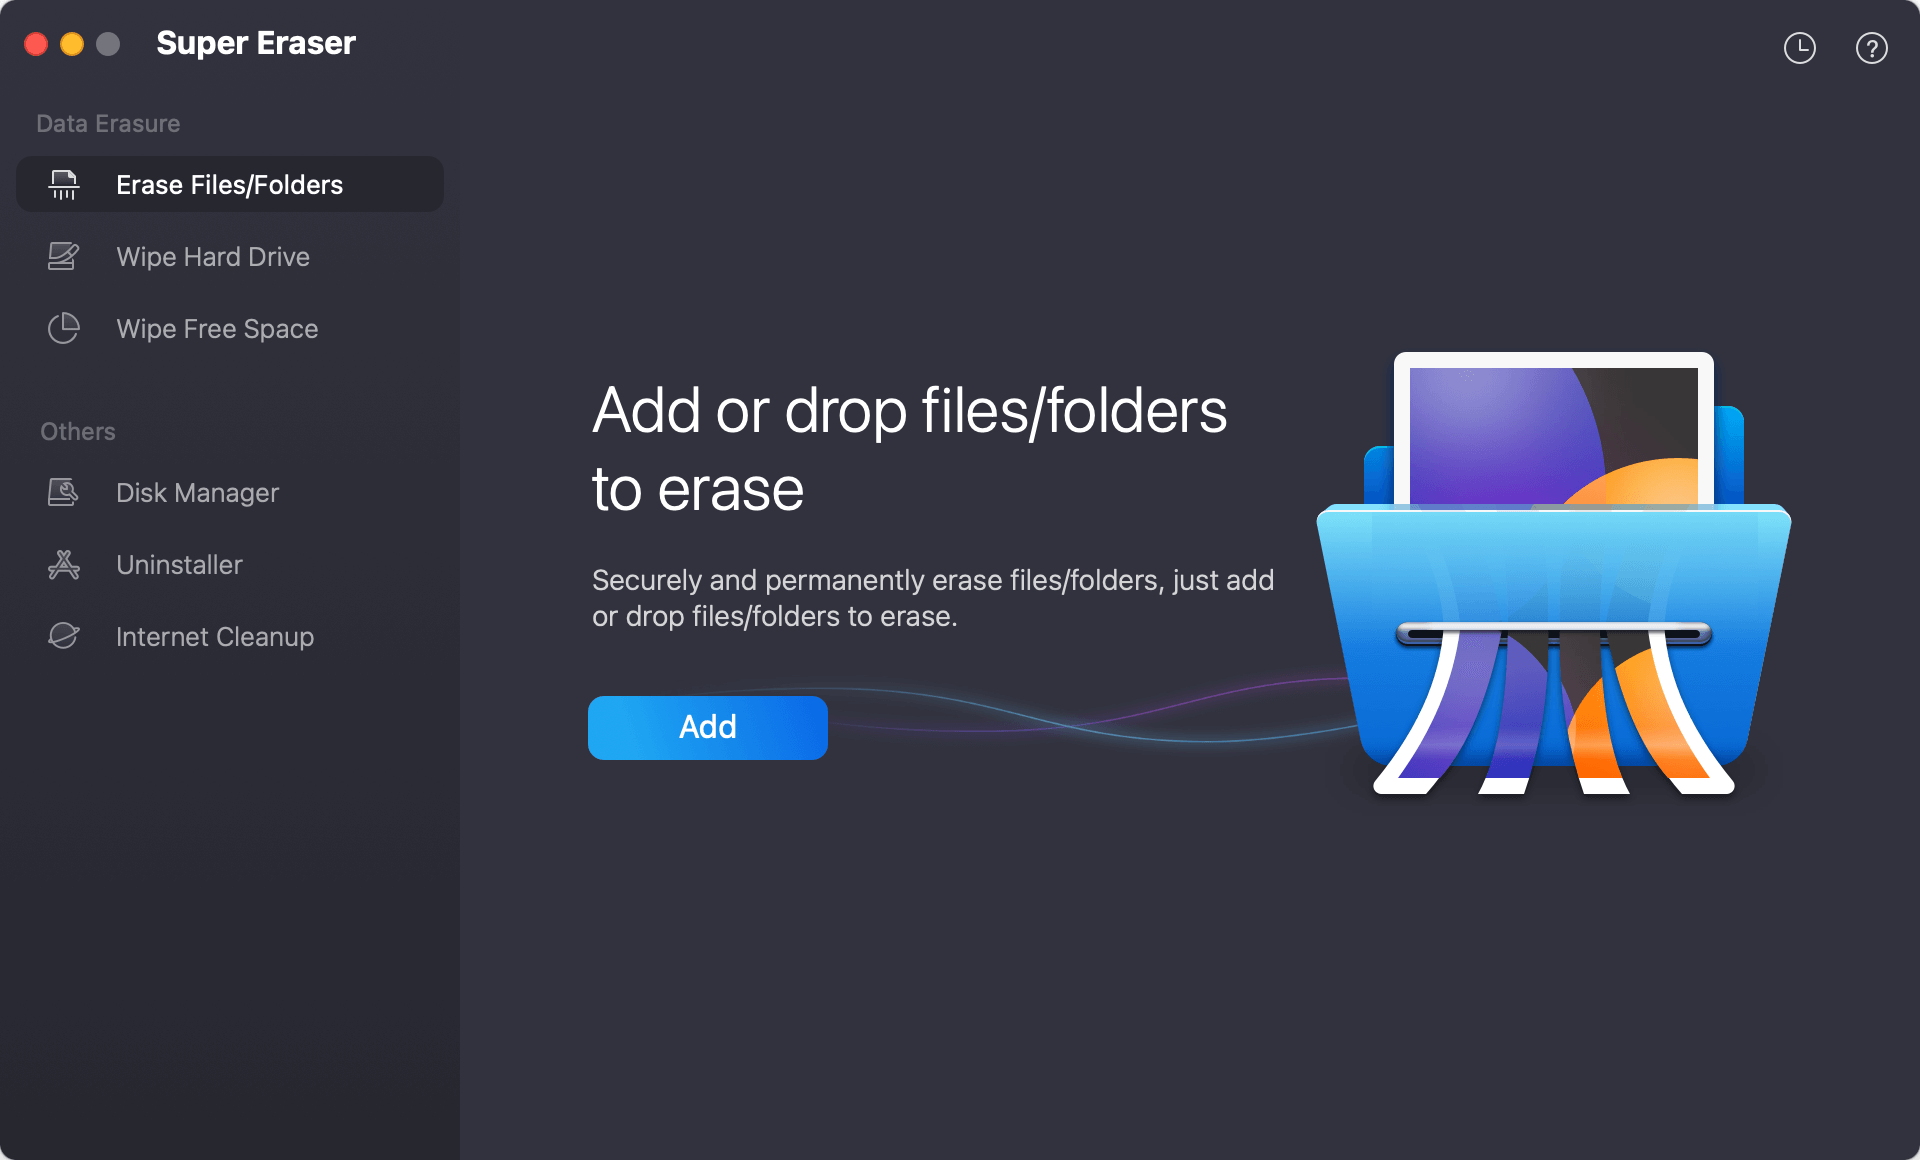
Step 3. Select files or folders: The safest way to delete files or folders is to drag and drop them into the list of the software. Or you can manually locate and add the files to the software. Then click Erase now button to continue.
Step 4. Choose a data erasure algorithm: You need to select a data sanitation standard from the drop-down list. If you want to ensure the data be wiped more completely, you can select a standard with more passes and it will take more time.
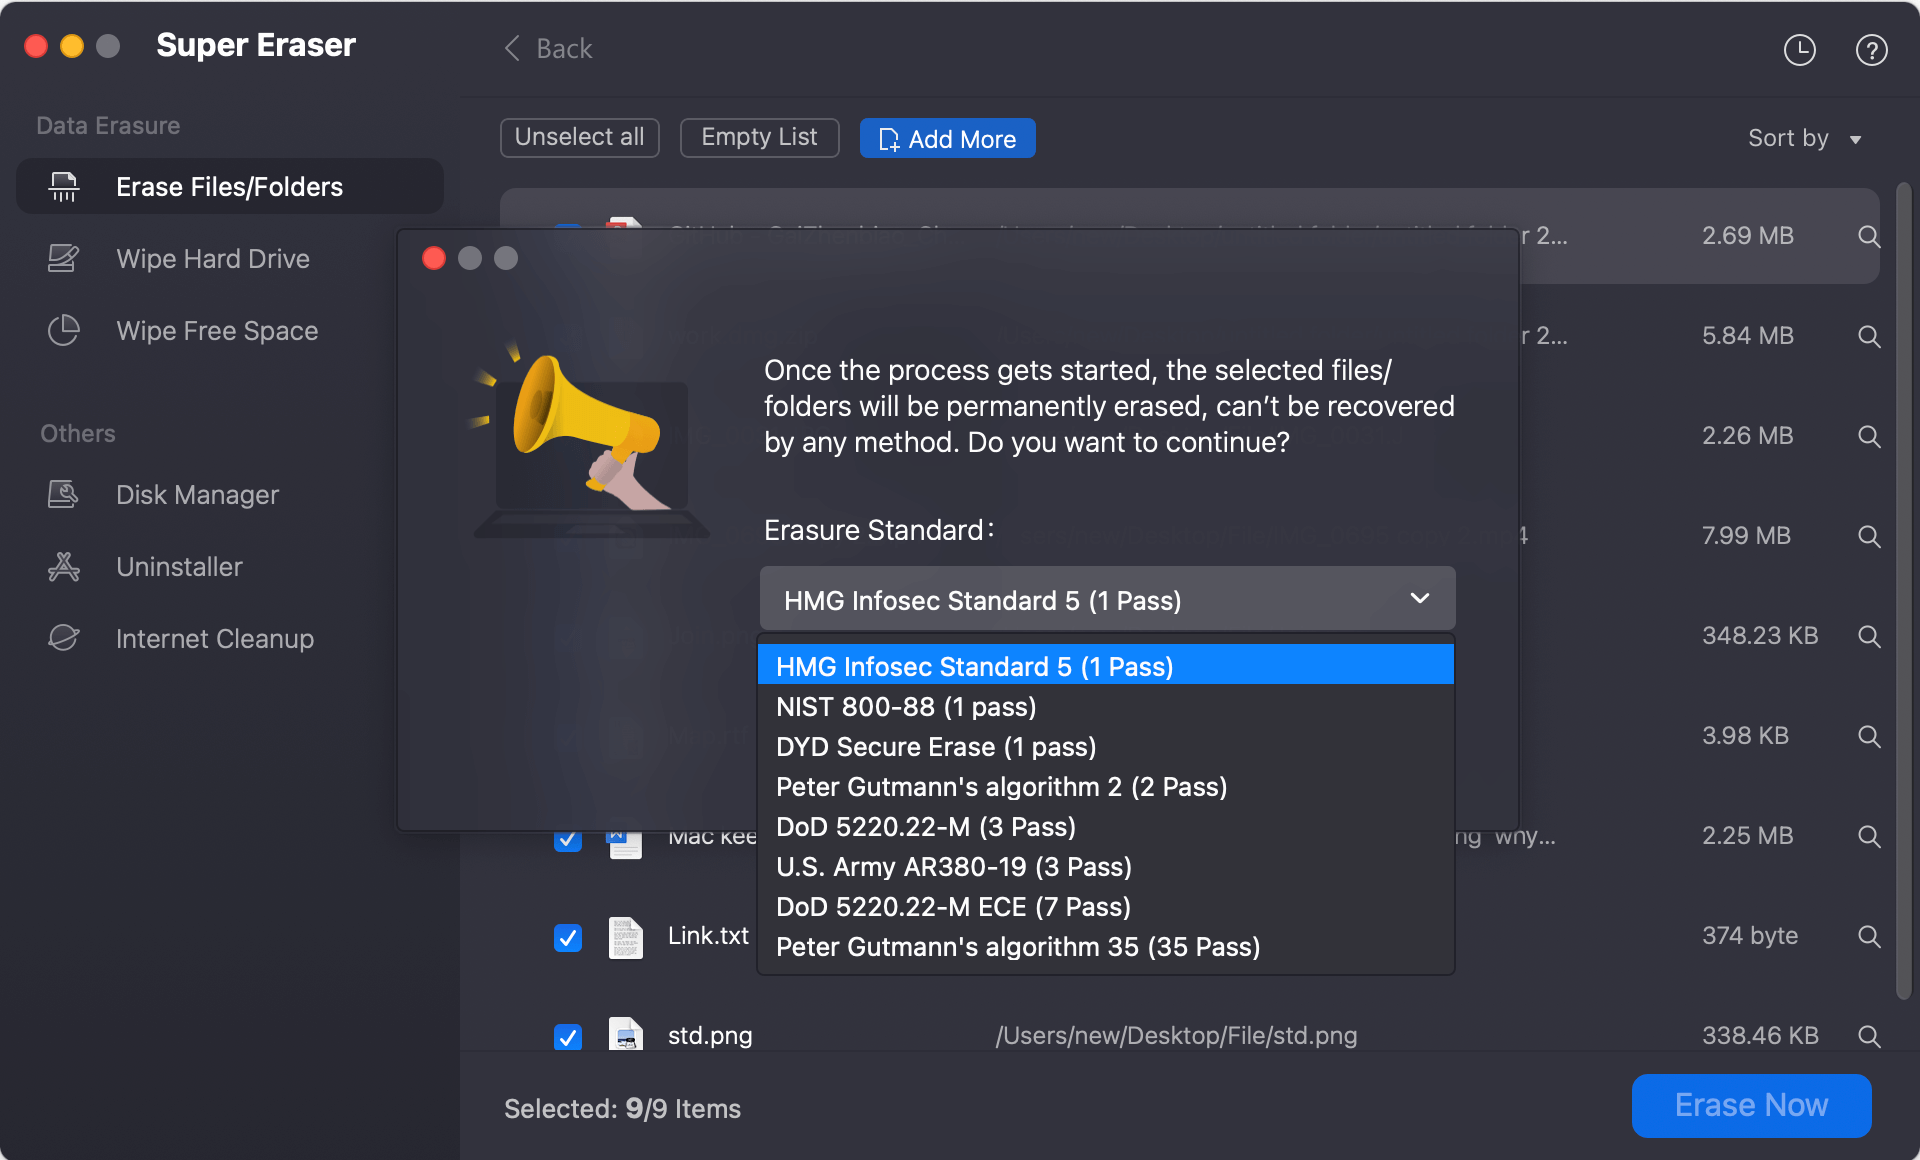
Step 5. Start to shred the files/folders: After confirming the data erasure standard, click the Continue button and the software will start the wiping process. After the process is done, the files and folders will be erased permanently and the data will not be recovered in any way.
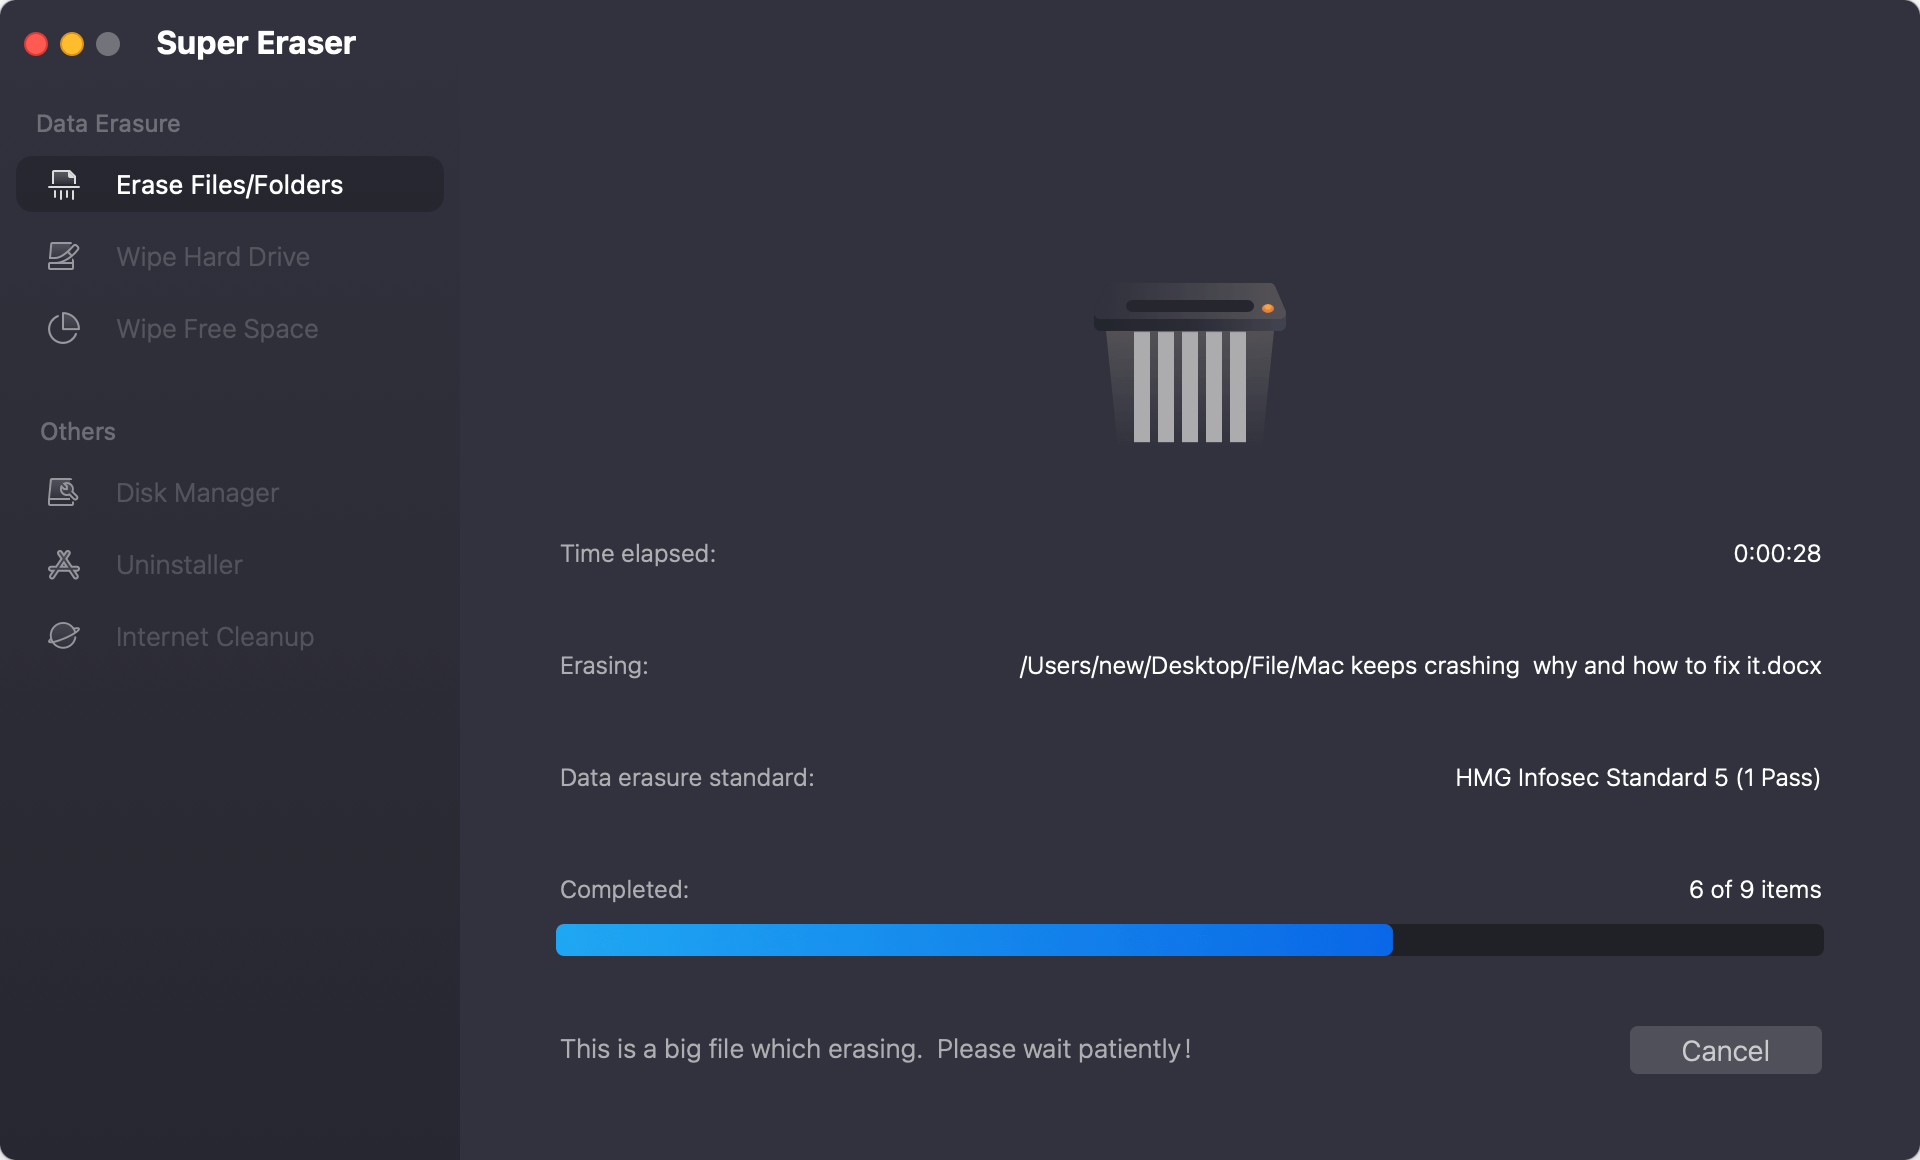
The software offers more data wiping options than Disk Utility or Terminal. You can not only shred specified files/folders, but also wipe all data from a drive with Wipe Hard Drive mode or overwrite deleted data with the mode Wipe Free Space.
💡 Tips: As the data wiped by the software will not be recovered with any software or service, ensure to be careful when select files/folders or drive.
Follow these best practices to make sure that all of your data is deleted safely and completely:
You must permanently delete data from MacOS High Sierra for your protection and safety. Whether you use built-in tools like Disk Utility and Terminal or third-party data wiping software, you can be sure that your private data is forever wiped.
Always make a copy of important files before you start working on something new, and always follow best practices to keep your information safe. Updating your software regularly and using FileVault to lock your disk are two more ways to keep your data safe. These steps will help you safely handle your data and keep your details safe.

DoYourData Super Eraser for Mac
DoYourData Super Eraser for Mac is a 100% safe, powerful and easy-to-use data erasure program. It offers certified data erasure standards including Peter Gutmann, U.S. Army AR380-19, DoD 5220.22-M ECE to permanently erase data from Macs and external devices, making data recovery be impossible.
