How to Erase Old MP3/MP4 Music or Video Player on Mac?
DoYourData Super Eraser for Mac, best Mac disk wipe software, can help you securely and permanently erase audio files, videos, and documents from Mp3/MP4 player on Mac. Once the data is erased, the data is lost for good, cannot be recovered by any method. No physical damage!
![]() Updated by Shirly Chen on August 8, 2024
Updated by Shirly Chen on August 8, 2024
Quick Navigation:
- Make a Backup Before Erasing Your Mp3/MP4 Player
- Steps to Erase Mp3/MP4 Music/Video Player on Mac
- Permanently Erase Data from MP3/MP4 Player on Mac
- Conclusion
In today's digital age, many of us have accumulated various devices over the years, including MP3 and MP4 players. These devices often hold personal information, music, videos, and other data that we may not want falling into the wrong hands. If you're looking to erase your old MP3 or MP4 player and ensure your data is securely removed, this guide will provide you with a comprehensive, step-by-step process to achieve that on a Mac.

Erasing data from an old MP3 or MP4 player is crucial for several reasons. First and foremost, it protects your personal information from being accessed by others. Additionally, securely erasing data ensures that your device is ready for resale, donation, or recycling without compromising your privacy. For Mac users, the process of erasing data from these devices can be straightforward but requires specific steps to ensure complete data removal. This guide will walk you through everything you need to know.
Make a Backup Before Erasing Your Mp3/MP4 Player
Before you begin the process of erasing your MP3 or MP4 player, it's essential to prepare by backing up your data. This step ensures that you won't lose any valuable files that you may want to keep.
Backing Up Your Data
To back up your data, connect your MP3 or MP4 player to your Mac using a USB cable or the appropriate connection method for your device. Open the Finder on your Mac, and you should see your device listed under "Locations" in the sidebar. Click on your device to access its contents.
Select the files you want to back up and drag them to a folder on your Mac. It's a good idea to create a specific folder for this purpose, such as "MP3 Backup" or "MP4 Backup." This way, you can easily locate your files later. Once you have copied all the files you want to keep, double-check to ensure everything is safely stored on your Mac.
Steps to Erase Mp3/MP4 Music/Video Player on Mac
Connecting Your MP3/MP4 Player to Your Mac
Connecting your MP3 or MP4 player to your Mac is essential for erasing data. Here's a guide on different connection methods and how to troubleshoot common connectivity issues.
Different Connection Methods
Most MP3 and MP4 players connect to a computer via USB. Ensure you have the correct cable for your device. Some modern players might use USB-C, while older ones generally use micro-USB or mini-USB cables. Some devices may also support Bluetooth connectivity, allowing for wireless file transfers.
Troubleshooting Common Connectivity Issues
- Device Not Recognized:
- Ensure your MP3/MP4 player is turned on and fully charged.
- Try a different USB port on your Mac.
- Use a different USB cable to rule out a faulty cable.
- Restart both your Mac and the MP3/MP4 player.
- Software Updates:
- Check for any macOS updates that may improve device compatibility.
- Update the firmware of your MP3/MP4 player if an update is available.
- Enable Disk Use:
- Some MP3/MP4 players require you to enable disk use. Refer to your device’s manual for instructions on how to enable this feature.
- Bluetooth Issues:
- Ensure Bluetooth is enabled on both your Mac and the MP3/MP4 player.
- Pair the devices again by removing the existing pairing and setting up a new one.
By following these steps, you should be able to establish a connection between your MP3/MP4 player and your Mac, allowing you to proceed with data erasure.
Identifying Your Device in Finder
Once your MP3 or MP4 player is connected to your Mac, the next step is to identify your device in Finder.
Locating Your Device in Finder
Open Finder, and look for your device under the "Locations" section in the sidebar. It should appear with its model name or a generic label such as "External Device." Click on your device to view its contents.
Ensuring Your Device is Recognized
If your device does not appear in Finder, you may need to enable disk use on your MP3/MP4 player. This option is typically found in the settings menu of the device. Refer to your device's user manual for specific instructions on enabling disk use.
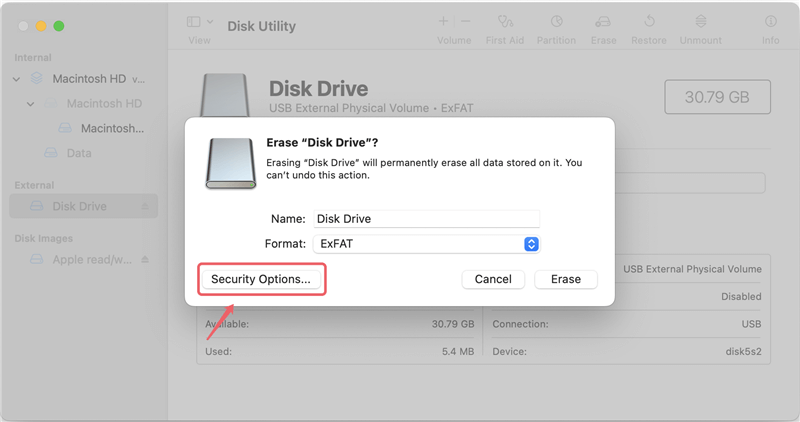
Erasing Data via Disk Utility
One of the most secure methods to erase data from your MP3 or MP4 player is by using Disk Utility on your Mac.
Step-by-Step Guide to Using Disk Utility
- Open Disk Utility on your Mac. You can find it by searching for "Disk Utility" in Spotlight or navigating to Applications > Utilities > Disk Utility.
- In Disk Utility, select your MP3/MP4 player from the list of external devices on the left-hand side.
- Click the "Erase" button at the top of the window.
- Choose a name for the device if prompted. The default name is usually sufficient.
- Select the file format. For most MP3/MP4 players, "MS-DOS (FAT)" or "ExFAT" is recommended.
- Click "Erase" to begin the process.
Permanently Erase Data from MP3/MP4 Player on Mac
If you're planning to sell, donate, give away, or discard an MP3/MP4 player device, it's crucial to permanently erase any sensitive data on the device. To ensure complete data removal under macOS, you can use specialized data erasure software such as DoYourData Super Eraser for Mac.
This software provides three modes to help you securely erase data from your MP3/MP4 player.
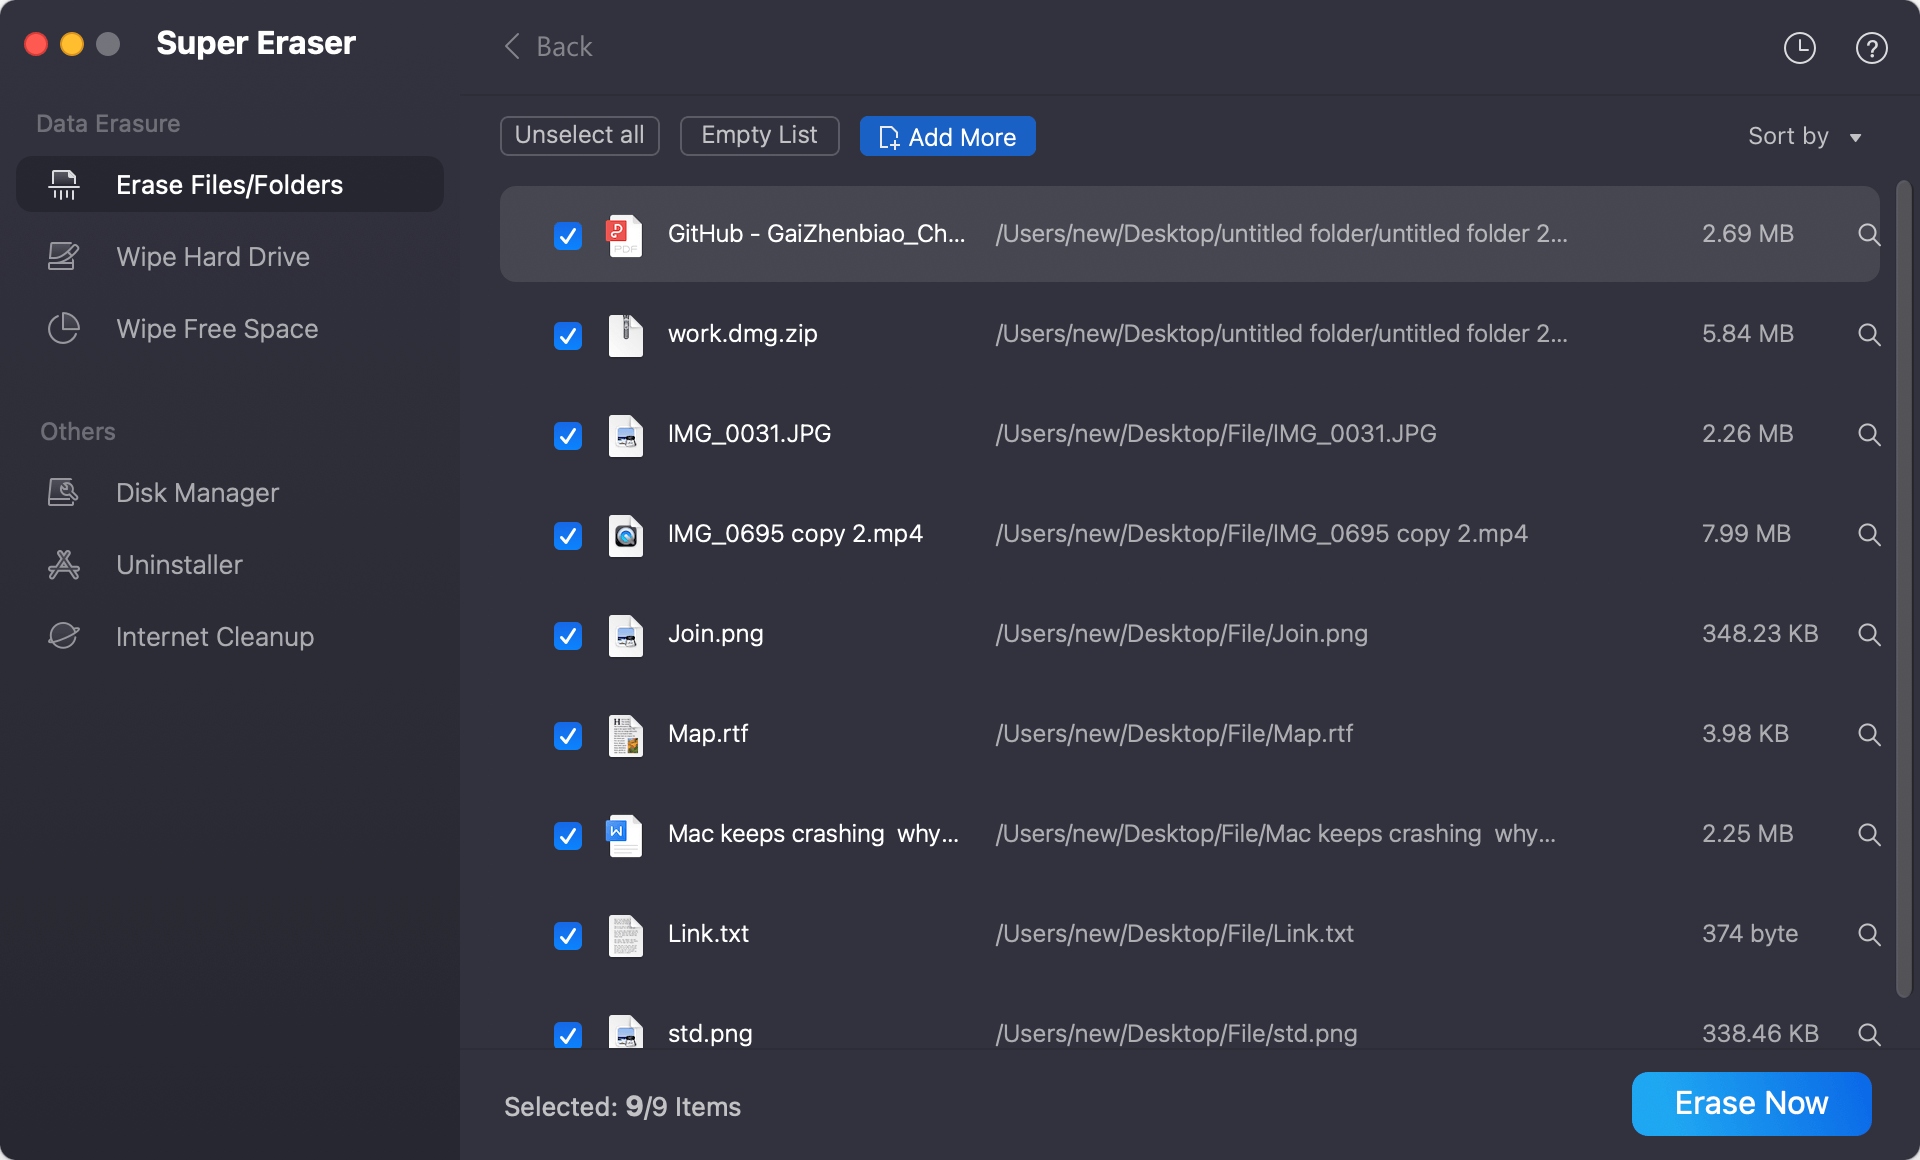
Mode 1: Selectively Erase Data from MP3/MP4 Player
This mode allows you to selectively erase specific files and folders from your MP3/MP4 player under macOS. Simply add the files or folders you wish to destroy, then click the "Erase Now" button to permanently remove them.
Mode 2: Wipe MP3/MP4 Player on Mac
This mode allows you to completely wipe your entire MP3/MP4 player, permanently erasing all data on the device.

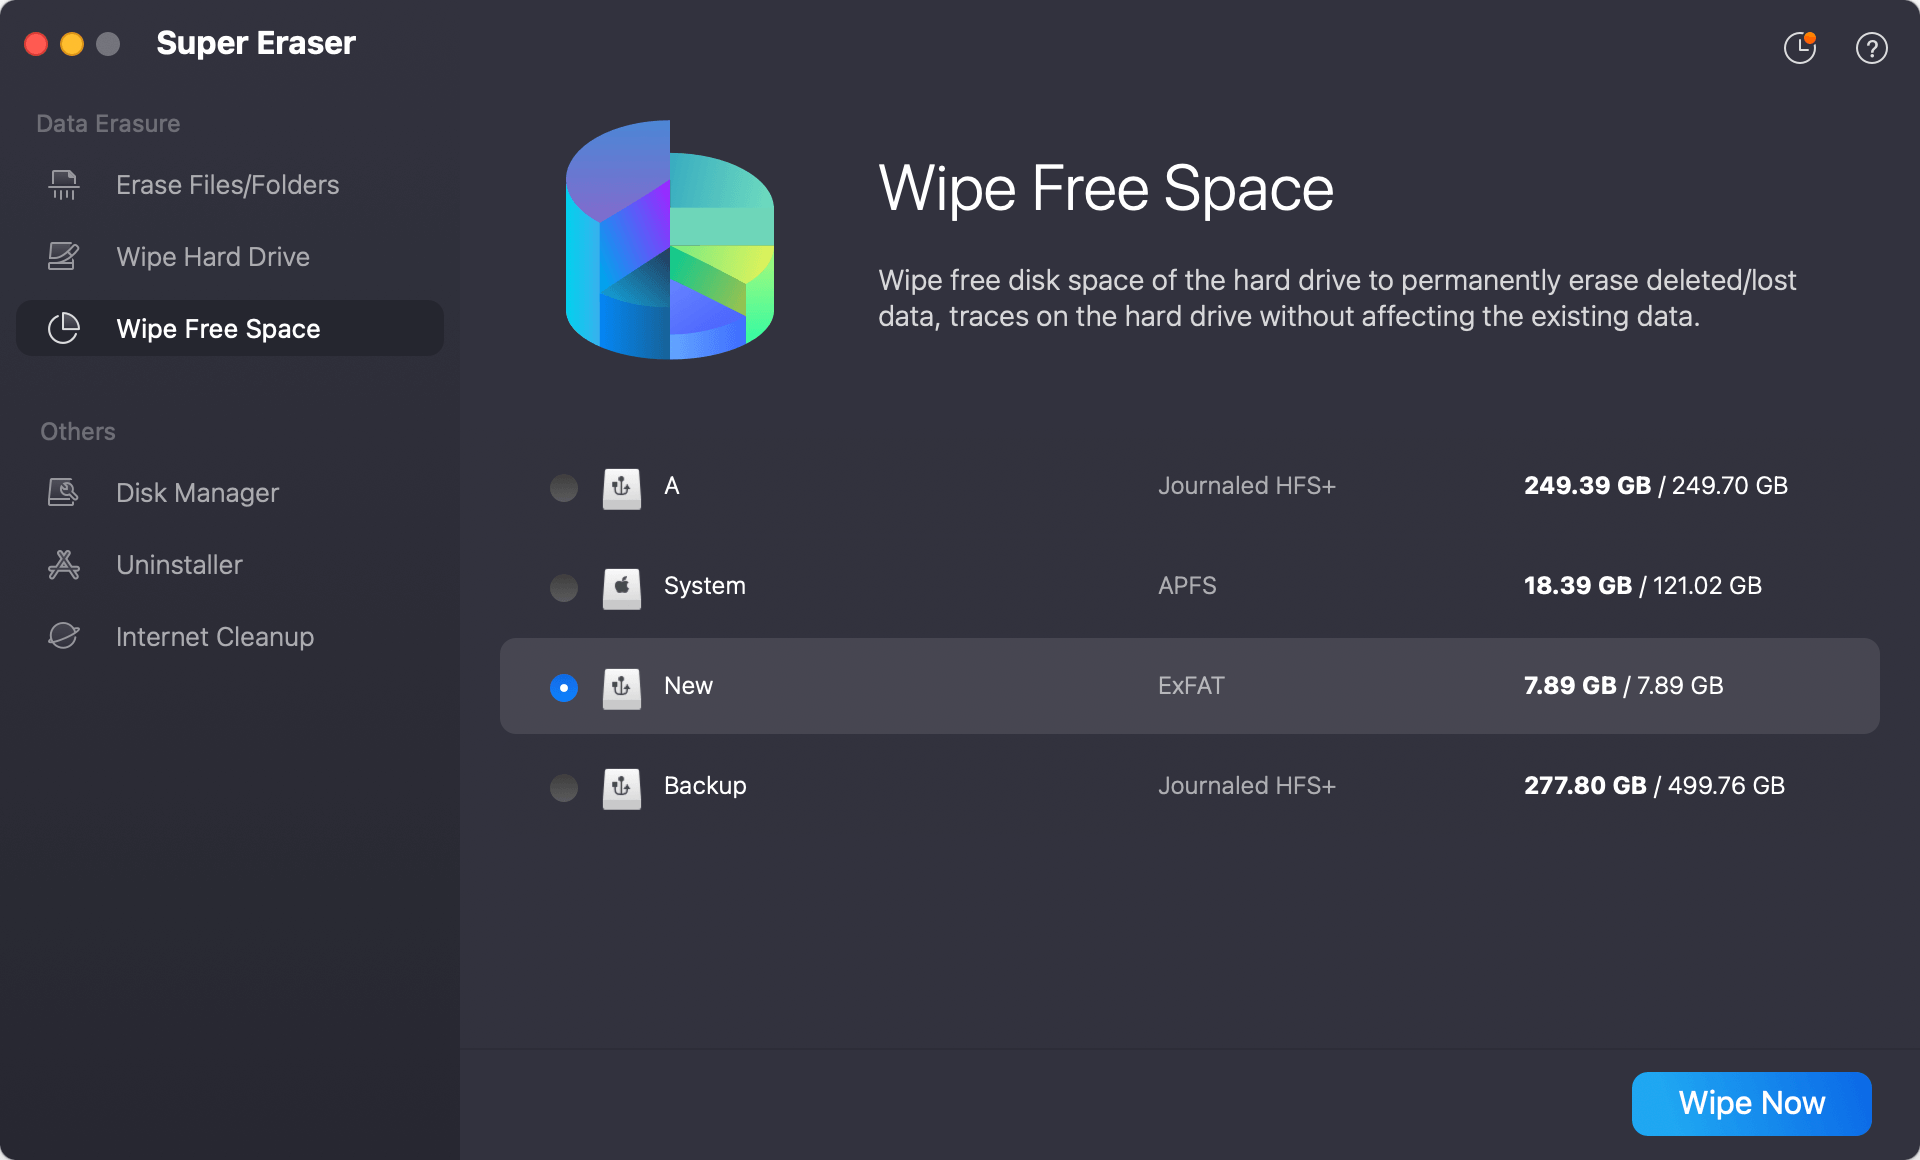
Mode 3: Wipe Free Disk Space of MP3/MP4 Player
This mode focuses on erasing only the deleted or lost data on your MP3/MP4 player, leaving existing files intact.
Please note that any data erased using DoYourData Super Eraser for Mac will be permanently removed. Ensure you back up any important data to another device before proceeding with the erasure process on your MP3/MP4 player.
Manually Deleting Files
- Open Finder and navigate to your MP3/MP4 player.
- Select all files and folders on the device. You can do this by pressing Command + A.
- Right-click and select "Move to Trash" or simply drag the selected files to the Trash.
- Empty the Trash to permanently delete the files. Right-click on the Trash icon in your dock and select "Empty Trash."
Navigating the Device's File System
Be cautious when manually deleting files to avoid accidentally deleting system files required for the device to function. Focus on deleting only media files such as music, videos, and personal documents.
Restoring Factory Settings
Restoring factory settings is an essential step to ensure all personal data is removed and the device is returned to its original state.
Why Restoring Factory Settings is Important
Factory reset erases all user data and settings, providing a clean slate for the next user or preparing the device for disposal. This step is especially important if you plan to sell or donate your MP3/MP4 player.
Initiating a Factory Reset
The process for restoring factory settings varies by device. Generally, it involves navigating to the settings menu and selecting an option like "Restore Factory Settings" or "Reset Device." Refer to your device's user manual for specific instructions.
Verifying Data Erasure
After erasing data, it's crucial to verify that all personal information has been removed.
Ensuring All Data Has Been Successfully Erased
Reconnect your MP3/MP4 player to your Mac and check the device's contents in Finder. Ensure there are no remaining files or folders. You can also attempt to play a few tracks to confirm that the media files are gone.
Using Third-Party Tools to Double-Check Erasure
There are several third-party tools available that can help you verify data erasure. These tools can scan your device for residual data and provide confirmation that the erasure process was successful. Some recommended tools include CCleaner and Do Your Data Recovery for Mac.
Disposing or Repurposing Your Old Device
Once you have securely erased your data, you may want to dispose of or repurpose your old MP3/MP4 player.
Environmentally Friendly Disposal Options
Electronic devices should never be thrown in the regular trash due to the harmful materials they contain. Instead, consider the following options:
- Recycling Centers: Many communities have electronic recycling centers that accept old devices.
- Manufacturer Programs: Some manufacturers offer take-back programs for recycling old devices.
Ideas for Repurposing or Donating Your Old MP3/MP4 Player
If your device is still functional, consider repurposing it. Here are a few ideas:
- Dedicated Audio Book Player: Load it with audio books and use it as a dedicated player.
- Children's Music Player: Fill it with kid-friendly music and give it to a child.
- Car Music Player: Keep it in your car as a dedicated music player.
Alternatively, you can donate your device to schools, community centers, or charities that may have use for it.
Conclusion
Securely erasing data from your old MP3 or MP4 player is a crucial step to protect your personal information. By following the steps outlined in this guide, you can ensure that your data is thoroughly and securely removed. Whether you're preparing your device for resale, donation, or recycling, taking the time to erase your data properly provides peace of mind and protects your privacy.

DoYourData Super Eraser for Mac
DoYourData Super Eraser for Mac is a 100% safe, powerful and easy-to-use data erasure program. It offers certified data erasure standards including Peter Gutmann, U.S. Army AR380-19, DoD 5220.22-M ECE to permanently erase data from Macs and external devices, making data recovery be impossible.
Written & Updated by Shirly Chen
Shirly Chen has been writing data recovery, data erasure articles for DoYourData over 4 years. She has been working as a professional website content writer & editor for quite a long time. She also writes articles about disk clone, Mac optimization, disk backup, etc.