Quick Navigation:
- Basics of Photo Recovery
- Precautions to Take After Deletion
- Methods to Recover Deleted Photos from a Digital Camera Card on a Mac
- Tips for Successful Photo Recovery
- Preventing Future Data Loss
- Troubleshooting Common Recovery Issues
- When to Seek Professional Help
- Conclusion
In the age of digital photography, memories are often stored on tiny, yet essential, storage devices like SD cards, CF cards, XQD cards. Whether you're a professional photographer or someone who enjoys capturing moments during travels, the potential loss of photos due to accidental deletion can be devastating. However, if you've accidentally deleted photos from your digital camera's card while using a Mac, don't panic - there are several methods to recover them. This comprehensive guide will guide you through the steps to successfully recover deleted photos from a digital camera's card on a Mac.
Basics of Photo Recovery
Prior studying the recovery process, it is important to understand how photo recovery works. Whenever a photo or an image is deleted from your camera's memory card, the file doesn't vanish instantly. Instead, the space it occupies is marked as available for new data. Until new data overwrites this space, there's a good chance that the deleted photos can be recovered. This means that if you act quickly, your chances of recovering the deleted files are high.
Precautions to Take After Deletion
The first thing you should do is cease using your memory card right away if you discover that you have inadvertently erased pictures from it. Continued use of the card may result in new data being written over the deleted files, which would make recovery much more difficult or even impossible.
- Eject the Card: Safely eject the memory card from your camera or card reader.
- Avoid Saving New Data: Do not take new photos or add any files to the card.
- Store the Card Safely: Until the time comes for you to start the recovery process, keep the card in a secure location.
Methods to Recover Deleted Photos from a Digital Camera Card on a Mac
There are several methods you can use to recover deleted photos from your digital camera's card on a Mac. Some are built into the macOS operating system, while others require third-party software. Below, we'll explore both options in detail.
1. Using Time Machine Backup
If you regularly back up your Mac and connected device using Time Machine, you might be able to recover your deleted photos from a previous backup. Time Machine is a built-in macOS feature that automatically backs up your entire system, including external devices such as memory cards.
Steps to Recover Photos Using Time Machine:
- Connect the Memory Card: Insert the memory card into your Mac's card reader.
- Open Time Machine: Either select System Preferences/System Settings > General > Time Machine or click the Time Machine symbol in the menu bar.
- Enter Time Machine: Click on "Enter Time Machine" to view your backups.
![Recover Deleted Photos from a Digital Camera Card on a Mac]()
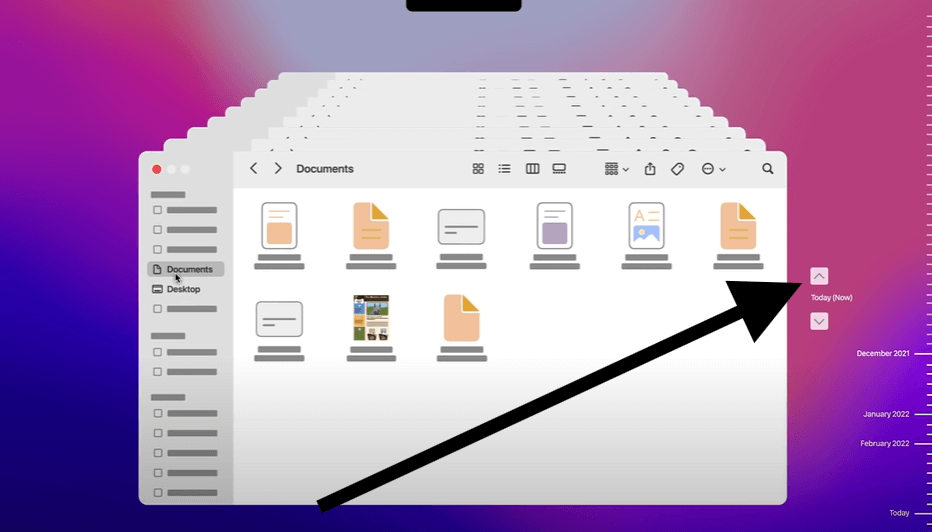
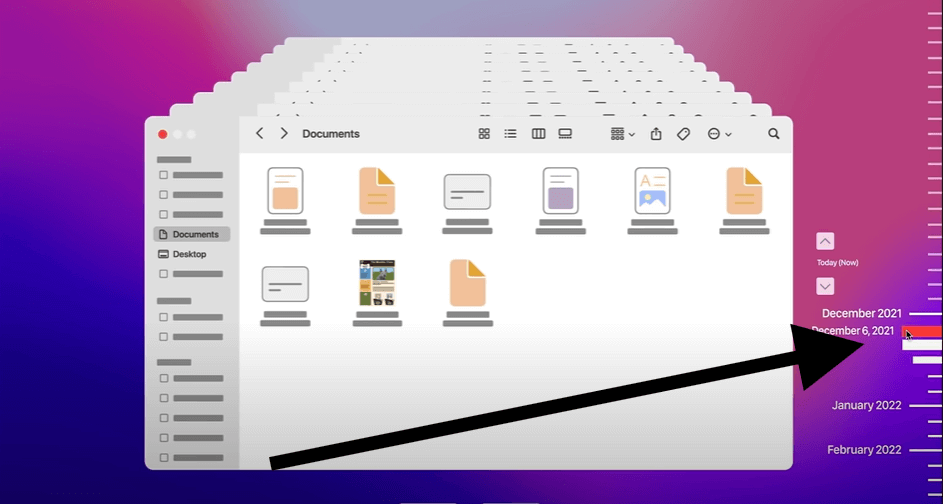
- Navigate to the Desired Backup: Use the timeline on the right side of the screen to locate the backup that contains your deleted photos.
![Recover Deleted Photos from a Digital Camera Card on a Mac]()
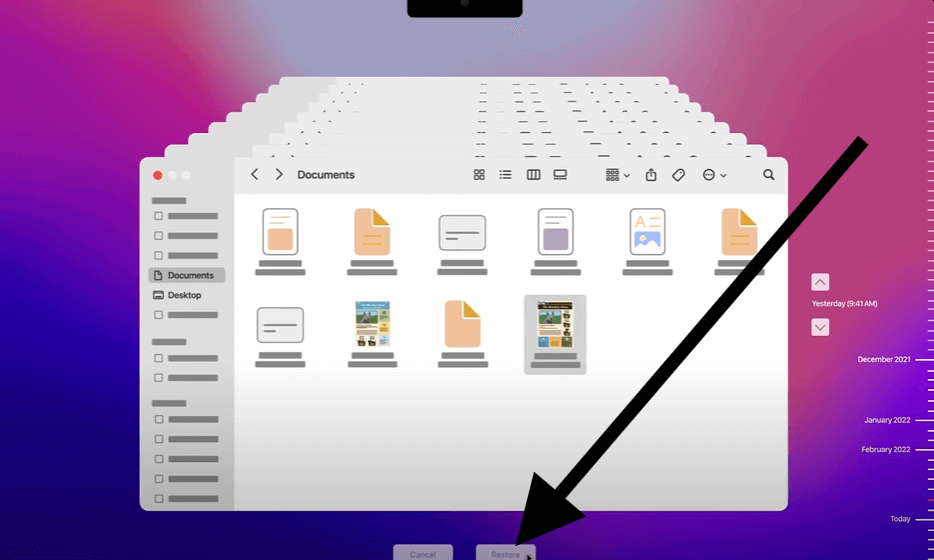
- Select the Photos to Restore: Once you've found the photos, select them and click "Restore." They will be recovered to their original location.
![Recover Deleted Photos from a Digital Camera Card on a Mac]()
- Restore Photos: Click on Restore, after selecting the photos.
![Recover Deleted Photos from a Digital Camera Card on a Mac]()
2. Using macOS Terminal
For those who are comfortable with using the Terminal, macOS offers a command-line utility that can help recover deleted photos from a memory card. This method is more advanced and should be approached with caution.
Steps to Recover Photos Using macOS Terminal:
- Connect the Memory Card: Insert the card into your Mac.
- Open Terminal: You can find Terminal in the Applications > Utilities folder.
- Use the diskutil Command: Type the command diskutil list to view all connected drives and identify the memory card.
- Unmount the Disk: Use the command diskutil unmountDisk /dev/diskX (replace diskX with the correct identifier for your memory card).
- Use TestDisk or Similar Tool: Download and use an open-source data recovery tool like TestDisk, which can be run via the Terminal, to recover your deleted photos.
This method requires a certain level of technical expertise, and it's not guaranteed to work in all cases. If you're not comfortable using Terminal, consider using a more user-friendly option like data recovery software.
3. Using Data Recovery Software
Data recovery software is one of the most reliable methods to recover deleted photos from a digital camera's card on a Mac.
Do Your Data Recovery for Mac is a reliable Mac data recovery software for macOS. It offers deep scan mode to scan the digital camera card and ensure finding every recoverable file.
Do Your Data Recovery for Mac
- Recover permanently deleted photos from digital camera card on Mac.
- Unformat digital camera card and recover all lost videos/photos/documents.
- Recover photos from damaged digital camera card on Mac.
Step 1. Open Do Your Data Recovery for Mac after installing, then select the digital camera card to start data recovery.

Step 2. Click on Scan button to deeply scan the digital camera card and find all recoverable files including the deleted photos.

Step 3. Once the scan is complete, preview the recovered photos and select the ones you want to restore. Click "Recover" to save them to a safe location on your Mac.

Tips for Successful Photo Recovery
Photo recovery can sometimes be a hit-or-miss process, depending on various factors. To increase your chances of success, here are some additional tips:
- Act Quickly: The sooner you attempt recovery after deletion, the better your chances of success.
- Avoid Writing New Data: As mentioned earlier, avoid adding new data to the memory card to prevent overwriting the deleted files.
- Use Reliable Software: Invest in reliable data recovery software with good reviews and a proven track record.
- Try Multiple Methods: If one method doesn't work, try another. Sometimes combining different approaches can yield better results.
- Regular Backups: Regularly back up your photos and other important data using Time Machine or another backup solution to avoid future data loss.
Preventing Future Data Loss
While it's reassuring to know that deleted photos can often be recovered, prevention is always better than cure. Here are some tips to help you avoid accidental deletion and data loss in the future:
- Enable Write Protection: Many memory cards have a write protection switch that prevents data from being deleted or overwritten. Enable this feature when you're not actively using the card.
- Organize and Backup Regularly: Develop a habit of regularly organizing and backing up your photos. This not only helps prevent data loss but also makes it easier to find specific photos when needed.
- Handle with Care: Memory cards are delicate and can be damaged if mishandled. Always eject the card safely and store it in a protective case.
- Keep Software Updated: Ensure your Mac and any data recovery software you use are always updated to the latest versions. Updates often include important security and performance improvements.
- Use Cloud Storage: In addition to physical backups, consider using cloud storage services like iCloud, Google Photos, or Dropbox to store your photos. This adds an extra layer of protection in case your physical storage devices fail.
Troubleshooting Common Recovery Issues
Even with the best tools and methods, you may encounter some challenges during the recovery process. Here are some common issues and how to troubleshoot them:
- Photos Not Found After Scan: If the data recovery software doesn't find your deleted photos, it's possible that the data has already been overwritten. Try a deeper scan or a different recovery tool.
- Recovered Photos Are Corrupted: Sometimes recovered files may be incomplete or corrupted. This could be due to partial overwriting or file fragmentation. In such cases, try recovering the files using a different method or tool.
- Memory Card Not Recognized: If your Mac doesn't recognize the memory card, try using a different card reader or connect it to another device. If the problem persists, the card may be physically damaged.
- Software Crashes During Scan: If the recovery software crashes or freezes during the scan, make sure your Mac meets the software's system requirements. Restart the software and try scanning again.
When to Seek Professional Help
In some cases, you may not be able to recover your deleted photos using DIY methods or software. This could be due to severe data corruption, physical damage to the memory card, or other complex issues. If you've tried multiple recovery methods without success, it may be time to seek professional help.
Professional Data Recovery Services:
- Specialized Labs: Expertise and specialized equipment are available for professional data recovery services to retrieve data from badly damaged or corrupted memory cards.
- Consultation: Most services offer a free consultation to assess the situation and provide an estimate of the recovery success rate and cost.
- Confidentiality: Reputable services ensure the confidentiality and security of your data throughout the recovery process.
While professional services can be costly, they are often the best option for recovering valuable photos when all else fails.
Conclusion
Losing photos from a digital camera's memory card can be a distressing experience, but with the right approach, there's a good chance of recovering them on a Mac. Whether you opt for built-in macOS features, data recovery software, or professional services, the key is to act quickly and carefully. By following the steps outlined in this guide, you can increase your chances of successfully recovering your deleted photos and preserving those precious memories for years to come. Additionally, by adopting preventive measures and regular backups, you can safeguard against future data loss and ensure that your photos are always protected.
Do Your Data Recovery for Mac
Do Your Data Recovery for Mac, one of the best Mac data recovery software, can help you easily and completely recover deleted, formatted or lost files from Mac HDD/SSD, external HDD/SDD, USB drive, memory card, digital camera, or other storage devices.

