Unable to Unmount Volume For Repair on Mac, Fix It Now
![]() Ricky Lin updated on July 25, 2024
Ricky Lin updated on July 25, 2024
Quick Navigation:
- Common Causes of the Error
- Fix Unable to Unmount Volume for Repair on Mac
- Recover Lost Data from Damaged or Erased Disk on Mac
- Conclusion
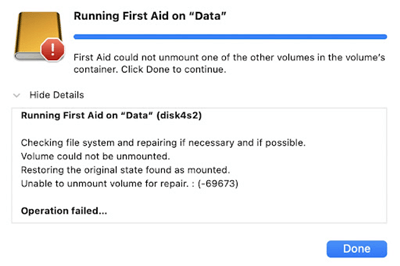
When you're in the middle of important disk fixes on your Mac and get the "Unable to Unmount Volume for Repair -69673" error, it can feel like you've hit a brick wall. When you're using Disk Utility, this annoying problem often comes up, but it can't unmount the disk because the system or other programs are using it.
Don't worry, you're not the only one who feels this way, and it can be fixed! In this complete guide, we'll show you several ways to unmount the volume and get your Mac back on track. Continue reading to find a step-by-step guide that will help you get past this problem and get your Mac working normally again. Let's get right to fixing it!
Common Causes of the Error
There are a few common reasons why you might get the "Unable to Unmount Volume for Repair" error on your Mac. You can pick the right answer if you know the reasons for this.
- Active Processes: An active process or program is most often to blame because it is accessing the volume. When software like Finder, Time Machine, or other background apps interact with the volume, Disk Utility can't remove it so that it can be fixed.
- System Files in Use: Mac OS may be using important system files stored on the drive. These files are needed for the system to work, and because they are live, the volume can't be safely unmounted.
- Disk Corruption: Sometimes, the volume itself may have mistakes or corruption of the disk. When these problems happen, the volume can get stuck in a bad state, which makes it hard for Disk Utility to unmount and fix.
- Background Tasks: Tasks that run in the background, such as Time Machine backups or Spotlight indexing, can also lock the drive. These things happen in the background without being heard, and the disk keeps being read, which makes it impossible for Disk Utility to unmount it.
Fix Unable to Unmount Volume for Repair on Mac
Solution 1: Force Quit Applications and Processes
To fix the "Unable to Unmount Volume for Repair" error, the first step is to ensure that no programs or processes are touching the volume. You can do this by quickly closing all open programs and looking for processes running in the background.
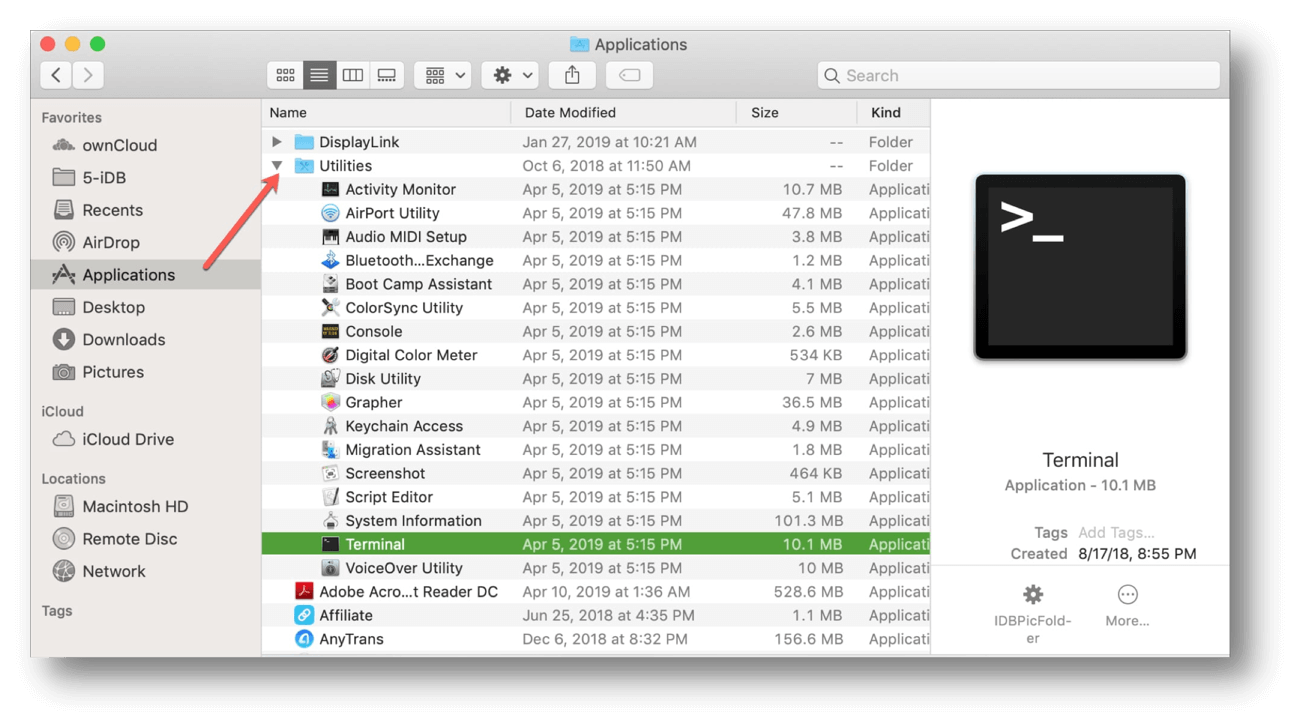
1. Activity Monitor can be found under Applications > Utilities.

2. There may be programs using the sound. Check the Activity Monitor for these programs. Finder, Time Machine, and Spotlight are often to blame.
3. To close an app for good, select it and pick the X button in the upper left corner.
4. Take a look at the background processes.
5. Go to Applications > Utilities and open Terminal.
6. Type sudo lsof | grep /Volumes/YourVolumeName and hit enter. This command lists all the open files and tasks on the given volume.
7. To end the processes, find them and type sudo kill -9 PID (where PID stands for the process ID).
8. Try unmounting the disk again with Disk Utility after forcing programs to close and ending background tasks.
Solution 2: Use Safe Mode
Safe Mode is a helpful way to fix problems on macOS because it only runs necessary system files and turns off any extraneous add-ons or startup items. Lowering the number of tasks running and starting up in Safe Mode can help unmount the volume. To Get into Safe Mode:
- Pick up the Apple menu and choose "Shut Down."
- Hold down the Shift key as soon as your Mac turns on until you see the login screen.
- Sign in to your Mac. The word "Safe Boot" should be in the upper right part of the screen.
- Open Disk Utility and try to unmount and fix the disk once you're in Safe Mode. If it works, restart your Mac properly.
Solution 3: Use Single-User Mode
You can use a command-line interface to work with your Mac in Single-User Mode, which is another advanced way to fix problems. In this mode, the system does as few things as possible, which can help unmount the file. To start up in single-user mode:
- Pick up the Apple menu and choose "Shut Down."
- First, turn on your Mac. Then, press and hold the Command and S keys until you see white words on a black screen.
- Type /sbin/fsck -fy and press Enter in Single-User Mode. This command checks and fixes the file system.
- To mount the volume, type /sbin/mount—uw / and press Enter if the file system check goes well. This will mount the volume in read-write mode.
- Once you've completed these steps, type reboot and press Enter to restart your Mac. Then, use Disk Utility to remove the volume and fix it.
Solution 4: Use Terminal Commands
If the other instructions don't work, you can force the volume to unmount with Terminal instructions. Be careful with this method, though, as giving the wrong orders can lead to data loss. Before you go any further, make sure you have a copy.
- Launch the Terminal by going to Applications > Utilities > Terminal.
- Just type "diskutil list" and hit "Enter." It shows a list of all the disks and folders that are available.
- Write down the name of the drive you want to unmount, for example, /dev/disk2s1.
- Press Enter after typing sudo diskutil unmount force /dev/disk2s1 (where /dev/disk2s1 is the name of your drive).
- If you can safely unmount the volume, you can use Disk Utility to fix it.
Solution 5: Use Recovery Mode
Recovery Mode is a useful part of macOS that lets you use many recovery tools, such as Disk Utility. By starting up in Recovery Mode, you can unmount the volume and fix it without any other tasks getting in the way.
- Pick up the Apple menu and choose "Shut Down."
- First, turn on your Mac. Keep pressing and holding the Command and R keys or Power button (for Apple silicon Mac) until you see the Apple sign or the Earth spinning.
- In the Utilities window for macOS, choose Disk Utility and click Start.
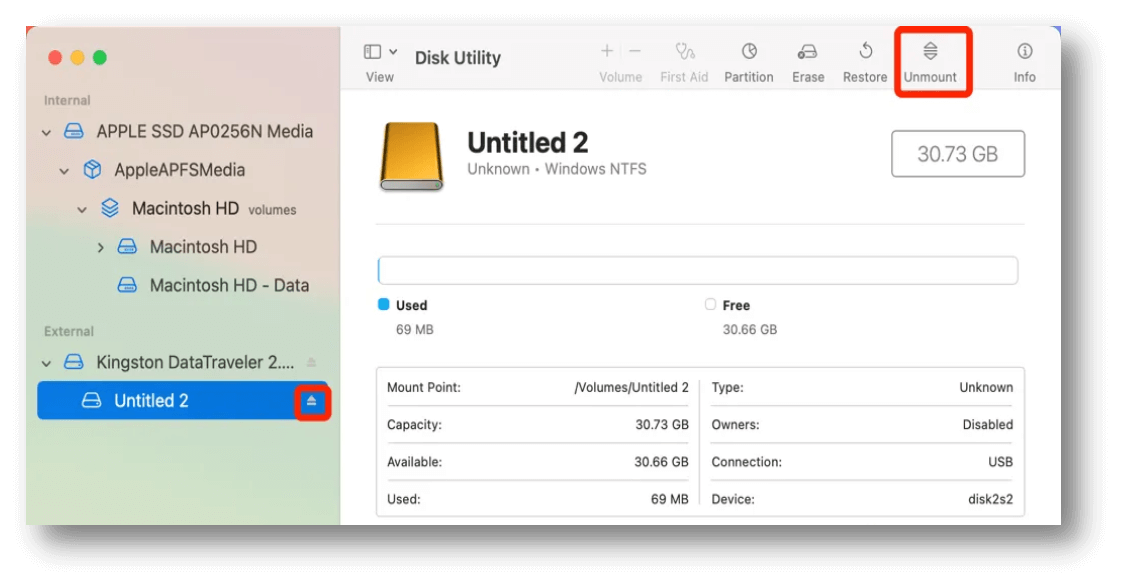
- To fix a volume, choose it, click "Unmount," and then click "First Aid."
![Unmount]()
- Once the fix is done, you can restart your Mac normally.
Recover Lost Data from Damaged or Erased Disk on Mac
Mac data recovery software - Do Your Data Recovery for Mac can help you recover lost data from a damaged or erased disk on Mac.
Step 1. Download and install Do Your Data Recovery for Mac on your Mac, then open it.
Step 2. Open Do Your Data Recovery for Mac, select the disk.

Step 3. Click on Scan button to deeply scan the damaged or erased disk and find all recoverable files.

Step 4. Once the scan is completed, you can preview all recoverable files. Then select the wanted files, click on Recover button to save them.

Do Your Data Recovery for Mac also can help you mount/unmount a drive on Mac, repair damaged disk, format external hard drive/USB drive/SD card, etc.
Conclusion:
It might seem impossible to fix the "Unable to Unmount Volume for Repair" error on your Mac, but it is possible if you follow the right steps. You can fix this problem by forcing programs to close, starting up in Safe Mode or Single-User Mode, running Terminal instructions, or entering Recovery Mode.
For problems that won't go away, you might need third-party tools or skilled help. Before you try to fix anything, you should always back up your info. You can unmount and fix your volume by following the steps in this guide and being patient. This will ensure that your Mac works properly again.
Written & Updated by Ricky Lin
Ricky Lin is an senior editor of DoYourData who lives in Adelaide, Australia. He is interested in writing technology articles related with data recovery, computer issue fixes, disk clone, iPhone data recovery, video edit, Mac optimization, etc. He Joined DoYourData in 2019 and have written 500+ articles to help both Windows users and Mac users to solve data or computer problems.
Hot Articles
- Fix External Hard Drive Read-Only Issue on Mac
- How to Wipe Trash Bin on Mac?
- Recover Lost Data from WD (Western Digital) External Hard Drive on Mac
- Fix External Hard Drive Not Showing Up on Mac
- How to Wipe SD Card on Mac?
- Mount and Unmount the External Hard Drive on the Mac
- Run First Aid on Mac to Repair Disks
- Fix Can't Save Files to An External Hard Drive on Mac
- (Solved) External SSD Not Detected in Disk Utility on Mac
- Why Can't Format A Hard Drive To NTFS on Mac? Can We Fix It?