How to Use SanDisk Portable SSD Dragon Edition on Mac?
![]() Ricky Lin updated on July 15, 2024
Ricky Lin updated on July 15, 2024
Quick Navigation:
- What Is SanDisk Portable SSD Dragon Edition?
- How to Use SanDisk Portable SSD Dragon Edition on Mac?
- How to Use NTFS SanDisk Portable SSD Dragon Edition on Mac Without Formatting?
- Conclusion
- FAQs About Using SanDisk Portable SSD Dragon Edition on Mac
In a time when digital data is growing exponentially, it is very important to have a reliable and fast storage option. The SanDisk Portable SSD Dragon Edition is made to meet the current storage needs by perfectly combining speed, reliability, and portability.
It works well and has a good read and write speed, making it great for pros and regular people. Because it's well-made and looks good, it can be used for many things, like saving and sending big files quickly and safely.
The SanDisk Portable SSD Dragon Edition is one of the best options. This SSD has many advanced features and functions that can be used with your Mac. This guide will show you how to connect it to your computer without problems and how to use the SanDisk Portable SSD Dragon Edition on your Mac.
What Is SanDisk Portable SSD Dragon Edition?
Modern storage devices like the SanDisk Portable SSD Dragon Edition are made to be fast, reliable, and portable. They can read up to 1050MB/s and write up to 1000MB/s, so they can quickly send and receive data. It makes them perfect for videographers, photographers, and other professionals who work with big files.

Its sleek, long-lasting design means it can handle the wear and tear of daily use while still being small and light, making it great for use on the go. Advanced security features like hardware encryption and password protection are also built into the SSD. These features keep your data safe and secure. It works with USB-C and USB-A and can be used with many products.
Whether you need to back up important files, move data between places, or add more storage, the SanDisk Portable SSD Dragon Edition is a strong and useful tool that should be in every tech enthusiast's collection.
How to Use SanDisk Portable SSD Dragon Edition on Mac?
If you get a new SanDisk Portable SSD Dragon Edition, just connect it to your Mac. If it is not compatible with macOS, you should reformat it.
#1 Format the SSD for Mac
It is very important to format your SanDisk Portable SSD Dragon Edition before you use it to ensure it works well with your Mac. How to do it:
Step 1. Connect the SSD: You can connect your SSD to a USB port on your Mac with either the USB-C to USB-C cable or the USB-C to USB-A adapter.
Step 2. Open Disk Utility: Start by going to Applications > Utilities > Disk Utility.
Step 3. Select the SSD: Find and choose your SanDisk Portable SSD Dragon Edition on the left of Disk Utility.
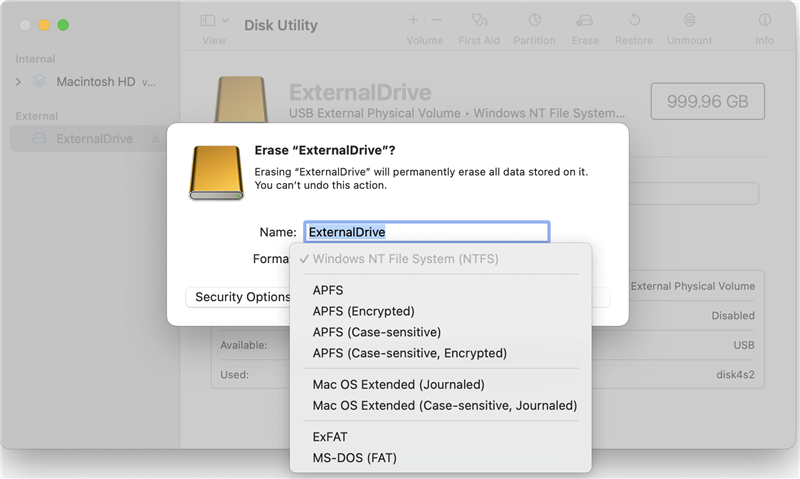
Step 4. Erase the SSD: At the top of the Disk Utility, click the "Erase" button.
- Choose a Format: To work best with macOS, choose APFS (Apple File System) for newer Macs or Mac OS Extended (Journaled) for older macOS versions. If you will use it on Windows PC and Mac, select ExFAT as the file system.
- Give The SSD A Name: In the Name field, give your SSD a name. To be sure, click "Erase" again. The cleaning process will begin, and your SSD will be ready to use when it's done.
When the process gets finished, click on Done button. Then check if it can work on your Mac.
#2 Transfer Files to the Dragon Edition of SanDisk Portable SSD
Simple steps can move things to your SanDisk Portable SSD Dragon Edition on a Mac. Follow these steps:
- Connect the SSD
You can connect your SSD to a USB port on your Mac with either the USB-C to USB-C cable or the USB-C to USB-A adapter. - Open Finder
It's also possible to type Finder and press Command + Space to open Finder from the Dock. - Find Your Files
Navigate through Finder to find the files or folders you want to send. - Pick out the files
Hold down the Command key and click to choose multiple files or folders. To pick a single item, click and drag.- Drag and Drop Method
You can drag the chosen folders or files to the SSD icon on the desktop or Finder's sidebar. As you release the mouse button, they will fall to the SSD. - Copy and Paste Method
Right-click on the folders or files you want to copy and choose "Copy." In Finder, go to the SSD, right-click where you want to paste, and select "Paste."
- Drag and Drop Method
- Wait for the Transfer
You can see how the move is going in the Finder window. Sending larger files or groups will take longer. Open the SSD in Finder to ensure all the files were copied correctly.
More Tips:
- If you want to set the SanDisk Portable SSD Dragon Edition as the backup disk, just click Apple menu > System Settings > General > Time Machine, then select the SanDisk Portable SSD Dragon Edition as the Time Machine backup disk, use it to back up your Mac.
- Disk Clone Software can help you create a bootable clone for your Mac with SanDisk Portable SSD Dragon Edition. Download and install DoYourClone for Mac, open it, choose Clone OS mode. Then select the SanDisk Portable SSD Dragon Edition as the destination drive, click on Clone Now button. DoYourClone for Mac will clone all data including operating system, apps, settings, user files from your Mac to the SanDisk Portable SSD Dragon Edition, creating a full bootable clone backup. After cloning, you can set the SanDisk Portable SSD Dragon Edition as the new startup disk.
#3 Optimizing SSD Performance
Follow these steps to make sure your SanDisk Portable SSD Dragon Edition works at its best:
Step 1. Enable TRIM
- Launch the Terminal by going to Applications > Utilities > Terminal.
- Type sudo trimforce enable and press Enter.
- When asked, confirm what you did. It keeps the SSD running smoothly by letting the operating system tell it which bits of data are no longer being used and can be erased from the inside.
Step 2. Update the Firmware
Check the SanDisk support page for your SSD model to see if there are any new firmware updates. Then, follow the steps to download and install any available firmware changes.
Step 3. Check the Disk Space
Ensure the SSD has enough free space to prevent performance from dropping. Try to keep the drive free between 10% and 20%.
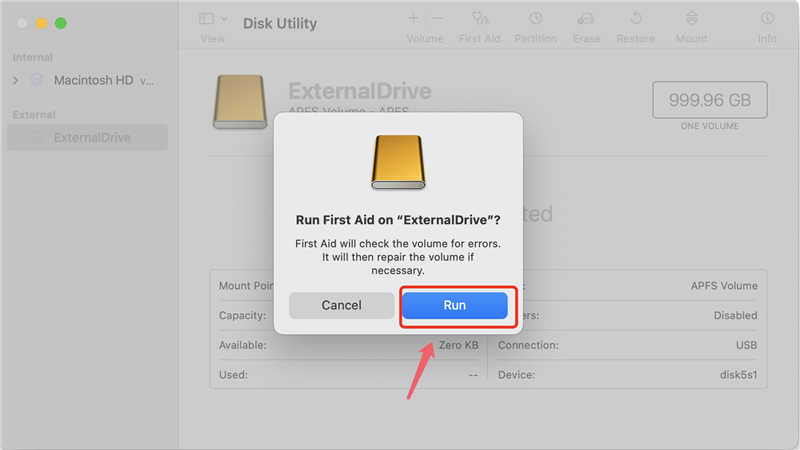
Step 4. Start Disk Utility First Aid
Start by going to Applications > Utilities > Disk Utility. From the left of Disk Utility, pick out your SanDisk Portable SSD Dragon Edition. Click First Aid and then Run to find and fix any disk problems.
Step 5. Disable Spotlight Indexing
- Launch the Terminal by going to Applications > Utilities > Terminal.
- To turn off /Volumes/YourSSDName, type sudo mdutil -i off and press Enter. Type in the name of your SSD instead of "YourSSDName." It can make things run faster by stopping macOS from indexing the SSD all the time.
Step 6. Back Up Your Data Regularly
To ensure your info is safe, go to System Settings > General > Time Machine and set up regular backups.
Step 7. Using Backup Solutions
It is very important to back up your data, and the SanDisk Portable SSD Dragon Edition can work perfectly with Time Machine, macOS's built-in backup tool. How to set it up:
- Open Time Machine
To get to Time Machine, go to System Settings > General > Time Machine. - Select Backup Disk
Choose the disk to back up. From the disks you can use, pick the SanDisk Portable SSD Dragon Edition. Press "Use Disk." - Automatic Backups
Once you set it up, Time Machine will back your Mac to the SSD daily. It ensures that your info is always backed up without you having to do anything.

How to Use NTFS SanDisk Portable SSD Dragon Edition on Mac Without Formatting?
If your SanDisk Portable SSD Dragon Edition has been pre-formatted to NTFS file system, you still can use it on your Mac with a NTFS driver.
Step 1. Download and install the best NTFS for Mac tool - DoYourData NTFS for Mac. Connect the SanDisk Portable SSD Dragon Edition to your Mac.
Step 2. Open DoYourData NTFS for Mac, select the SanDisk Portable SSD Dragon Edition, click on Mount button.
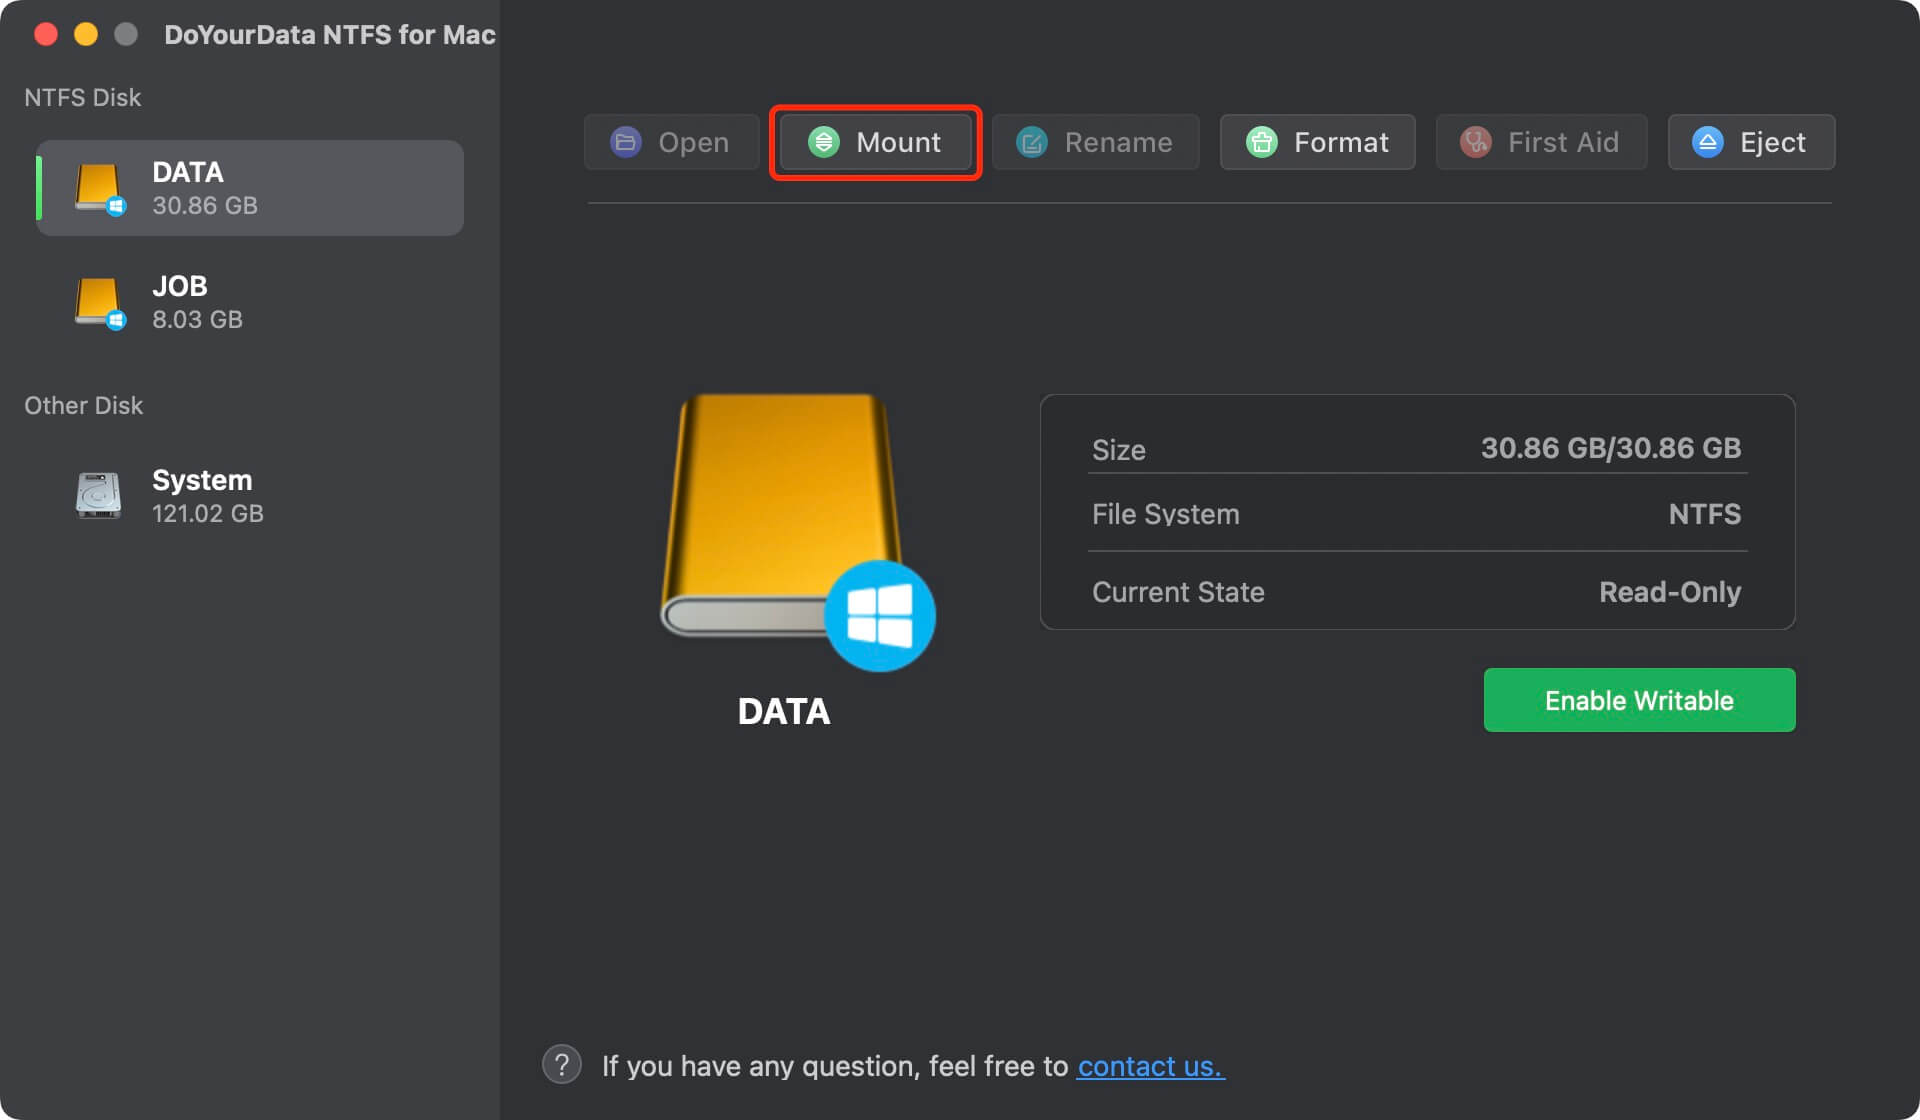
Step 3. Click on Enable Writable button. Then you can read-write the NTFS SanDisk Portable SSD Dragon Edition on your Mac without any limitation.

Conclusion:
The SanDisk Portable SSD Dragon Edition is a powerful and flexible storage option that works great for Mac users who need to handle their data quickly, reliably, and on the go. It is an essential digital tool you can't do without, whether you're a professional working with big files or a tech enthusiast looking for strong backup options. Its speed, durability, and security features make it unbeatable. This great SSD will help you be more productive and give you peace of mind.
FAQs About Using SanDisk Portable SSD Dragon Edition on Mac
1. How to fix SanDisk Portable SSD Dragon Edition not showing up on Mac?
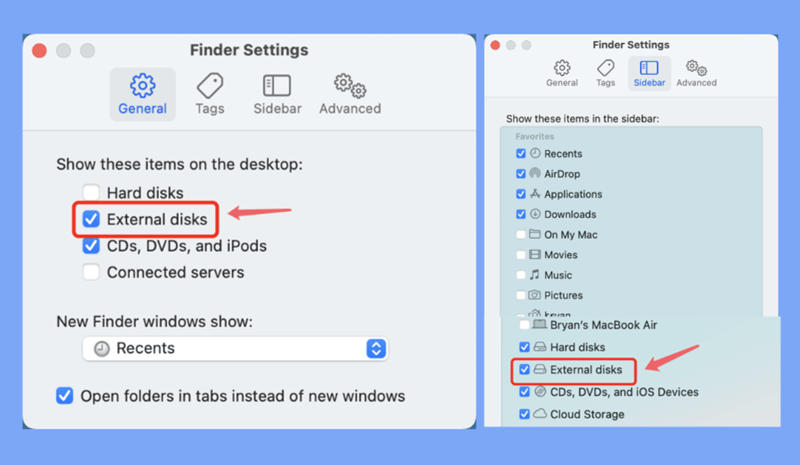
Make sure the connection is good, then open a Finder:
- Click Finder on Apple menu, choose Settings.
- Open Finder Settings.
- Make sure External disks is selected under General and Sidebar.
2. How to repair damaged SanDisk Portable SSD Dragon Edition on Mac.
- Connect the SanDisk Portable SSD Dragon Edition to your Mac.
- Go to Launchpad > Other > Disk Utility, open it.
- Select the SanDisk Portable SSD Dragon Edition, click on First Aid button to repair it.
3. How to format SanDisk Portable SSD Dragon Edition for Mac?
You can use Disk Utility to format SanDisk Portable SSD Dragon Edition for your Mac:
- Connect the SanDisk Portable SSD Dragon Edition to your Mac.
- Open Disk Utility.
- Select the SanDisk Portable SSD Dragon Edition, click Erase.
- Select APFS or Mac OS Extended as the file system.
- Click Erase again.
If you have lost data due to formatting your SanDisk Portable SSD Dragon Edition on your Mac, you can use a data recovery app to scan the SanDisk Portable SSD Dragon Edition and get the lost data back.
- Download and install Do Your Data Recovery for Mac, open it.
- Select the SanDisk Portable SSD Dragon Edition.
- Click on Scan button.
- Preview and recover lost files after scanning.
4. How to fix SanDisk Portable SSD Dragon Edition not mounting on Mac?
Try these solutions to fix SanDisk Portable SSD Dragon Edition not mounting on Mac:
- Open Finder Settings, make sure External disks is selected under General and Sidebar.
- Open Disk Utility, click on Mount button. If the Mount button is grayed out, click on First Aid button.
- Use NTFS for Mac tool to mount NTFS SanDisk Portable SSD Dragon Edition on Mac.
- Open Disk Utility, click Erase to reformat the unmounted SanDisk Portable SSD Dragon Edition.
Written & Updated by Ricky Lin
Ricky Lin is an senior editor of DoYourData who lives in Adelaide, Australia. He is interested in writing technology articles related with data recovery, computer issue fixes, disk clone, iPhone data recovery, video edit, Mac optimization, etc. He Joined DoYourData in 2019 and have written 500+ articles to help both Windows users and Mac users to solve data or computer problems.
Hot Articles
- Fix External Hard Drive Read-Only Issue on Mac
- How to Wipe Trash Bin on Mac?
- Recover Lost Data from WD (Western Digital) External Hard Drive on Mac
- Fix External Hard Drive Not Showing Up on Mac
- How to Wipe SD Card on Mac?
- Mount and Unmount the External Hard Drive on the Mac
- Run First Aid on Mac to Repair Disks
- Fix Can't Save Files to An External Hard Drive on Mac
- (Solved) External SSD Not Detected in Disk Utility on Mac
- Why Can't Format A Hard Drive To NTFS on Mac? Can We Fix It?