External Hard Drive Not Mounting on macOS Big Sur? Fix It Without Losing Data
If the external hard drive is not mounting on macOS Big Sur, check it in Disk Utility and mount it or repair it. NTFS for Mac tool can help you force mount any drive including NTFS drive on macOS Big Sur. It also can add NTFS read-write support on macOS Big Sur so that you can read-write to a NTFS drive on Mac without any limitation.
![]() Ricky Lin updated on September 18, 2024
Ricky Lin updated on September 18, 2024
Quick Navigation:
- Common Reasons for External Hard Drive Not Mounting on macOS Big Sur
- Solutions to Fix External Hard Drive Not Mounting on macOS Big Sur
- Preventing Future Issues with External Hard Drives
- Conclusion
External hard drives are essential tools for data storage and backup. Whether you're using them to store important files, backup critical data, or simply expand your Mac's storage capacity, it's frustrating when they fail to mount on macOS Big Sur. If you're encountering this issue, don't panic. This comprehensive guide will help you understand why your external hard drive might not be mounting and provide step-by-step solutions to fix it. Let's dive into the troubleshooting process to get your drive up and running again.
Common Reasons for External Hard Drive Not Mounting on macOS Big Sur
There are various potential causes for an external hard drive not mounting on macOS Big Sur:
- File System Incompatibility: It's possible that the file system on your external hard drive is incompatible with macOS Big Sur.
- Faulty Cable or USB Port: A damaged cable or malfunctioning USB port could prevent your Mac from recognizing the drive.
- Software Issues: There may be bugs or software glitches related to the macOS Big Sur update.
- Drive Corruption: The external hard drive itself may be corrupted, preventing it from mounting.
- Power Supply Issues: Some external hard drives require more power than what your Mac's USB port can supply.
Quick Fixes:
1. Check the USB Connection
Make sure your Mac and external hard drive are connected correctly. Try disconnecting and re-plugging the drive. To rule out problems with the USB hub, if you are using one, try connecting the disk straight to your Mac.
2. Test the Cable and Port
Faulty cables or USB ports are common culprits. Test the external hard drive with a different cable and try connecting it to a different USB port. If the drive works on another port or with another cable, you'll know that the original port or cable is faulty.
3. Check the Power Supply
If an external power source is needed for your external hard drive, ensure sure the power cord is plugged in correctly and working. Some drives also have a power switch—ensure that it is turned on.
4. Verify with Another Computer
Connect the external hard drive to another computer. If it mounts on a different system, the problem is likely related to your Mac. If it still doesn't mount, the issue may be with the drive.
5. Check Finder Preferences or Finder Settings
In some cases, macOS may not display external hard drives by default. To check if this is the issue, follow these steps:
- Open Finder.
- Go to Finder > Preferences.
- Tap on the General and Sidebar tab.
- Ensure that the box next to External disks is checked.
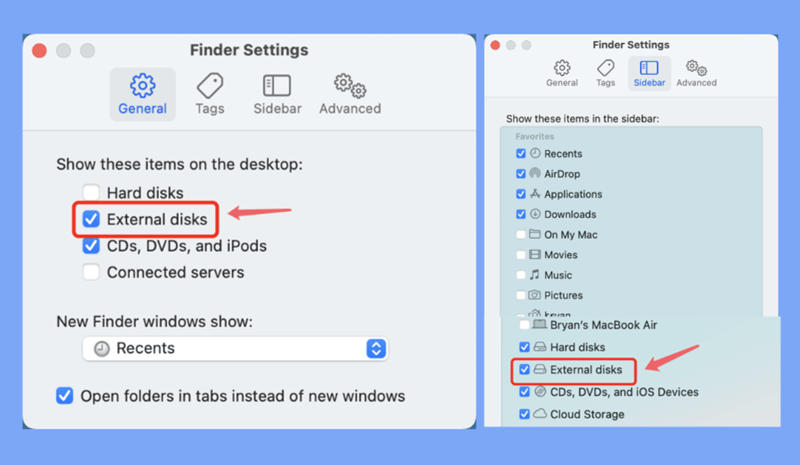
This will make sure that external hard drives are shown in the Finder window.
Solutions to Fix External Hard Drive Not Mounting on macOS Big Sur
If the preliminary checks didn't resolve the issue, it's time to try more advanced troubleshooting methods.
Solution 1. Turn Your Mac Back On
Restarting the computer could occasionally fix a lot of software-related problems. After restarting your Mac, connect the external hard drive again and check to see if it mounts.
Solution 2. Examine Disk Utility
An integrated macOS utility called Disk Utility can assist you in maintaining and fixing your disks. Your external hard disk can still be displayed in Disk Utility if it isn't mounting automatically.
How to use Disk Utility to check:
- Launch Disk Utility by going to Applications > Utilities.
- Locate your external hard drive under External in the sidebar.
You can try to manually mount the disk if it's visible to you but grayed out:
- Decide which external hard disk to use.
- Press the Mount button located at the window's top.
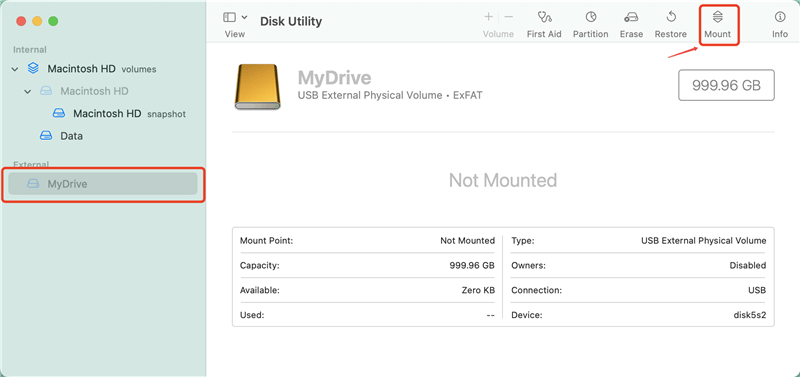
If the drive mounts successfully, you should be able to access it through Finder.
Solution 3. Use First Aid in Disk Utility
If Disk Utility shows your external hard disk but still won't mount, it may be experiencing file system issues or corruption. In this case, you can try repairing the drive using the First Aid feature in Disk Utility.
How to use First Aid:
- After launching Disk Utility, choose the external hard disk.
- Press the toolbar's First Aid button.
- Confirm that you want to run First Aid by clicking Run.
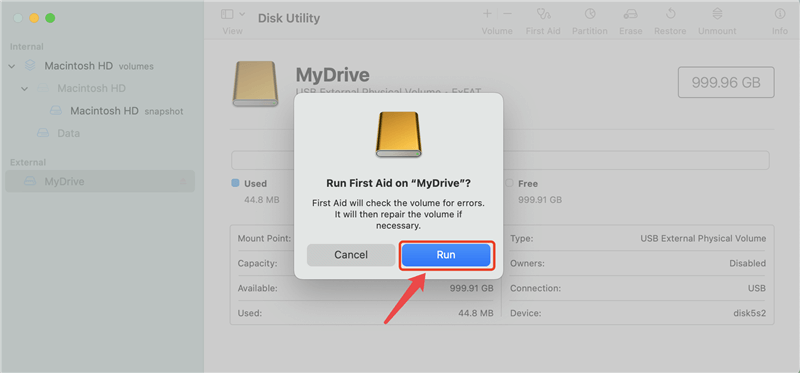
First Aid will scan the drive for errors and attempt to repair any issues it finds. Once the repair process is complete, try mounting the drive again.
Solution 4. Reset NVRAM/PRAM
Resetting your Mac's NVRAM (Non-Volatile Random Access Memory) or PRAM (Parameter RAM) can sometimes fix hardware-related problems like disks that won't mount.
How to Clear the PRAM/NVRAM:
- Turn off your Mac.
- Press and hold the keys Option, Command, P, and R to turn it back on.
- Release the keys after holding them for around 20 seconds.
Your Mac will restart, and once it has booted up, reconnect the external hard drive to see if it mounts.
Solution 5. Reset SMC (System Management Controller)
Try resetting the System Management Controller (SMC) if the NVRAM reset is ineffective. This may assist in resolving power-related problems that might be harming your external hard disk.
How the SMC is reset:
- Turn off your Mac.
- If your MacBook has a non-removable battery, simultaneously press and hold the Shift, Control, and Option keys on the left side of the keyboard and push the power button.
- Release all keys after holding them for ten seconds.
- Restart your Mac, then see if the drive mounts.
Just disconnect the power cord for 15 seconds, then plug it back in to turn on desktop Macs (iMac, Mac mini, etc.).
Solution 6. Update macOS
macOS Big Sur may have introduced bugs that prevent external hard drives from mounting properly. Apple frequently releases updates to fix known issues, so make sure your system is up to date.
To update macOS:
- Select Software Update under System Preference.
- Select Update Now if there is a current update available.
Once your Mac is updated, try connecting your external hard drive again.
Solution 7. Check File System Compatibility
If your external hard drive was previously used on a Windows system, it may be formatted using a file system that is not fully compatible with macOS, such as NTFS. macOS can read NTFS-formatted drives but cannot write to them without third-party software.
You can check the file system format of the drive in Disk Utility:
- After launching Disk Utility, choose the external hard disk.
- To find out which file system is being used, check the Format box.
If the drive is formatted as NTFS and you need full read and write access on your Mac, you have two options:
- Reformat the drive using a macOS-compatible file system like ExFAT or APFS, HFS+ (this will erase all data on the drive).
- Use third-party software such as DoYourData NTFS for Mac to enable write access to NTFS drives.
Solution 8. Reformat the External Hard Drive
If none of the above methods work and the drive still won't mount, reformatting the drive may be necessary. However, reformatting will erase all data on the drive, so make sure you have a backup or can access the data through another computer before proceeding.
How to reformat an external hard drive:
- Open Disk Utility.
- From the sidebar, choose the external hard disk.
- Press the Erase button located at the window's top.
- Choose a new file system format (ExFAT is a good option for compatibility with both macOS and Windows).
- Name the drive and click Erase.
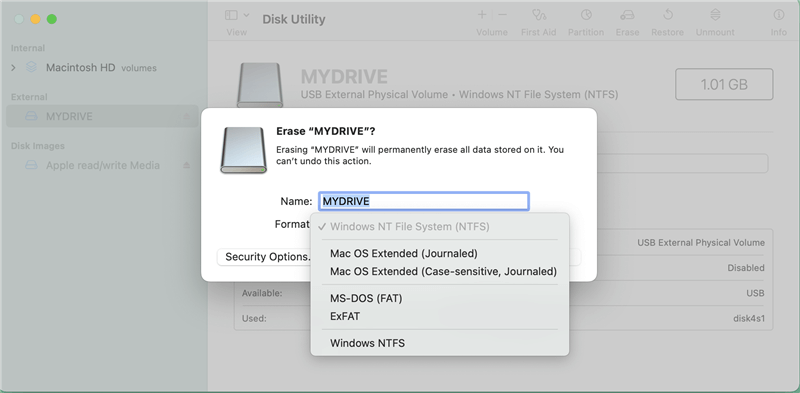
Once the reformatting process is complete, the external hard drive should mount on your Mac.
Note: Make a backup before you reformat the external hard drive.
Solution 9. Try a Third-Party Mounting Tool
If you're still having trouble mounting the drive, there are third-party tools available that can help. DoYourData NTFS for Mac and Tuxera NTFS are popular tools that can help with mounting NTFS drives on macOS. Do Your Data Recovery for Mac is another option that can help repair and recover data from a problematic drive.
Step 1. Download and install DoYourData NTFS for Mac on macOS Big Sur. Then run it from Launchpad.
Step 2. Connect the NTFS external hard drive on your Mac, find and select it, click on Mount button.
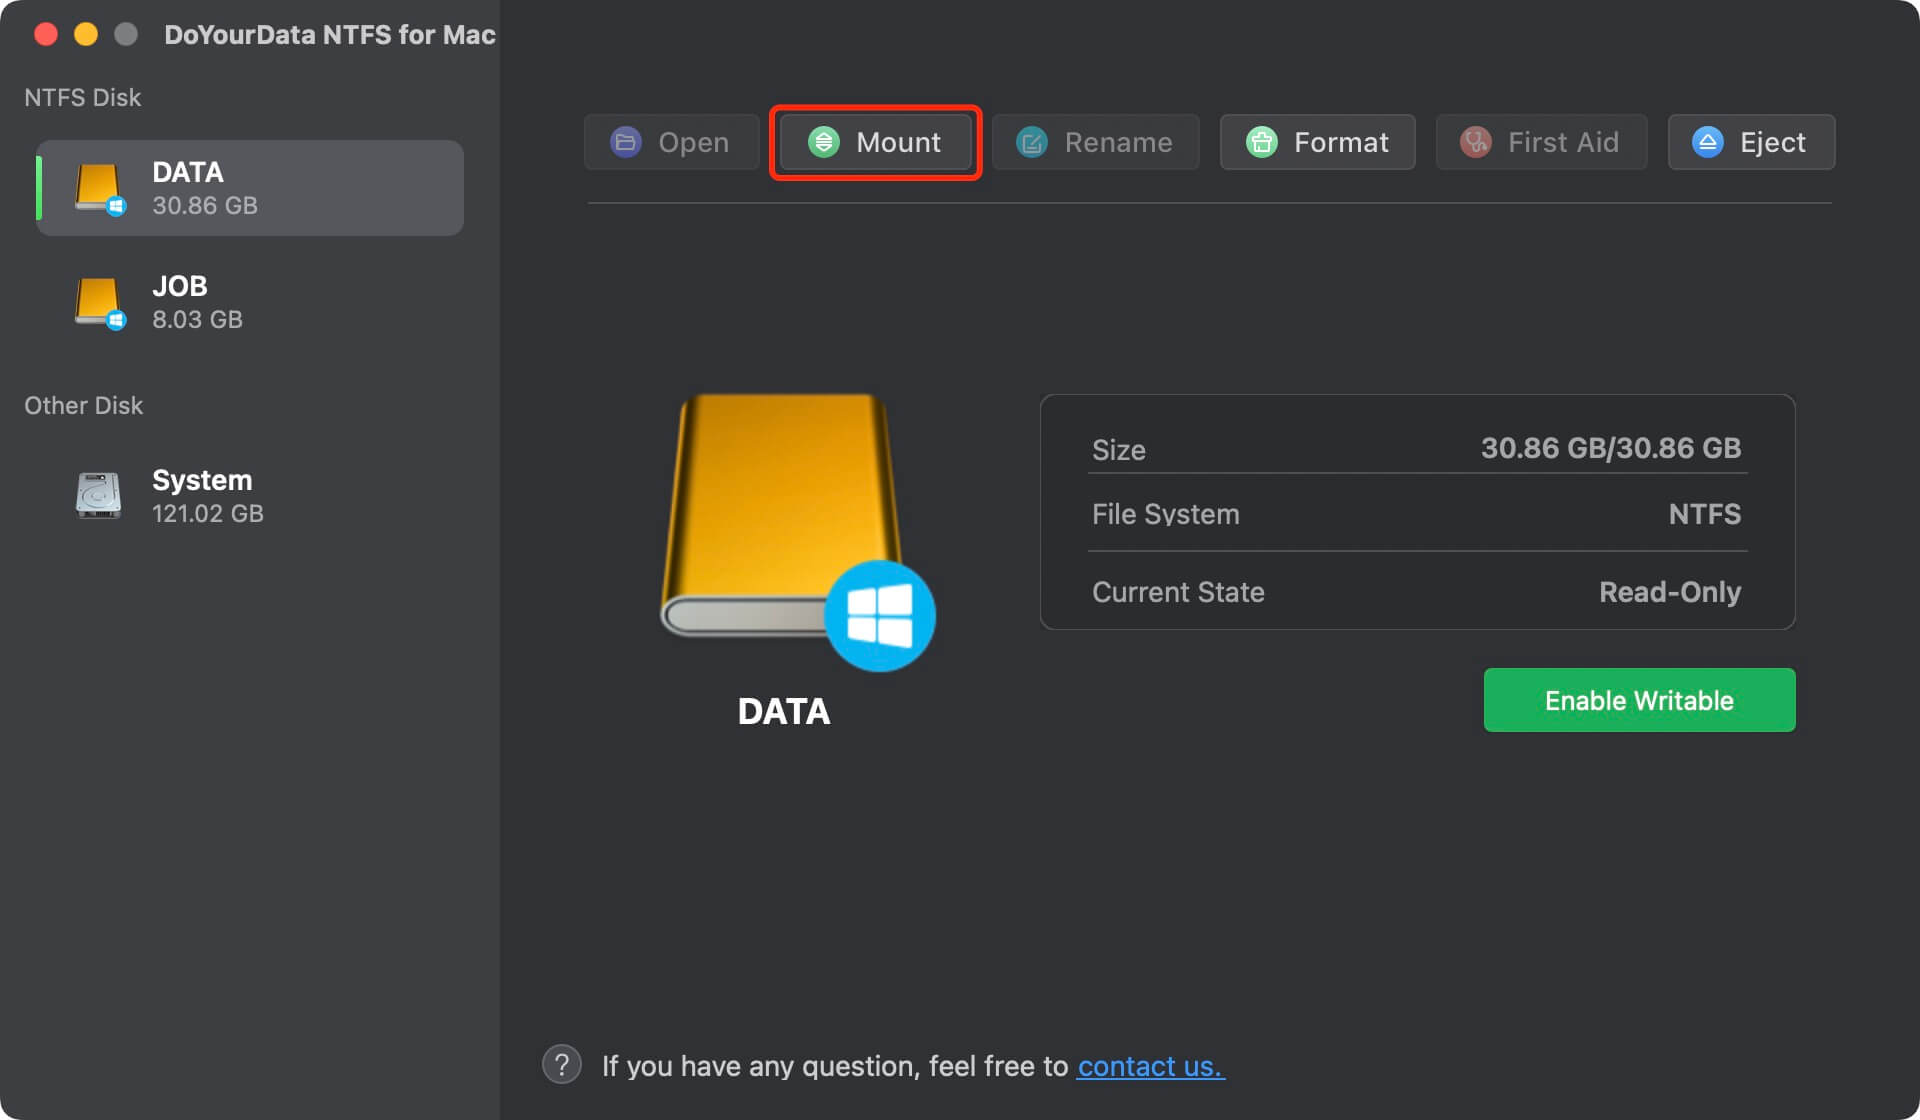
Step 3. If you want to write data to the NTFS external hard drive, click on Enable Writable button.

Data Recovery Options:
If your external hard drive still won't mount after trying all of the above solutions, you may be dealing with a hardware failure or severe corruption. In this case, data recovery software may help you retrieve your files before replacing the drive.
These programs can scan your external hard drive for recoverable data and help you save important files before attempting to repair or replace the drive.
Check how to recover lost data from HDD/SSD/USB drive/SD card on macOS Big Sur >>
Preventing Future Issues with External Hard Drives
To avoid problems with external hard drives in the future, consider the following tips:
- Safely Eject the Drive: Always eject your external hard drive safely before unplugging it from your Mac to prevent data corruption.
- Keep Your macOS Updated: Regularly updating your macOS ensures that you have the latest fixes and compatibility for external devices.
- Use a Reliable File System: If you use your external hard drive with both macOS and Windows systems, consider using the ExFAT file system for better compatibility.
- Backup Your Data: Always keep backups of important files in case your external hard drive fails unexpectedly.
Conclusion
External hard drives not mounting on macOS Big Sur is a common issue that can usually be resolved with some troubleshooting. From checking the USB connection to repairing the drive using Disk Utility, there are multiple steps you can take to get your external hard drive working again. In more severe cases, reformatting the drive or using data recovery software may be necessary. By following the tips and solutions provided in this guide, you can fix this frustrating issue and ensure your data remains safe.
Written & Updated by Ricky Lin
Ricky Lin is an senior editor of DoYourData who lives in Adelaide, Australia. He is interested in writing technology articles related with data recovery, computer issue fixes, disk clone, iPhone data recovery, video edit, Mac optimization, etc. He Joined DoYourData in 2019 and have written 500+ articles to help both Windows users and Mac users to solve data or computer problems.
Hot Articles
- Fix External Hard Drive Read-Only Issue on Mac
- How to Wipe Trash Bin on Mac?
- Recover Lost Data from WD (Western Digital) External Hard Drive on Mac
- Fix External Hard Drive Not Showing Up on Mac
- How to Wipe SD Card on Mac?
- Mount and Unmount the External Hard Drive on the Mac
- Run First Aid on Mac to Repair Disks
- Fix Can't Save Files to An External Hard Drive on Mac
- (Solved) External SSD Not Detected in Disk Utility on Mac
- Why Can't Format A Hard Drive To NTFS on Mac? Can We Fix It?