Best NTFS Driver for macOS Catalina (macOS 10.15)
DoYourData NTFS for Mac is one of the best NTFS for Mac tools. It is fully compatible with macOS Catalina and can quickly enable writable for NTFS drives on Mac. It also can help you mount a drive, repair a drive, format a drive on macOS Catalina. With this NTFS driver, you can read-write any NTFS drive on macOS Catalina without any limitation.
![]() Ricky Lin updated on September 24, 2025
Ricky Lin updated on September 24, 2025

Quick Navigation:
- NTFS and macOS Catalina Compatibility
- 3 Methods to Make NTFS Drive Writable on macOS Catalina
- Method 1: Using Terminal with Native macOS Support
- Method 2: Reformatting NTFS Drive to exFAT or FAT32 on macOS Catalina
- Method 3: Using Third-Party NTFS Drivers [Highly Recommended💯]
- Conclusion
- FAQs About NTFS for macOS Catalina
Finding your way around the internet can be hard, especially when working on different platforms. For Mac users who work with NTFS drives, the read-only access restrictions in macOS Catalina are probably something you've experienced firsthand.
It can make simple things like editing papers or moving files around a real pain. However, you can read and write to your drives without problems if you can get proper NTFS driver for macOS Catalina. Actually, there are a few ways to bridge the gap between NTFS and macOS Catalina.
This guide has everything you need, whether you want a quick fix, a more permanent fix, or even a free way to do it. We'll look at the best tools and methods for managing NTFS drives on your macOS Catalina or any other Mac machines, so you can get your work done without worrying about file compatibility problems.
NTFS and macOS Catalina Compatibility
NTFS, which stands for "New Technology File System," is a file system that Microsoft made. The file system comes with Windows and is used by internal drives, external drives, and USB flash drives by default. NTFS is known for being reliable, handling big files, and compressing and encrypting files.
However, macOS, including Catalina 10.15, does not make it easy to write to NTFS drives. It can only read them. This limitation can be especially annoying for people who often need to move files between Windows and macOS. macOS can read NTFS drives without problems, but you cannot change, delete, or make files on an NTFS drive unless you find a way to get around this. Here we will introduce 3 ways to help you make it and write data on NTFS drives on macOS Catalina or other Mac operating system.
3 Methods to Make NTFS Drive Writable on macOS Catalina
The 3 methods outline here is to use Terminal, Disk Utility or with a third-party NTFS driver for macOS Catalina. If you are skilled and familiar with command line, you can choose to enable the native macOS support for NTFS with the Terminal. Otherwise, you can choose the other 2 methods which might be easier for most users.
Method 1: Using Terminal with Native macOS Support
You can also change the native NTFS support in the Terminal to allow NTFS write access on macOS Catalina. Apple doesn't approve of this method, which could be dangerous because it changes system files. However, it is a free option that you can use if you know how to use the command line.
To use the Terminal to allow NTFS write access, do the following:
Step 1. Connect the NTFS Drive: Make sure the NTFS drive is mounted on your Mac after connecting it.
Step 2. Open Terminal: Look in the Applications > Utilities folder for the Terminal app and open it.

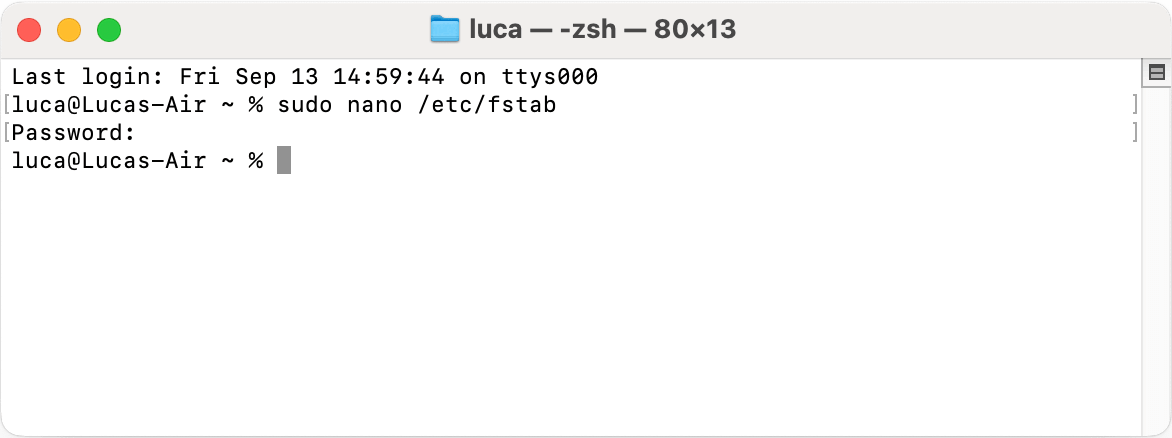
Step 3. Enter the following command in the terminal and then enter your system password:
sudo nano /etc/fstab
It will open the file /etc/fstab with nano editor.
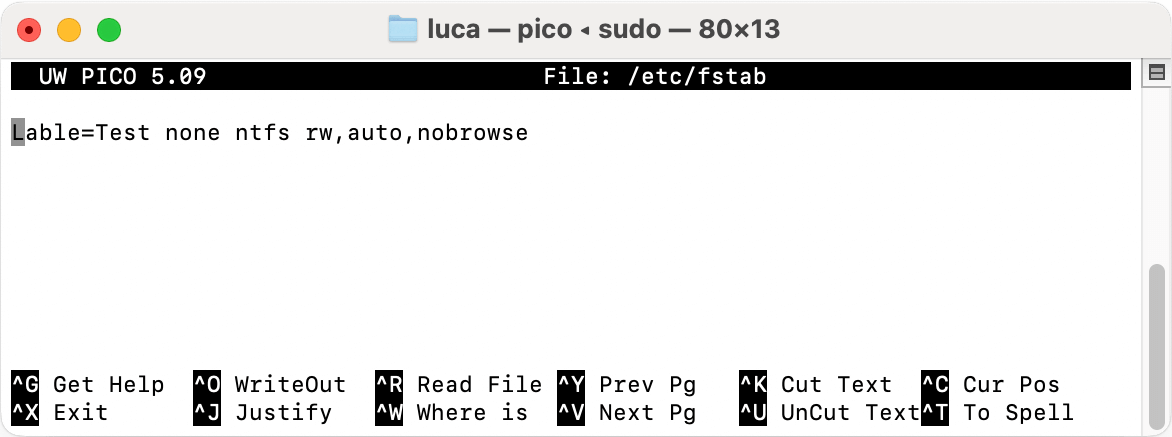
Step 4. Then enter the following command and click Control + X keys to save it:
Lable=Test none ntfs rw,auto,nobrowse
You need to replace the Test to the lable (or name) of your own NTFS drive.
Step 5. After the that, your NTFS drive is writable on macOS Catalina now. You can enter the Finder and check if you can add or edit data on the NTFS drive.
📢 Note: If the NTFS drive won't appear in Finder on macOS Catalina, you can access it as follows.
Open Finder ![]() and click Go from the top menu bar, select Go to Folder, enter /volumes/ to list all the drives. There you will see and access the NTFS drive. You can also drag the NTFS to add it to the sidebar of Finder. Then you can access it from Finder directly in the future.
and click Go from the top menu bar, select Go to Folder, enter /volumes/ to list all the drives. There you will see and access the NTFS drive. You can also drag the NTFS to add it to the sidebar of Finder. Then you can access it from Finder directly in the future.
Method 2: Reformatting NTFS Drive to exFAT or FAT32 on macOS Catalina
The method to enable the native support for NTFS on Mac is not easy for every user. If you are not skilled at command line and you often move files between macOS and Windows, formatting your NTFS drive to a file system that works with both can help. For example, exFAT or FAT32. These files systems support read and write directly on both Windows and Mac machines.
Before you formatting (or Erasing in Mac term), you need to back up the NTFS drive on Windows first if there are important files. The erasing process on Mac will remove everything on the drive. Then you can follow the steps below to erase (format) the NTFS drive to exFAT or FAT32 on macOS Catalina:
Step 1. Open Disk Utility: Navigate to Applications > Utilities and open Disk Utility ![]() .
.
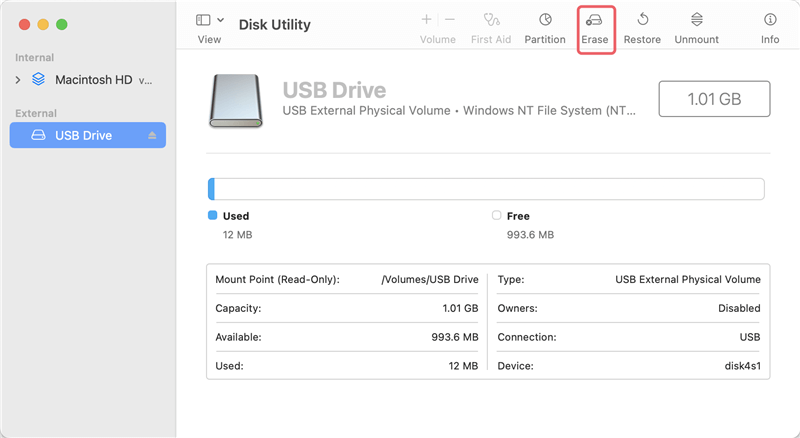
Step 2. Select the NTFS drive and click the button Erase ![]() .
.
Step 3. You will see a popup window. In the format drop-down list, select either exFAT for large file support or MS-DOS (FAT) which is FAT32.
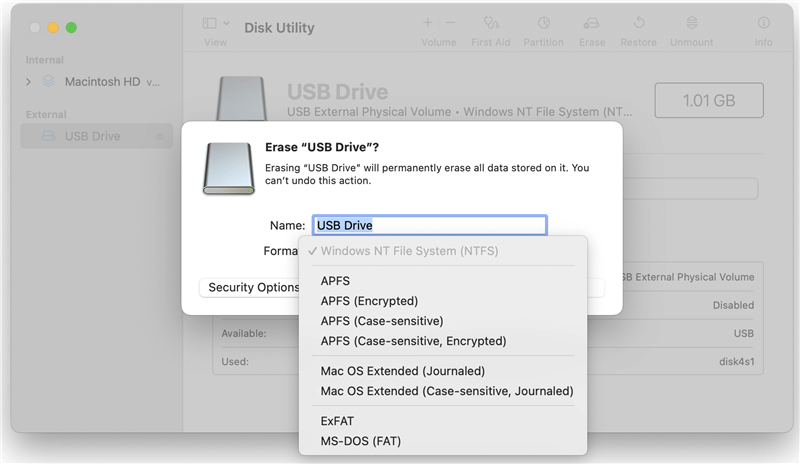
Step 4. Optionally, enter a new name for the drive if necessary. Click on the button Erase to start the reformatting process. After the process is done, the drive will be compatible with both macOS and Windows. You can write data to the drive in both operating systems without a problem.
If you don't want to format the drive to another file system to keep high performance on Windows, or don't have another drive to back up the data on the NTFS drive, there is still another way to accomplish the task. With a third-party software, you can enable writable permission for NTFS on macOS Catalina without affect the files on the drive. Then you can go ahead and find the workaround as follows.
Method 3: Using Third-Party NTFS Drivers [Highly Recommended💯]
Third-party NTFS drivers are among the best ways to access full read and write NTFS drives on macOS Catalina. The goal of these drivers is to make it possible to work with NTFS formatted drives in the same way you would with native macOS file systems. DoYourData NTFS for Mac is the most well-known third-party NTFS drivers.
You can also use DoYourData NTFS for Mac to make NTFS write support work on macOS Catalina. This stable and easy-to-use program simplifies giving macOS Catalina users full read and write access to NTFS files. You can easily handle your NTFS drives with this software because it works well with macOS.
Key features of DoYourData NTFS for Mac include:
- Full read and write access: There are no limits on what you can read or write on NTFS drives with DoYourData NTFS for Mac.
- Quick and easy setup: The software is simple and doesn't need much setup, so it's a good choice for people who want an easy time. its design is simple enough that people of all technical levels can use it.
- User-friendly interface: The software works well with macOS, and the interface is simple enough that it's not hard to use to manage your NTFS drives.
- Full NTFS compatibility: DoYourData NTFS for Mac allows you to read and write to NTFS drives and change, delete, and create files on NTFS volumes from your Mac. It can also format drive with NTFS file system directly on Mac.
- High-speed performance: The software is designed to be fast, so moving files between your Mac and NTFS drives is quick and easy.
- Seamless integration with macOS: Once they are set up, NTFS drives appear in Finder like any other drive, making it simple to handle your files.
Once the software is installed, whenever you connect an NTFS drive to your Mac, it will instantly mount it so that you can read and write to it directly without always to open the software each time.
You can refer to the steps below to enable write permission for NTFS drives on macOS Catalina:
Step 1. Download and install the software on your macOS Catalina computer. Ensure to connect the NTFS drive to the computer.
Step 2. Run the software DoYourData NTFS for Mac. Select the NTFS drive and click on the button Enable Writable. Then your NTFS drive will be writable on macOS Catalina.

That's very simple to enable write permission for NTFS on macOS Catalina. Also, the software can also format a drive to NTFS on macOS Catalina. The software can also support the later versions of macOS, including the latest macOS Tahoe.
Conclusion
In conclusion, handling NTFS drives on macOS Catalina can go smoothly with the right NTFS for macOS Catalina tools and know-how. Third-party drivers like DoYourData NTFS for Mac, or Terminal commands can help you get around the read-only restrictions on your NTFS drives and give you full power over them.
You can choose the best way for you based on your level of technical knowledge and your needs. Follow this guide, and you'll be able to work without any problems between systems. No more worrying about whether or not files will work.
FAQs About NTFS for macOS Catalina
1. Is it possible to read and write NTFS drive on macOS Catalina?
It's able to read or copy files from NTFS drive on macOS Catalina and other Mac operating systems. However, it's not able to write to NTFS drive on Mac directly. If you want to modify files or write data to NTFS drive, you need to enable writable permission on macOS Catalina first.
2. Enable NTFS driver for macOS Catalina with Terminal.
If you are familiar with command and Terminal, you can try this method:
- Open Terminal from Applications > Utilities.
- Enter the command sudo nano /etc/fstab and enter your password.
- Then enter the command Lable=Test none ntfs rw,auto,nobrowse, replace the Test with your own drive lable (name).
- Open Finder, click on Go from the top menu bar and choose Go to Folder.
- Enter /Volumes/ to list all the drive.
- Open and access your NTFS drive directly.
3. How to enable writable permission for NTFS on macOS Catalina with easy way?
The easiest way to enable writable permission for NTFS on macOS Catalina is using the third-party software DoYourData NTFS for Mac. Here is how:
- Download and install the software on your macOS Catalina Mac.
- Connect the NTFS drive to the Mac.
- Run the software from launchpad.
- Select the NTFS drive in the software and click Enable Writable.
4. Can I format a drive which can read and write directly on both Windows and Mac?
Yes, both exFAT and FAT32 drives can be readable and writable on both Windows and Mac directly without limitation. You can format a drive to exFAT or FAT32 with Disk Utility:
- Open Disk Utility from Applications > Utilities.
- Select the drive which you want to format and click Erase button at the top toolbar of Disk Utility.
- Select the Format as exFAT or FAT32, change name if you want. Then click the Erase button to format it.
DoYourData NTFS for Mac
DoYourData NTFS for Mac is a safe, powerful and easy-to-use NTFS for Mac tool. It allows macOS to read & write files on NTFS drives without any limitation. It is also a comprehensive disk management tool for Mac to mount/unmount disk, format disk, repair disk, read-write disk...on Mac.
Written & Updated by Ricky Lin
Ricky Lin is an senior editor of DoYourData who lives in Adelaide, Australia. He is interested in writing technology articles related with data recovery, computer issue fixes, disk clone, iPhone data recovery, video edit, Mac optimization, etc. He Joined DoYourData in 2019 and have written 500+ articles to help both Windows users and Mac users to solve data or computer problems.
Hot Articles
- Fix External Hard Drive Read-Only Issue on Mac
- How to Wipe Trash Bin on Mac?
- Recover Lost Data from WD (Western Digital) External Hard Drive on Mac
- Fix External Hard Drive Not Showing Up on Mac
- How to Wipe SD Card on Mac?
- Mount and Unmount the External Hard Drive on the Mac
- Run First Aid on Mac to Repair Disks
- Fix Can't Save Files to An External Hard Drive on Mac
- (Solved) External SSD Not Detected in Disk Utility on Mac
- Why Can't Format A Hard Drive To NTFS on Mac? Can We Fix It?