Quick Navigation:
- Can You Read NTFS on Mac?
- How to Enable Writable Access for NTFS on Mac?
- Fixing NTFS Drive Problems on macOS
- Final Thought
- FAQs About Read & Write NTFS Drives on Mac
When moving files between macOS and Windows, especially NTFS drives, it's common to question whether the two systems will work together. The file system for Windows is NTFS, which was made by Microsoft and is known for its advanced features for handling big files.

When you add an NTFS drive to a Mac, on the other hand, you might find that macOS can only read the files and not change them or create new ones. People who often move files between the two operating systems may find this limitation annoying. This guide will discuss whether Mac can fully read and write NTFS drives, why this is the case, and the different ways to make macOS fully support NTFS drives.
Can You Read NTFS on Mac?
The answer is Yes. You can read NTFS drives and copy the files from NTFS drives on Mac. However, because NTFS is a Microsoft-only technology, companies besides Microsoft must buy a license to include it in their operating systems.
Apple did not allow a license for NTFS at this time. Macs use an NTFS version that can only be read, built on top of the FreeBSD one. There have been efforts to add NTFS permissions to Mac, but the work was never finished and was still buggy, causing errors and kernel panics.
🔹 Is it possible to make NTFS drive writable on Mac?
Actually, there are still some solutions to make NTFS drives writable on Mac. For example, you can use third-party NTFS driver for Mac. If you are an advanced user, you can also enable the NTFS writable access on Mac with commands in Terminal.
Or you can just reformat the NTFS drive to another file system which is compatible with macOS, like APFS, HFS+ or exFAT.
How to Enable Writable Access for NTFS on Mac?
There are some solutions to make NTFS drive writable on Mac. Here we will introduce 3 ways to achieve the goal: Using third-party NTFS driver for Mac, enabling NTFS writable permission with Terminal, or just reformat the drive to another file system as the last solution.
🛠️ Use Third-Party NTFS Driver for Mac:
DoYourData NTFS for Mac is great software that lets you change your external device's NTFS file system directly. This tool instantly lets your Mac read and write to an NTFS external drive fully without changing the drive.
DoYourData NTFS for Mac
- Reliable third-party NTFS driver for macOS.
- Enable NTFS writable access fast on Mac.
- Automatically mount NTFS drive as writable.
The software is very easy to use and you can make an NTFS drive writable on Mac with only a few clicks. Then you can have writable access to NTFS drive without repeating the operations each time when connecting the NTFS drive.
Here is a simple guide about how to use the software and enable NTFS writable access on Mac:
Step 1: Download and install the software on your Mac. Start DoYourData NTFS for Mac from launchpad or Applications.
Step 2: Connect an NTFS drive to your Mac. DoYourData NTFS for Mac will find the drive immediately. You can now see that your drive is marked as "Read-only" when you choose it. Click Enable Writable to give the drive the ability to read and write.

💡 Tips: If you are the first time to start the software and try to enable NTFS writable access on Mac, you will be asked to allow the NTFS driver on the machine, you can just follow the onscreen instructions to allow it, for more detailed information, you can refer to the online help.
After successfully enabling the NTFS writable access with DoYourData NTFS for Mac, you can open the NTFS drive to to check, you will find it's able to read, write, and even change saved data on the NTFS drive.
🛠️ Use Terminal to Enable NTFS Write Support on Mac:
If you want NTFS to write on your Mac, use the Terminal, an Apple tool. But it could go wrong if new users type in the wrong order. That could hurt your drive or make you lose info. If you have never used this tool, ensure that write support is turned on the first time. That is not the way you should do things.
Step 1: Click the Finder button in the middle of the screen. From the menu that appears, choose Applications. To run Terminal, click Utilities and pick up the file.
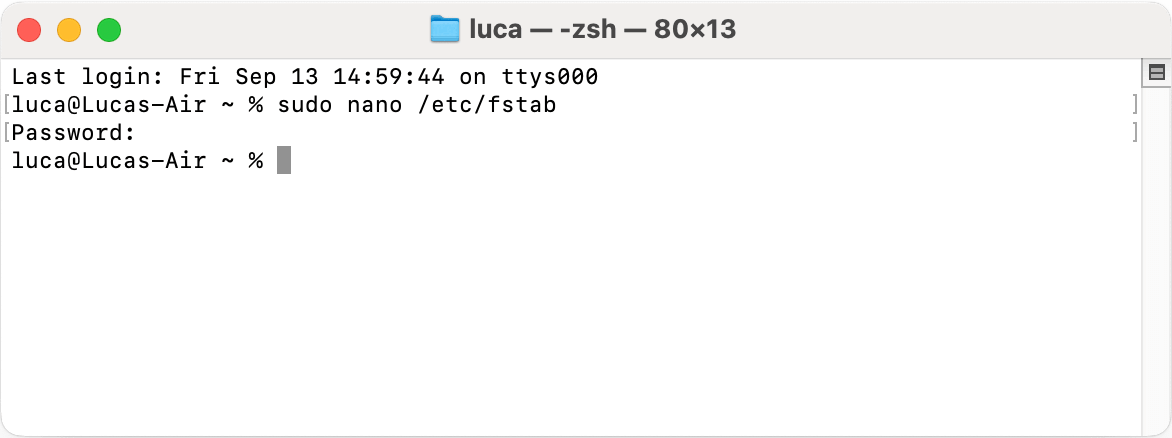
Step 2: Type sudo nano /etc/fstab and press Enter. If asked, enter the password. Your list of NTFS files will be opened when you tell it to.

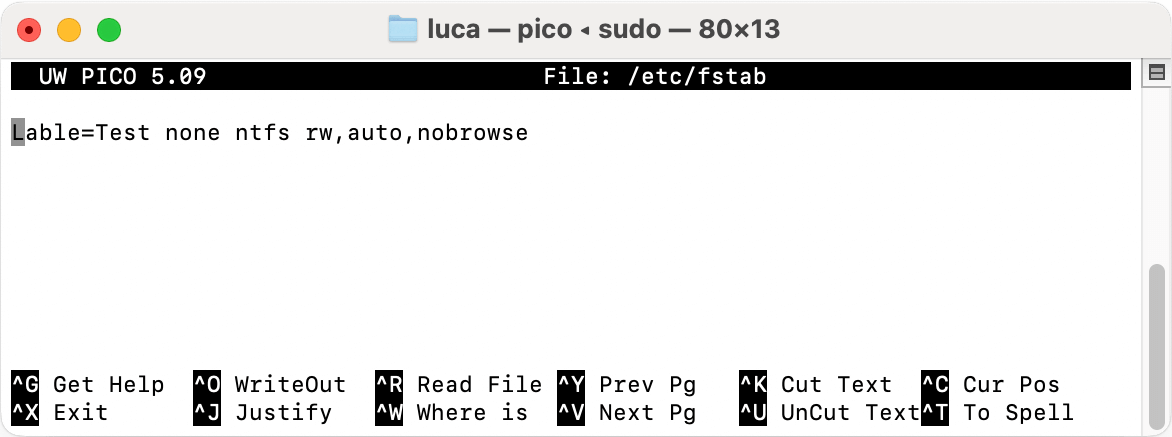
Step 3: Type LABEL=NAME none ntfs rw, auto, nobrowse at the very end of the file. (Write the name of your NTFS drive where NAME is)

Step 4: Press Ctrl + O and Enter to save the change. To leave, press Ctrl + X.
After that, the NTFS writable access is enabled, you can connect your NTFS drive to your Mac and check if you can write or edit files on the drive.
💡 Note: This method is not very stable. It would cause some unexpected issues to the NTFS drive or data on the drive. So ensure to undo the operations to disable the NTFS writable access once you have done the needed operations on the NTFS drive. So it's not a long-term solution for NTFS writable access on Mac.
🛠️ Formatting the NTFS Drive to Another File System:
Another choice is to reformat the drive with a file system that works with macOS and Windows if you don't need to keep the NTFS format. There are two main choices:
- exFAT: exFAT is a file system that works with Windows and macOS. It works with big files and folders, making it a good choice for external drives you need to use with different OSes. NTFS, on the other hand, has more advanced features and better protection than exFAT.
- FAT32: The FAT32 file system is more traditional but works with macOS and Windows. Some of its major flaws are that it can handle files up to 4GB and partitions up to 32GB in size. Most of the time, you shouldn't use FAT32 unless your files are very small.
To reformat a drive with Disk Utility in macOS:
- Use the Disk Utility app, which you can find in Applications > Utilities.
- From the list on the left, pick out your drive, then click on the Erase button.
- Pick either exFAT or FAT32 as the file type.
- To erase the drive, click Erase.
💡 Note: As the formatting process will remove all the files on the drive, ensure to move the files to another drive first to avoid data loss.
Fixing NTFS Drive Problems on macOS
If you use NTFS drives on macOS, you might have problems, even if you use third-party tools or Terminal commands. These are some usual issues and how to fix them:
- NTFS Drive Won't Mount: If Finder doesn't show your NTFS drive, try manually mounting it with Disk Utility. If it still doesn't show up, the drive may be damaged or have hardware problems.
- Read-Only Access Despite Using Third-Party Software: Ensure the third-party NTFS software you installed is up to date and installed properly if you still can't write to the drive after installing it. Also, you might have to restart your Mac or connect the drive again.
- Slow Performance: When using open-source drivers like NTFS-3G, writing to NTFS files on macOS may take longer than on Windows. For better speed, you can buy paid software like DoYourData NTFS for Mac, which is professional can ensure high permission for NTFS drive on Mac.
🔹 Should You Use NTFS on Mac?
You can use NTFS on a Mac, but it's not always the best choice. If you switch between macOS and Windows, you might want to use a cross-platform file system like exFAT to avoid problems. On the other hand, third-party software is the best way to view NTFS drives on macOS without losing the NTFS format.
Final Thought
In conclusion, macOS can read NTFS drives directly but only lets you read them. To read and write fully, use third-party Mac NTFS driver software or try new ways, like Terminal commands. If cross-platform use is necessary, you could also change the drive to a file system that works better with both systems, like exFAT. By learning about these options, you can pick the one that works best for you and ensure that moving files between macOS and Windows runs smoothly.
FAQs About Read & Write NTFS Drives on Mac
1. Is NTFS read & write access supported natively by macOS?
It's able to read data on NTFS drives on Mac. However, the writable access for NTFS drives is not natively supported by macOS.
2. How to make NTFS drive writable on Mac?
There are some applicable solutions to enable NTFS write access on macOS:
- Enable NTFS writable access on Mac with third-party NTFS driver for Mac.
- Using Terminal to make NTFS drive writable on Mac with commands.
- Changing the NTFS drive to another file system which is compatible with macOS.
3. What's the best NTFS driver for Mac and how to use it?
The best NTFS driver for Mac is DoYourData NTFS for Mac. It can enable full read & write access for NTFS on Mac. It's very simple to use the software:
Download and install the software on your Mac.
Connect NTFS drive to the Mac with proper connection cable or adapter.
Run the software from Launchpad.
Select the NTFS drive in the software and click Enable Writable button.
4. Is it safe to use DoYourData NTFS for Mac?
Yes, it's 100% safe to use the software. With reliable NTFS driver for Mac, the software can manage NTFS drives stably without doing harm to the data, drive, and the macOS.

DoYourData NTFS for Mac
DoYourData NTFS for Mac is a safe, powerful and easy-to-use NTFS for Mac tool. It allows macOS to read & write files on NTFS drives without any limitation. It is also a comprehensive disk management tool for Mac to mount/unmount disk, format disk, repair disk, read-write disk...on Mac.
Hot Articles
- Fix External Hard Drive Read-Only Issue on Mac
- How to Wipe Trash Bin on Mac?
- Recover Lost Data from WD (Western Digital) External Hard Drive on Mac
- Fix External Hard Drive Not Showing Up on Mac
- How to Wipe SD Card on Mac?
- Mount and Unmount the External Hard Drive on the Mac
- Run First Aid on Mac to Repair Disks
- Fix Can't Save Files to An External Hard Drive on Mac
- (Solved) External SSD Not Detected in Disk Utility on Mac
- Why Can't Format A Hard Drive To NTFS on Mac? Can We Fix It?