Home > Hard Drive Solutions for Mac
How to Enable NTFS Support on Mac?
The best way to enable NTFS support on Mac is to install an NTFS for Mac tool. DoYourData NTFS for Mac is an easy-to-use NTFS for Mac. Download and install it on your Mac, then click Enable Writable for NTFS drives on Mac. Then you can use an NTFS hard drive as a local hard drive without any limitation. Download and install this best Mac NTFS driver tool on your Mac.
![]() Updated by Justin Kenny on December 22, 2025
Updated by Justin Kenny on December 22, 2025
Quick Navigation:
- Enable NTFS to Write Support on Mac
- Why NTFS Is Better than Other File Systems?
- FAQs about Enabling NTFS Support on Mac
- Conclusion
The rules and data that make up a file system represent a library where all information is kept in its proper place. The file system allows for uncomplicated access to all of the system's data.
Numerous file systems exist, each designed to meet a specific requirement. The NTFS file system is considered by many to be the best of its kind. Although this file system sees widespread use, not all operating systems can completely support it. As an illustration, consider Mac OS. NFTS is read-only for Mac operating system. If you want to get NTFS write permission on Mac, you'd better enable NTFS support on the Mac.
You can try three methods to enable NTFS to write capability on macOS: formatting your NTFS drive as a Mac-compatible file system, with the Terminal app's help, or addding NTFS driver on Mac with a third-party NTFS for Mac solution like DoYourData NTFS for Mac. Now that we've established that let's dive into how to enable NTFS to write capability and add NTFS support on a Mac.
Enable NTFS to Write Support on Mac
DoYourData NTFS for Mac bridges macOS and the NTFS file system, solving the NTFS write problem between the two. Files on Microsoft NTFS can be edited, copied, relocated, and deleted with the help of this program. DoYourData NTFS for Mac is a Microsoft NTFS writer that is simple to use and perfect for newcomers. This application is compatible with Macs running Apple Silicon (M5, M4...), and Intel Macs.
The ability to quickly and easily enable Mac writing to NTFS is a major benefit of the DoYourData NTFS for Mac program. The data may be transferred quickly and without any mistakes with the DoYourData NTFS for Mac application. It's packed with high-end extras like automount, volume management, and more.
Here's how to turn on read/write access with DoYourData NTFS for Mac.
Step 1. Download and install DoYourData NTFS for Mac, then open it.
DoYourData NTFS for Mac
- Best and Most reliable NTFS for Mac driver software.
- Make NTFS drives writable on macOS Tahoe and other systems.
- Easy-to-use and will not affect the drive performance.
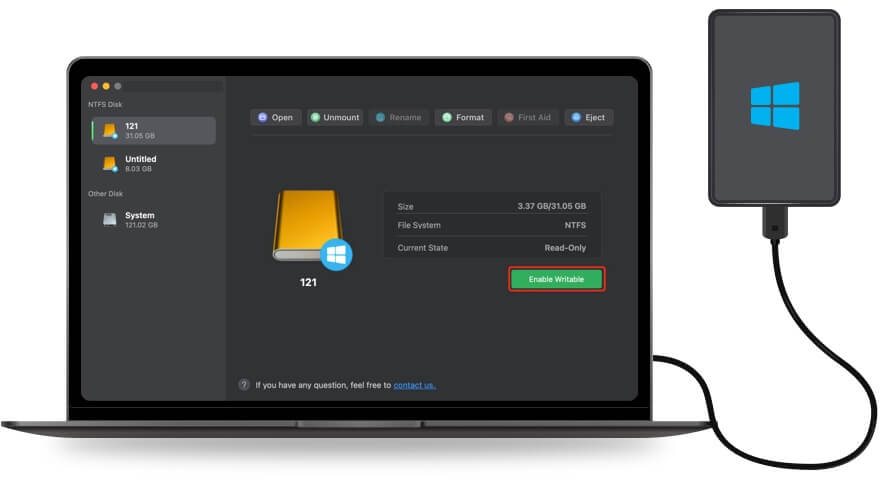
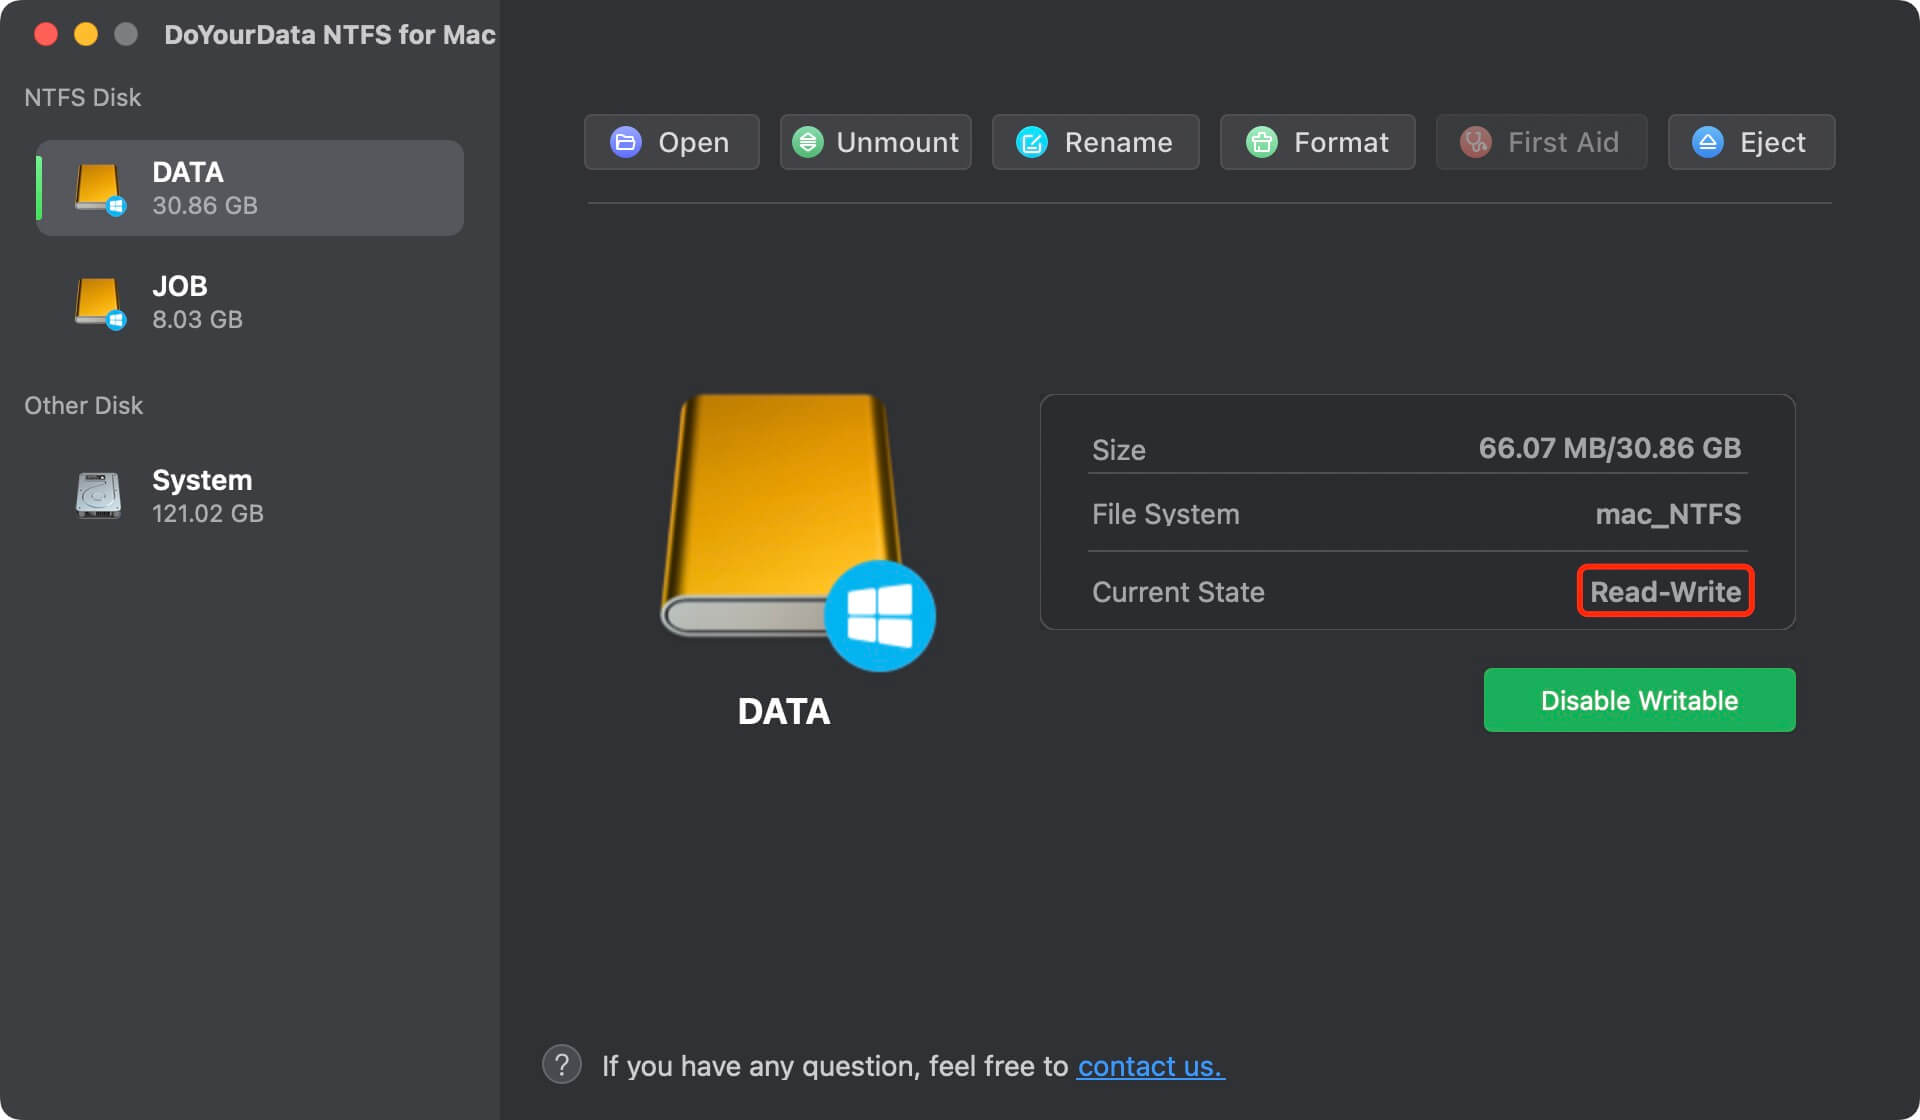
Step 2. Connect an NTFS drive to your Mac. On the main interface of DoYourData NTFS for Mac, you will see the NTFS drive, then click Enable Writable to add NTFS support on your Mac.

After enabling NTFS support on Mac, the NTFS drives will become be Read-Write.
Why Choose DoYourData NTFS for Mac?
Three methods are generally accepted for granting Mac users complete read/write access to NTFS drives. Free NTFS drivers; installing open-source NTFS drivers can be a hassle as it requires expert knowledge of the command lines in the Terminal window; You can also choose the easy-to-use paid NTFS for Mac software.
Commercial NTFS drivers are available for purchase and are quite user-friendly. You don't even need to know what a command line is. Apple's NTFS write functionality is experimental and thus disabled by default. Mac OS's NTFS write capability is currently in beta. It is not a stable approach to enable NTFS to write support in macOS and may cause damage to NTFS volumes.
Third-party NTFS for Mac software is one of the easiest ways to enable NTFS support on Mac. Numerous third-party programs exist to assist you in having your Mac write NTFS drives. One of the most popular tools for Mac users who need to write to NTFS drives is DoYourData NTFS for Mac.
Why NTFS Is Better than Other File Systems?
Microsoft's proprietary NTFS (New Technology File System) file system. After Windows NT 3.1, when it superseded the FAT file system, it became Windows' default file system.
When comparing NTFS (now NTFS 3.1) to FAT, its benefits become immediately apparent. For instance:
- The NTFS file system improves security by enabling users to set permissions on individual files.
- The amount of usable space on a drive can be increased through compression.
- The data can be encrypted to prevent unauthorized access.
- The corruption rate does not increase with disk size, and it works well with files and partitions greater than 4 GB. Journaling is a feature of NTFS that records changes made to and deletions of files on a storage medium. This feature can be invaluable when data needs to be retrieved from the drive.
Despite its many advantages on Windows systems, the NTFS file system is not fully compatible with macOS. Can this divide be bridged without requiring NTFS drives to be reformatted? To put it simply, yes. Fixing the compatibility issue by enabling NTFS write support on Mac is possible.
FAQs about enabling NTFS support on Mac
- Plug the NTFS drive into your Mac.
- Type sudo nano /etc/fstab and press return.
- Type LABEL=NAME none ntfs rw, auto, nobrowse, and press Return. Replace "NAME" with the name of the NTFS drive on your Mac.
- Press Control + O > Control + X on Mac keyboard. In Finder, click Go > Go to Folder > Type: /Volumes, and click "Go". Replace Name with the label of your NTFS drive.
- Open Disk Utility and connect the NTFS drive to your Mac.
- Click on Erase button.
- Select ExFAT as the file system.
- Click Erase.
- When it gets finished, click on Done button.
- DoYourData NTFS for Mac
- Donemax NTFS for Mac
- Paragon NTFS for Mac
- iBoysoft NTFS for Mac
- Mounty
Conclusion:
The NTFS drive read-only problem on Mac can be resolved using NTFS for Mac driver. The simplest option to add NTFS support on Mac is to use NTFS for Mac software. You may get software online that allows your Mac to read and write to NTFS volumes. However, the Mac with Apple silicon can use a select group of software options. One reliable piece of software is DoYourData NTFS for Mac.
DoYourData NTFS for Mac
DoYourData NTFS for Mac is a safe, powerful and easy-to-use NTFS for Mac tool. It allows macOS to read & write files on NTFS drives without any limitation. It is also a comprehensive disk management tool for Mac to mount/unmount disk, format disk, repair disk, read-write disk...on Mac.
Written & Updated by Justin Kenny
Justin Kenny is a writer & editor of DoYourData. He joined DoYourData in 2016 and focuses on writing articles about Windows data recovery, Mac data recovery, external device data recovery, hard drive clone, data erasure, Mac cleanup, computer issue fixes, etc. He is a super fan of Apple devices and is big on testing new digital device and system utility software.