
Create A Full Bootable Clone for Mac
Donemax Disk Clone can clone everything from the Mac SSD to the external hard drive and make a full bootable clone.
To reformat the internal SSD of your Mac, just start it into macOS Recovery mode, then use Disk Utility to format it to APFS or Mac OS Extended. If you are planning to sell or donate your Mac, you also need to permanently wipe all deleted/lost data from the SSD. Then install DoYourData Super Eraser, then choose Wipe Free Space mode to help wipe free disk space of the internal SSD, erasing all deleted/lost data.
![]() Updated by Shirly Chen on May 25, 2024
Updated by Shirly Chen on May 25, 2024
Quick Navigation:
Managing the space on your Mac may seem like a difficult job in the world of technology. Don't worry, though! Learning to format the Solid State Drive (SSD) inside your Mac is easier than you think. When you format your SSD, clean it up and prepare it. It's like starting over. Knowing this is important because it can make your Mac run faster and protect your files.
Here is a simple guide showing you how to format the internal SSD on your Mac. We'll talk about everything, from making a copy of your data to picking the right file and then formatting itself. After reading this guide, you can handle your Mac's files like a pro! Let's get your SSD in great shape.

When you format your drive, all of its info is erased for good. Before moving forward, think about these things:
It is very important to back up all of your important info on your SSD before you do any formatting. Everything on the drive will be erased when you format it, so make copies of any files, papers, or programs you want to keep. You can use Time Machine, iCloud, or portable hard drives to make backups.
Create A Full Bootable Clone for Mac
Donemax Disk Clone can clone everything from the Mac SSD to the external hard drive and make a full bootable clone.
It may take a while to format and reinstall macOS, based on how big your backup is and how fast your internet is (if you wish to download macOS).
Most of the time, you must be online to download the latest macOS version before reinstalling it.
After you've saved a copy of your data and checked to see if you can connect to the internet, do the following:
You'll need to choose a file system that works for you when you format your SSD. Apple File System (APFS) is the default file system for macOS. It is designed to work best with solid-state drives (SSDs) and offers features like native encryption, snapshot support, and faster speed.
You could choose the older HFS+ (Mac OS Extended) or even exFAT for cross-platform compatibility if you need to work with older Macs or Windows PCs.
You've backed up your info and picked the right file system. Now, it's time to format your SSD.
Step 1. Access Disk Utility.
Press Command + Space to open Spotlight Search. Type "Disk Utility" and hit "Enter."
Step 2. Select Your SSD.
Use Disk Utility to find your internal SSD. It should be on the list of drives on the left.
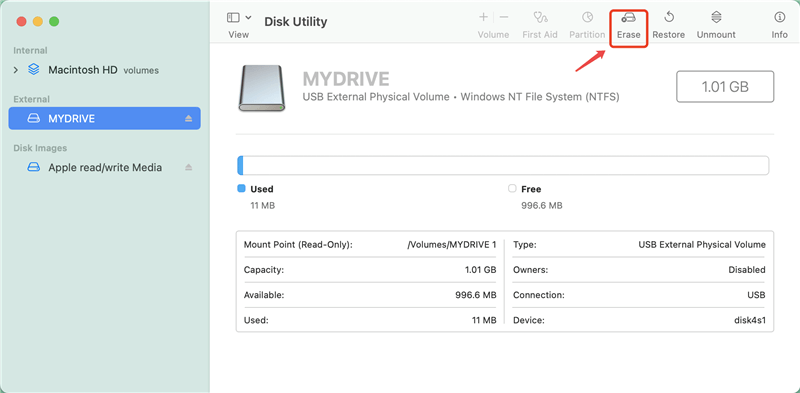
Step 3. Erase the SSD.
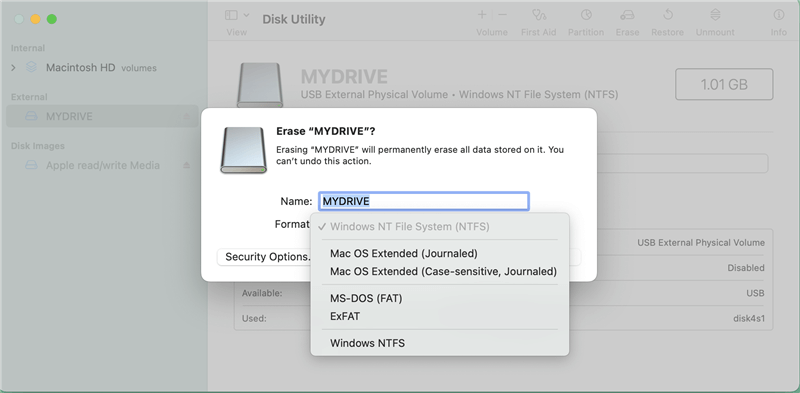
At the top of the Disk Utility, click the "Erase" button. A box asking you to give your SSD a name, size, and scheme will pop up.
Select the Format and Scheme you want. From the dropdown menu, choose the file system you want, such as APFS, HFS+, or exFAT. Choose APFS for the best speed if you're formatting the SSD so it can only be used with macOS. Choose HFS+ or exFAT, depending on whether you want to use it with older Macs or Windows PCs. After that, pick the partition method. On newer Macs, this is usually a GUID Partition Map.
Step 4. Name Your SSD.
In the Name field, give your SSD a name. Pick a name that tells you something about the drive that will make it easy to find.
Step 5. Begin Formatting.
Once the format and scheme choices are set, click the "Erase" button to start the formatting process. Disk Utility will let you know that all of the files on the SSD will be deleted. To be sure of your choice, click "Erase" again.
Step 6. Wait for Completion.
The formatting process may take some time, depending on the size of your SSD. Disk Utility will show a proof message when it's done.
Step 7. Exit Disk Utility.
When the formatting process is complete, close Disk Utility. Now that your SSD has been cleaned, you can use it.
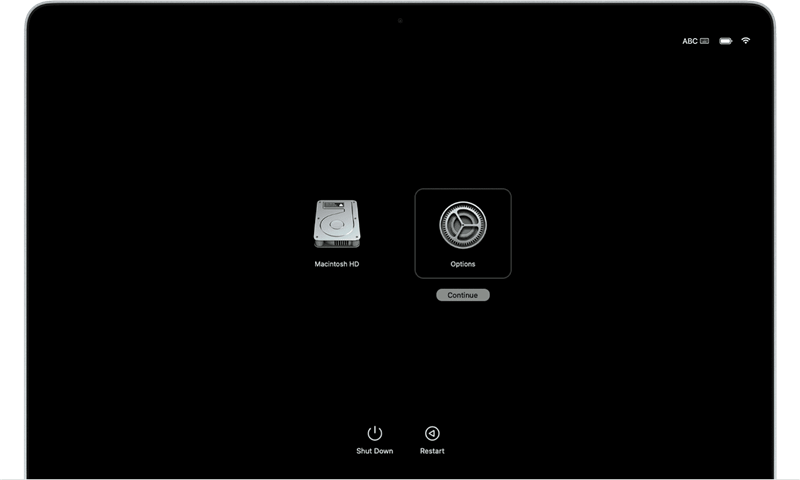
Step 1. Boot Into macOS Recovery Mode.
Restart your Mac, then press and hold Power button (if you are using an Intel-based Mac, press and hold Command+R) until it boots into macOS Recovery mode. Choose Options, then click on Continue button.
Step 2. Open Disk Utility in macOS Recovery.
Choose Disk Utility, then click Continue, you will see Disk Utility.
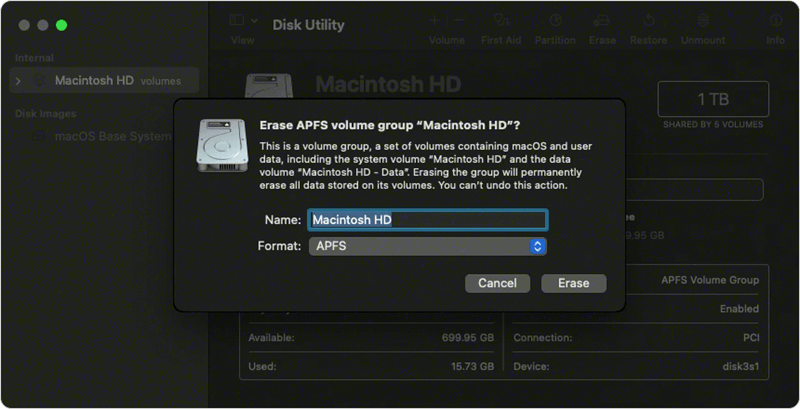
Step 3. Format the Startup Disk.
Just select the internal SSD (the startup disk), then click on Erase button. Select a file system such as APFS, then click on Erase button again to format the internal SSD.
Once the process gets finished, click on Done button. Then close Disk Utility and go back to Utilities window.
Step 4. Reinstall macOS.
Choose Reinstall macOS...then follow the onscreen instructions to reinstall operating system on the Mac.
There are a few more things you might want to do with your SSD after formatting it to get the most out of its speed and features:
If you have lost data due to formatting your SSD and don’t have a backup, you can use a data recovery application to help you get the deleted/formatted data back!
Step 1. Download and install the reliable Mac data recovery software - Do Your Data Recovery for Mac. This Mac data recovery software is able to find all lost files from the erased or formatted SSD.
Step 2. Open Do Your Data Recovery for Mac, then select the internal SSD to start data recovery.

Step 3. Click on Scan button, then it will deeply scan the formatted internal SSD and find all lost files.

Step 4. You can look at the files immediately after the info appears on the screen. You can choose as many files as you want and see what they look like. Press the "Recover" button to recover the files to your disk.

To prevent the data on your Mac from being recovered by data recovery software, just use a data erasure app to wipe the data permanently.
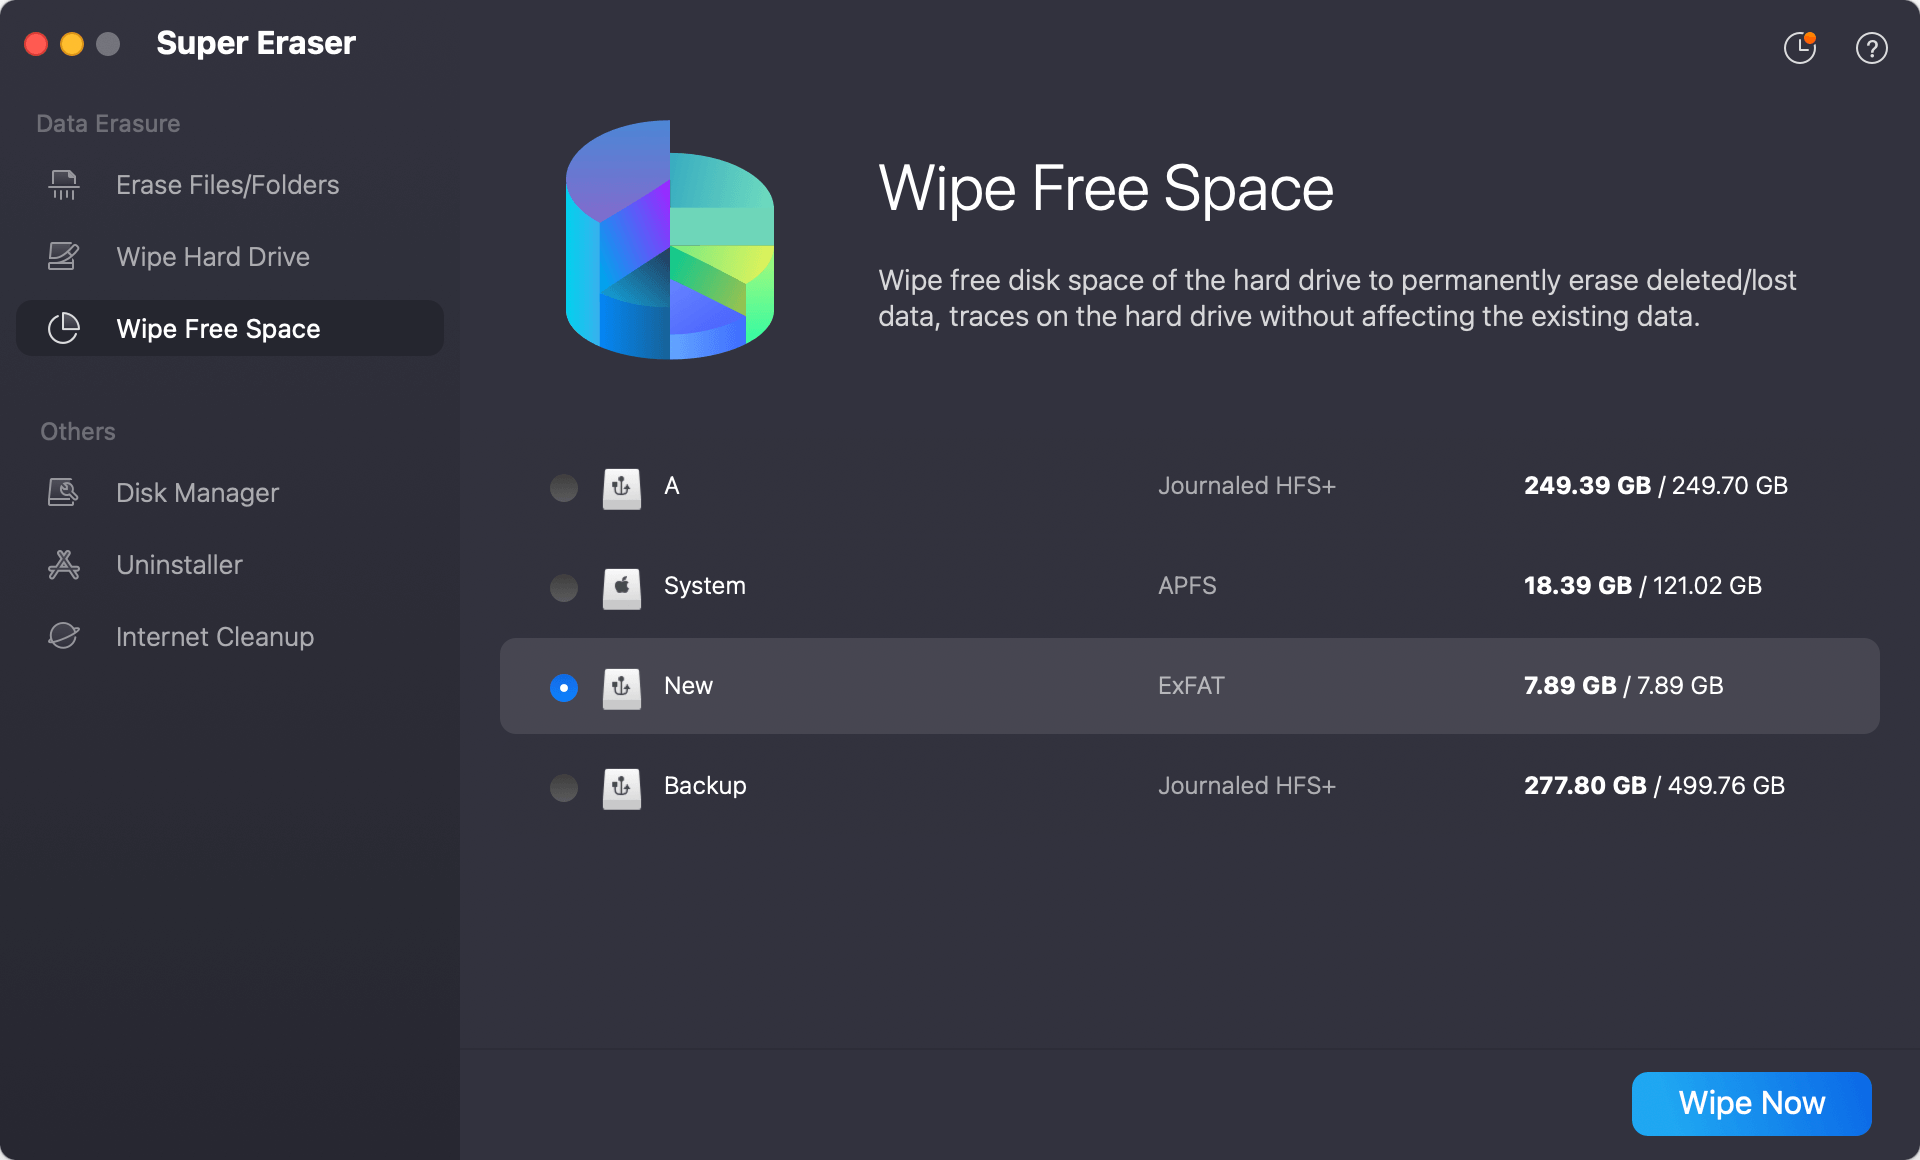
Step 1. Download and install DoYourData Super Eraser for Mac - the best Mac data erasure software.
Step 2. Open DoYourData Super Eraser for Mac, then choose Wipe Free Space mode, select the internal SSD, click on Wipe Now button. It will wipe free disk space of the internal SSD and permanently erase all deleted/lost data.
Formatting the internal SSD in your Mac is a simple process that can make it run faster, keep your files organized, and keep your data safe. You can ensure that your SSD works best for you by following the steps in this guide and thinking about what to do after formatting it.
Please make a copy of your data before you format it, and make sure you pick the right file system for your needs. Ensuring your SSD is clean and cleared correctly will run faster and give you peace of mind that your data is safe.
1. How to format internal SSD on Mac?
First of all, boot your Mac into macOS Recovery mode, then select Disk Utility and erase the internal SSD by clicking on Erase button.
If you want to permanently erase all data from the internal SSD, just use DoYourData Super Eraser for Mac to help you securely and permanently erase all data.
2. How to recover lost data after formatting Mac SSD?
3. How to wipe external SSD on Mac?
4. What is best Mac SSD wipe software?
Here is the list of top 5 disk wipe software for Mac:

DoYourData Super Eraser for Mac
DoYourData Super Eraser for Mac is a 100% safe, powerful and easy-to-use data erasure program. It offers certified data erasure standards including Peter Gutmann, U.S. Army AR380-19, DoD 5220.22-M ECE to permanently erase data from Macs and external devices, making data recovery be impossible.
Written & Updated by Shirly Chen
Shirly Chen has been writing data recovery, data erasure articles for DoYourData over 4 years. She has been working as a professional website content writer & editor for quite a long time. She also writes articles about disk clone, Mac optimization, disk backup, etc.