MacBook Disk Wipe Solution: Delete Everything from Your MacBook
Log out of your accounts and then enter into macOS Recovery mode to use Disk Utility to wipe your MacBook's disk. You also need to permanently erase all your private data before you sell or donate your MacBook. DoYourData Super Eraser for Mac can help you securely and permanently wipe data from your MacBook, leaving no trace for data recovery.
![]() Updated by Shirly Chen on March 9, 2024
Updated by Shirly Chen on March 9, 2024
Quick Navigation:
- Why Wipe Your MacBook's Disk?
- Make A Backup Before Wiping MacBook's Disk
- Steps to Wipe MacBook Disk
- Permanently Erase Data from MacBook
- Conclusion
- FAQs About MacBook Disk Wipe
Are you getting ready to say goodbye to your beloved MacBook? You might be getting a newer, better model or giving it to someone else. No matter the reason, you need to safely wipe your MacBook's disk before you can make the switch without any worries.
Protecting sensitive information is a must in today's digital world. But the process doesn't have to be scary. This easy-to-follow guide will show you a quick and easy way to ensure all your private data is deleted from your MacBook's hard drive.
We're here to help you every step of the way, from saving your essential files to navigating Disk Utility. After reading this guide, you can say goodbye to your MacBook without worrying about privacy. Let's start this journey to keep your info safe together.

Why Wipe Your MacBook's Disk?
For safety and protection of your personal information, you must wipe your MacBook's disk. It's hazardous to leave your data on the disk when you get a new MacBook, sell the old one, or give it to someone else. Without proper wiping, people who aren't supposed to have access could see private papers, financial records, login information, and browsing history.
By safely wiping your MacBook's disk, you lower the chance of identity theft, scams, and people accessing your personal information without your permission. In addition, wiping the disk ensures that you follow data protection laws and maintain high standards for data privacy.
Make A Backup Before Wiping MacBook's Disk
It is essential to back up any critical data you want to keep before you start the disk wipe process. You can ensure your files are safe somewhere else by using Apple's Time Machine or a cloud storage service like iCloud or Dropbox.
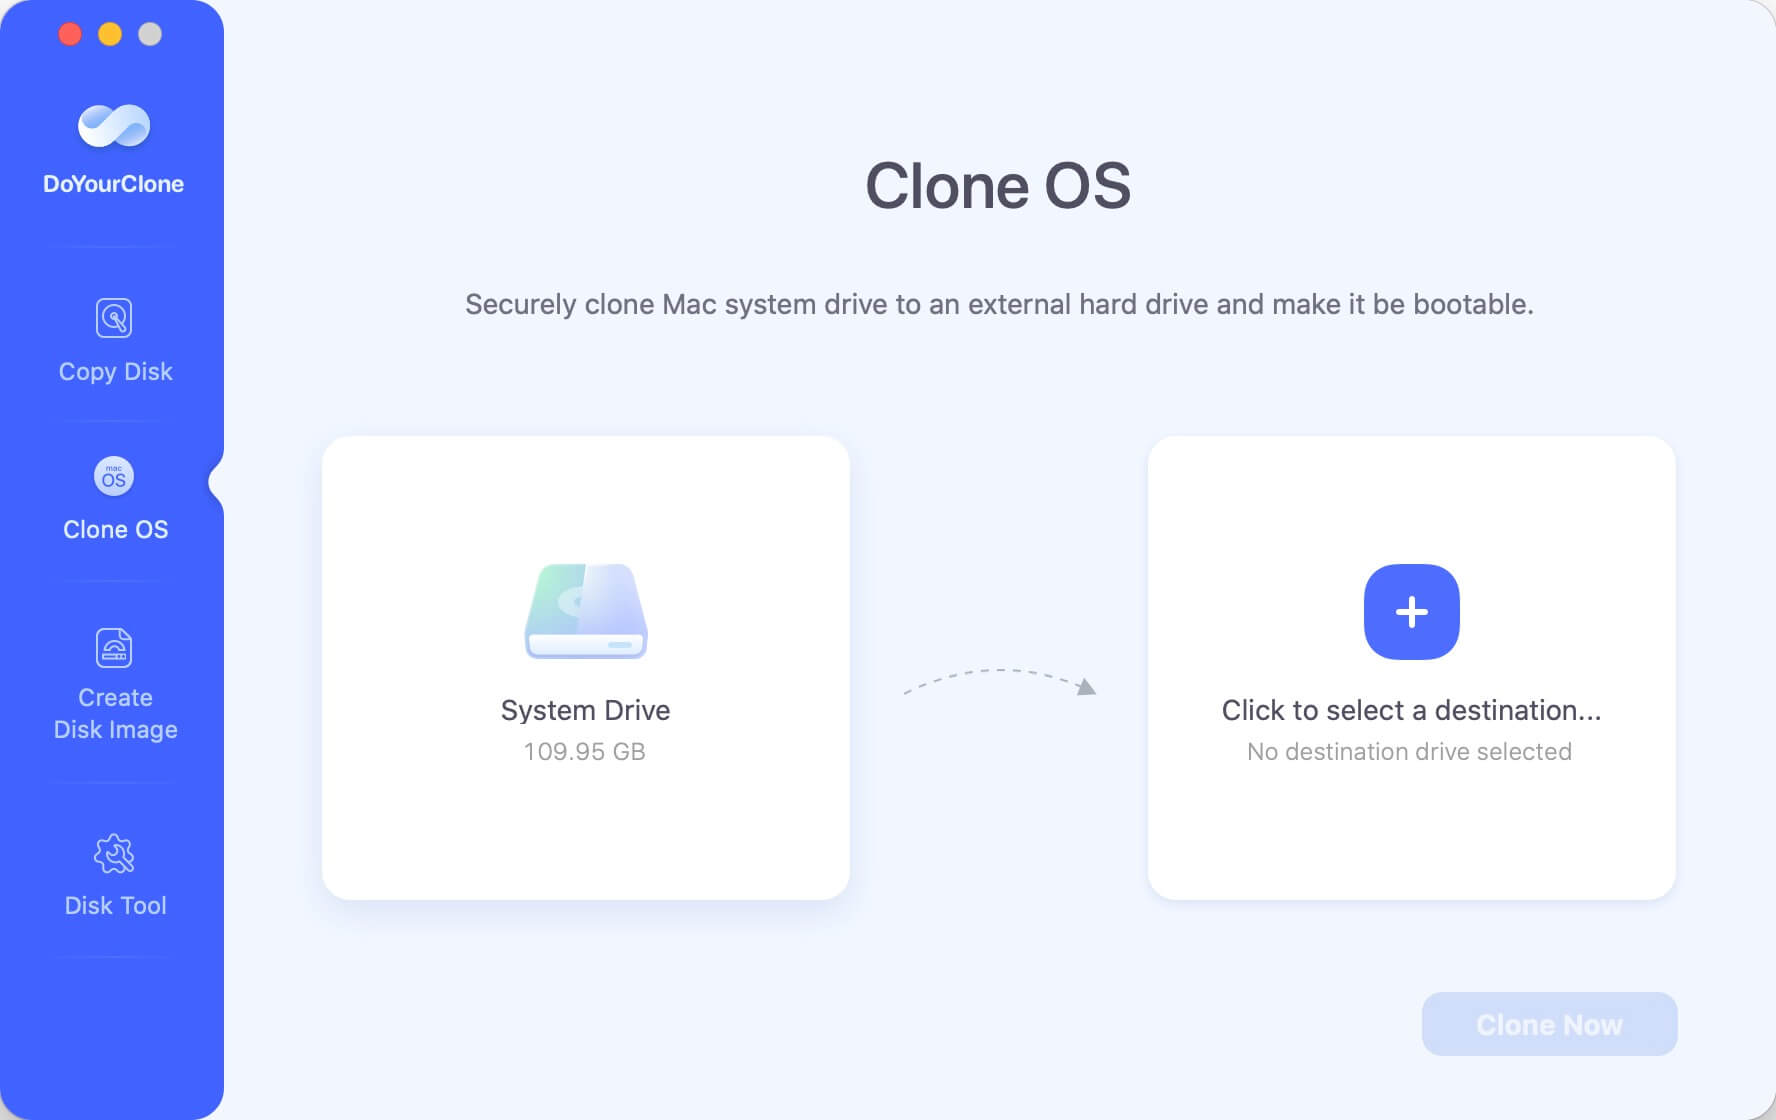
Here, we introduce another way to back up your MacBook - make a full bootable clone with Disk Clone app.
Step 1. Download and install the reliable Mac disk clone app - DoYourClone for Mac.
Step 2. Connect an external hard drive to your MacBook, then open DoYourClone for Mac, choose Clone OS mode. This mode will clone all data from the MacBook to the external hard drive, and make a bootable clone backup.
Steps to Wipe MacBook Disk
1. Disconnect iCloud and Other Accounts
It is very important to disconnect the MacBook from iCloud and any other accounts. To do so, go to System Preferences/System Settings > Apple ID and sign out of iCloud, iTunes, the App Store, and any other linked services.
2. Deauthorize Apps
If you bought anything from the Mac App Store or iTunes, ensure these sites don't have access to your MacBook. This step keeps your purchased material from having licensing problems on other devices.
3. Turn off Find My
By turning off "Find My," you can be sure your MacBook will not be linked to your Apple ID after the wipe. Please turn it off by going to System Preferences/System Settings > iCloud > Find My.
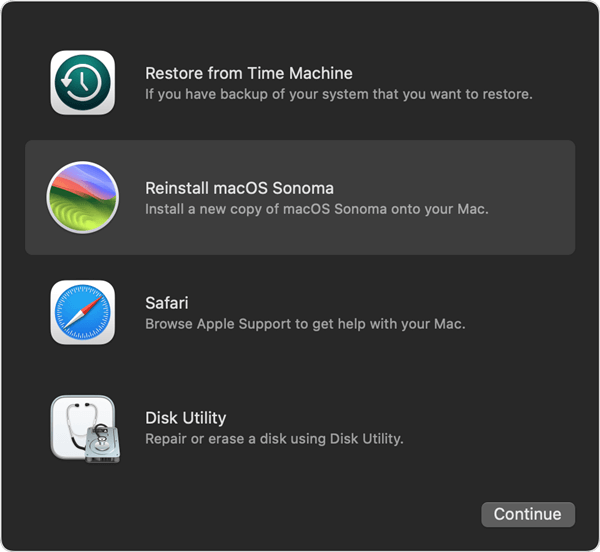
4. Start-Up In Recovery Mode
To enter Recovery Mode, restart your MacBook:
For Intel-based Mac: press and hold down Command + R while it starts up. From this page, you can access Disk Utility and other tools to control your disks.
For Apple silicon Mac: press and hold Power button until you see macOS Recovery interface, select Options and click on Continue button. Then you will see the utilities window, choose Disk Utility.
5. Click Erase
Select the internal disk on your MacBook in Disk Utility and click the "Erase" button. Pick the correct format (most of the time, APFS or Mac OS Extended) and rename your disk if you want to. Click "Erase" to start wiping the disk.
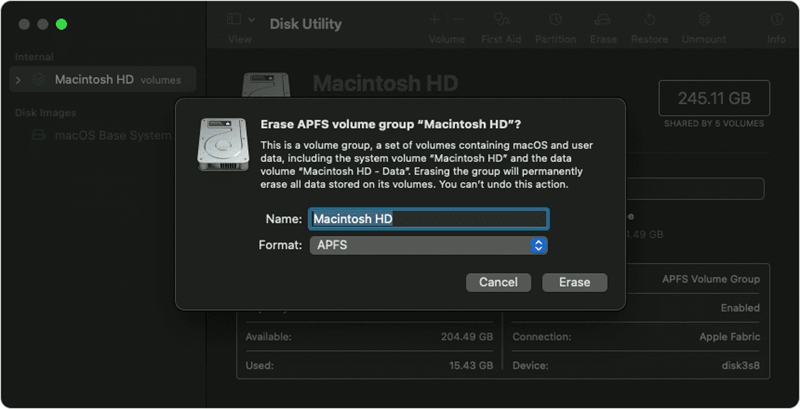
6. Erase the Disk Safely
For extra safety, you might use Disk Utility's "Security Options" to erase your disk safely. If you choose this choice, your data will be erased several times, making it almost impossible to return. Pick the security level you want (like "Overwrite with zeroes" or "7-pass erase") and then start the erase process.
7. Reinstall macOS
When the disk wipe is done, close Disk Utility and go back to utilities window to choose "Reinstall macOS." To update the operating system on your MacBook's newly cleaned disk, follow the steps on the screen.
8. Verify the Wipe
It's essential to ensure that your MacBook is working correctly and that all your data has been deleted after restarting macOS. Check to see if your personal information is still there, and if it is, do a final factory restart.
Note: The data which is erased by Disk Utility is not forever and can be recovered by data recovery software.
Permanently Erase Data from MacBook
Before selling or donating your old MacBook, you should make sure all private data of you is erased and is unrecoverable. Mac data erasure software can help in permanently erasing data with certified data erasure standards.
DoYourData Super Eraser for Mac is a powerful Mac data erasure application. It offers multiple overwriting erasure standards including Peter Gutmann, U.S. Army AR380-19, DoD 5220.22-M ECE to help wipe data permanently.
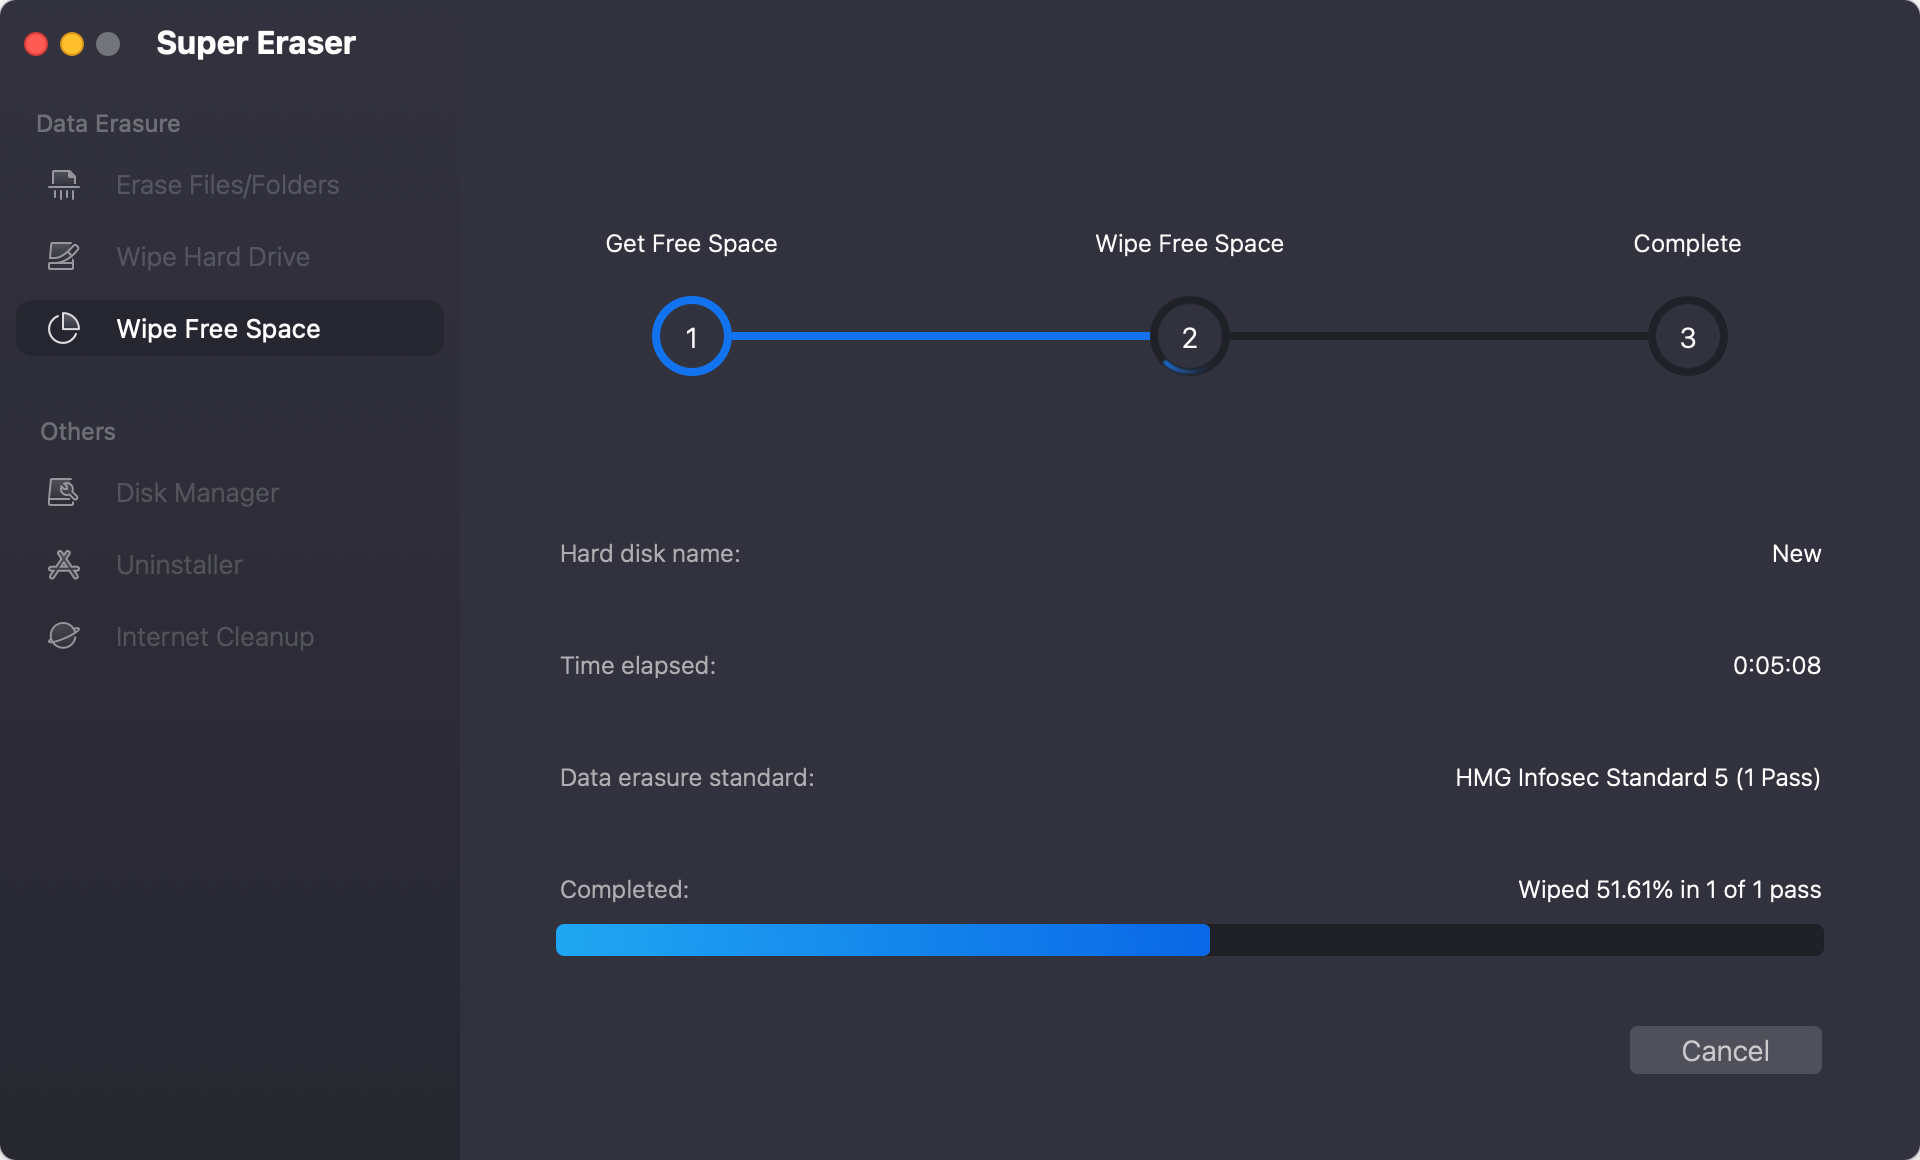
After wiping disk with Disk Utility, you can use Wipe Free Space mode to permanently erase all deleted/erased/lost data on your MacBook, make data be unrecoverable.
Step 1. Download and install DoYourData Super Eraser on your MacBook after factory reset.
Step 2. Open DoYourData Super Eraser for Mac, choose Wipe Free Space mode.
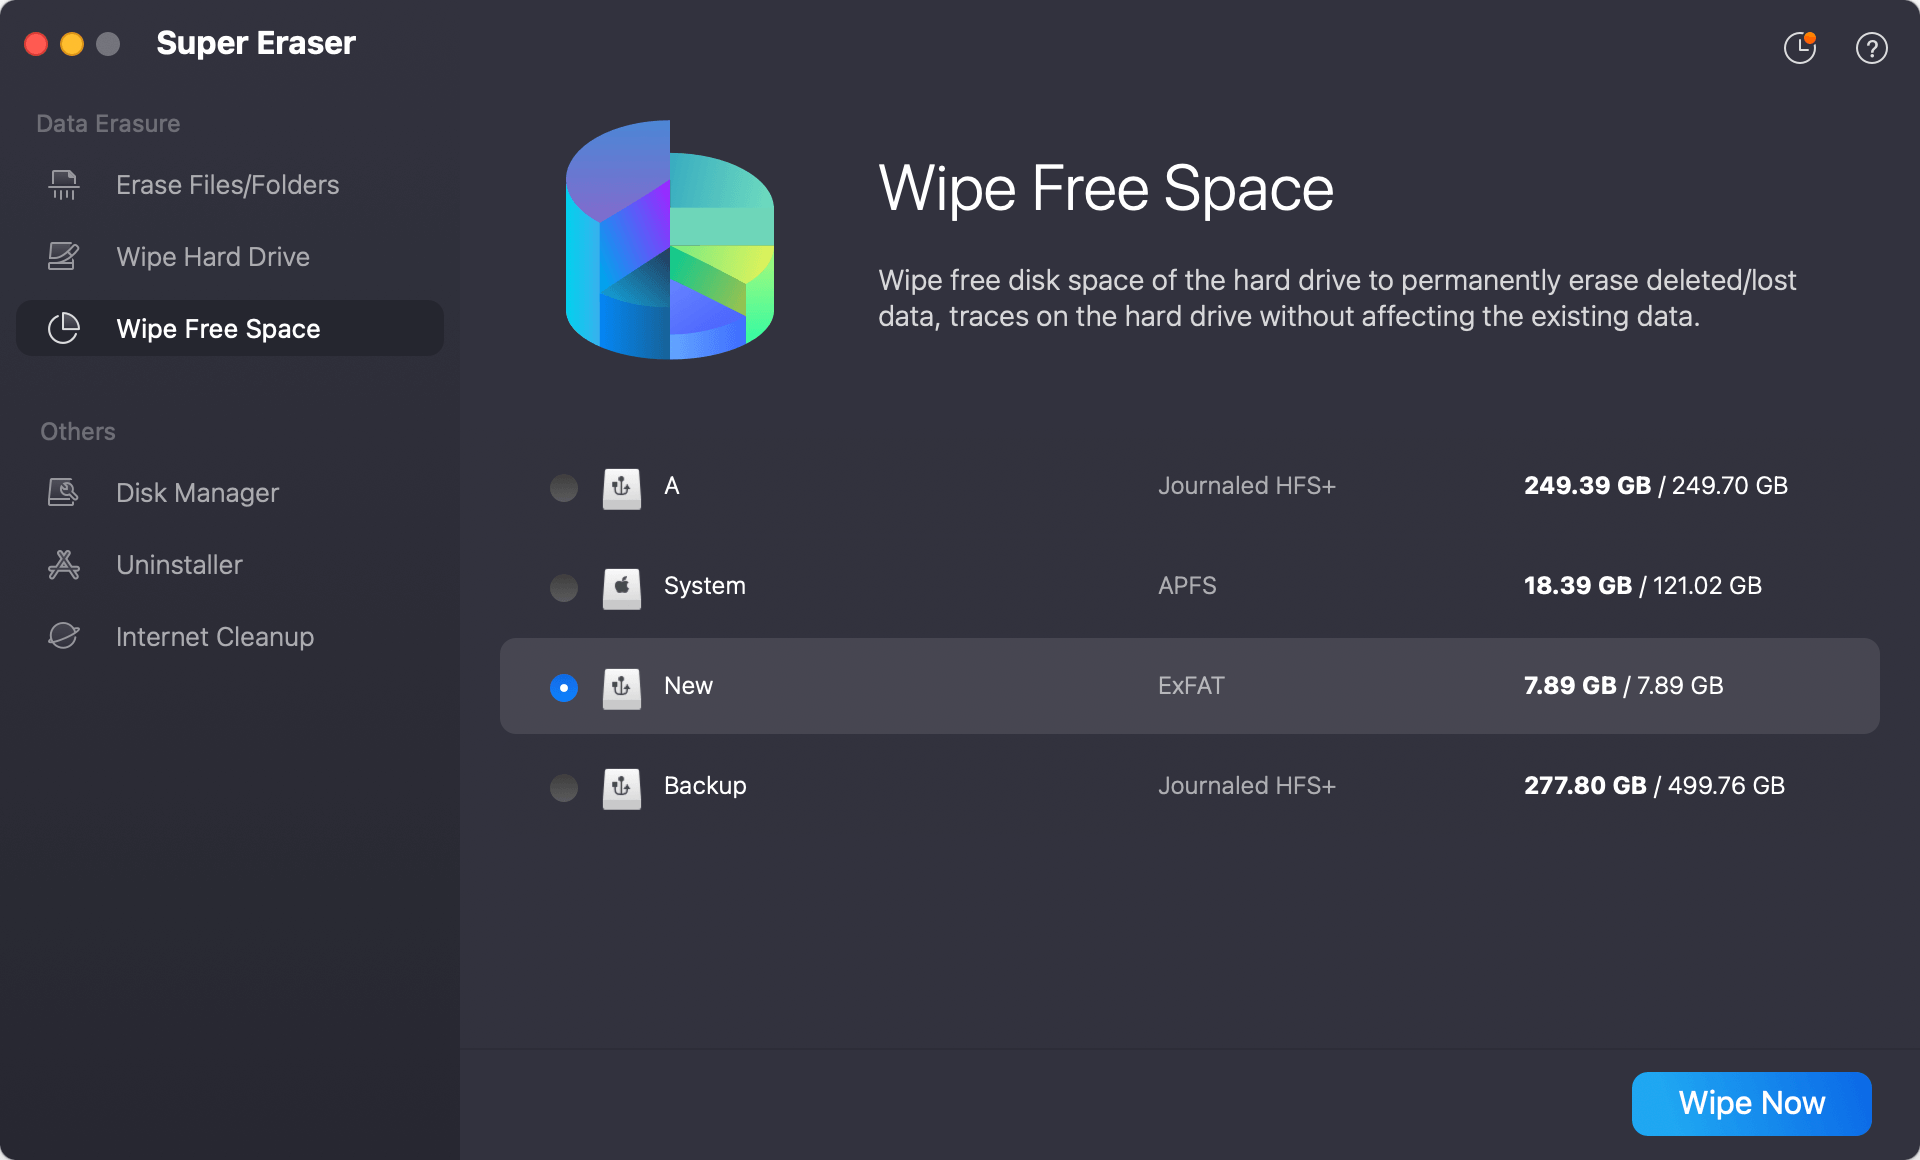
Step 3. Select Mac HDD or SSD, then click on Wipe Now button. Then it will permanently erase all deleted/erased/lost data on the Mac.
Conclusion:
In conclusion, protecting your personal information when you give your MacBook to someone else is very important in this digital world. If you follow the steps in this guide, you can safely erase the data on your MacBook's hard drive, keeping your private data safe.
Every step is essential, from making a copy of your files to erasing the disk safely and restarting macOS. Whether you recycle your old MacBook or give it to someone else, these steps will provide peace of mind and protect your privacy. Take this trip to keep your data safe and say goodbye to your MacBook without stress.
FAQs About MacBook Disk Wipe
1. How to wipe disk on MacBook?
Here are three solutions to wipe disk on your MacBook:
- For macOS Monterey or later, use Erase All Contents and Settings to erase disk on the MacBook.
- Start the Mac into macOS Recovery mode, then use Disk Utility to wipe the startup disk of the MacBook.
- Use DoYourData Super Eraser for Mac to permanently erase data from the MacBook.
2. How to permanently erase data from MacBook?
Data erasure app - such as DoYourData Super Eraser for Mac can help you permanently erase data from MacBook, make data recovery be impossible, it offers three erasure modes:
- Mode 1. Erase Files - permanently erase files and folders.
- Mode 2. Wipe Hard Drive - wipe a hard drive to permanently erase all data from the drive.
- Mode 3. Wipe Free Space - wipe free disk space to permanently erase all deleted/lost data.
3. Is the erased data on MacBook gone forever?
Yes, once the data is erased by DoYourData Super Eraser for Mac, the data is gone forever, no trace left, can’t be recovered by any method.

DoYourData Super Eraser for Mac
DoYourData Super Eraser for Mac is a 100% safe, powerful and easy-to-use data erasure program. It offers certified data erasure standards including Peter Gutmann, U.S. Army AR380-19, DoD 5220.22-M ECE to permanently erase data from Macs and external devices, making data recovery be impossible.
Written & Updated by Shirly Chen
Shirly Chen has been writing data recovery, data erasure articles for DoYourData over 4 years. She has been working as a professional website content writer & editor for quite a long time. She also writes articles about disk clone, Mac optimization, disk backup, etc.