How to Wipe Hard Drive on macOS 10.15 Catalina?
Through this guide, we will show you how to wipe internal and external drive under macOS Catalina. When the files are deleted and emptied from trash, the files are still stored on the hard drive & can be recovered by Mac data recovery software. To prevent data recovery, you can use data erasure application - such as DoYourData Super Eraser for Mac to permanently erase all data from the Mac and overwrite the disk space with random data.
![]() Updated by Shirly Chen on August 5, 2024
Updated by Shirly Chen on August 5, 2024
Quick Navigation:
- Everything You Should Know About Wiping Hard Drive on macOS Catalina
- Methods to Wipe Hard Drive on macOS Catalina
- Wipe Data Permanently on macOS Catalina with DoYourData Super Eraser for Mac
- Post-Wipe Considerations
- Common Issues and Troubleshooting
- Conclusion
macOS Catalina, officially known as macOS 10.15, is an operating system developed by Apple Inc. for its Macintosh line of computers, released on October 7, 2019. It introduced a range of new features including Sidecar, which allows an iPad to be used as a second display, and the splitting of iTunes into separate Music, TV, and Podcasts apps. Additionally, Catalina brought enhanced security features like the read-only system volume and Activation Lock, as well as tools such as Screen Time for monitoring usage and Voice Control for accessibility. The update also introduced Project Catalyst, enabling developers to port iPad apps to macOS, and revamped existing apps like Photos, Notes, and Reminders to improve functionality and user experience.
However, there are times when you might need to wipe your hard drive, such as when you're selling your Mac, troubleshooting persistent software issues, or simply wanting to start fresh. Wiping your hard drive securely is crucial to ensure your personal data doesn't fall into the wrong hands.
Everything You Should Know About Wiping Hard Drive on macOS Catalina
Wiping a hard drive involves more than just deleting files or formatting the drive. When you delete files, they are moved to the Trash and can be easily recovered. Even emptying the Trash doesn't permanently erase the data; it only marks the space as available for new data, meaning recovery software can still retrieve it. Formatting the drive removes all data but doesn't overwrite it, making recovery still possible. Securely wiping a hard drive ensures that the data is overwritten, making it much more difficult to recover.
macOS Catalina provides built-in tools for hard drive management, including Disk Utility and Terminal, which can be used to securely erase data.
Preparation Before Wiping
Before wiping your hard drive, it's essential to back up your important data. This ensures you don't lose any valuable files during the process.
Backing Up Important Data:
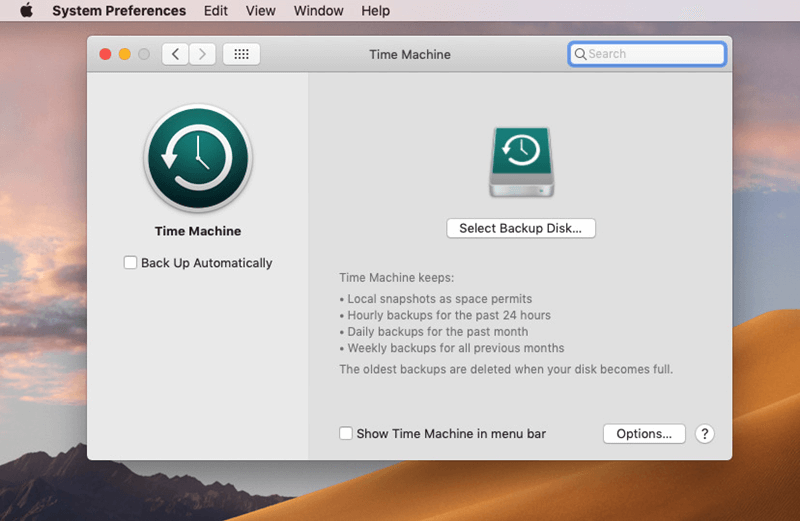
One of the most reliable ways to back up your data is by using Time Machine, Apple’s built-in backup feature. Time Machine allows you to create a full backup of your system, which can be restored later.
To use Time Machine:
- Connect an external hard drive to your Mac.
- Open System Preferences and select Time Machine.
- Click 'Select Backup Disk' and choose your external drive.
- Turn on Time Machine and start the backup process.
Alternatively, you can use third-party backup solutions like DoYourClone for Mac, Carbon Copy Cloner or SuperDuper! These tools also allow you to create a bootable backup of your system.
Step 1. Download and install DoYourClone for Mac, then connect an external hard drive to your Mac.
Step 2. Open DoYourClone for Mac, then choose Clone OS mode. It will clone everything from your Mac to the external hard drive and make a full bootable clone backup.
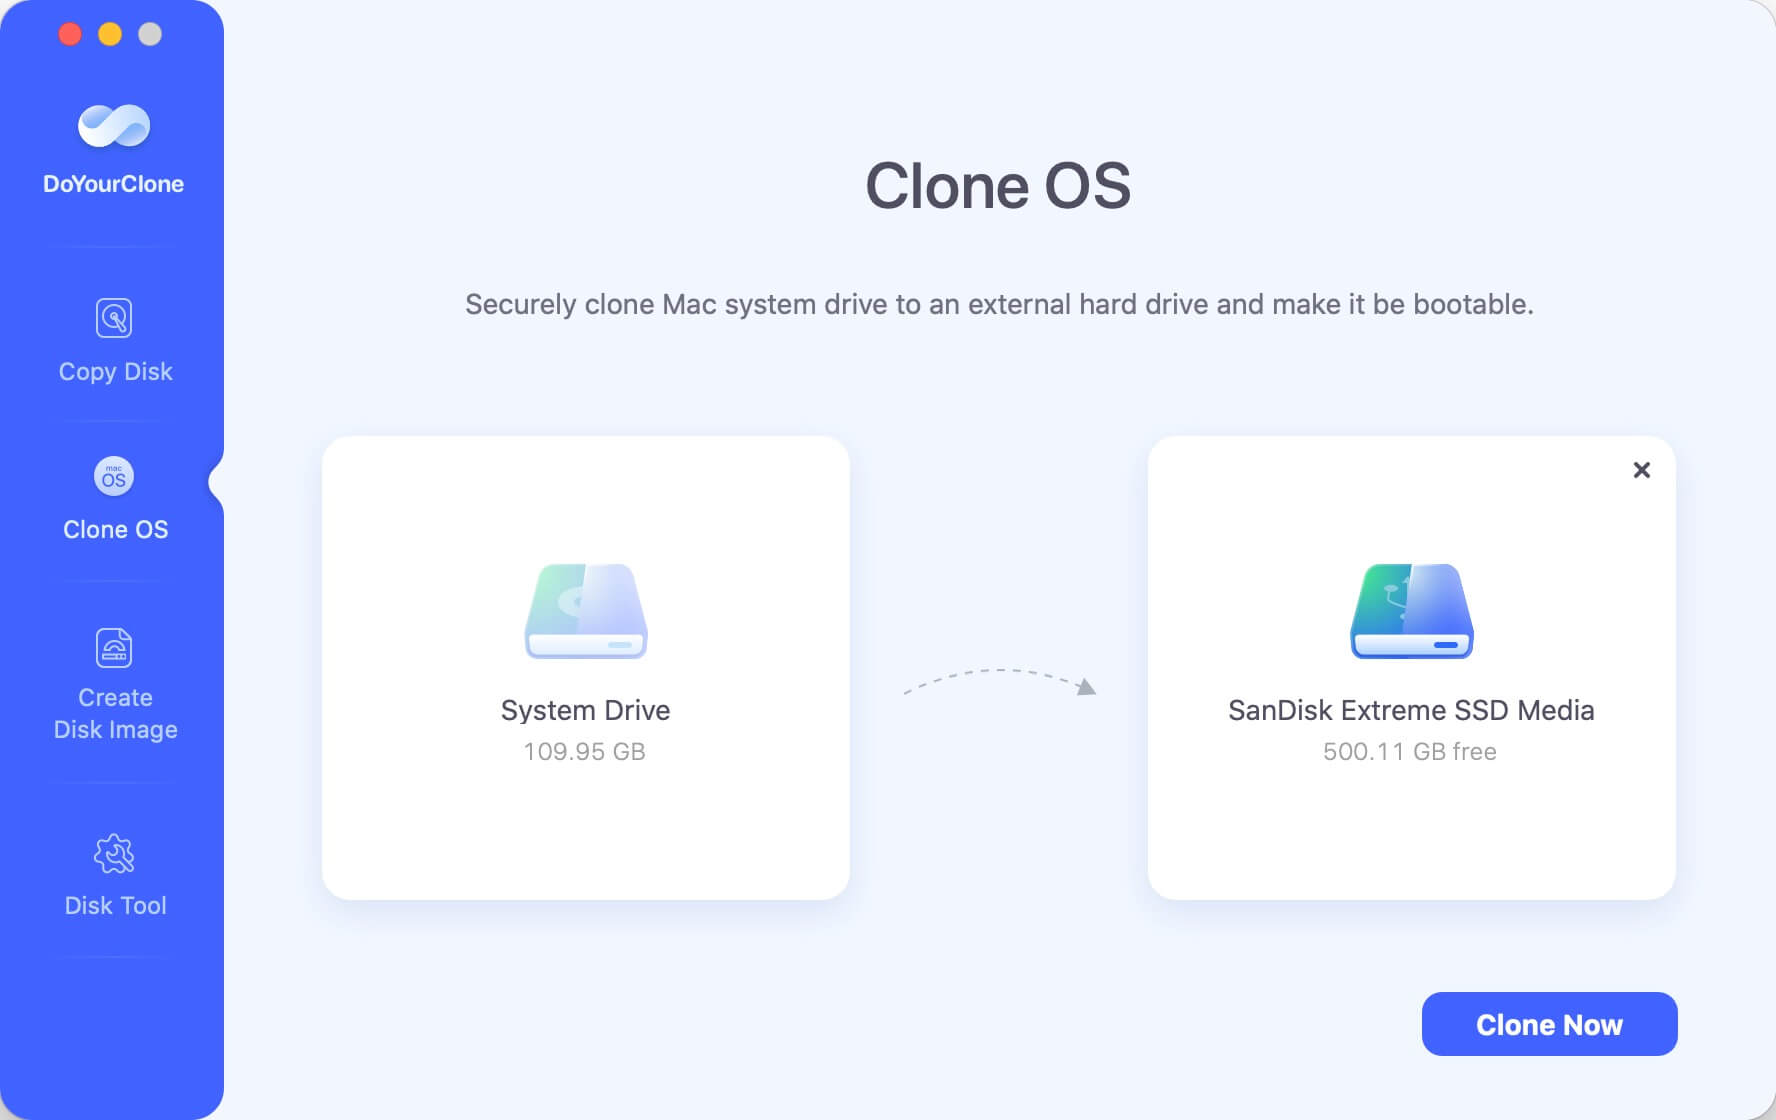
Step 3. Select the external hard drive as the destination drive, click on Clone Now button.

It will clone all data including macOS Catalina, all apps, user data, settings from the Mac internal SSD to the external hard drive.
Deauthorizing Accounts and Services:
Before wiping your hard drive, it's important to deauthorize accounts and services linked to your Mac. This ensures you don't encounter issues with account limits or locked content on your new setup.
- iTunes/Apple Music: Open the Music app, go to Account > Authorizations > Deauthorize This Computer.
- iCloud: Open System Preferences, click Apple ID, and sign out of iCloud.
- Other third-party services: Deauthorize any other services or software that have device limits or require authorization.
Gathering Necessary Information and Tools:
Before starting the wipe process, make sure you have the following:
- Admin passwords for your Mac.
- An external drive or installation media if you plan to reinstall macOS.
- A reliable internet connection if you need to download macOS Catalina.
Methods to Wipe Hard Drive on macOS Catalina
There are two primary methods to wipe your hard drive on macOS Catalina: using Disk Utility and using Terminal.
Using Disk Utility
Disk Utility is a powerful tool built into macOS that allows you to manage your disks and volumes. Here’s a step-by-step guide to wiping your hard drive using Disk Utility:
Step 1. Restart Your Mac in Recovery Mode:
- Restart your Mac and hold down Command + R keys until the Apple logo appears.
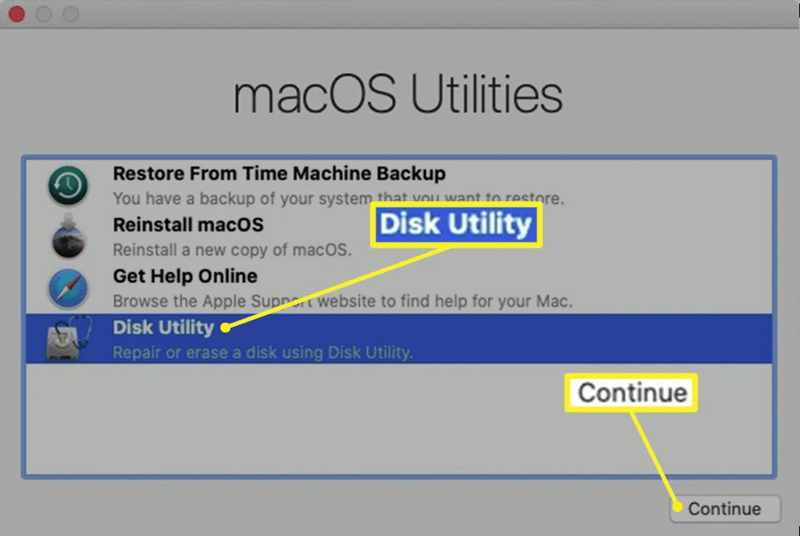
- Release the keys when you see the macOS Utilities window.
Step 2. Open Disk Utility: Select Disk Utility from the macOS Utilities window and click Continue.
Step 3. Select Your Hard Drive: In Disk Utility, select the hard drive you want to erase from the sidebar.
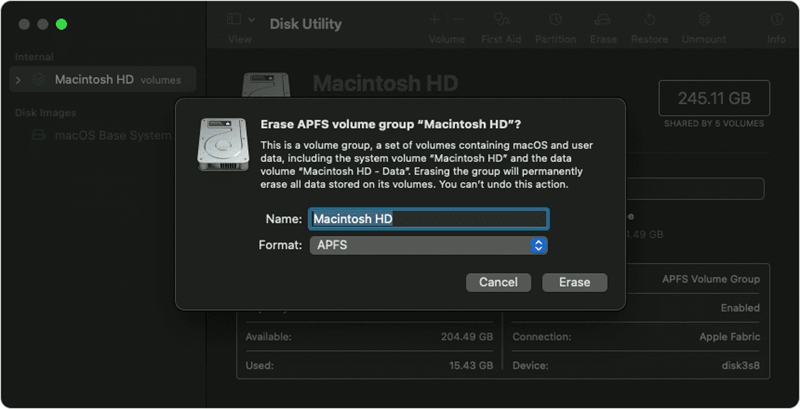
Step 4. Erase the Hard Drive:
- Click the Erase button at the top of the window.
- Choose a name for the new volume, select APFS or Mac OS Extended (Journaled) as the format, and GUID Partition Map as the scheme.
- Click Erase to begin the process.
Step 5. Optional - Secure Erase Options:
- For a more secure erase, click Security Options before erasing.
- Choose a secure erase method, such as 7-pass erase, which overwrites the data multiple times.
Using Terminal
For advanced users, Terminal offers a powerful way to wipe your hard drive using command-line instructions. Here’s how to do it:
Step 1. Restart Your Mac in Recovery Mode: Follow the same steps as in the Disk Utility method to restart in Recovery Mode.
Step 2. Open Terminal: In the macOS Utilities window, select Terminal from the menu bar.
Step 3. List All Drives: Type diskutil list and press Enter to see a list of all drives and their identifiers.
Step 4. Erase the Hard Drive:
- Identify the drive you want to erase (e.g., disk2).
- Type diskutil eraseDisk APFS "Macintosh HD" disk2 (replace disk2 with your drive identifier) and press Enter.
Step 5. Optional - Secure Erase: For a secure erase, use diskutil secureErase 1 disk2 (replace 1 with the desired secure erase level and disk2 with your drive identifier).
Reinstalling macOS Catalina
Once your hard drive is wiped, you'll need to reinstall macOS Catalina.
Downloading macOS Catalina
You can download macOS Catalina from the App Store or directly from Apple’s website. Ensure you have a stable internet connection for this process.
Creating a Bootable Installer
If you prefer to create a bootable installer, you'll need a USB drive with at least 16GB of storage. Here's how to create one:
Step 1. Download macOS Catalina: Download the macOS Catalina installer from the App Store.
Step 2. Create the Bootable Installer:
Insert the USB drive into your Mac.
Open Terminal and type the following command (replace MyVolume with the name of your USB drive):
sudo /Applications/Install\ macOS\ Catalina.app/Contents/Resources/createinstallmedia --volume /Volumes/MyVolume
Press Enter and follow the prompts to create the bootable installer.
Reinstalling macOS from Recovery Mode:
To reinstall macOS Catalina:
Step 1. Restart in Recovery Mode: Restart your Mac and hold down Command + R keys until the Apple logo appears.
Step 2. Select Reinstall macOS: In the macOS Utilities window, select Reinstall macOS and click Continue.
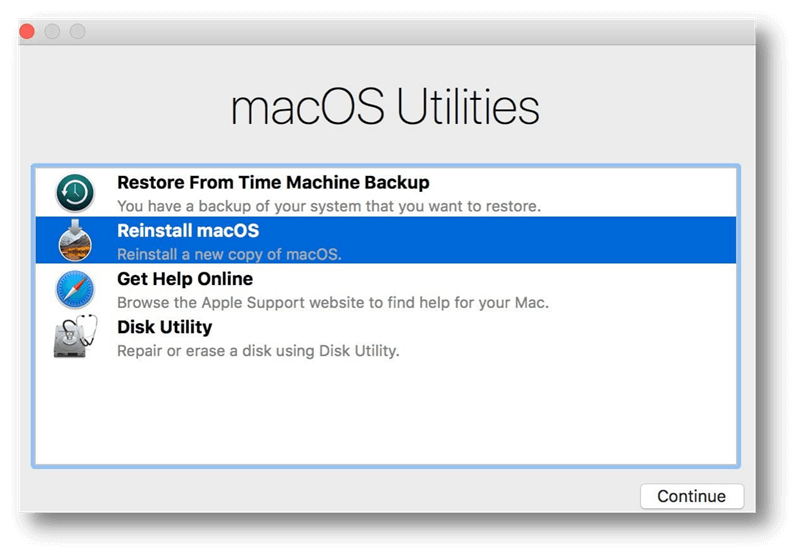
Step 3. Follow the On-Screen Instructions: Follow the prompts to complete the installation.
Note: The data lost due to erasing Mac startup disk with Disk Utility or reinstalling macOS is not lost forever. It can be recovered by Mac data recovery software. If you want to permanently erase the already deleted/erased/lost data from your Mac internal SSD, just try data erasure software.
Wipe Data Permanently on macOS Catalina with DoYourData Super Eraser for Mac
DoYourData Super Eraser for Mac is a powerful and 100% safe data erasure application. It offers certified data erasure standards including HMG Infosec, NIST 800-88, Peter Gutmann's algorithm, DoD 5220.22-M, U.S. Army AR380-19 to help in securely and permanently erasing data from Mac HDD/SSD, external disk, USB drive, digital camera, SD card, etc. Once the data is erased by DoYourData Super Eraser for Mac, the data is lost for good, cannot be recovered by any method.
After erasing startup disk and reinstalling macOS, you can use Wipe Free Space mode to wipe free disk space of the Mac HDD/SSD and permanently erase all deleted/erased/lost data from the drive, leaving no trace for data recovery.
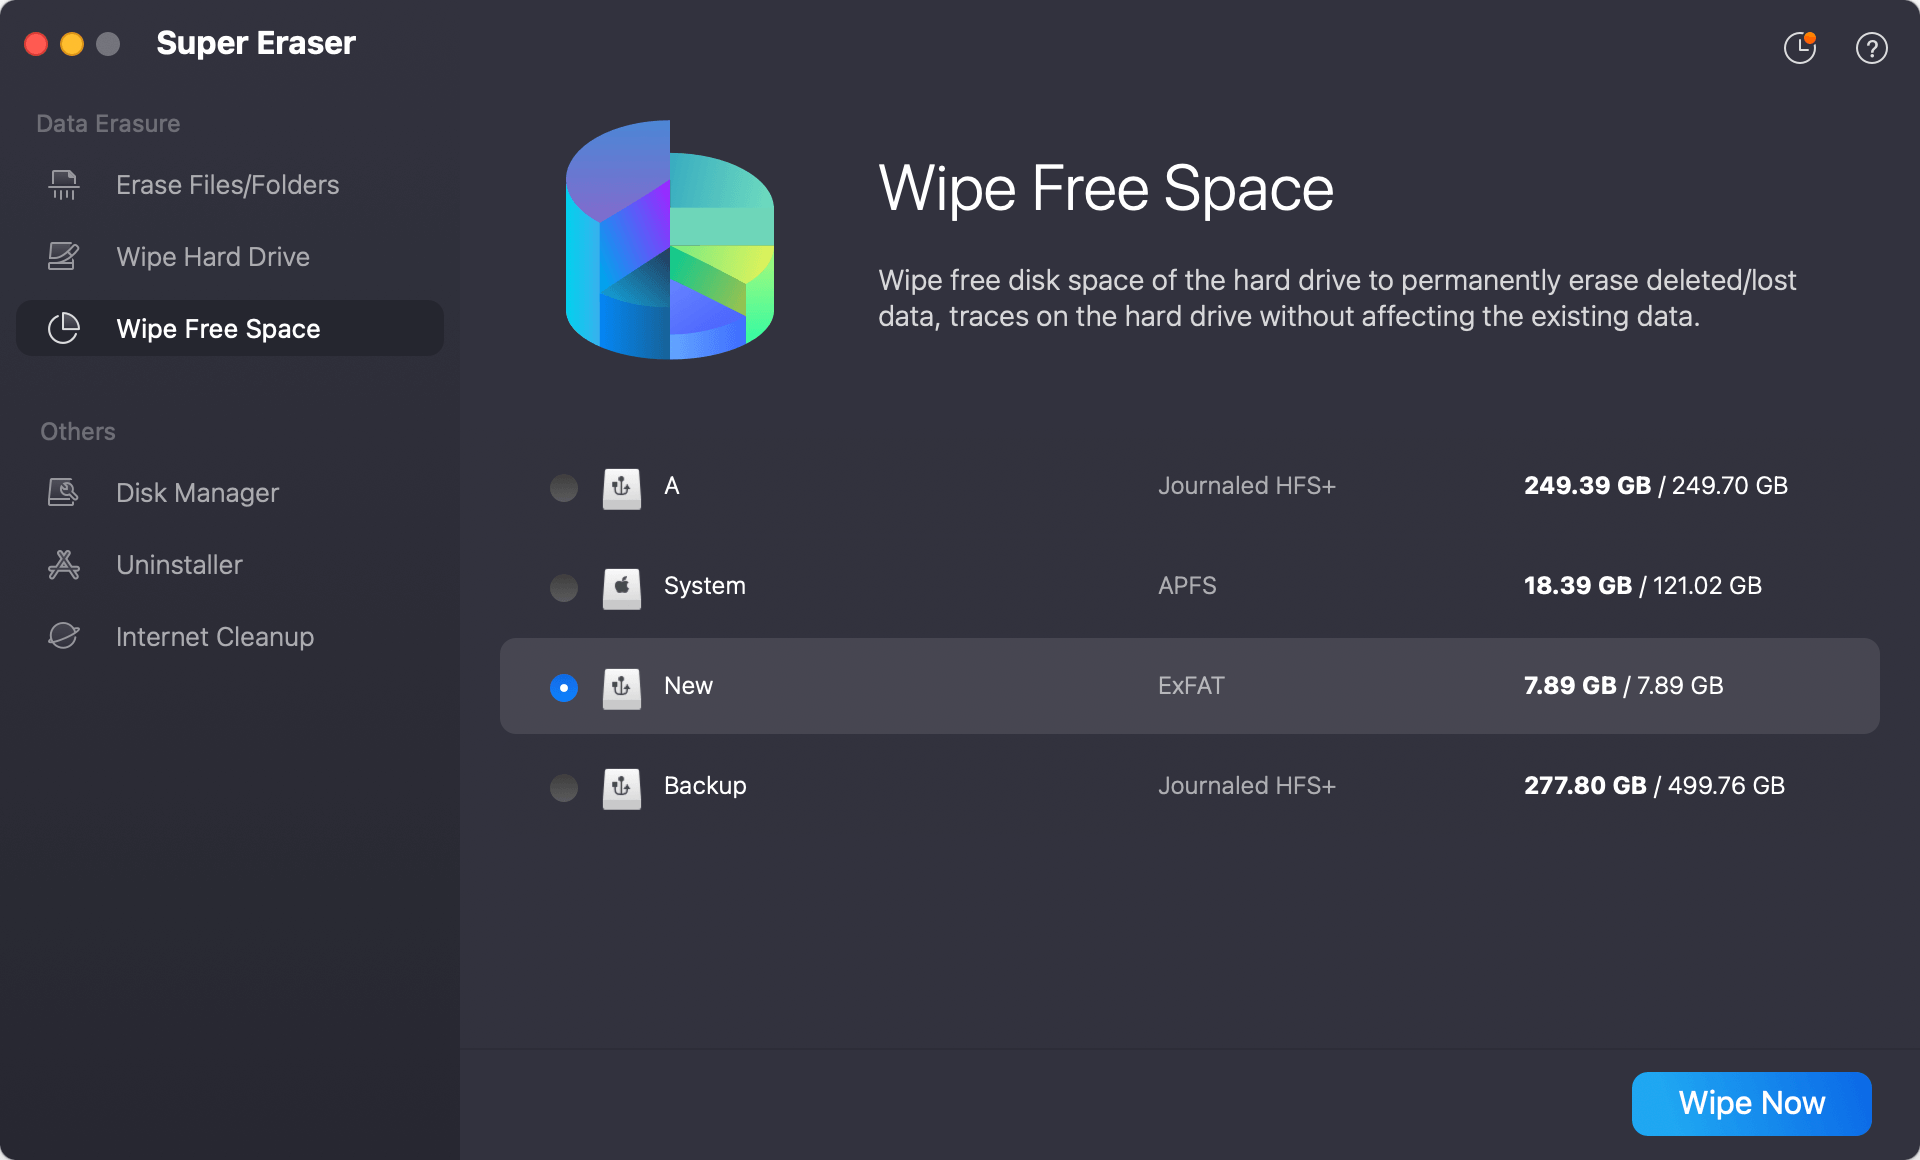
Step 1. Download and install DoYourData Super Eraser for Mac on your Mac, then open it. Choose Wipe Free Space mode.
Step 2. Select the internal SSD - such as Macintosh HD, then click on Wipe Now button.
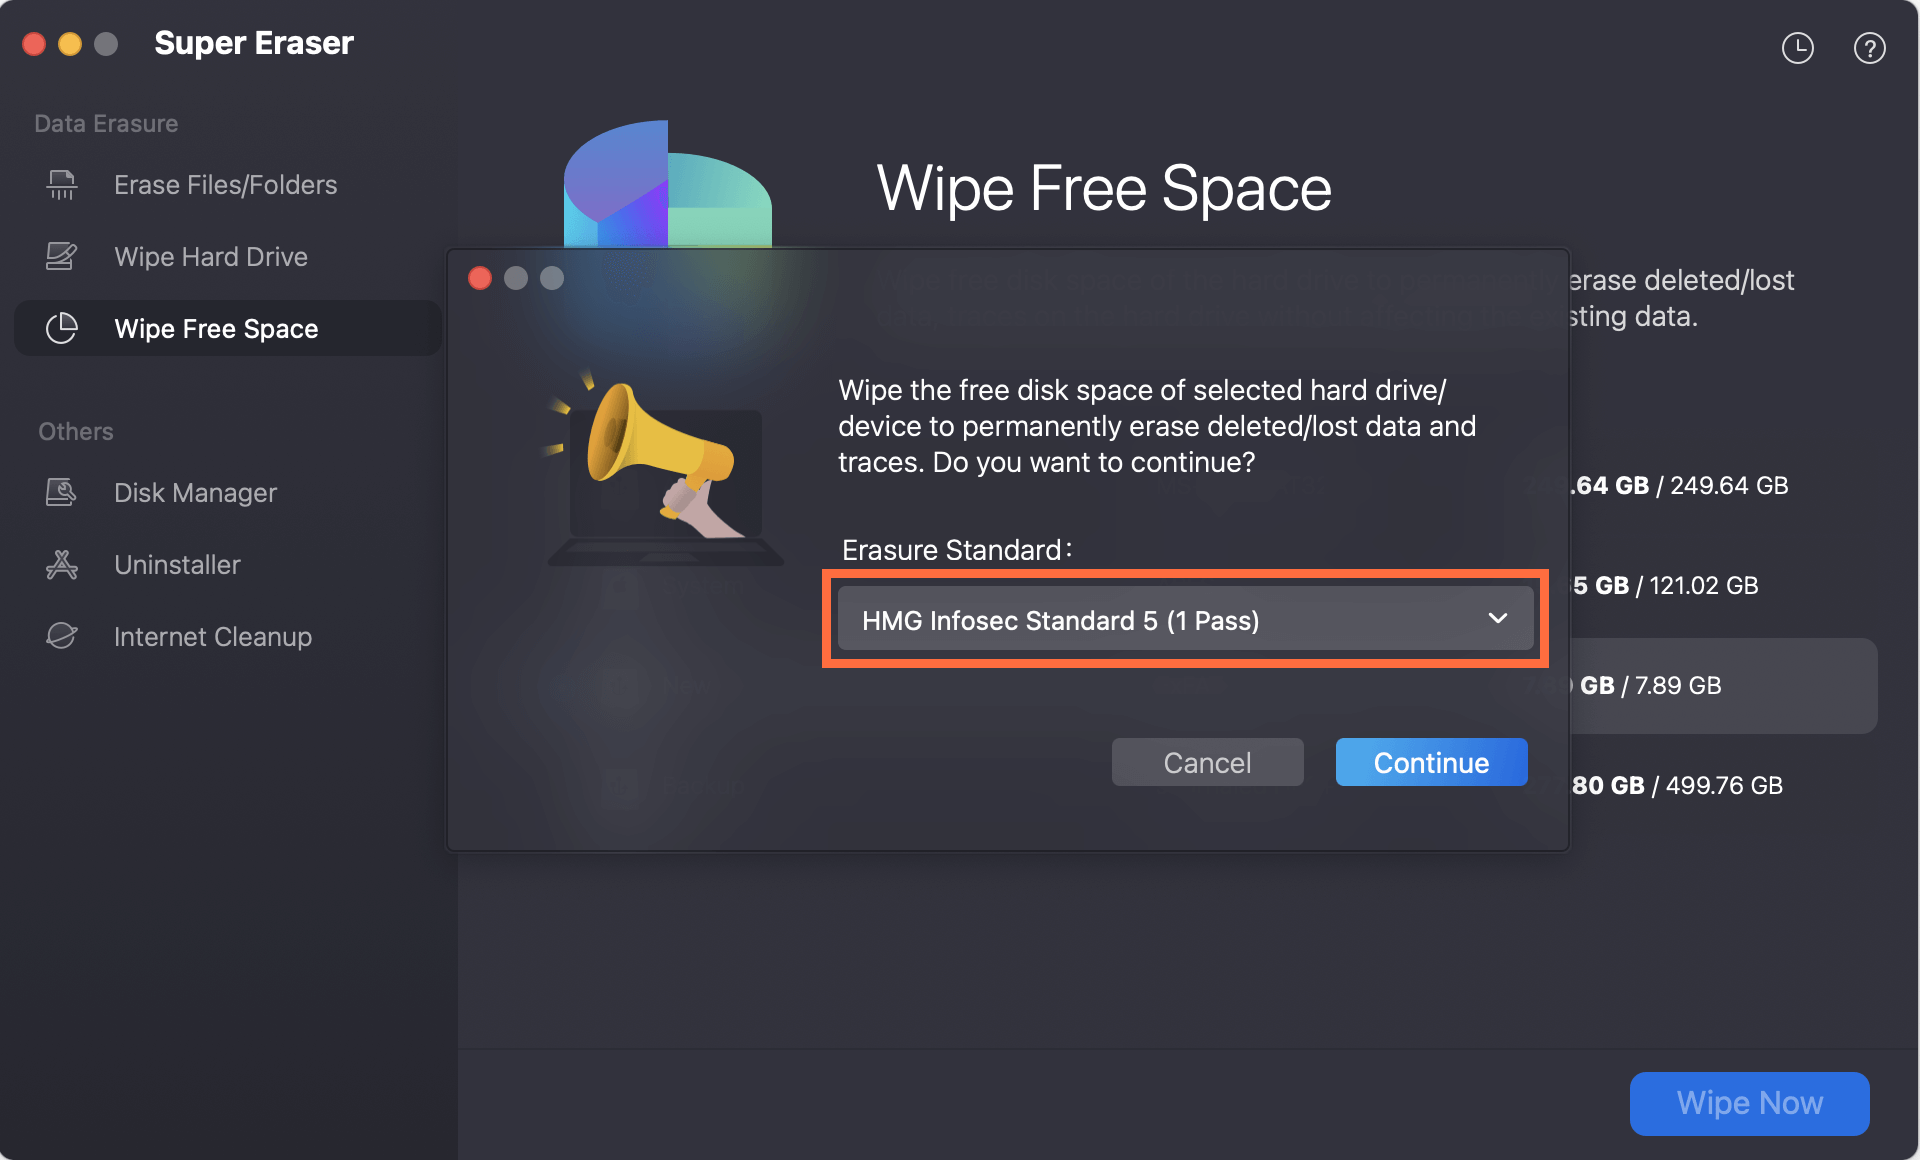
Step 3. Select a data erasure standard, then click on Continue button to wipe free disk space of the startup disk.
If you want to wipe an external hard drive, USB flash drive, SD card, just choose Wipe Hard Drive mode. Then select the drive, click on Wipe Now button to permanently erase all data from the selected drive.

Post-Wipe Considerations
After wiping your hard drive and reinstalling macOS, there are several steps to consider for setting up your Mac and ensuring its security.
Setting Up the Mac as New or Restoring from a Backup:
During the initial setup process, you can choose to set up your Mac as new or restore data from a backup. If you backed up using Time Machine, you can restore your data by selecting the appropriate option during setup.
Reinstalling Necessary Applications and Tools:
After setting up your Mac, reinstall the applications and tools you need. This may include productivity software, creative tools, and other essential applications. Ensure you download the latest versions from the App Store or the developers’ websites.
Security Measures Post-Wipe:
To maintain a clean and secure system, consider the following security measures:
- Enabling FileVault: FileVault encrypts your entire hard drive, protecting your data from unauthorized access. To enable FileVault, go to System Preferences > Security & Privacy > FileVault and click Turn On FileVault.
- Setting Strong Passwords: Use strong, unique passwords for your user account and any online services. Consider using a password manager to keep track of your passwords.
Common Issues and Troubleshooting
Wiping your hard drive and reinstalling macOS can sometimes lead to issues. Here are some common problems and their solutions:
Issues During the Wiping Process:
- Disk Utility Errors: If Disk Utility encounters errors, try restarting your Mac in Recovery Mode and repeating the process. If the issue persists, consider using Terminal for the wipe.
- Terminal Command Issues: Ensure you type the commands correctly and use the correct drive identifiers. If you encounter errors, double-check the command syntax and drive information.
Problems During macOS Reinstallation:
- Installation Failures: If the macOS installation fails, ensure you have a stable internet connection and enough disk space. Try restarting the installation process or using a bootable installer.
- Network-Related Issues: If you encounter network issues during installation, check your Wi-Fi connection or use a wired Ethernet connection for stability.
Post-Wipe Performance Issues:
- Slow Performance: If your Mac runs slowly after reinstalling macOS, consider resetting the NVRAM and SMC. Also, check for software updates and install them.
- Application Crashes: Ensure you’re using the latest versions of your applications. If issues persist, consider reinstalling the problematic applications.
Conclusion
Securely wiping your hard drive on macOS 10.15 Catalina is essential for protecting your personal data and ensuring a clean start. By following the steps outlined in this article, you can effectively wipe your hard drive, reinstall macOS, and set up your Mac securely. Remember to back up your data, deauthorize accounts, and take post-wipe security measures to maintain a smooth and safe computing experience.
If you will sell, donate or dispose of an old Mac which is running macOS Catalina, you also need to permanently wipe all data from your Mac HDD/SSD. DoYourData Super Eraser for Mac is a powerful Mac data erasure application. It can help you erase data, wipe hard drive on macOS Catalina, making data recovery become impossible.

DoYourData Super Eraser for Mac
DoYourData Super Eraser for Mac is a 100% safe, powerful and easy-to-use data erasure program. It offers certified data erasure standards including Peter Gutmann, U.S. Army AR380-19, DoD 5220.22-M ECE to permanently erase data from Macs and external devices, making data recovery be impossible.
Written & Updated by Shirly Chen
Shirly Chen has been writing data recovery, data erasure articles for DoYourData over 4 years. She has been working as a professional website content writer & editor for quite a long time. She also writes articles about disk clone, Mac optimization, disk backup, etc.