How to Reset and Erase An M2 Chip Mac?
Erasing data from an M2 chip Mac revolves wiping the hard drive with Disk Utility in Recovery mode. Then you need to reinstall the macOS to continue using the Mac. If the wiped M2 chip Mac will be sold or donated, you need to erase data permanently with professional data erasure software, such as DoYourData Super Eraser for Mac. Then all your private data on the Mac is gone for good beyond data recovery.
![]() Updated by Shirly Chen on April 22, 2025
Updated by Shirly Chen on April 22, 2025
Quick Navigation:
- Back up your Data before erasing your M2 Mac
- How to erase your M2 Mac using Disk Utility?
- Permanently erase data on M2 Chip Mac
- Final Words
Suppose you're looking to sell your Apple Silicon chip M2 Mac and purchase a new one. What should you do with your old macOS to ensure no one uses your data?

Erasing the M2 Mac will be the most appropriate solution as it can remove all your data. After erasing the data, you can give your M2 Mac to anyone as the data you stored earlier would be removed from your device. And if you worry about data recovery, just try data erasure software to permanently erase all data from your M2 Mac's startup disk.
This article tells you how to format the startup disk (built-in) of the M2 Mac with Apple Silicon M2 chip and show the right method to permanently erase data on a M2 Mac.
Back up your Data before erasing your M2 Mac
Before doing anything, you should look to back up your Mac files. You can do it by copying the files from Mac to an external drive. However, if you're using iCloud, your contacts, mail, photos, and documents should automatically be backed up in your cloud storage.
But, we recommend you back up the Mac files through Time Machine. In this way, you'll be able to transfer the backed-up files to a new Mac as Time Machine is a built-in tool of Mac that performs better than any other tool.
You also can try disk cloning software - such as DoYourClone for Mac to help you create a bootable clone backup for your M2 Mac.
Unlink Your Apps
You'll need to unlink some apps manually before saying goodbye to your M2 Mac. Some third-party apps need a license to work on any computer, so you need to consider the license you might have purchased.
Similarly, it is recommended to de-authorize the iTunes account from the device as it helps remove its access to the content you purchased from the App Store, iBook Store, and iTunes Store, including books and apps and TV shows, movies, and music.
Here's how to de-authorize your iTunes account.
Step 1. First, you'll need to launch iTunes on your Mac and then sign in with your Apple ID credentials.
Step 2. Navigate to the menu bar and select Account. Next, you'll need to tap View My Account.
Step 3. After visiting the Account Information page, you'll need to select the Deauthorize All options. Next, you'll need to tap OK to confirm the action you're working on.
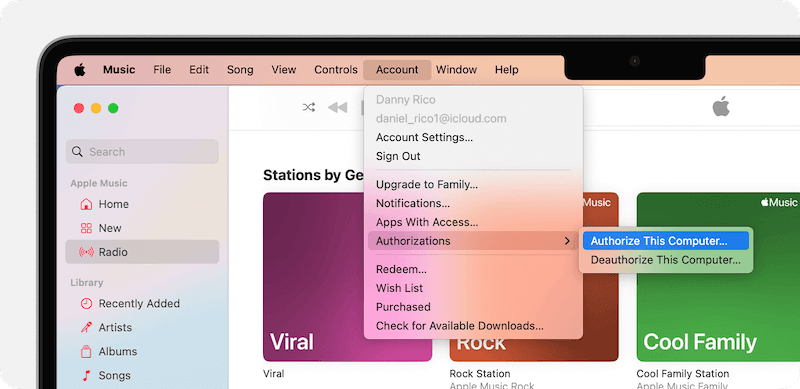
Step 4. You'll need to tap Account and Authorizations to authorize the current computer. Next, you must hit the Authorize This Computer icon and enter your Apple ID credentials. You'll be able to authorize your Mac by hitting Authorize icon.
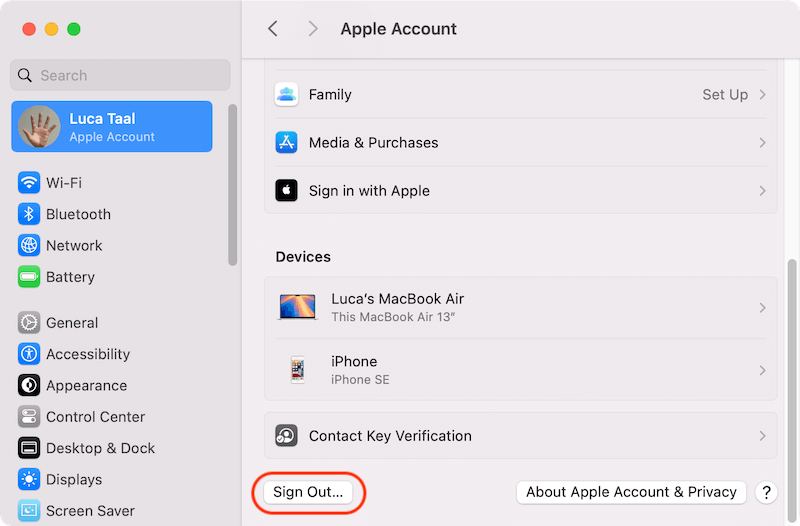
Sign out of your iCloud
You must also consider disabling Find My Mac and Signing out of your iCloud on Mac PC. In this way, you can prevent your Apple ID from being used by someone who tends to purchase your sold Mac.
Here's how to sign out of your iCloud.
Step 1. First, you'll need to tap the Apple ID symbol in front of your screen and choose System Preferences afterward.
Step 2. After navigating to the preference pane, you must select Apple ID from there.
Step 3. Now, you'll need to uncheck all options after selecting iCloud. This process will remove the copy of your related data on macOS.
Step 4. After selecting Overview, you'll need to select Sign Out. This way, you'll be able to completely sign out of your iCloud Account.
How to erase your M2 Mac using Disk Utility?
After backing up the data and signing out of Apple ID, you'll need to begin erasing your Apple Silicon Mac.
However, this process disconnects Bluetooth devices from Mac, so you should look to connect your mouse trackpad or Bluetooth keyboard with a USB cable.
You can follow the guide below to erase your M2 Mac.
Step 1. To begin with, you'll need to turn your Mac off if it is turned on. For this, you'll need to tap the Apple Symbol and hit the Shut Down icon afterward. Next, you'll need to turn your Mac on again to startup in macOS Recovery. Press and hold Mac's power button until startup window options appear.
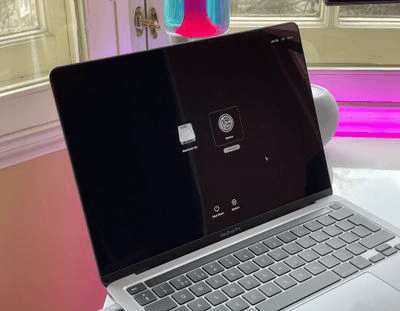
Step 2. Select Continue after hitting Options icon. If asked, you might need to select a user. After selecting the user, you'll need to tap the Next icon and enter the password afterward.
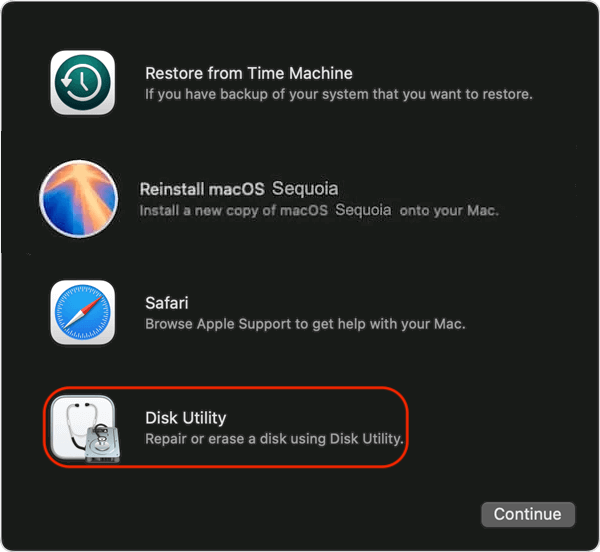
Step 3. After visiting the utility window, tap Continue after selecting Disk Utility.
Step 4. Now, you should be able to find a volume called Macintosh HD under the Internal section.
If you don't find the volume option there and cannot alter the system Disk's name yourself, select Apple Menu and then choose Shut Down. Next, you need to unplug the unnecessary devices from M2 Mac and try again.

Step 5. You might choose each additional volume of your Disk Utility for establishing internal volumes on Macintosh HD. Next, delete the volume after hitting the Delete Volume icon.
Step 6. After selecting the Macintosh, you'll need to tap the Erase icon in the toolbar, select another if you want to, and format your disk as APFS afterward.
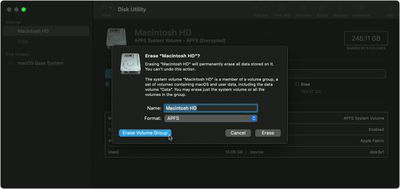
Step 7. Click Erase Volume Group and enter your Apple ID credentials if you're asked to do so.
Step 8. You can confirm the action by tapping Erase and Restart.
If you're selling your macOS, you don't need to do anything more as you can sell your device without. However, suppose you've no ambition to give up on your PC. In that case, you'll need to restart your Mac and select Language after following the on-screen instructions.
Next, your Mac will ask for an internet connection, and you'll need to connect your device to the WiFi network.
Later, you'll need to tap Exit to Recovery Utilities and then choose Reinstall macOS. After following the on-screen instructions, you can install a new macOS version.

Please note that the data which is deleted or erased by Disk Utility can be recovered by data recovery software, check here: recover deleted or lost data on M2 Mac >>
If you want to permanently erase data on M2 chip Mac, just check the method below.
Permanently erase data on M2 Chip Mac
To permanently erase data on M2 Mac, just try data erasure software - such as DoYourData Super Eraser for Mac. It offers certified data erasure standards to help you securely and permanently shred files or wipe data from a M2 Mac, external hard drive, memory card, USB flash drive, M1, T1/T1, Intel chip Mac, etc.
DoYourData Super Eraser for Mac
- Certified data erasure standards, including U.S. Army AR380-19, DoD 5220.22-M ECE.
- Permanently shred files, wipe hard drive, erase deleted data on M2 Mac.
- 100% safe, no damage to your SSD or HDD.
DoYourData Super Eraser for Mac offers three flexible data erasure modes to help you permanently erase data on M2 Mac:
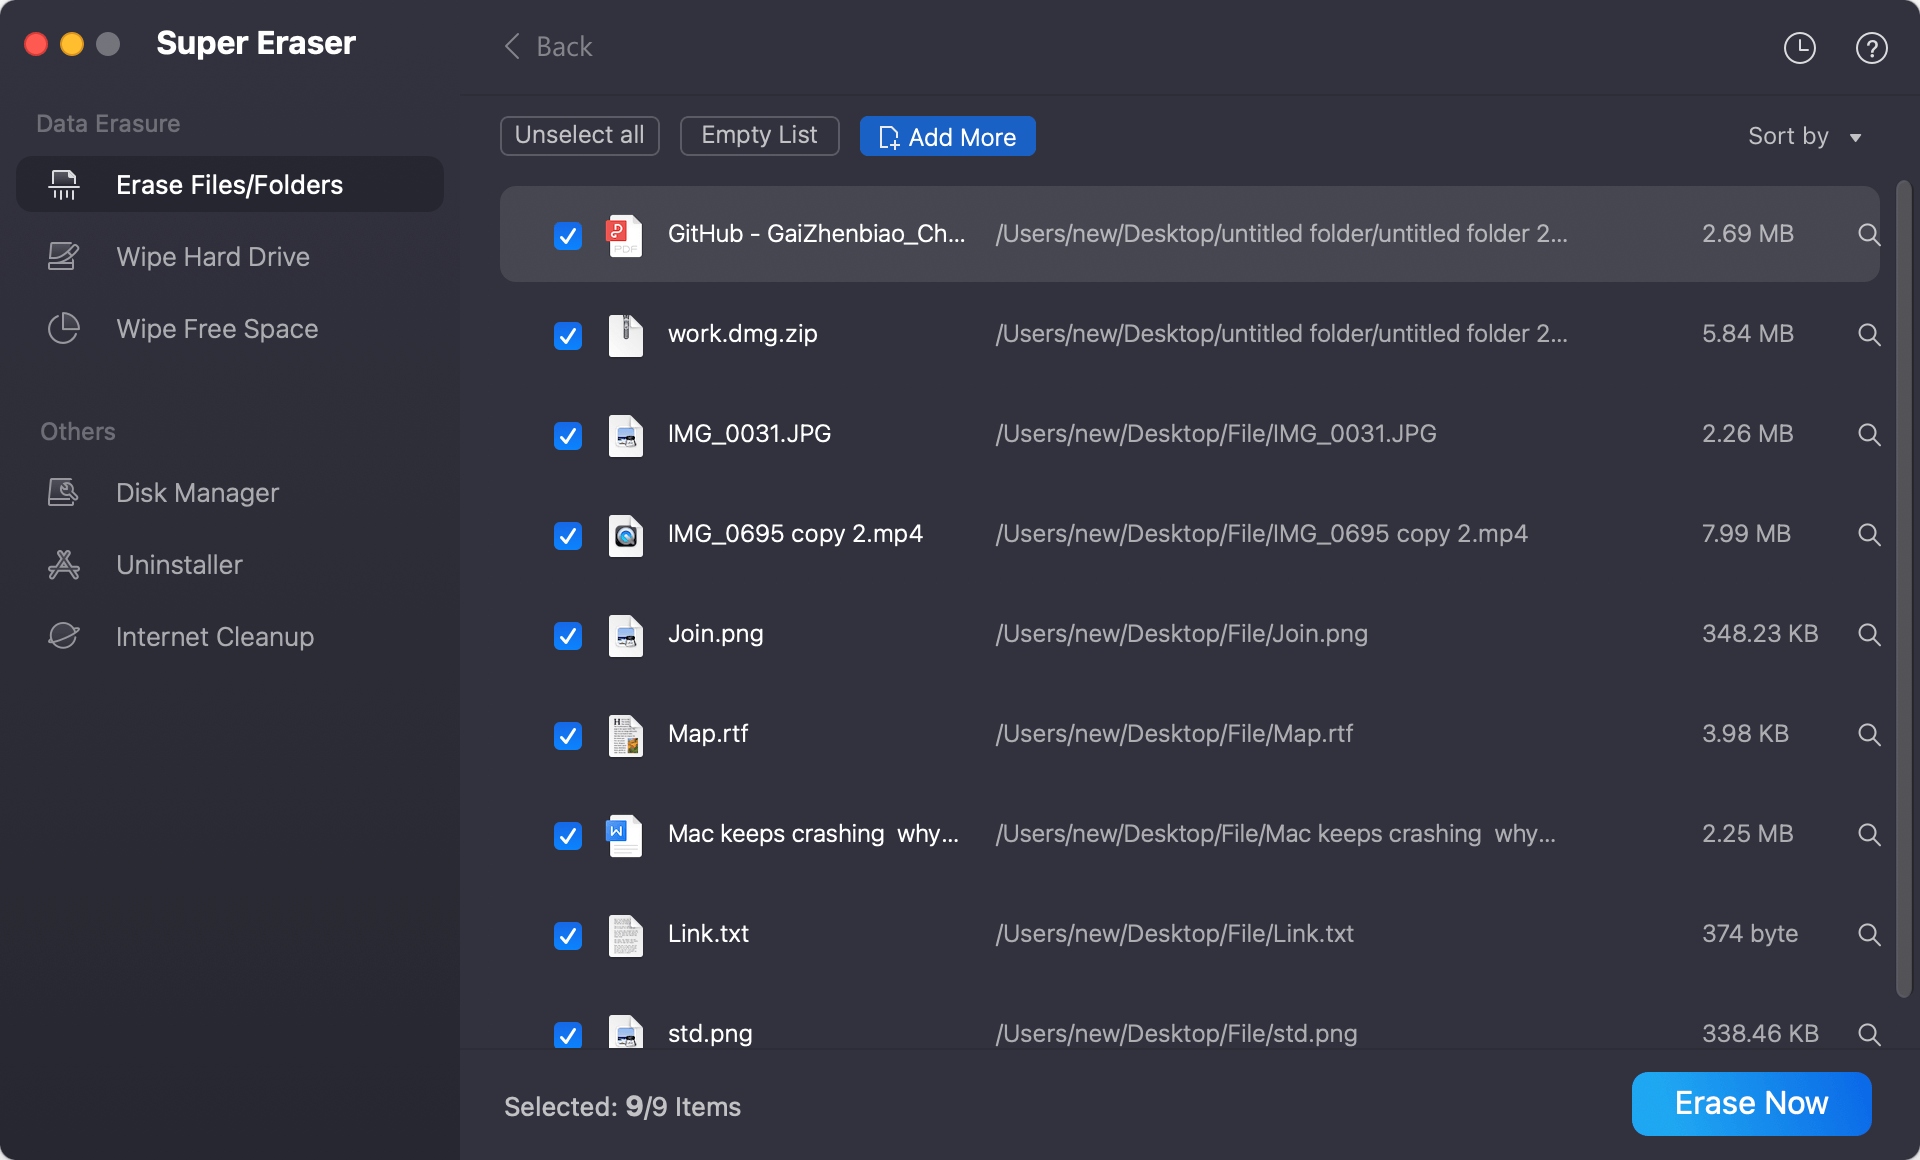
Mode 1. Erase Files - permanently shred files/folders on M2 chip Mac.
This mode can help you permanently shred files or folders on M2 Mac. Just add the files/folders to the erasure list, then permanently erase them.
Mode 2. Wipe Hard Drive - wipe an entire hard drive on M2 chip Mac.
Select a hard drive, then click on Wipe Now button to permanently wipe all data from the hard drive.

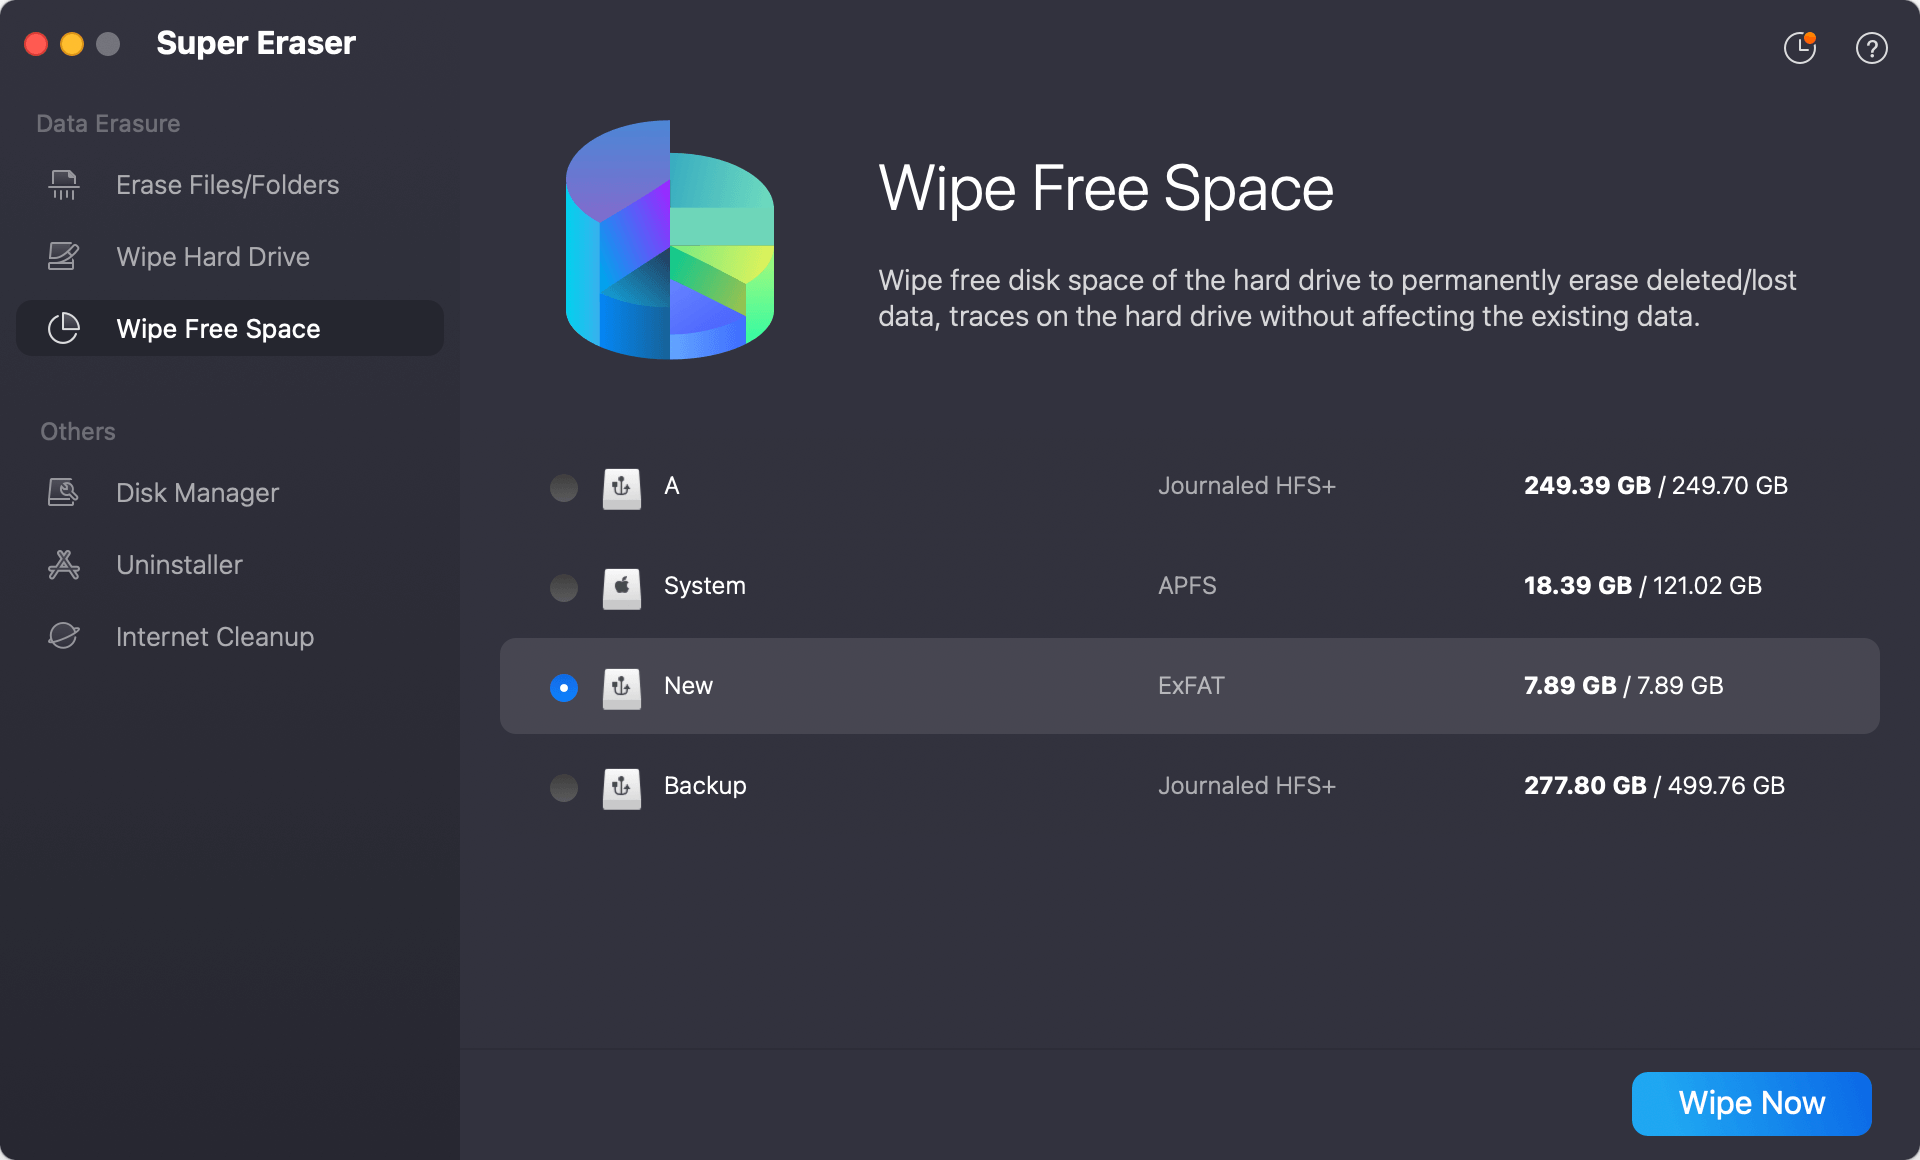
Mode 3. Erase Free Space - permanently erase all deleted/lost data on M2 chip Mac.
This mode will not erase the existing data on your Mac, it will wipe the free disk space of your M2 Mac's disk, then permanently erase all deleted/lost data on the M2 Mac.
Please note that once the data is erased by DoYourData Super Eraser for Mac, the data will be gone forever, can't be recovered by any method. Please make a backup before you erase your M2 Mac using DoYourData Super Eraser for Mac.
Final Words
If you're up to erasing your M2 Mac with Apple Silicon chip, you'll need to back your data first. Formatting the Mac startup disk causes data loss; if you don't bother to back up your data, you might lose your important data.
Formatting the Mac startup disk is easy as we've mentioned the easy ways to put things in order. After reading this post, you'll be able to erase your M2 Mac with ease. We're hopeful that this post will be insightful for you.

DoYourData Super Eraser for Mac
DoYourData Super Eraser for Mac is a 100% safe, powerful and easy-to-use data erasure program. It offers certified data erasure standards including Peter Gutmann, U.S. Army AR380-19, DoD 5220.22-M ECE to permanently erase data from Macs and external devices, making data recovery be impossible.
Written & Updated by Shirly Chen
Shirly Chen has been writing data recovery, data erasure articles for DoYourData over 4 years. She has been working as a professional website content writer & editor for quite a long time. She also writes articles about disk clone, Mac optimization, disk backup, etc.