Quick Navigation:
- Understanding Mac Hard Drive Partitions
- Precautions Before Formatting Hard Drive Partition on Mac
- Step-by-Step Guide to Formatting a Mac Hard Drive Partition
- How to Wipe a Mac Hard Drive Partition [data unrecoverable]?
- Conclusion
Formatting a Mac hard drive partition is a straightforward process, yet it requires careful attention to ensure that you don't lose important data. Whether you're preparing a drive for a fresh operating system installation, resolving disk errors, or simply clearing up space, knowing how to properly format a partition is essential. This guide will walk you through the steps, considerations, and precautions necessary to format your Mac's hard drive partition safely and effectively.
Understanding Mac Hard Drive Partitions
A hard drive partition is a section of a physical hard drive that is treated as a separate logical unit. It allows users to organize and manage their data more efficiently. Each partition can have its own file system and can be used to install different operating systems or store different types of data. For instance, you might have one partition for your operating system and applications, another for personal files, and another for backups.
Partitions are crucial for system management. They help in isolating operating systems, keeping system files separate from user data, and managing disk space efficiently. On a Mac, partitions can be created using the Disk Utility application, which is a powerful tool for disk management.
Precautions Before Formatting Hard Drive Partition on Mac
Before formatting the partition on your Mac, it's crucial to take some precautions:
1. Backup Your Data
Formatting a partition will erase all data stored on it. Therefore, it's essential to back up any important files before you begin. You can use Time Machine, iCloud, or any external storage device to back up your data. This ensures that even if something goes wrong, your files are safe and can be restored later.
2. Verify the Partition to Format
Ensure that you are formatting the correct partition. Mistaking one partition for another can lead to unintended data loss. You can identify the partition by its name, size, or the type of data it contains. Double-checking this information is critical to avoid formatting the wrong partition.
3. Check Disk Health
Before formatting, it's wise to check the health of your disk. Use Disk Utility's First Aid feature to scan for and repair any errors on the disk. This can help prevent potential issues during the formatting process. If the disk is showing signs of failure, consider replacing it before proceeding.
4.Decide to Choose the Right File System
Selecting the appropriate file system for your partition is crucial, as it affects compatibility, performance, and storage capacity. Here are the most common file systems used on Macs:
- APFS (Apple File System): Introduced with macOS High Sierra, APFS is optimized for SSDs and offers features like encryption, space sharing, and snapshots. It's the recommended file system for modern Macs, providing better performance and reliability.
- HFS+ (Mac OS Extended): Before APFS, HFS+ was the standard file system for Mac. It's still used for older Macs and for compatibility with certain applications and devices. It's a good choice if you’re using an older Mac or need to maintain compatibility with older software.
- FAT32 and ExFAT: These file systems are compatible with both Mac and Windows. FAT32 has a 4GB file size limit, making it unsuitable for large files. ExFAT, however, supports larger files and is ideal for external drives and media devices.
Step-by-Step Guide to Formatting a Mac Hard Drive Partition
Formatting a hard drive partition on a Mac is a task that can be easily accomplished using the built-in Disk Utility application. Below is an expanded guide to help you through each step of the process.
Step 1: Open Disk Utility
1. Accessing Disk Utility
- Click on the Finder icon in the Dock to open a Finder window.
- In the Finder sidebar, click on Applications.
- In the Applications folder, scroll down and open the Utilities folder.
- Inside the Utilities folder, locate and double-click on Disk Utility to launch the application.
Alternatively, you can use Spotlight to quickly open Disk Utility:
- Press Command + Spacebar to open Spotlight.
- Type Disk Utility in the search bar and press Enter.
Step 2: Select the Partition to Format
1. Navigating Disk Utility
- Once Disk Utility is open, you will see a list of all available disks and their partitions on the left sidebar.
- Carefully examine the list to identify the drive that contains the partition you wish to format. Disks are usually listed by their manufacturer and size, making it easier to identify.
2. Selecting the Correct Partition
- Click on the drive to expand its partitions if they aren't already visible.
- Select the partition you want to format. The selected partition will be highlighted, and its details will appear in the main window of Disk Utility.
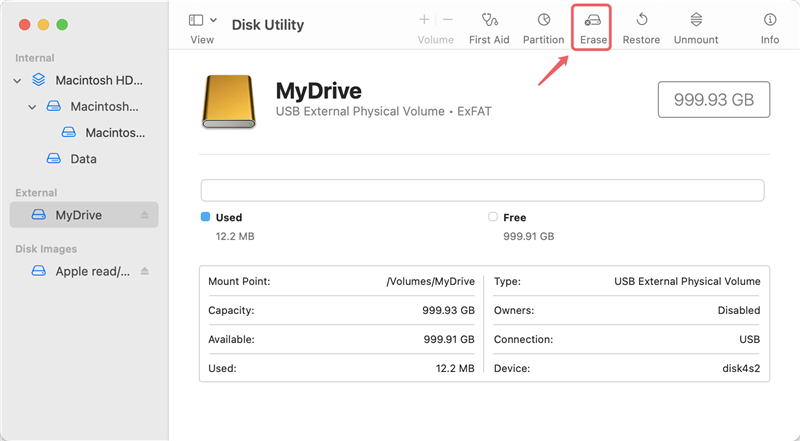
Tip: If you're unsure about which partition to format, check the partition's current name, size, and available space to confirm it's the correct one.
Step 3: Erase the Partition
1. Opening the Erase Function
- With the correct partition selected, click on the Erase button located at the top of the Disk Utility window. This will open a new dialog box with options for erasing the partition.
2. Configuring Erase Options
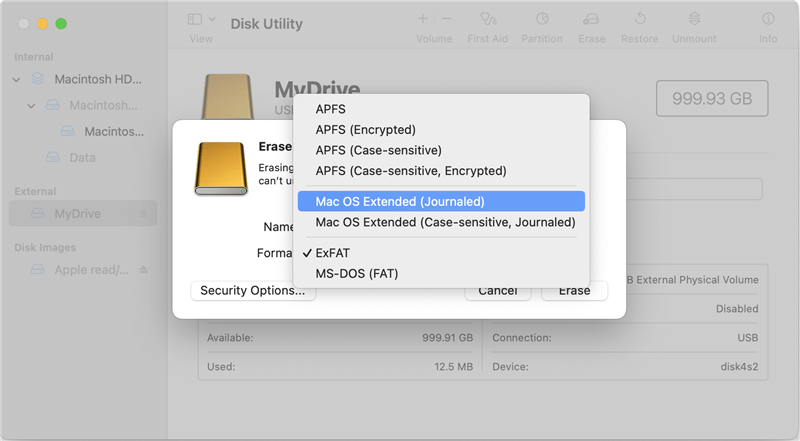
- Name: Enter a new name for the partition. This will be the name displayed in Finder and other file management applications.
- Format: Choose the desired file system from the drop-down menu. Common options include:
- APFS: Ideal for SSDs and the latest macOS versions.
- Mac OS Extended (HFS+): Suitable for older Macs and HDDs.
- ExFAT: Useful for cross-compatibility with Windows and handling large files.
- Scheme: If you see this option, select “GUID Partition Map” for most modern Macs.
3. Starting the Erase Process
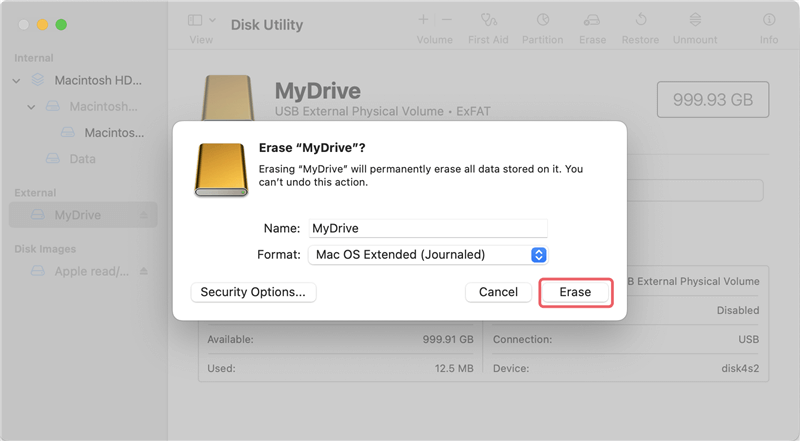
- After configuring the erase options, double-check that all settings are correct.
- Click the Erase button at the bottom of the dialog box to begin the formatting process. Disk Utility will format the partition, which might take a few moments depending on the size of the partition and the speed of the drive.
Step 4: Confirm the Formatting
1. Completion Message
- Once the formatting process is complete, Disk Utility will display a confirmation message indicating that the partition has been successfully formatted.
- Click the Done button to close the dialog box.

2. Verifying the Partition
- The newly formatted partition should now appear in the list of volumes in Disk Utility with the new name and file system.
- Open Finder to ensure the partition is visible and accessible. Navigate to the partition and try creating a new file or folder to verify that it is functioning correctly.
Troubleshooting Formatting Issues
Sometimes, you may encounter issues while formatting a partition. Here are some common problems and their solutions:
1. Disk Utility Fails to Format the Partition
- Restart Your Mac: A simple restart can often resolve temporary issues that prevent Disk Utility from formatting a partition.
- Run First Aid: In Disk Utility, select the problematic partition and click the First Aid button. This will check the partition for errors and attempt to repair them. After running First Aid, try formatting the partition again.
- Use Terminal: For advanced users, Terminal commands can be used to format the partition. Open Terminal (found in Applications > Utilities) and use the diskutil command. For example:
diskutil eraseVolume APFS "NewName" disk2s1
Replace APFS with the desired file system, “NewName” with the partition name, and disk2s1 with the identifier of the partition you wish to format.
2. Formatting Errors and Unrecognized Partitions
- Check Disk Connections: Ensure that the drive is properly connected to your Mac. For external drives, try using a different USB port or cable.
- Use Recovery Mode: Restart your Mac and hold down Command + R or Power button to boot into Recovery Mode. Open Disk Utility from the Recovery Mode menu and attempt to format the partition from there.
Please note that the data which is erased by Disk Utility is lost for good and can be recovered by data recovery software. Check how to recover lost data from erased hard drive partition >>
How to Wipe a Mac Hard Drive Partition [data unrecoverable]?
DoYourData Super Eraser for Mac
- Format and wipe hard drive partition on Mac.
- Permanently erase data from HDD, SSD, USB drive, SD card, digital camera, etc.
- Erase files, wipe free disk space on Mac, etc.
DoYourData Super Eraser for Mac's Disk Manager tool is a handy tool designed to simplify the process of formatting hard drives or external devices on a Mac. It also provides functionalities to rename hard drives and safely eject external devices. Just choose Disk Manager, then select the hard drive partition, click on Format button.
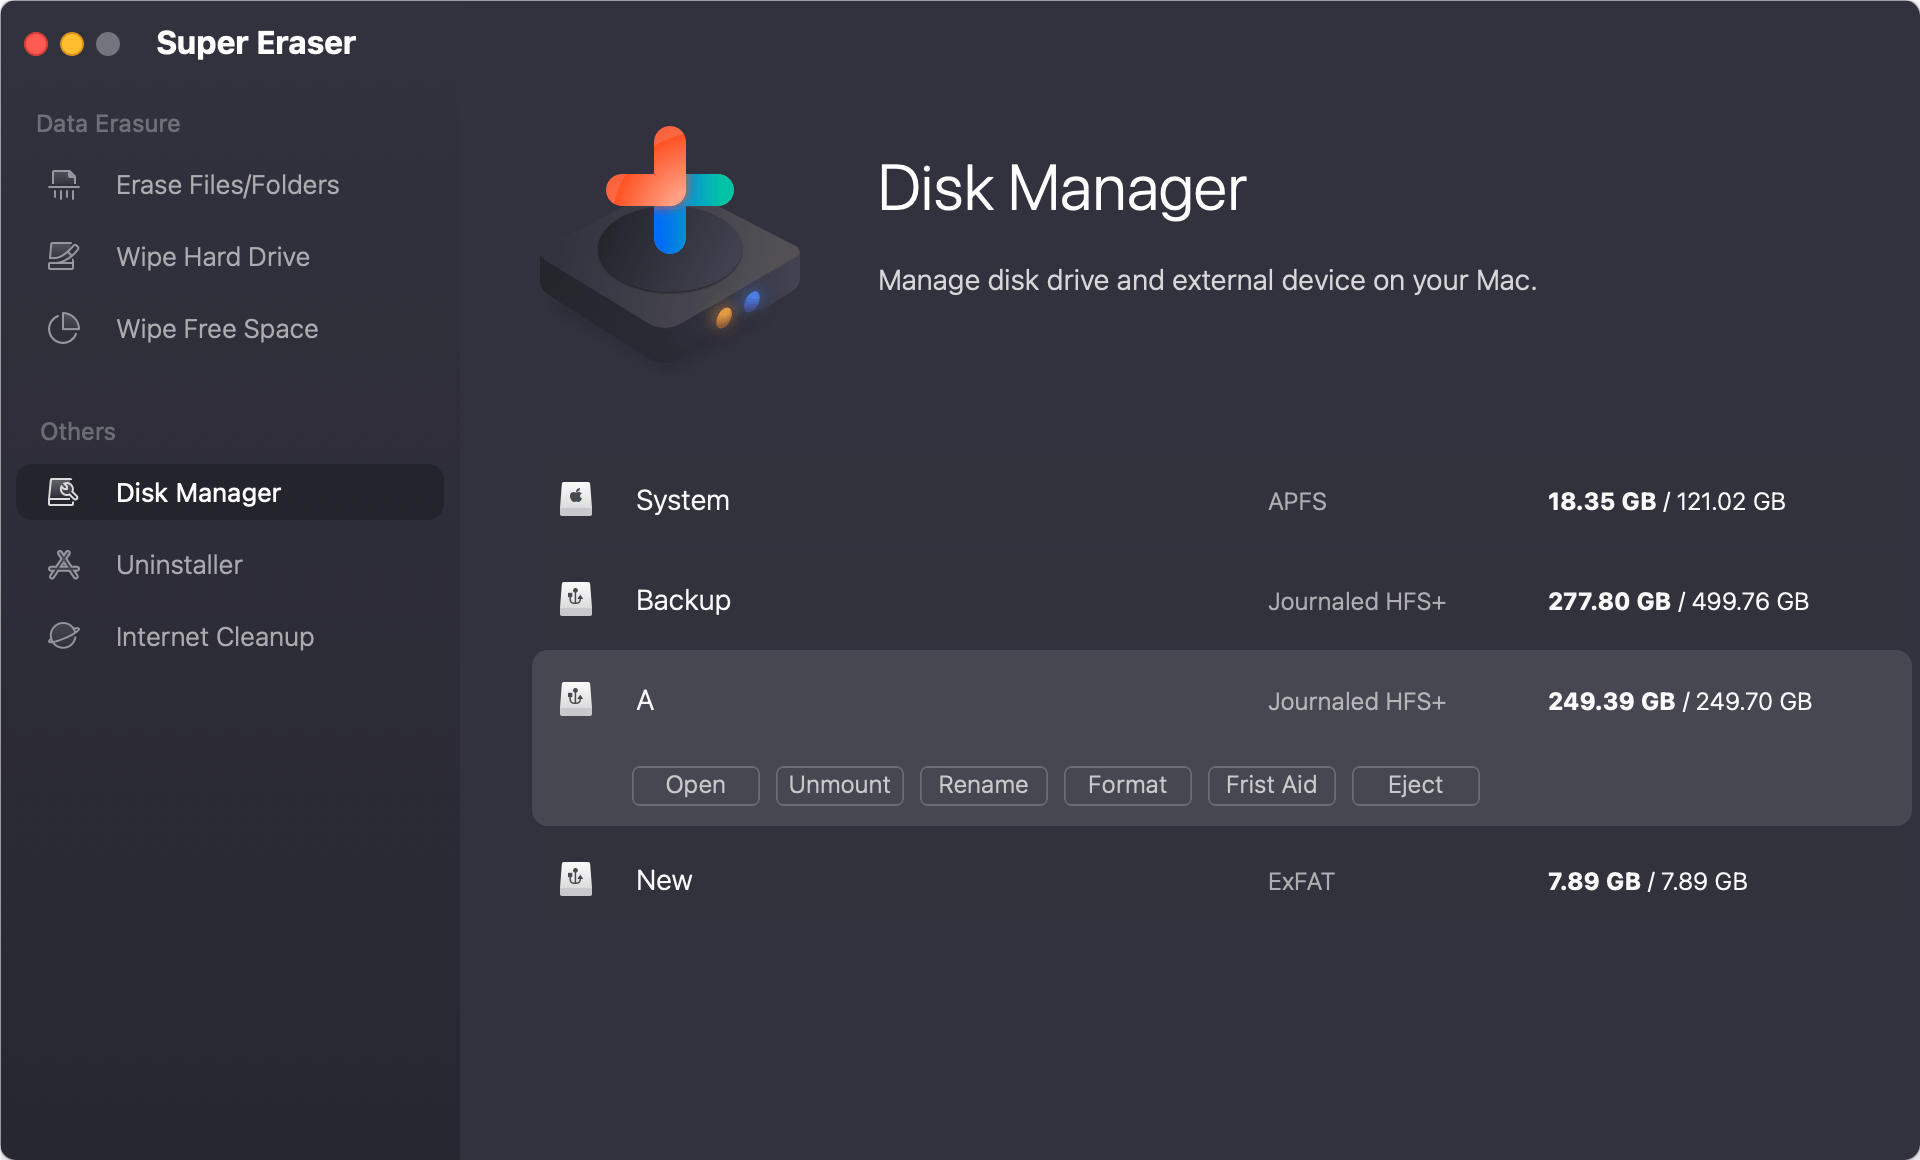
If you want to format and wipe a hard drive partition on Mac, just choose Wipe Hard Drive mode, select the partition, click on Wipe Now button.

Select a data erasure standard, then click on Continue button.
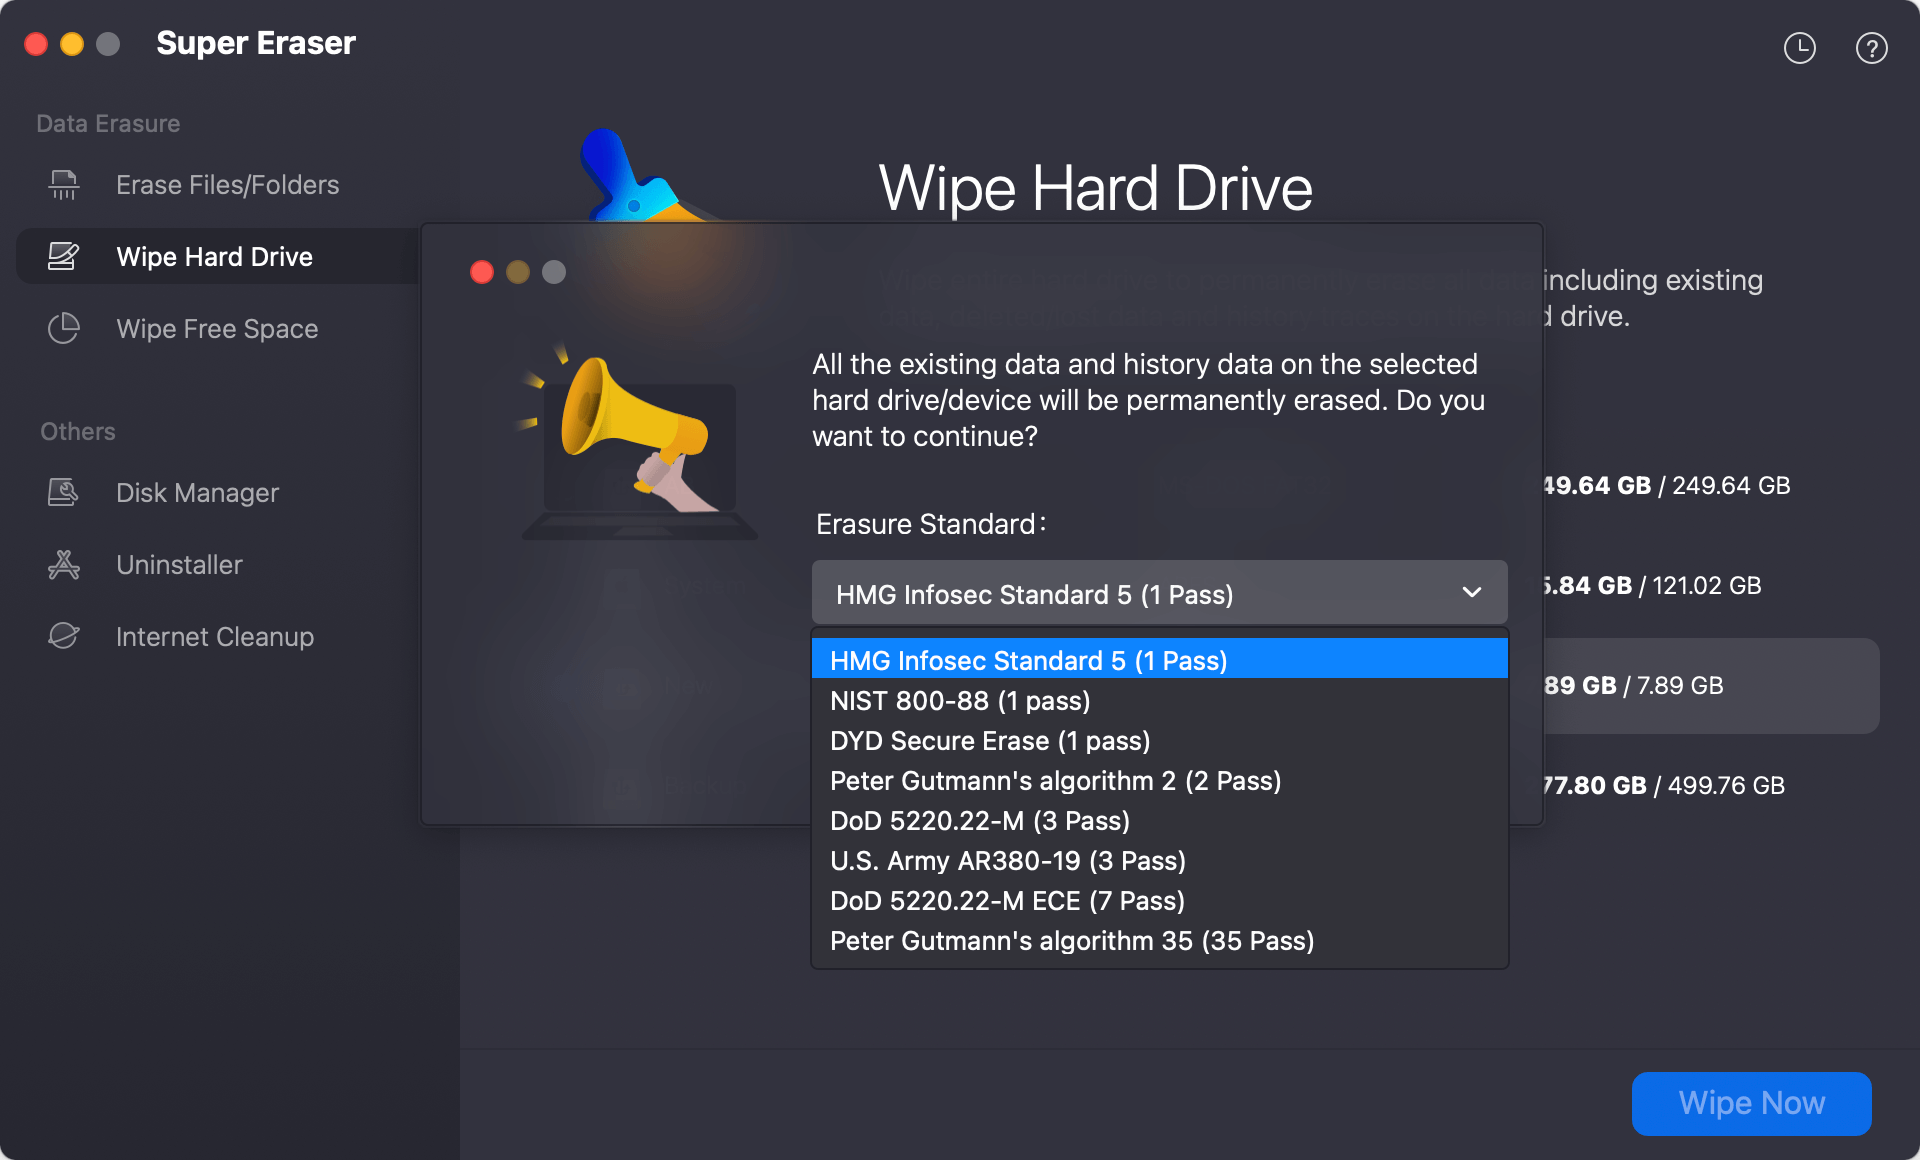
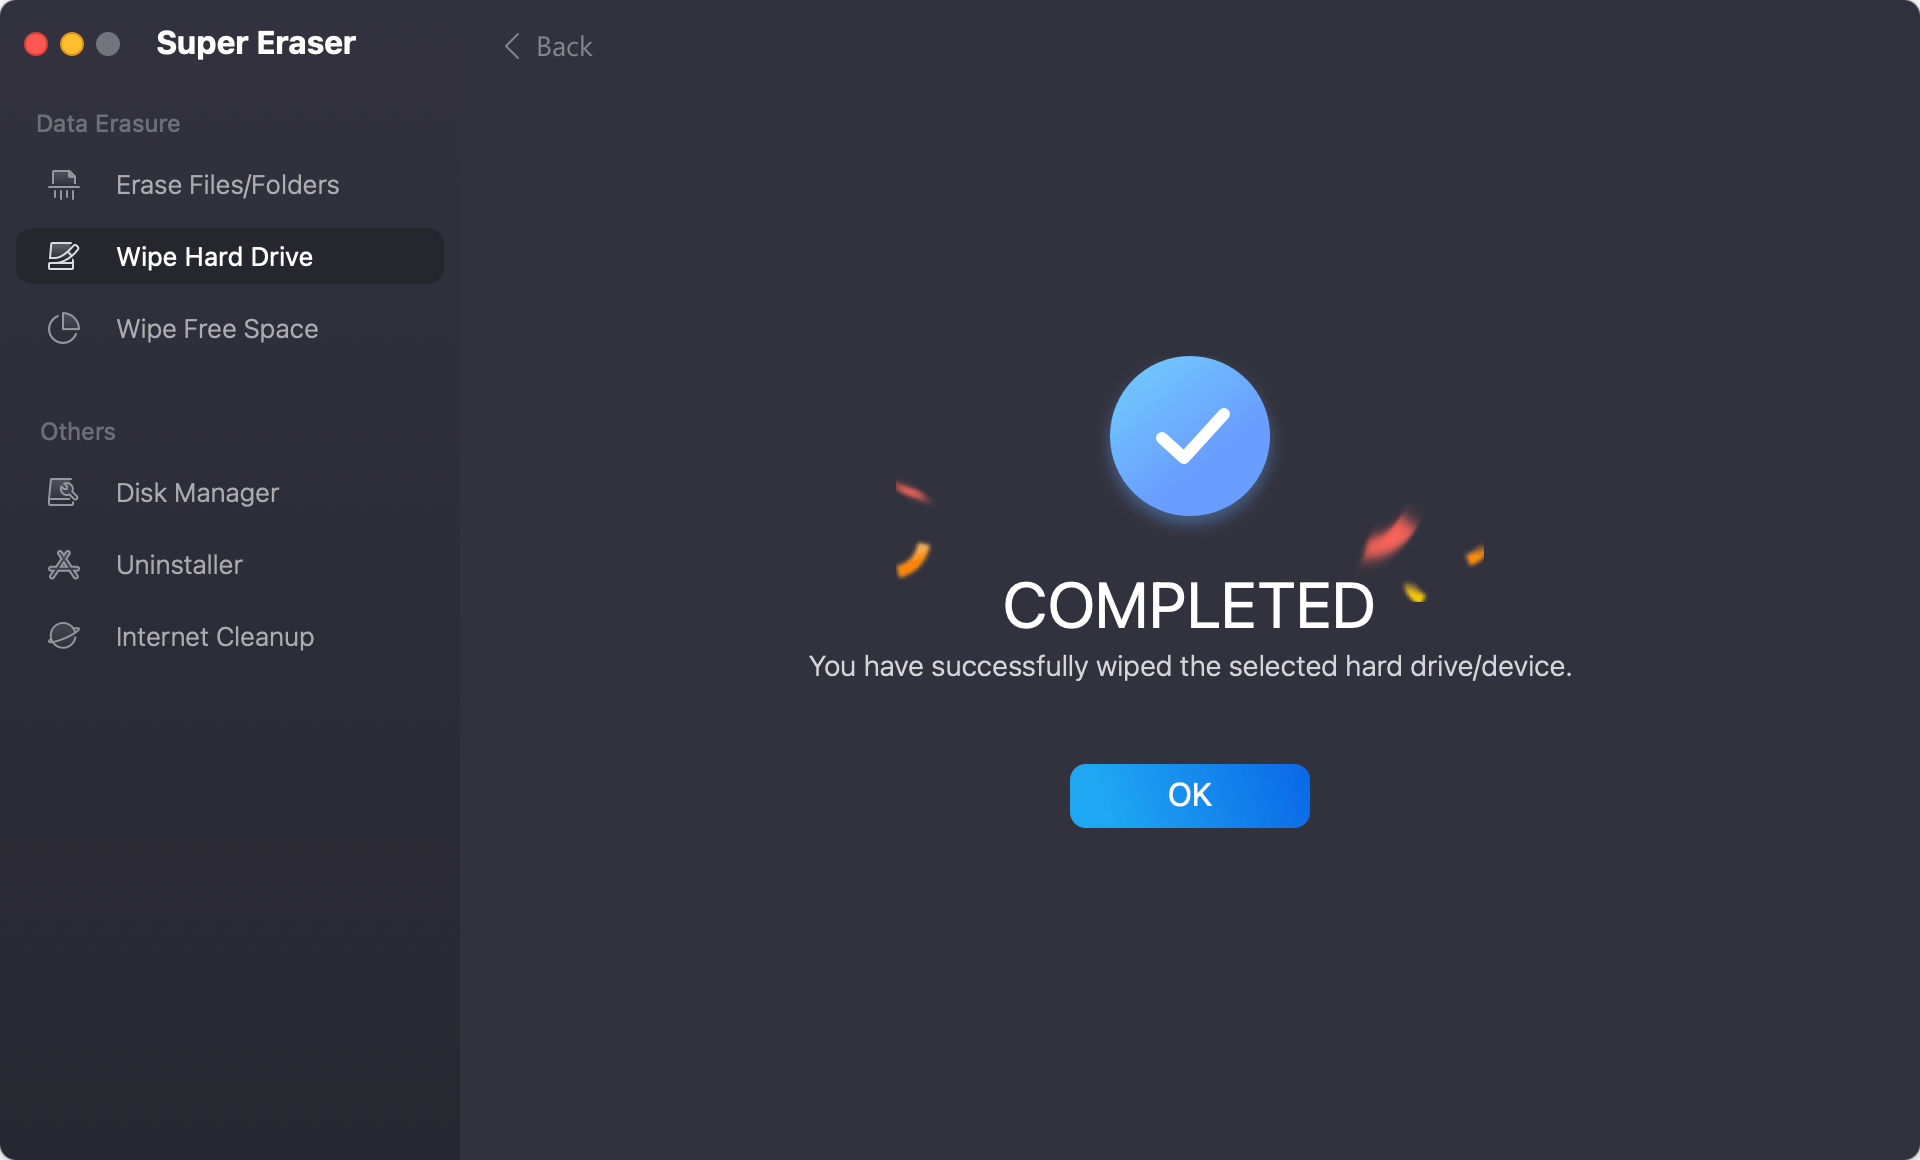
It will format and wipe the selected partition. Once the wiping process gets finished, all data stored on the partition is lost for good, cannot be recovered by any data recovery method.
Conclusion
Formatting a Mac hard drive partition is a fundamental task that can help you manage your storage effectively. By following the steps outlined above, you can format your partition safely, ensuring your data is protected and your system is set up according to your needs. Always remember to back up your data and double-check the partition you are formatting to avoid accidental data loss. With the right precautions and steps, you can maintain a well-organized and efficient storage system on your Mac.

DoYourData Super Eraser for Mac
DoYourData Super Eraser for Mac is a 100% safe, powerful and easy-to-use data erasure program. It offers certified data erasure standards including Peter Gutmann, U.S. Army AR380-19, DoD 5220.22-M ECE to permanently erase data from Macs and external devices, making data recovery be impossible.