Summary: If you find you can't write data to your WD external hard drive, just follow this guide to solve this read-only issue. There are two ways to fix WD external hard drive read-only issue on Mac: 1. Download and install a WD NTFS driver on Mac; 2. Format the WD external hard drive to Mac-compatible file system.
Quick Navigation:
- 1. WD External Hard Drive Read-only Issues on Mac
- 2. Solve 'WD External Hard Drive Is Read-only on Mac' Issue with WD NTFS Driver for Mac
- 3. Solve 'WD External Hard Drive Is Read-only on Mac' Issue with Disk Utility
- 4. Recover Lost Data after Erasing WD External Hard Drive
- 5. FAQs About Fixing WD External Hard Drive Read-only on Mac
WD External Hard Drive Read-only Issues on Mac
- I have a 1TB WD external hard drive and have stored 5GB documents on it. When I connect it to my Mac, it can be opened, but it shows nothing. Where are my documents gone?
- When I drag files from Mac desktop to my WD Elements external hard drive, nothing happens!
- When I connect my WD Drive to my MacBook Air, it gets mounted fine, I can open files and copy the data but I'm unable to delete data or move and rename the folders which are on WD Element 1TB Drive, I found out that is because my drive status is Read Only.

When you encounter this type of issue, just open Disk Utility to check if the file system of your WD external hard drive is NTFS. NTFS is a Windows-based file system and is used widely by most of external hard drives. This file system is not compatible with Mac OS.
When you connect an NTFS disk to your Mac, you just can copy files from it to your Mac, but you can’t write new data to the disk or change anything from it. So, if your WD external hard drive is an NTFS drive, you can't write new data to it. How to solve this issue? Just check the two methods below.
Solve 'WD External Hard Drive Is Read-only on Mac' Issue with WD NTFS Driver for Mac
If you find the WD external hard drive is an NTFS hard drive and you can’t write data to it, you can download and install a third-party WD NTFS driver for Mac software to help you enable NTFS support on Mac.
After downloading DoYourData NTFS for Mac, just double-click it, then drag it to Applications to complete installation. Then run it from Launchpad to help you enable writable for WD hard drive on Mac.
Just click on Enable Writable, then you can get full read-write access to the WD external hard drive without formatting it.

Solve 'WD External Hard Drive Is Read-only on Mac' Issue with Disk Utility
Please note that this method will erase all files stored on the WD external hard drive. So, you’d better back up the files to another drive before you erase the WD external hard drive with Disk Utility.
#1 Back up your WD external hard drive.
If you want to the WD external hard drive become a compatible disk for your Mac, you have to format it to APFS/FAT/EXFAT/Mac OS Extended. Before formatting it, you’d better back up important data to a safe disk.
#2 Format the WD external hard drive with Disk Utility.
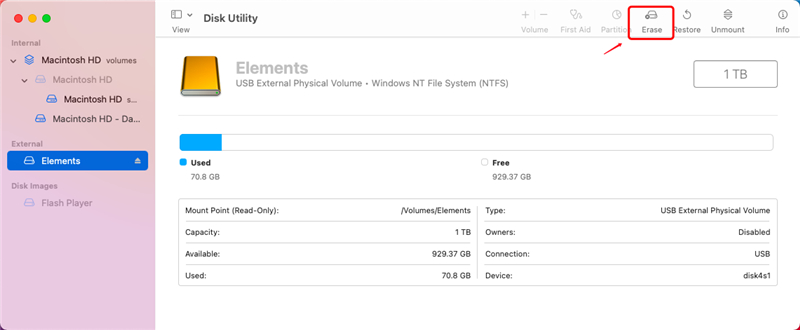
To solve this issue, you can use Disk Utility to format the WD external hard drive to a compatible file system. Just open Disk Utility on your Mac, click the WD external hard drive.

Now, click the Erase button.
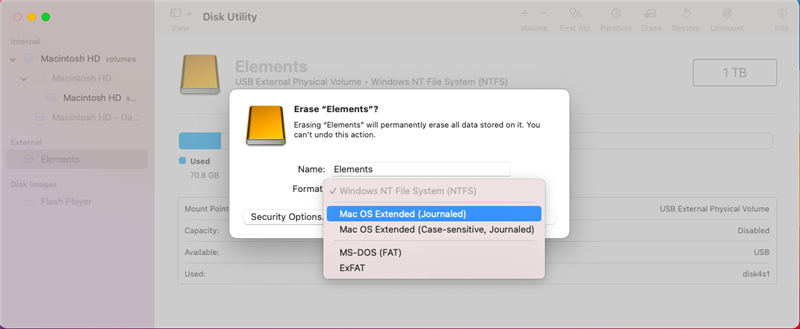
Select the file system you want and click on Erase button again.
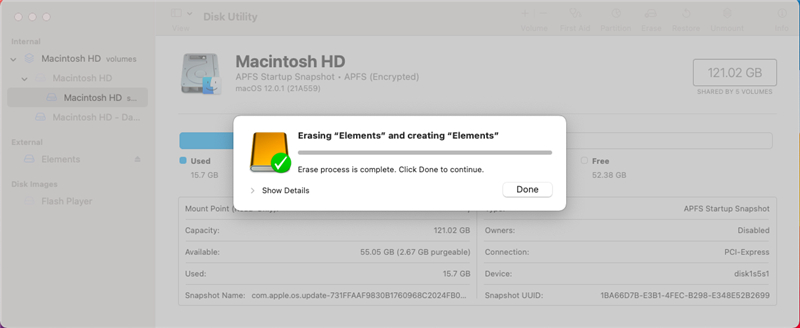
Once the process gets finished, you can write new data to your WD external hard drive without any limitation.
If you are going to sell, donate or dispose of your old WD external hard drive, you’d better permanently wipe all data from it. Check this guide: for Mac users, wipe all data before selling old WD external hard drive.
Recover Lost Data after Erasing WD External Hard Drive
If you format your WD external hard drive without backing up it, you will lose all files in it. Don’t worry, you still have the chance to recover lost data. With a data recovery application, you can get all lost files back.
Do Your Data Recovery for Mac is a powerful data recovery application which is able to recover deleted, formatted or corrupted data on Mac. This easy-to-use data recovery application can help you quickly recover all lost files from the WD external hard drive after it is erasing by Disk Utility.
Just follow the steps below:
Step 1. Download and install Do Your Data Recovery for Mac, then run it from Launchpad. Connect your WD external hard drive to your Mac.
Step 2. Select the WD external hard drive and click on Scan button.

Do Your Data Recovery for Mac will scan the erased WD external hard drive and find lost files.

Step 3. Once the scan is completed, you can preview all recoverable files. Then select the files you want to recover, click on Recover button to save them.

FAQs About Fixing WD External Hard Drive Read-only on Mac
1. How to fix Western Digital external hard drive Read-only issue on Mac?
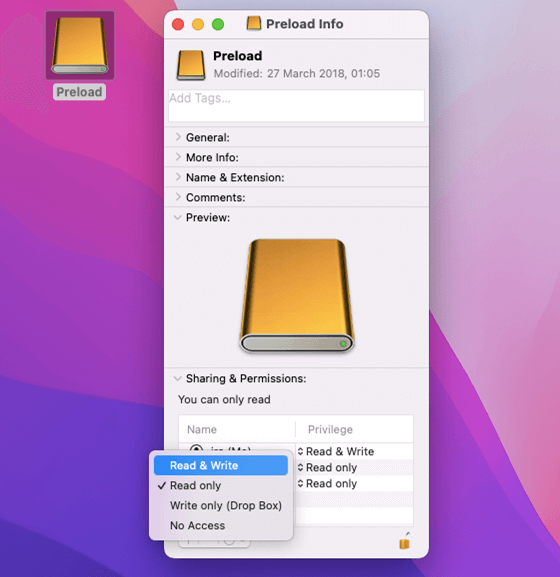
First of all, find the WD external hard drive icon on desktop, right-click the icon and choose Get Info. Then to check if your account is able to read-write the WD external hard drive on Mac. You can change the read-only to read-write.
And if your WD Elements, WD My Book or WD My Passport is NTFS-formatted drive, it won't be compatible with macOS. To solve this issue, download and install an NTFS for Mac tool - DoYourData NTFS for Mac, then click enable writable for the WD external hard drive. Then you can write data to the NTFS WD external hard drive without any limitation.
2. How to format an WD external hard drive for Mac?
If the WD external hard drive is recognized by Disk Utility, you can format it using Disk Utility:
- Connect the WD external hard drive to your Mac.
- Open Disk Utility.
- Select the WD external hard drive and click Erase.
- Give it a new name and select a file system (ExFAT is compatible with both Windows and Mac OS, if you will use the WD external hard drive on both PCs and Macs, just select ExFAT as the file system).
- Click on Erase button again. Once it gets finished, click on Done button.
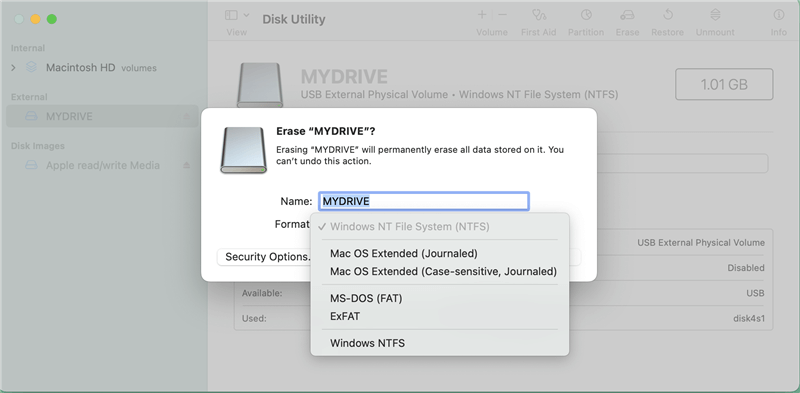
You’d better make a full backup before you erase the WD external hard drive with Disk Utility. And if you have erased it by mistake and don't have a backup, you can use a data recovery application to scan the WD external hard drive to help you recover erased files or lost files.
3. How to fix WD external hard drive not mounting on Mac?
Open Disk Utility, find the WD external hard drive, click on Mount button. DoYourData NTFS for Mac also can help you mount WD external hard drive on Mac whether it is an Mac-compatible drive or an NTFS hard drive.
If the WD external hard drive is not showing up on your Mac, open a Finder, select settings and in Finder Settings, click General, Sidebar, select External disks.
4. What is the best WD NTFS driver for Mac?
NTFS driver can help you enable full NTFS support on Mac. Here is the list of top 5 NTFS driver for Mac:
- DoYourData NTFS for Mac
- Fuse for macOS
- Donemax NTFS for Mac
- Paragon NTFS for Mac
- NTFS-3G
The WD NTFS driver is able to enable writable for WD external hard drives on Mac. You don’t need to format the WD external hard drive and you can write data to it or modify files on it without any limitation. DoYourData NTFS for Mac is pretty simple to use. Just 1-click away, you can enable full read-write access to NTFS drives on Mac.
Final Words:
When you find your WD external hard drive is read-only on Mac, you can use Disk Utility or other Mac disk formatting software to format it and this issue will be resolved. And Do Your Data Recovery for Mac can help you quickly recover lost files even you format the WD external hard drive using Disk Utility.
If you don't want to format the WD external hard drive and quickly solve the WD external hard drive read-only issue on Mac, you can download and install the NFTS for Mac tool. It will help you quickly grant full read-write access to any NTFS hard drive on Mac.
If your WD external hard drive is not showing up on your Mac, check this solution: fix WD external hard drive not showing up on Mac >>