Quick Navigation:
- Why Isn't My External Hard Drive Showing In My Windows 11?
- Fix External Hard Drive Not Showing Up on Windows 11
- Recover lost data from unrecognized external hard drive on Windows 11
Today, data is essential; thus, it's understandable that seeing the error message "Hard drive not showing up" on your system screen might be stressful. However, likely, the external hard drive isn't showing up in Windows 10/11.
But what happens if your external hard disks fail? As a result, all hard drive data might be damaged or erased. The term "portable hard drive" refers to a kind of external hard disk that is often used to store and back up data because of its huge storage capacity.
It is possible to increase the storage capacity of your computer by connecting an external hard drive or a second hard disk; it will almost always instantly appear. But if you're experiencing the "Hard drive not showing up" problem, there are several ways to solve it in this article.
Why Isn't My External Hard Drive Showing In My Windows 11?
The absence of a hard drive in Disk Management and other problems with hard drives may be caused by several factors. Here are some of them:
- It's possible that it was accidentally formatted, causing the system to see it as an unallocated memory.
- Files that are harmful or infected may be present on the computer.
- Data on the hard disk may have been destroyed or corrupted.
- The system will not detect physical damage to the hard disk, such as overheating or a damaged drive.
- It's possible that the hard drive will not be detected if there are loose connections.
- The hard disk may contain faulty sectors or corrupt sectors that prevent the hard drive from being found.
- Hard drives that are more than five years old aren't always compatible with the newest software and upgrades.
Fix External Hard Drive Not Showing Up on Windows 11
To make your external hard drive accessible on your computer, follow the instructions below. To avoid overlooking any details, follow the steps outlined in this article.
Method 1: Do Some Basic Fixes
Inspect the drive to see whether it works. Using an external hard drive, you may see an LED light to indicate that it has been turned on. If you hear a fan spin, this indicates that the hard drive has started up. Changing the ports and the cable may fix the problem if you don't see any warning indications. This signifies that the hard disk is defective and needs to be replaced.
You may have a defective port or cable as long as it turns on when you switch ports or cables. After that, you should access the hard disk without any problems. The next step is to test the hard disk on a separate PC and restart your computer. If that doesn't work, you should proceed to the next set of instructions.
Method 2: Run the Troubleshooter
Windows has a built-in troubleshooter that may assist you in resolving the issue. To determine whether there are any problems with the device, it performs a series of tests on it.
- Control Panel may be accessed from the Start menu's Right-hand Column. Alternatively, you may hit Windows+R, type "Control," then launch the Control Panel by pressing Enter.
- Search for "troubleshooting" in the panel's search box or use the listed items to locate it directly.
- Click "View All" when the results are shown.
- Run the "Hardware and Device Troubleshooter" now to resolve the problem.
Method 3: Update Or Reinstall Disk Driver
There are device compatibility difficulties with each Windows 11/10 update. If you have a device driver that doesn't function with your current Windows version, this problem is more likely to occur. To fix the issue, your disk driver must be updated or reinstalled in Device Manager.
Update Disk Driver
- Right-click This Computer and choose "Manage." Click "Device Manager" on the left side.
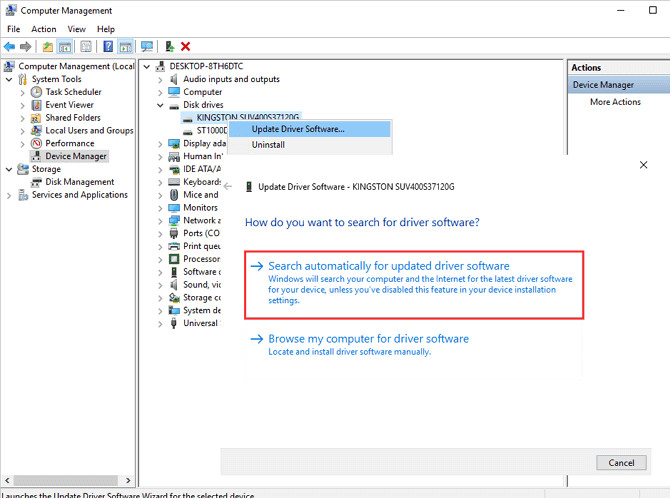
- When you double-click on the Disk Driver folder, you will see more options. Choose "Update Driver Software" when you right-click your disk driver.
- From the pop-up menu, choose "Automatically search for updated driver software". Then, sit back and wait for the computer to find and install the most current driver software.
Re-install Disk Driver
If upgrading the driver doesn't fix the missing drive problem, you may still try reinstalling the driver.
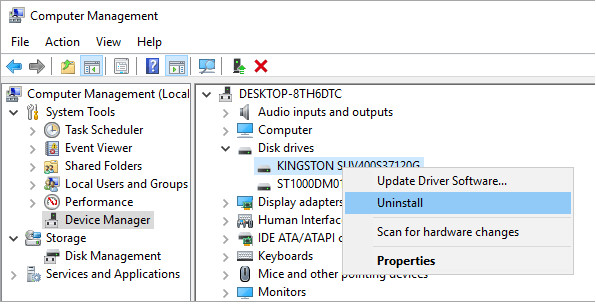
- When you right-click the disk driver, choose "Uninstall". When you're done, click "OK". Try rebooting your computer to reinstall the driver.
- Alternatively, you may check the company's website for the most recent updates, which you can then download and install on your PC.
Method 4: Initialize The Drive
If you have a new HDD, it is possible that it has not yet been initialized and is not ready to be used with Windows. Initiating a drive wipes out all of the data on that disk. It's only advised if the drive is brand new and empty or you have a backup that you can use to restore the contents. You may also utilize data recovery software if you have a backup to restore your information.
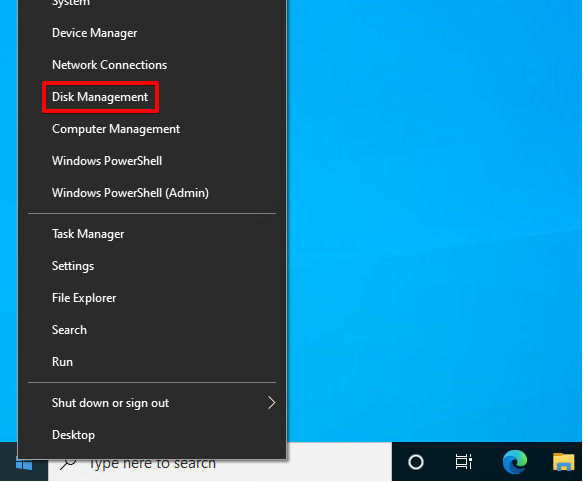
Select Disk Management from the Start menu by right-clicking.
Click Initialize Disk from the context menu when you right-click on the external disk that indicates "Not Initialized".
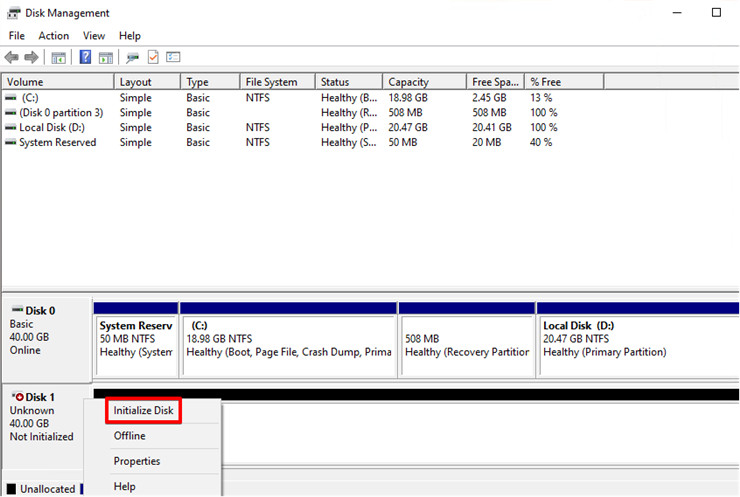
Click the "OK" button.
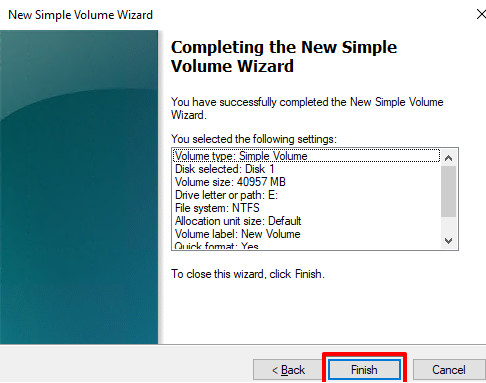
Then, to utilize the disk, you will need to format it. Then choose New Simple Volume from the context menu by right-clicking on the available unallocated space.
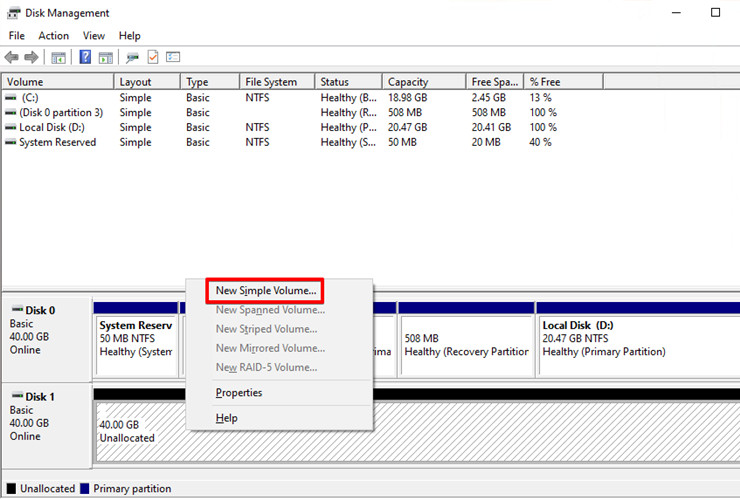
Click the Next button.
Set the size of the volume in megabytes (MB). You may proceed by using the Next button.
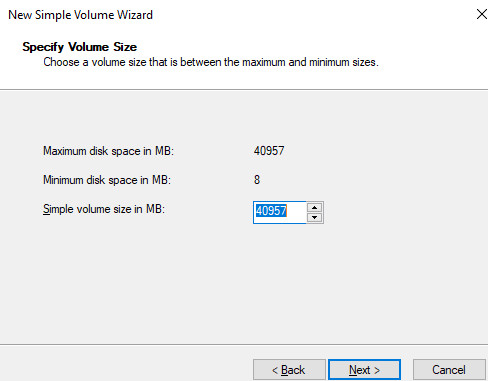
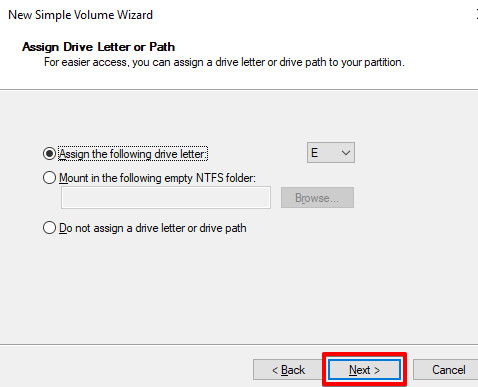
You should do this by giving each drive a unique letter. Click Next, Windows will automatically choose an available one.
The volume name and file system must be specified. Click Next to continue with the default settings.
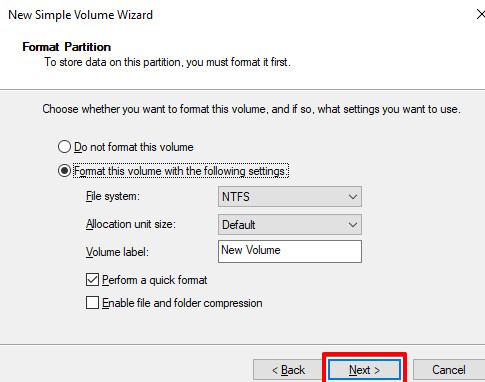
As the last step, click Finish to complete the procedure. After that, the drive should be operational.
The external hard disk will not identify the issue if all of the techniques listed above fail to solve it. If you still see the same error message, there is a high possibility that your hard disk has failed. In this scenario, you should seek the assistance of a professional hard drive recovery service provider. That's why it's essential to take a backup of your hard disk data once you've fixed your issue.
Recover lost data from unrecognized external hard drive on Windows 11
Do Your Data Recovery is a powerful data recovery software. With this software, you can easily recover permanently deleted/formatted data and export data from an inaccessible device to your Windows 11 PC. Download it:
Do Your Data Recovery
- Quickly recover lost data from unrecognized external hard drive on Windows 11 whether you have formatted the external hard drive or not.
- Export data from inaccessible external hard drive to Windows 11 PC.
- Unformat hard drive or recover erased hard drive on Windows 11.
It means Do Your Data Recovery can help you recover lost data when the external hard drive is not showing up on your Windows 11 PC.
Step 1. Run Do Your Data Recovery on your Windows 11 PC and connect your external hard drive to this PC.

Step 2. Select the external hard drive and click on Scan button.

Step 3. Once the scan is completed, just preview all recoverable files. Then select the desirable files, save them.
