Home > Hard Drive Solutions for Mac
Best WD NTFS Driver for Mac: Enable NTFS Write-Read Support on Mac
Mac WD (Western Digital) NTFS driver software lets you write, edit, and modify NTFS hard drives. Many of the best NTFS drivers allow Mac users to write and edit NTFS-formatted WD external hard drives. Download and install the best WD NTFS driver for Mac - DoYourData NTFS for Mac:
![]() Updated by Justin Kenny on July 19, 2023
Updated by Justin Kenny on July 19, 2023
Quick Navigation:
Technology has advanced to the point where it permeates all facets of modern life. We use our electronic devices constantly to communicate with others, organize events, conduct business, and entertain ourselves.
Naturally, a great deal of critical information is exchanged at such events, and how and where you save this information is crucial; this is where WD's external hard drive comes in.

For example, WD My Passport is a reliable and transportable hard drive with 5-star reviews on most sites. My Passport adds an extra layer of security to the WD Backup TM program, which already includes a password protection function. However, there are times when formatting or reformatting the drive is necessary. If you don’t want to format the WD external hard drive and want to remove the Read-only limitation on a Mac, just use a WD NTFS driver.
Best WD NTFS Driver for Mac and How to Use It?
DoYourData NTFS for Mac is one of the best WD NTFS drivers. It can help you enable read-write support for all WD hard drives on Mac. You don’t need to format the NTFS WD external hard drive, just need to install DoYourData NTFS for Mac and use it to enable writable for all NTFS drives.
NTFS file system is a Windows-based file system and it is not compatible with Mac OS. Most of WD external hard drives are formatted with NTFS file system by default. When you get a new WD external hard drive, you connect it to your Mac, you may find you can’t write data to it or edit files on it. To solve this issue, you can download and install the easy-to-use WD NTFS driver - DoYourData NTFS for Mac.
As its name indicates, WD NTFS driver is able to enable write-read support for all NTFS drives on your Mac. Actually, DoYourData NTFS for Mac is able to enable NTFS support for all types of hard drives on Mac such as Seagate, WD, Samsung, LaCie, HP, G-Drive, etc.
Follow the steps below to enable WD NTFS support on Mac:
Step 1. Download and install DoYourData NTFS for Mac on your Mac, then open it.
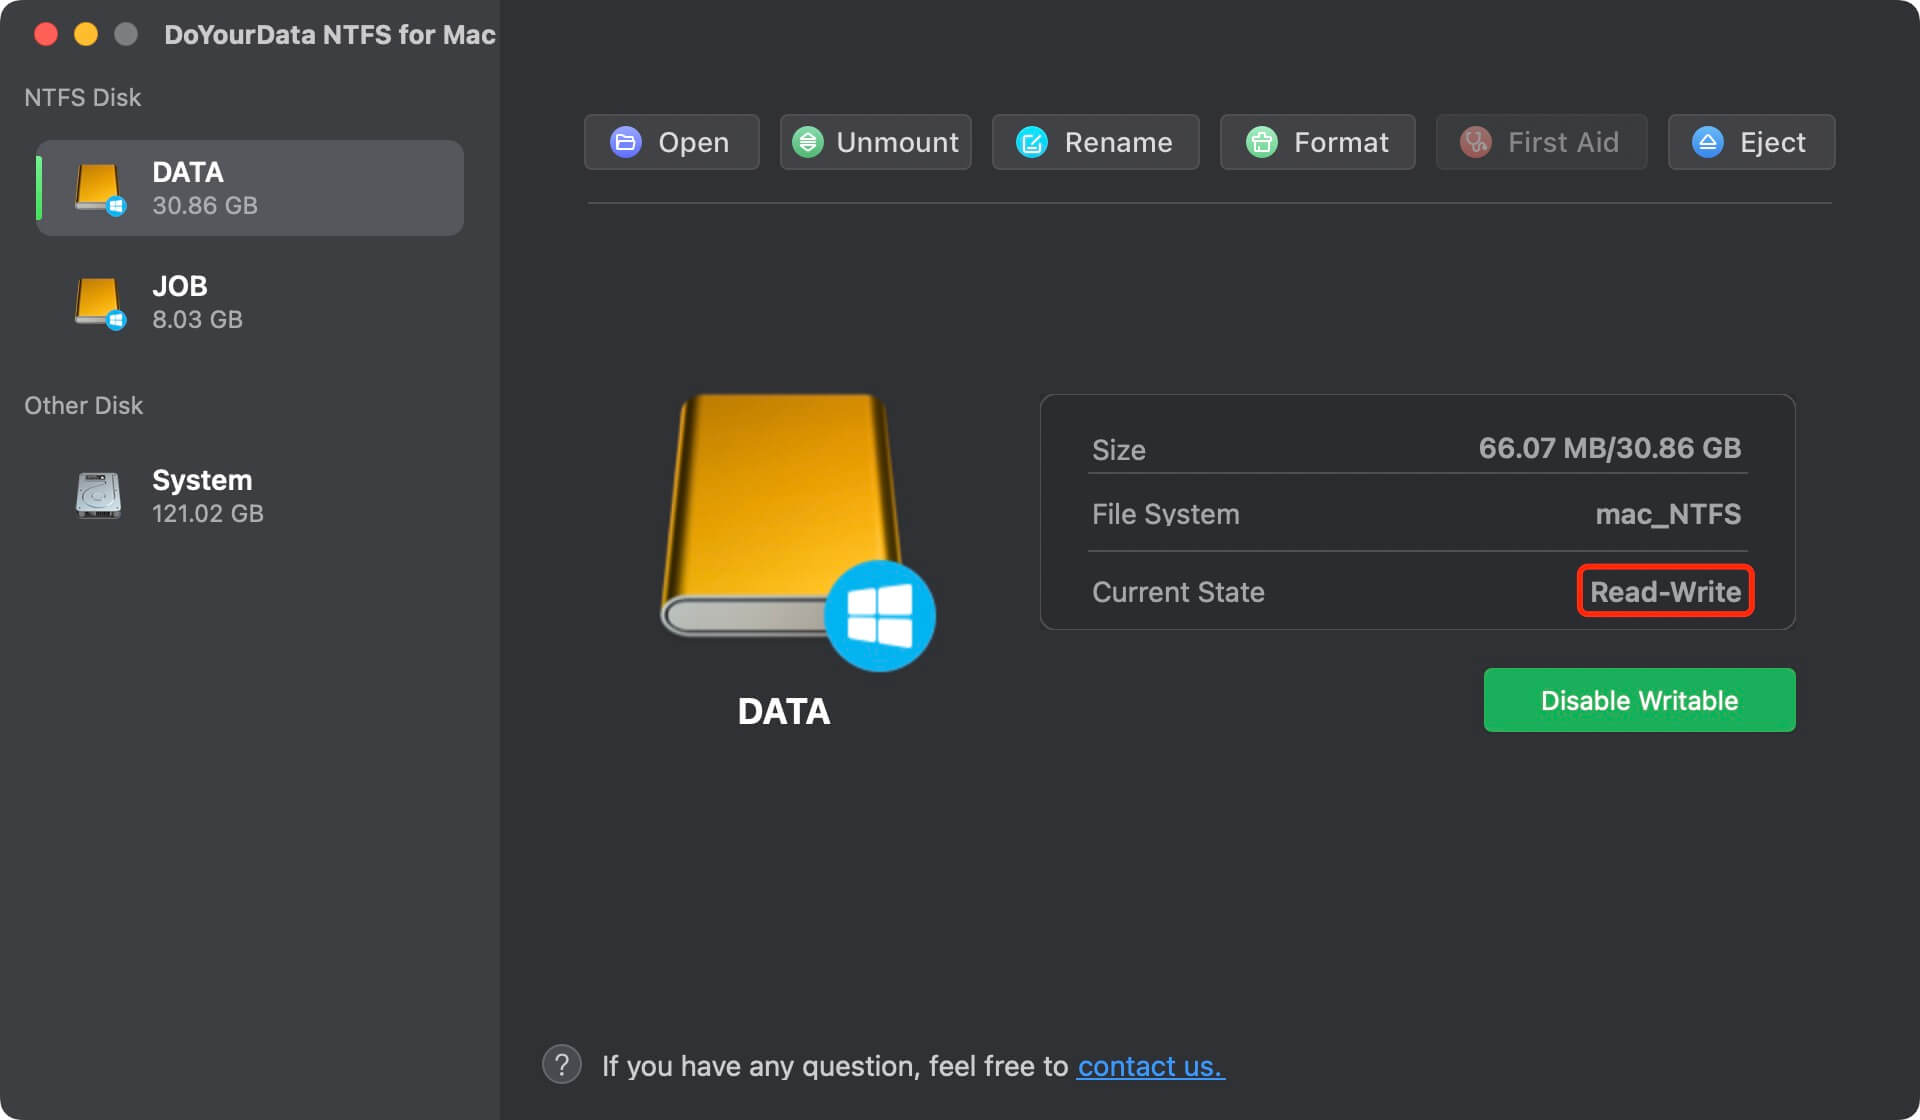
Step 2. Connect the WD external hard drive to your Mac. DoYourData NTFS for Mac will recognize it and list it under NTFS Disk.
Step 3. Select the WD external hard drive and click Enable Writable.

Then the state of the WD external hard drive will become Read-write. You can write data to the external hard drive without any limitation.
If you want to use NTFS WD external hard drive without NTFS driver, you have to format the WD external hard drive to a Mac-compatible file system.
How to Format WD External Hard Drive for Mac?
Most WD external hard drives are incompatible with Mac OS because of fundamental incompatibilities between the two operating systems. To overcome this barrier, you'll need to reformat the hard drive into a commonly used format.
You want to know how to convert WD drives to Mac OS. Well, to begin with, it's fairly simple, and it can be done across different devices so that cross-platform usage capabilities may be taken advantage of. No additional software is needed, and the procedures involved are straightforward.
Many formats are available, each with pros and cons, making determining which is best for reformatting a hard drive challenging. For instance, ExFAT has restricted partition sizes, FAT32 is uncommon, and the Journaled format used by Mac OS is platform-specific. Therefore, knowing what you need can help you choose the best format.
Mac OS Journaled formats are preferable if you solely use Mac OS devices, as they place little restrictions on partition and file sizes. HFS+ formats are compatible with Android, Windows, and Mac OS without any problems and have no constraints that make them less usable than NTFS systems if you want to use them on all your devices.
Many options are available to users who wish to reformat their WD external hard drives on a Mac. On a Windows machine, you choose the appropriate file format; on a Mac, you can use Disk Utility; and the Command Prompt.
Use Windows to format a Mac-compatible WD external hard drive
Follow these simple instructions to implement this technique on a Windows OS machine.
Step 1: Connect your WD hard drive to your computer through USB and wait for it to be recognized. Then, in the left pane of Windows Explorer, select "This PC" and click on it.
Step 2: Select "Format" from the list of options when you right-click the drive name you want to format. In the following window, choose "File System" and choose your desired format. The next step is to label the hard disk in the "Volume Label" field.
Step 3: After checking your options, pick "Quick Format" and press the "Start" button. You'll need to be patient while your drive is being formatted.

WD NTFS formatting on a Mac
The first step in formatting a Western Digital external hard drive for use in a Mac is to attach it to the computer and launch Disk Utility. Once the drive is recognized, WD external hard drive will appear on the computer's desktop.
To begin, select Finder from the dock, then navigate to the left pane and double-click the Applications icon.
Select several options from the right panel. Find the Utilities icon, and then click it.
Launch Disk Utility.
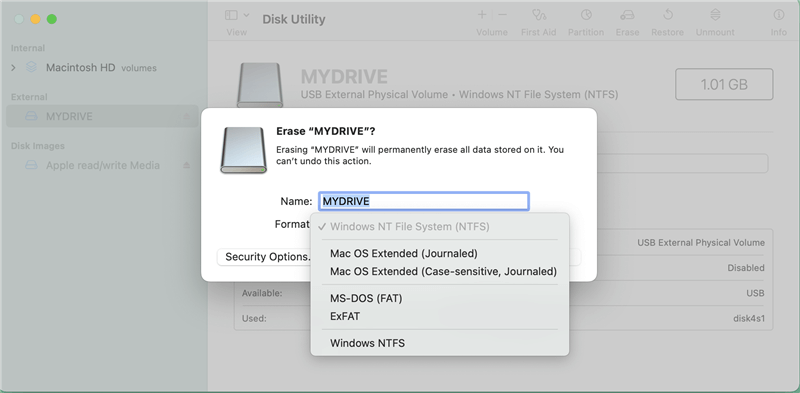
Launch Disk Utility and inspect the Western Digital NTFS drive.
Click Erase.
Select a file system and click Erase again.
After the format is complete, you can insert the drive into a Mac.
FAQs About WD NTFS Driver for Mac
- DoYourData NTFS for Mac
- NTFS-3G
- Donemax NTFS for Mac
- iBoysoft NTFS for Mac
- Mac Fuse
- Download and install Do Your Data Recovery for Mac, open it on Mac.
- Connect the WD external hard drive to your Mac.
- Select the formatted WD external hard drive.
- Click on Scan button.
- Preview and recover lost files.
Conclusion:
WD NTFS driver for Mac can help you fix the issue: WD external hard drive is read-only on Mac. Download and install the reliable WD NTFS driver on your Mac, open it and click on Enable Writable button. Then all NTFS drives will become Read-write. You can write data to any WD external hard drive without any limitation. DoYourData NTFS for Mac is an easy-to-use NTFS for Mac tool. It can help you quickly fix external hard drive read-only issue and enable WD read-write support on Intel-based Mac, T2 Mac and Apple silicon Mac.
Written & Updated by Justin Kenny
Justin Kenny is a writer & editor of DoYourData. He joined DoYourData in 2016 and focuses on writing articles about Windows data recovery, Mac data recovery, external device data recovery, hard drive clone, data erasure, Mac cleanup, computer issue fixes, etc. He is a super fan of Apple devices and is big on testing new digital device and system utility software.