Quick Navigation:
- Understanding Photo Deletion on Mac
- 3 Methods to Remove Photos Permanently on Mac:
- Best Practices for Photo Deletion
- Conclusion
- Mac Photo File Eraser
Handling digital pictures on a Mac is common, but ensuring they are erased permanently is important for privacy and space. Even if you delete pictures and empty the trash, the data stays on your hard drive until it's overwritten, which means it might be possible to get it back. This guide will show several safe and lasting ways to delete photos from your Mac.

We'll go over all the steps you need to take to permanently erase photos on Mac, from using the Photos app and emptying the Trash safely to using Photos app, third-party Mac photo file eraser software. Whether you need to make room in your photo library or keep private data safe, these tips will help you do it safely and confidently.
Understanding Photo Deletion on Mac
Most Mac photos end up in the trash when you delete them. While emptying the trash might seem to remove the file, the data stays on the hard drive until new data replaces it. That means that data recovery software might be able to retrieve the pictures.
To get rid of photos permanently and ensure the photos will not be recovered with any software or data recovery services, you need to either overwrite the data or use software that is made to delete files safely.
3 Methods to Remove Photos Permanently on Mac:
There are different methods on Mac to remove or delete the photos permanently. However, the methods will offer different security level and recovery ability. If you want to remove some private photos and don't want the photos be recoverable, you should choose the professional data sanitation application and ensure to overwrite the data permanently.
In case you just want to clean up your Mac to get more free space and don't worry about the data security, then just remove the photos from Photos app or Finder, then empty the Trash or Recently Deleted items. Please check and choose a proper solution based on y our own needs.
| Photo deletion method | Security | Recover-ability | Tools Required |
|---|---|---|---|
| Wipe with software | High | Absolutely irretrievable | DoYourData Super Eraser |
| Delete in Photos app | Low | Possible with software | System built-in tool |
| Remove from Finder | Low | Possible with software | System built-in tool |
1. Permanently Delete Mac Photos with DoYourData Super Eraser
Using a file eraser program like DoYourData Super Eraser for Mac is the fastest and easiest way to get rid of all your photos on a Mac for good. With this software, you can get rid of files other than pictures. Follow these steps to use the software to get rid of all the pictures on your Mac:
DoYourData Super Eraser for Mac
- Securely and permanently shred photos and other files on Mac.
- Best data wiping tool to wipe data on SSD, HDD, USB flash drive, SD card, etc.
- Support erasing deleted data in free space or all data on a hard drive.
Step 1: Download and install the software on your Mac. Run the software from launchpad. Choose the first mode Erase Files/Folder.

Step 2: Click the Add button the add the specified photos or the photos which contain all the photos which you want to delete permanently. All the added photos or folders will be listed. You can check and confirm the files before you process further.
🚨 Warning: As the shredded photos will no longer be recovered with any data recovery software or services, ensure to check and confirm the right photos files are selected. Otherwise, you will lose them forever.

Step 3: Click Erase Now button, then you will go to the next step where you can choose a data erasure algorithm to shred your photo files.
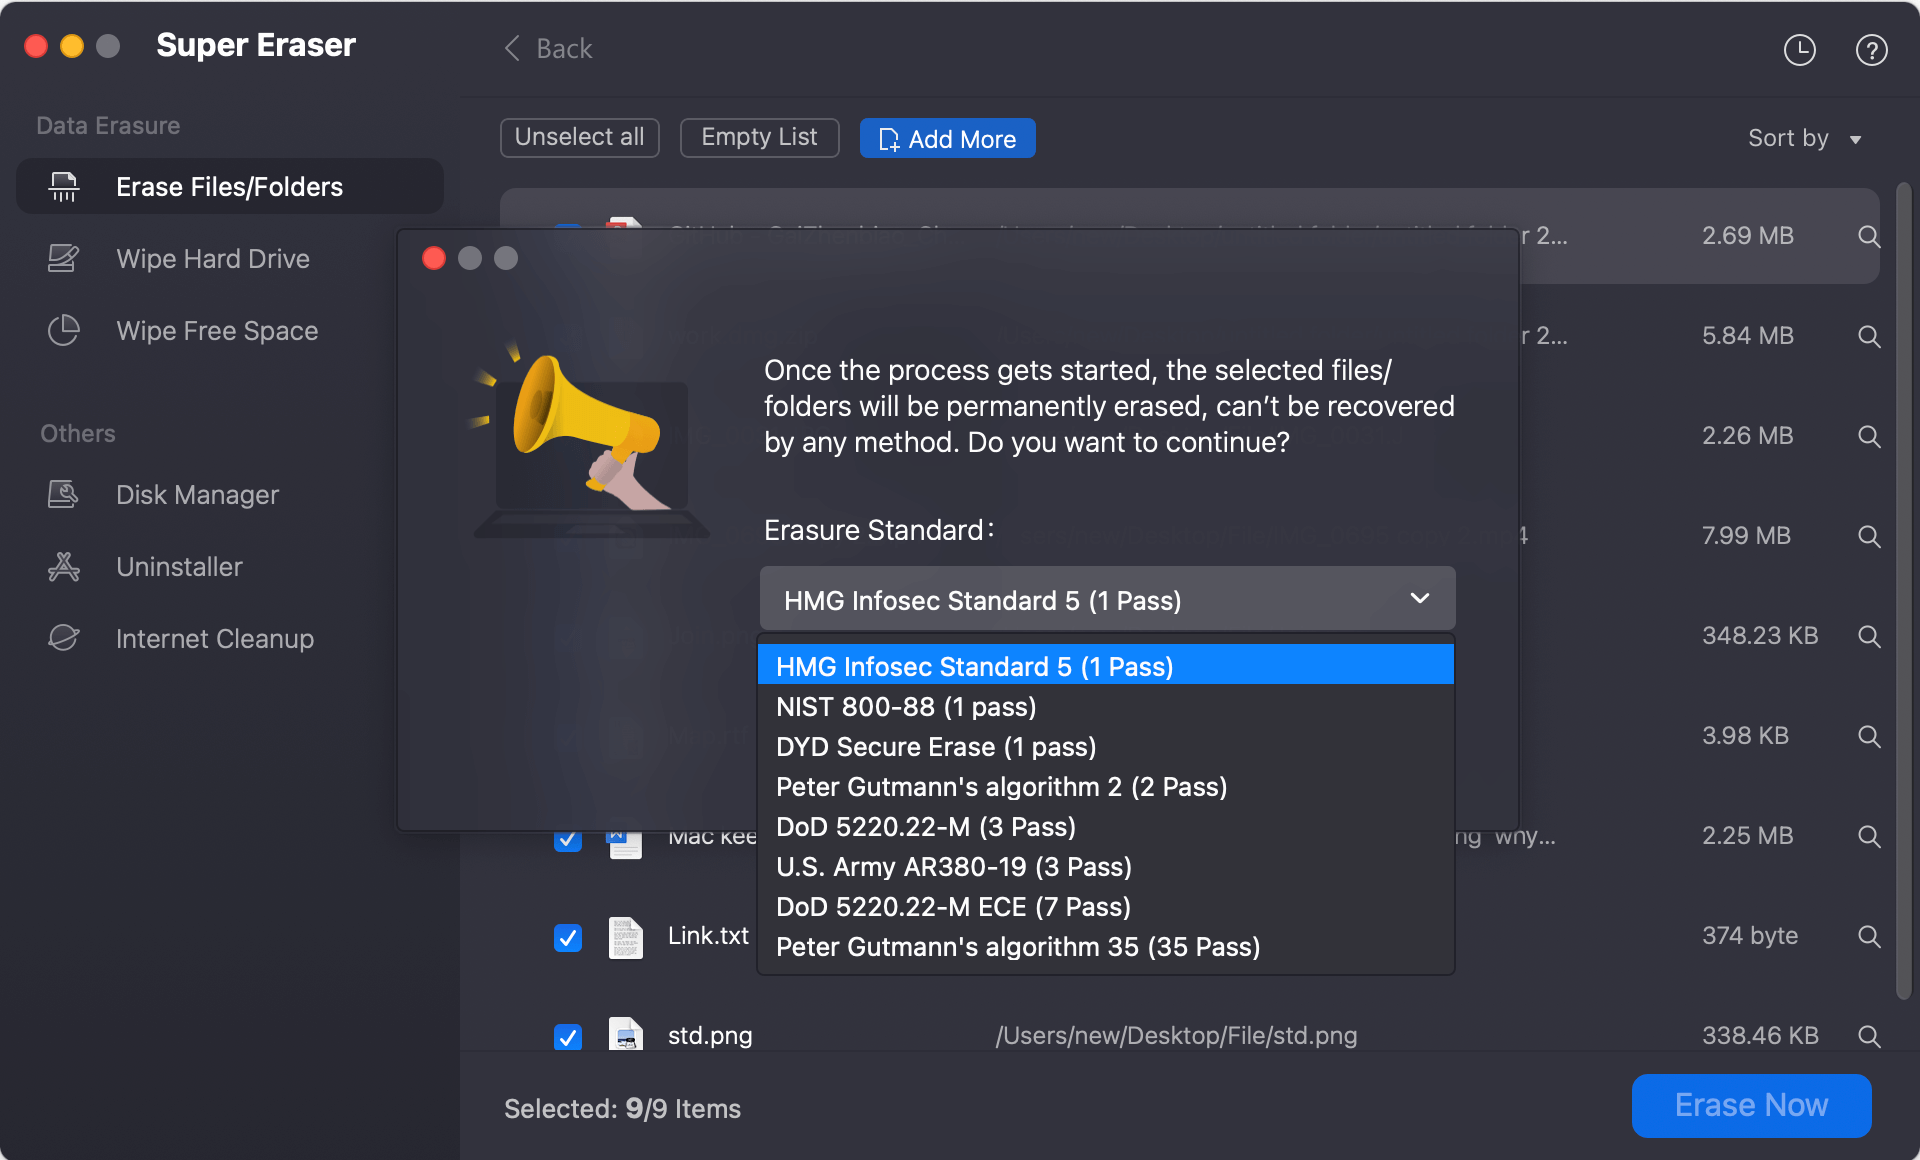
Step 4: Once the data sanitation standard is selected and confirmed. Click the Continue button and the data wiping process will start.
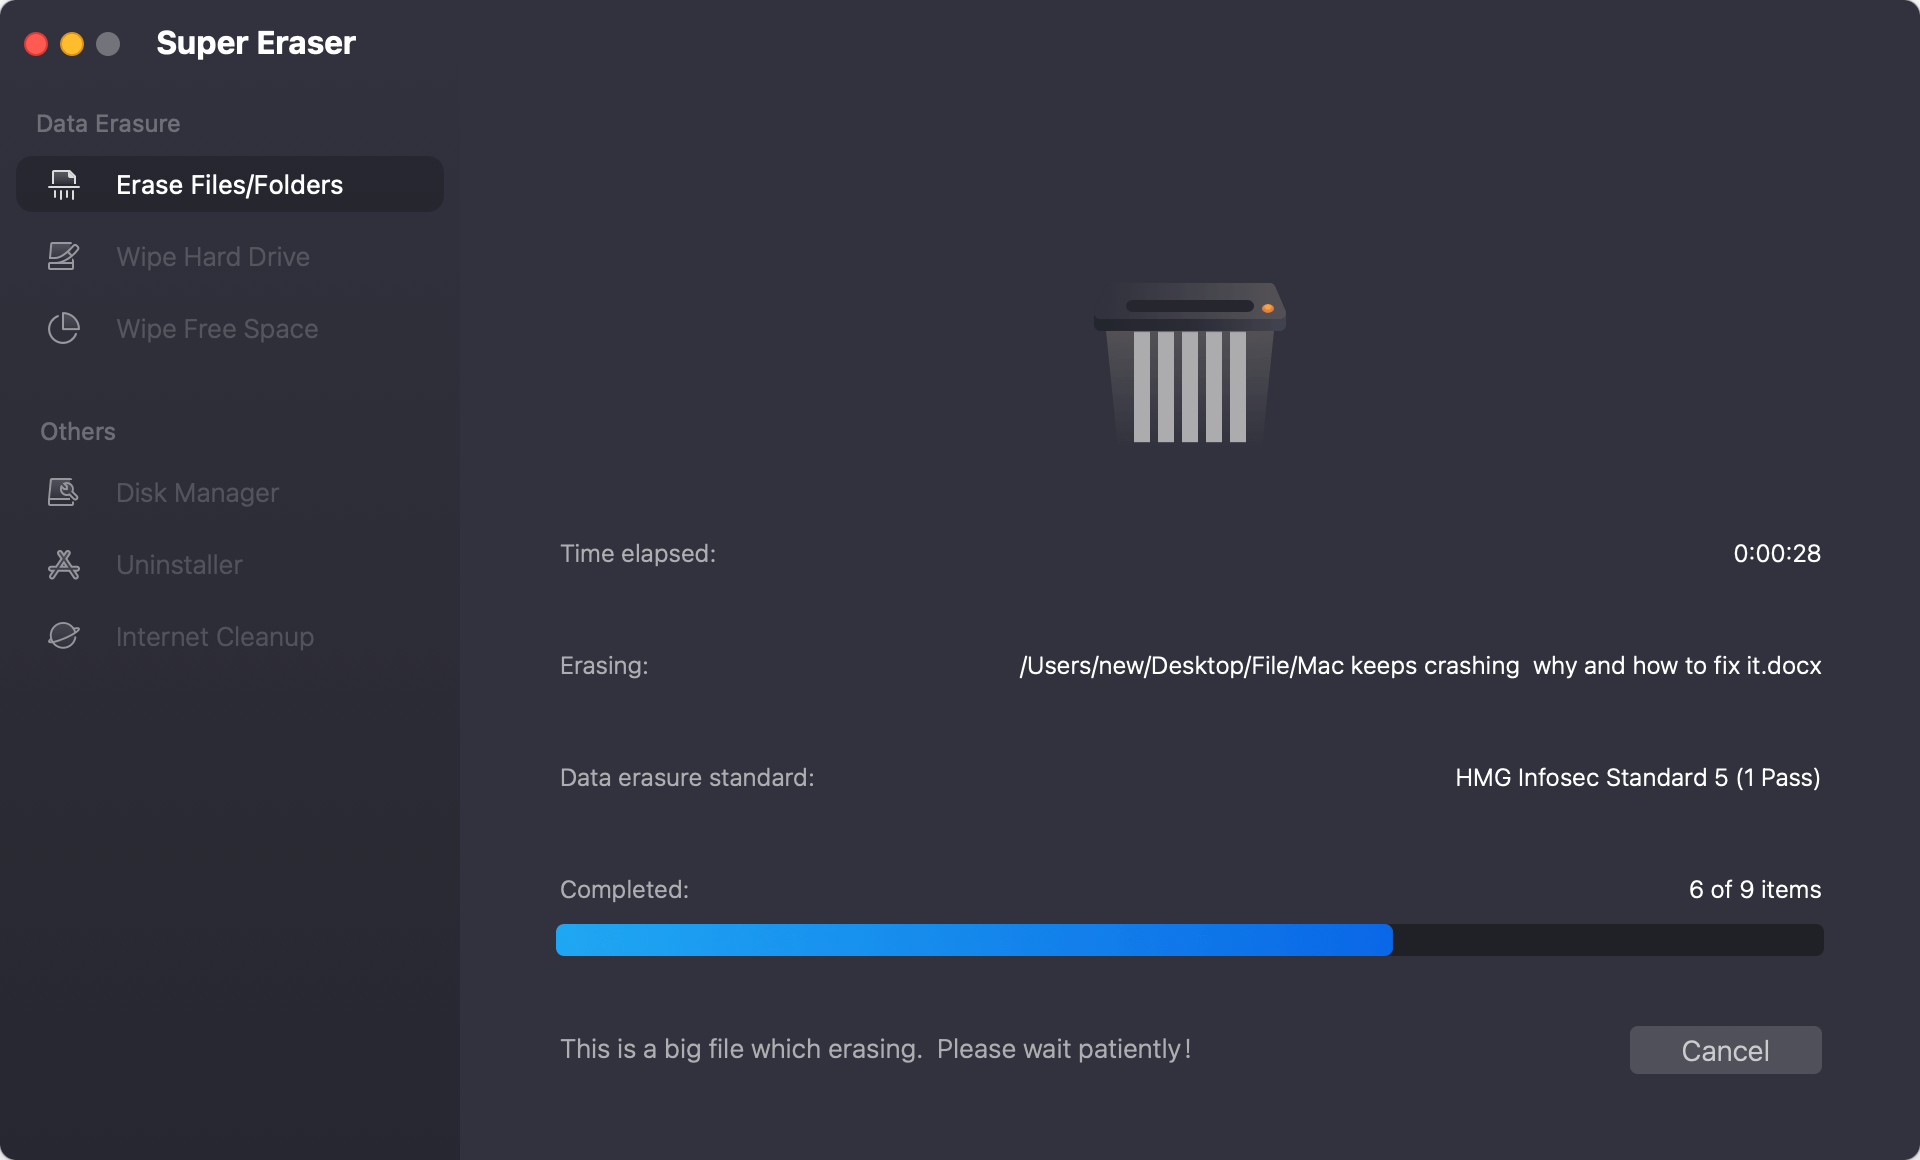
Step 5: When the process of erasing is finished, a message confirms that the file has been erased.

After the photos are erased permanently, they will not be recovered in any way. You can use any data recovery software to verify if the erased photos could be recovered successfully.
This method is very useful especially when you need to remove some sensitive, private, or certificate data to keep your privacy secure.
If you only need to release more space by deleting some old photos, duplicate photo files, or useless files, then you may not need to wipe the data. Here we also show you the other simple ways to remove photos on Mac.
2. Remove Photos permanently from Mac Photos App
According to Apple Support, this method to delete pictures on a Mac is the best way to do it. It's easy enough for people who even have never used a Mac before, and you can delete pictures and videos you don't want in the macOS pictures app.
Step 1: The Photos app will mostly stay on the Dock. To open it, click the button.
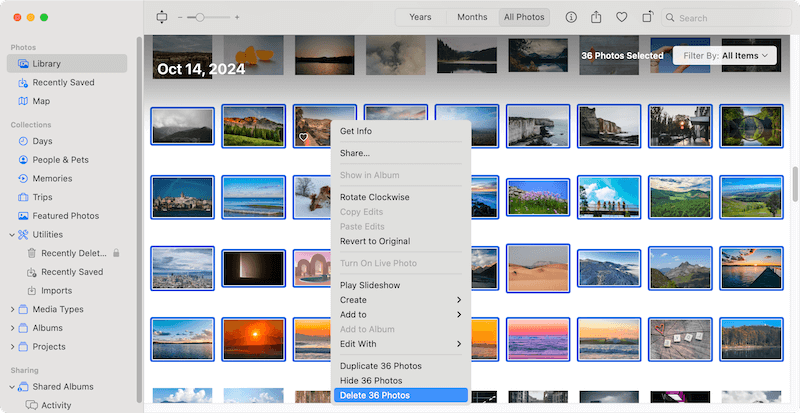
Step 2: From the left, click Library under Photos. Then, pick out the photos you don't want to keep in your Photos app, right click and choose Delete X Photos from the context menu to remove them.
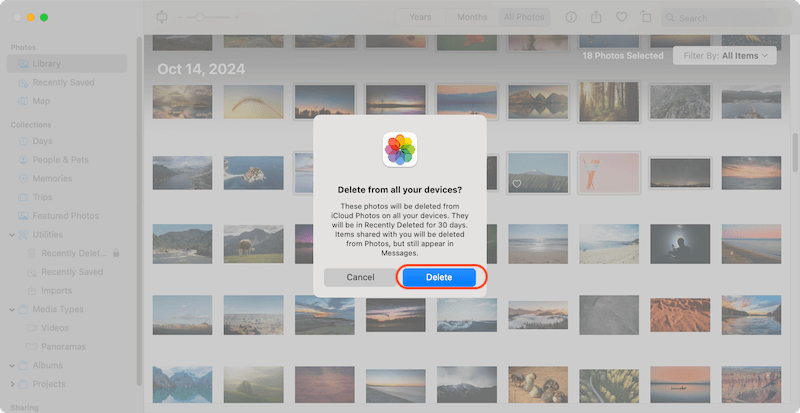
Step 3: There will pop up a window asking if you want to delete these photos from all devices. You can click "Cancel" if you change your mind. Click Delete button if you confirm to delete these photos.
Step 4: The pictures you deleted can be found in the album called Recently Deleted. That is how you can get rid of these pictures: hit Delete All to get rid of them all at once. Then all these selected photos are removed from your Mac and you cannot undo the deletion.

3. Delete Photos Permanently in Finder with Trash Folder
If your photos were not imported into Photos app and can be accessed directly in Finder, then you can also remove the photo files in Finder. After deleting the photos in Finder, the files are not removed from your Mac. Instead, the deleted photos will still be found in Trash and you can restore them easily. If you want to permanently delete them, you can empty the Trash.
Here are the detailed steps to remove photos from Finder and empty the Trash:
Step 1: To open a new window, click the Finder button in the Dock.
Step 2: Go to the location where you store the photos that you want to get rid of.
Step 3: Check and select the pictures, right click and click the option Move to Trash. Then the photos will be put into the Trash. (You can also drag and drop them into the Trash in the Dock directly).
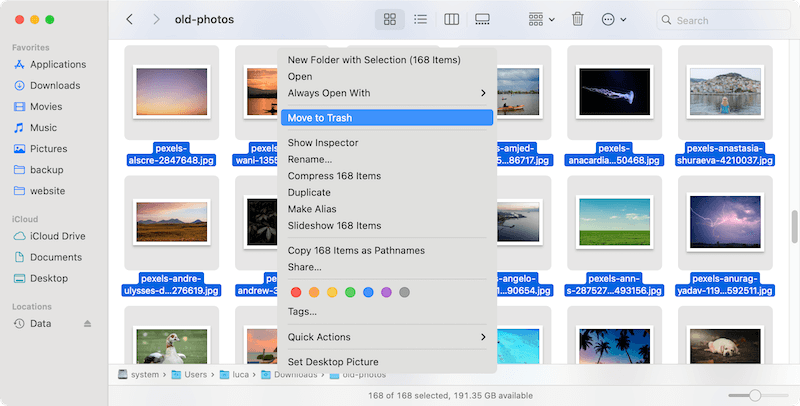
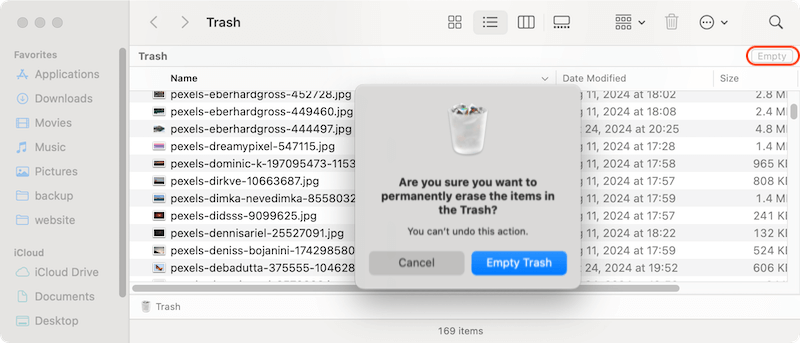
Step 4: Click the Trash button from Dock to open it and click Empty button to remove all the files permanently in the Trash. There will pop up a window to confirm if you really want to remove all the files permanently. You can just click on Empty Trash to permanently delete the files.
💡 Tips: You can also select the photos and then click Command + Del keys to permanently delete the photos without putting them into the Trash.
After that, your deleted pictures and everything else in the Trash are gone permanently and release more free space for further use on your Mac.
Best Practices for Photo Deletion
- Before you delete important photos for good, you should always make sure you have a copy of them if necessary. Time Machine, iCloud, or an external hard drive can be used to back up the important photos or other data.
- Look over the pictures you're about to get rid of to ensure you don't accidentally delete any important memories.
- In the Photos app, make it a habit always to clear out the Recently Deleted album or files.
- When you delete private photos, you should always use safe methods to ensure they can't be retrieved, like using professional and reliable data sanitation tools.
Conclusion
There is more to permanently deleting photos on a Mac than clearing the Trash. Safe ways like the Photos app, a third-party data wiping software, will ensure your photos are gone permanently and can't be found again. If you do these things, you can keep your information safe, make space, and organize your picture library well.
Before you delete any important photos, ensure you have a copy of them and only use safe ways to access sensitive data. You can be sure that your personal information is safe and that your Mac works if you follow these steps.
Mac Photo File Eraser FAQs
1. How to permanently deleted photos from Mac?
There are 2 methods to deleted photos on Mac.
- Deleted photos from Photos app: If you want to remove the photos in Photos app, first open the app from Dock and select the photos you want to delete, right click and select to delete them. Then go to Recently Deleted and ensure to delete them permanently.
- Remove photos in Finder: Locate the photos in Finder, select all the photos you want to remove, right click and select Move to Trash, or just drag them into Trash, and then empty the trash. You can also click Command and Del keys to remove them permanently.
2. Will the photos be recoverable after deleting permanently?
Yes. With specified data recovery tool, like Do Your Data Recovery for Mac, it's easily to recover the photos permanently deleted from Photos app or Finder.
3. How to permanently wipe the photos and ensure they are irretrievable?
To ensure the deleted photos will not be recovered in any way, it's necessary to shred the photos with data eraser application, like DoYourData Super Eraser. Here are the steps to wipe photos with it:
- Download and install the software on your Mac.
- Run the software and choose the mode Erase Files/Folder.
- Click Add button to select the photos you want to erase.
- Click Erase Now and then choose the data sanitation algorithm.
- Click Continue and the software will wipe the selected photos permanently.
After that, no software or data recovery services can get back the erased photos.

DoYourData Super Eraser for Mac
DoYourData Super Eraser for Mac is a 100% safe, powerful and easy-to-use data erasure program. It offers certified data erasure standards including Peter Gutmann, U.S. Army AR380-19, DoD 5220.22-M ECE to permanently erase data from Macs and external devices, making data recovery be impossible.