Quick Navigation:
- Cutting Files vs. Copying Files: What's the Difference?
- Understanding the Problem
- Recovering Lost Files Using Time Machine
- Using Third-Party Data Recovery Software
- Using Terminal Commands for File Recovery
- Additional Tips and Preventive Measures
- Conclusion
File transfer interruptions can happen to anyone at any time, especially when cutting or copying files on your Mac. Whether due to a power failure, accidental disconnection, or a sudden system crash, losing files because of an unfinished cut or copy operation can be frustrating. These situations might seem disastrous, but don't worry—there are several ways to recover those lost files. This article will guide you through different methods to retrieve your data safely and suggest preventive measures to avoid similar problems in the future.
Cutting Files vs. Copying Files: What's the Difference?
Cutting Files
When you "cut" a file, you are essentially telling your operating system to remove the file from its original location and move it to a new one. The file is temporarily stored in a clipboard, and it is only deleted from the original location once it has been successfully pasted into the destination folder.
How They Work
- When you cut a file, it remains in the original location until it is pasted elsewhere.
- If an interruption occurs (like a system crash or power failure) before pasting, the file may still be in its original location.
- If the paste action completes successfully, the file is removed from the source location.
Use Cases
- Use cut when you want to move files from one location to another without leaving a copy behind.
- It's ideal when organizing files or freeing up space in the original location.
Potential Risks
- Data Loss: If the operation is interrupted (like through a system crash or accidental shutdown), the file could end up neither in the original location nor in the new one, appearing as if it is lost.
- Incomplete Transfer: During the cut operation, if there is an issue, the file might only be partially moved or corrupted.
Copying Files
Copying creates a duplicate of the original file. The original file remains intact in its initial location, while a copy of it is placed in the new destination. Both locations now have the same file, and no data is deleted during this process.
How They Work
- When you copy a file, the original remains unaffected regardless of the operation's outcome.
- The file is duplicated to the new location, and even if an interruption occurs during copying, the original remains safe.
- If copying fails, there is no loss of data; you just need to restart the copy process.
Use Cases
- Use copy when you want to have the same file available in multiple locations.
- It's helpful for creating backups, sharing files with others, or working on different versions of a document.
Potential Risks
- No Data Loss: Since copying doesn't remove the original, data loss is rare.
- Space Consumption: Copying takes up extra storage space because it duplicates files, which might lead to running out of disk space more quickly.
Understanding the Problem
When a cut or copy operation is interrupted on Mac OS, the outcome can vary depending on the stage of the transfer and the type of interruption. For example, if you were moving files from one location to another and the process was interrupted, the files might not appear in either the original or the destination location. This can happen for several reasons:
- 💥 System Crashes: A sudden system failure can cause the file transfer to stop abruptly, leading to the disappearance of the files.
- 🔗 Accidental Disconnection: Unplugging an external drive or storage device while transferring data can result in an incomplete operation.
- 🪫 Power Failure: If your Mac shuts down unexpectedly due to a power outage or battery failure, the transfer may not complete.
When these situations occur, files might appear to be lost, deleted, or corrupted. However, there are several ways to recover them. Let's explore these methods in detail.
Preliminary Checks
Before diving into complex recovery methods, it's crucial to perform some preliminary checks to locate the missing files. Sometimes, the files might still be somewhere on your system, but not where you expect them to be. Here are some basic steps you can follow:
1. Check the Original Location and Destination Folder:
Start by examining both the original location (where the files were before you started the cut or copy operation) and the destination folder (where you intended to move them). It's possible that the files might still be in either location if the operation didn't complete.
2. Use Spotlight Search:
Mac OS has a built-in search tool called Spotlight, which can help you quickly find files. Press Cmd + Space to open Spotlight and type the name of the lost file. If the file is still on your Mac, Spotlight should locate it.
3. Check the "Recent Items" or "Recents" Folder:
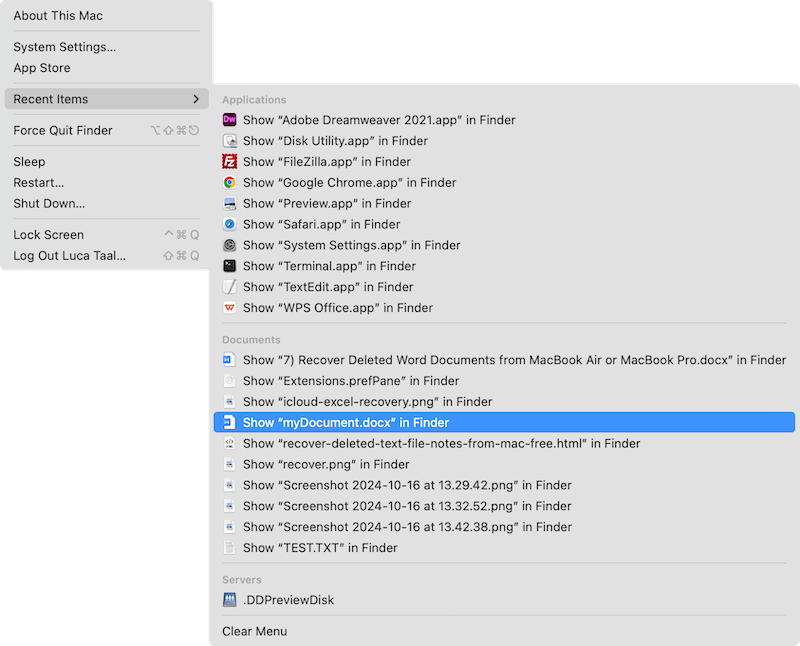
Go to the Apple Menu and select "Recent Items." This will show a list of files you've recently accessed, including those you might have lost due to an unfinished operation. Additionally, you can check the "Recents" folder in Finder.
4. Look in the Trash or Downloads Folder:
Files that seem lost might have been moved to the Trash accidentally. Open the Trash folder and see if the files are there. Also, check the Downloads folder, as some file operations may end up there due to automatic settings or unexpected interruptions.
Recovering Lost Files Using Time Machine
If the preliminary checks do not yield any results, the next step is to use Time Machine, Mac OS X's built-in backup feature. Time Machine regularly backs up your entire system, including files and folders. If you had Time Machine enabled before losing your files, you could restore them easily.
1. Open Time Machine:
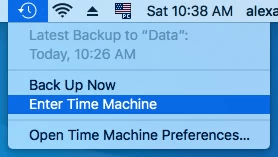
Connect your Time Machine backup drive to your Mac. Click on the Time Machine icon in the menu bar or go to "System Preferences" > "Time Machine" and select "Enter Time Machine."
2. Locate the Missing Files:
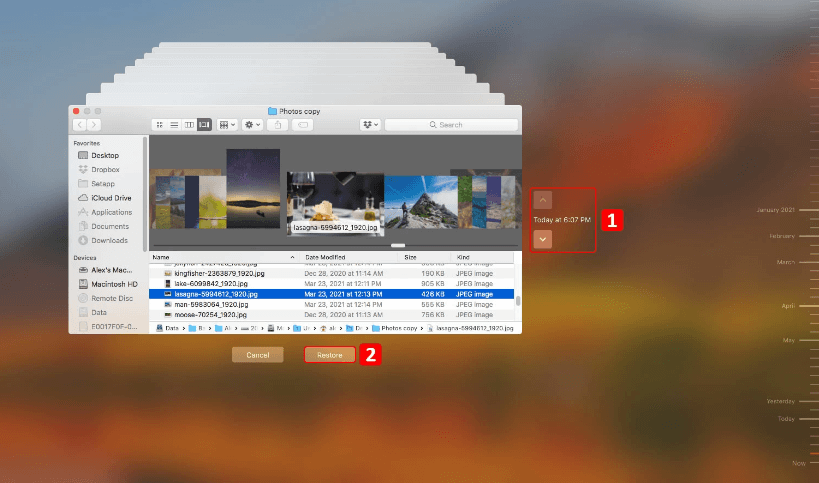
In Time Machine, navigate to the folder where the files were originally located. Use the timeline on the right side of the screen to go back to a time when the files were still there.
3. Restore the Files:
Select the missing files and click "Restore." Time Machine will copy the files back to their original location.
4. Ensure Correct Backup Settings:
For future safety, ensure Time Machine is set up to back up your data regularly. Go to System Preferences > Time Machine and check the backup frequency and storage location.
Using Third-Party Data Recovery Software
If Time Machine is not an option, or if it was not enabled before the file loss, third-party data recovery software can be a powerful solution. Several data recovery tools are designed specifically for Mac OS. Here are some popular choices:
1. Do Your Data Recovery for Mac:
Do Your Data Recovery for Mac is a reliable data recovery tool that supports Mac OS X and macOS. It offers a straightforward interface for scanning and recovering lost files on Mac in different data loss scenarios, like accidental deletion, formatting, partition loss, file system corruptions, system crash, and so on.
Do Your Data Recovery for Mac
- Best data recovery software for Mac OS X and macOS.
- Recover lost files in any data loss scenarios.
- Support data recovery for documents, videos, photos, audio, etc.
2. Disk Drill:
Disk Drill is another user-friendly tool that can recover various file types from Mac OS X, including documents, photos, videos, and more. It works with both internal and external drives.
Stellar Data Recovery provides advanced scanning options to recover lost files. It supports various file systems and storage devices.
Pros and Cons of Using Third-Party Software
- Pros:
- Can recover files from formatted, corrupted, or inaccessible drives.
- Supports various file formats and types.
- User-friendly interfaces make recovery straightforward.
- Cons:
- Many data recovery tools are not free; they often require a paid license to recover files.
- Recovery success is not guaranteed, especially if the files have been overwritten.
How to Recover lost files due to unfinished cut or copy in Mac OS X with Do Your Data Recovery?
To understand the software and know how to recover the missing files with the software, you can follow the steps to do the data recovery with the software Do Your Data Recovery:
Step 1. Run the software and ensure to select the right drive where you lost the files due to unfinished cut or copy operation.

Step 2. Click on "Scan" button and the tool will start to search for the missing files deeply from the selected drive.

Step 3. After the scan is done, you can see and check the files. Double click a file can preview the file content fully, in this way you can verify if the files are recoverable.

Step 4. Choose the wanted files and then click "Recover" button to select a location to save the files. You need to select another drive instead of the drive where you lost the files.

Using Terminal Commands for File Recovery
For those comfortable with using the Terminal, Mac OS provides several command-line utilities that can help recover lost files. Terminal commands can be effective, but they require some technical knowledge and should be used carefully.
1. Open Terminal:
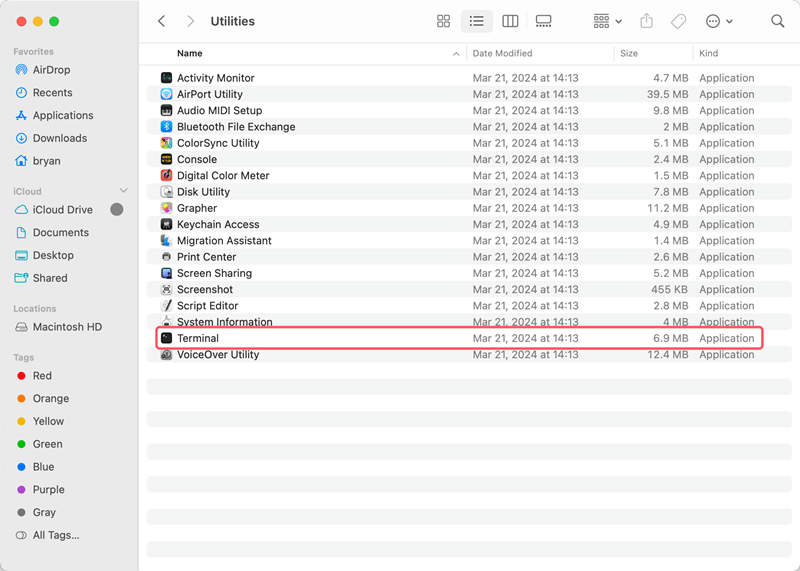
Go to "Applications" > "Utilities" > "Terminal" to open the Terminal app.
2. Use Basic Commands:
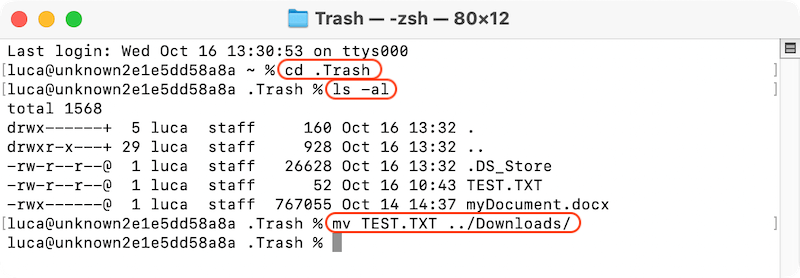
Use the ls command to list files and directories to check if the lost files are in a hidden or unexpected location.
Use the mv command to move files from one location to another, which can be helpful if you suspect the files are hidden or misplaced.
3. Check for Corrupted Files:
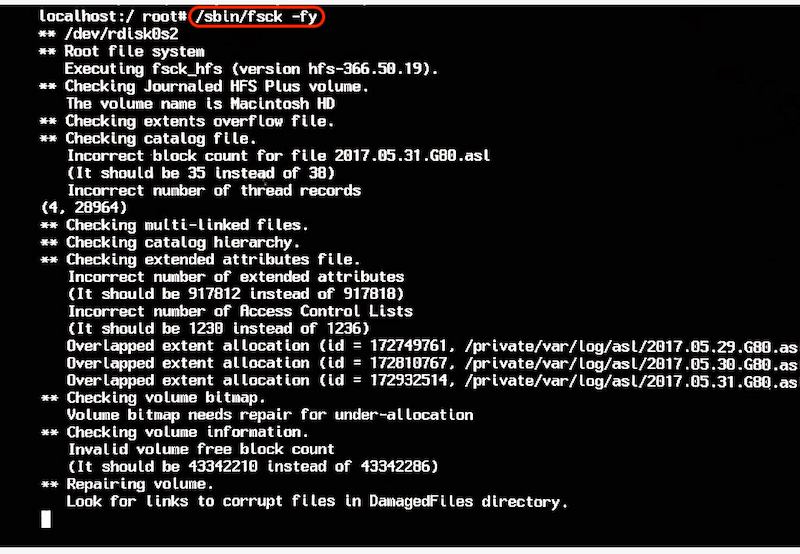
If you suspect files are corrupted, use the fsck (file system consistency check) command to repair any file system issues that might be causing the problem.
4. Exercise Caution:
Terminal commands can have significant consequences if not used correctly. Always double-check the command syntax and avoid using commands that could further damage your files or system.
Additional Tips and Preventive Measures
To avoid the hassle of recovering lost files, consider these preventive measures to minimize the risk of data loss:
1. Regular Backups:
Use Time Machine or another backup solution to create regular backups of your important files. Cloud storage services like iCloud, Google Drive, or Dropbox can provide additional backup layers.
2. Stable Connections:
Ensure stable connections when transferring files between devices. Use quality cables and avoid transferring data over unstable or unreliable networks.
3. Use a UPS or Battery Backup:
To protect against power failures, consider using an uninterruptible power supply (UPS) or a battery backup for your Mac. This will give you time to save your work and safely shut down your system in case of a power outage.
Conclusion
Losing files due to an unfinished cut or copy operation can be stressful, but with the right tools and methods, recovery is often possible. Start with simple checks, such as using Spotlight Search and checking the Trash. If those don't work, Time Machine or third-party data recovery software can provide more robust solutions. For those comfortable with command-line operations, Terminal can be an effective recovery tool. Finally, adopting preventive measures like regular backups and stable connections will help safeguard your data from future loss.
Do Your Data Recovery for Mac
Do Your Data Recovery for Mac, one of the best Mac data recovery software, can help you easily and completely recover deleted, formatted or lost files from Mac HDD/SSD, external HDD/SDD, USB drive, memory card, digital camera, or other storage devices.