Home > Hard Drive Solutions for Mac
Fix a RAW Drive on Mac Without Losing Data
How to fix a RAW drive on Mac? Don't worry, you can use Disk Utility or third-party disk management tool to fix a RAW drive on Mac. If you have lost data due to fixing a RAW drive on Mac, you can use data recovery software - such as Do Your Data Recovery for Mac to help you scan the RAW drive or erased drive, find and recover all lost data from it.
![]() Updated by Justin Kenny on September 15, 2024
Updated by Justin Kenny on September 15, 2024
Quick Navigation:
- About RAW Drives
- Diagnosing the Problem: Drive Becomes RAW on Mac
- Fixing a RAW Drive Using Disk Utility
- Using Third-Party Tools to Recover and Fix a RAW Drive on Mac
- Conclusion
- FAQs About Fixing a RAW Drive on Mac
Encountering a RAW drive on your Mac can be a perplexing and frustrating experience. A RAW drive, by definition, is a storage device that the operating system cannot recognize due to its lack of a proper file system. This state means the drive appears empty or inaccessible, and often, it is accompanied by an error message stating that the drive needs to be formatted. For Mac users, dealing with a RAW drive involves a series of steps to diagnose and resolve the issue while potentially recovering any valuable data.
This article will guide you through understanding what a RAW drive is, diagnosing the problem, and employing various methods to fix it. We will also cover data recovery options and preventive measures to avoid future issues.
About RAW Drives
A RAW drive refers to a storage device that is not formatted with a recognized file system. In computing terms, a file system is a way of organizing and storing files on a storage device like a hard drive or SSD. Common file systems on Mac include APFS (Apple File System) and HFS+ (Mac OS Extended).
When a drive becomes RAW, it means that the file system is either missing, corrupted, or unrecognized by the operating system. This can happen due to various reasons such as abrupt system shutdowns, hardware failures, software issues, or even malware attacks. Unlike other file system states, a RAW drive does not provide access to its contents and often appears as unallocated or empty when viewed in Disk Utility or Finder.
Diagnosing the Problem: Drive Becomes RAW on Mac
Before jumping into fixing a RAW drive on Mac, it's essential to diagnose the issue accurately. Here's how you can do that:
- Checking if Your Drive is RAW:
- Open Disk Utility (found in Applications > Utilities).
- Look for the drive in the list on the left side. If it shows "RAW" or "Uninitialized," it indicates that the drive is in a RAW state.
- Using Terminal for Diagnosis:
- Open Terminal (Applications > Utilities).
- Type diskutil list and press Enter. This command will display a list of all disks and partitions. If the drive shows as “untitled” or with no file system, it may be RAW.
- Identifying Error Messages:
- Common error messages include "The disk you inserted was not readable by this computer" or "Drive needs to be initialized."
- These messages typically indicate that the system cannot recognize the file system on the drive.
Initial Troubleshooting Steps:
Before attempting any repairs, follow these initial troubleshooting steps:
- Basic Checks and Preparations:
- Ensure Proper Connections: Verify that the drive is correctly connected to your Mac. Check cables and ports for any visible issues.
- Check for Physical Damage: Inspect the drive for any signs of physical damage. If the drive is damaged, it may require professional assistance.
- Backup Important Data:
- If you have access to the drive or can temporarily mount it, back up any important data. Data backup is crucial as attempting repairs can sometimes lead to data loss.
Fixing a RAW Drive Using Disk Utility
Disk Utility is a built-in tool on macOS that can help in repairing drives. Here's a step-by-step guide on using Disk Utility to address a RAW drive:
- Open Disk Utility:
- Navigate to Applications > Utilities > Disk Utility.
- Select the RAW Drive:
- In Disk Utility, select the drive listed on the left-hand sidebar. Ensure you are choosing the correct drive to avoid data loss.
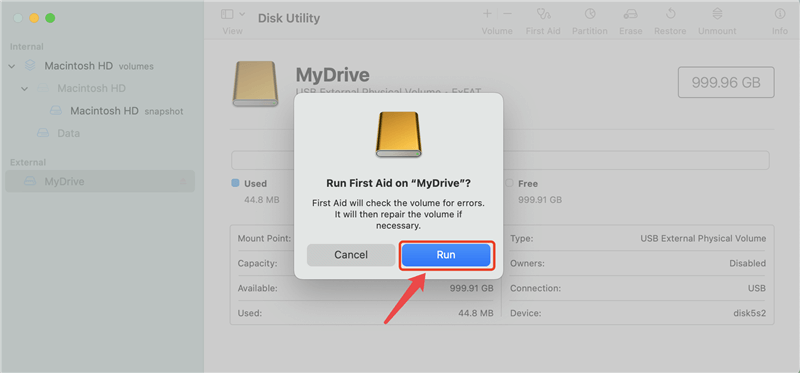
- Run First Aid:
- Click on the "First Aid" button. Disk Utility will attempt to verify and repair any issues with the drive's file system.
![repair RAW drive on Mac]()
- Follow the on-screen instructions. If Disk Utility reports that the drive is "not repairable," you may need to proceed with formatting.
- Click on the "First Aid" button. Disk Utility will attempt to verify and repair any issues with the drive's file system.
- Formatting the Drive:
- If repairing fails, formatting may be necessary. This will erase all data on the drive.
- Click on the "Erase" button. Choose a file system format compatible with macOS (APFS or HFS+). Give the drive a name and click "Erase" to begin the process.
![repair RAW drive on Mac]()

Using Third-Party Tools to Recover and Fix a RAW Drive on Mac
When Disk Utility falls short in addressing a RAW drive issue, third-party tools can provide more specialized solutions for repair and data recovery. These tools are often designed to handle complex file system problems and can be invaluable in situations where built-in utilities fail.
Do Your Data Recovery for Mac is a reliable Mac data recovery tool. It can help you fix a RAW drive on Mac and recover all lost data from a RAW drive or erased drive.
Step 1. Download and install Do Your Data Recovery for Mac on your Mac and connect the RAW drive or erased drive to your Mac.
Step 2. Open Do Your Data Recovery for Mac, select the drive to start data recovery.

Step 3. Click on Scan button to deeply scan the drive and find all recoverable files.

Step 4. Once the scan is completed, you can preview all recoverable files. Then select the wanted files, click on Recover button to save them.

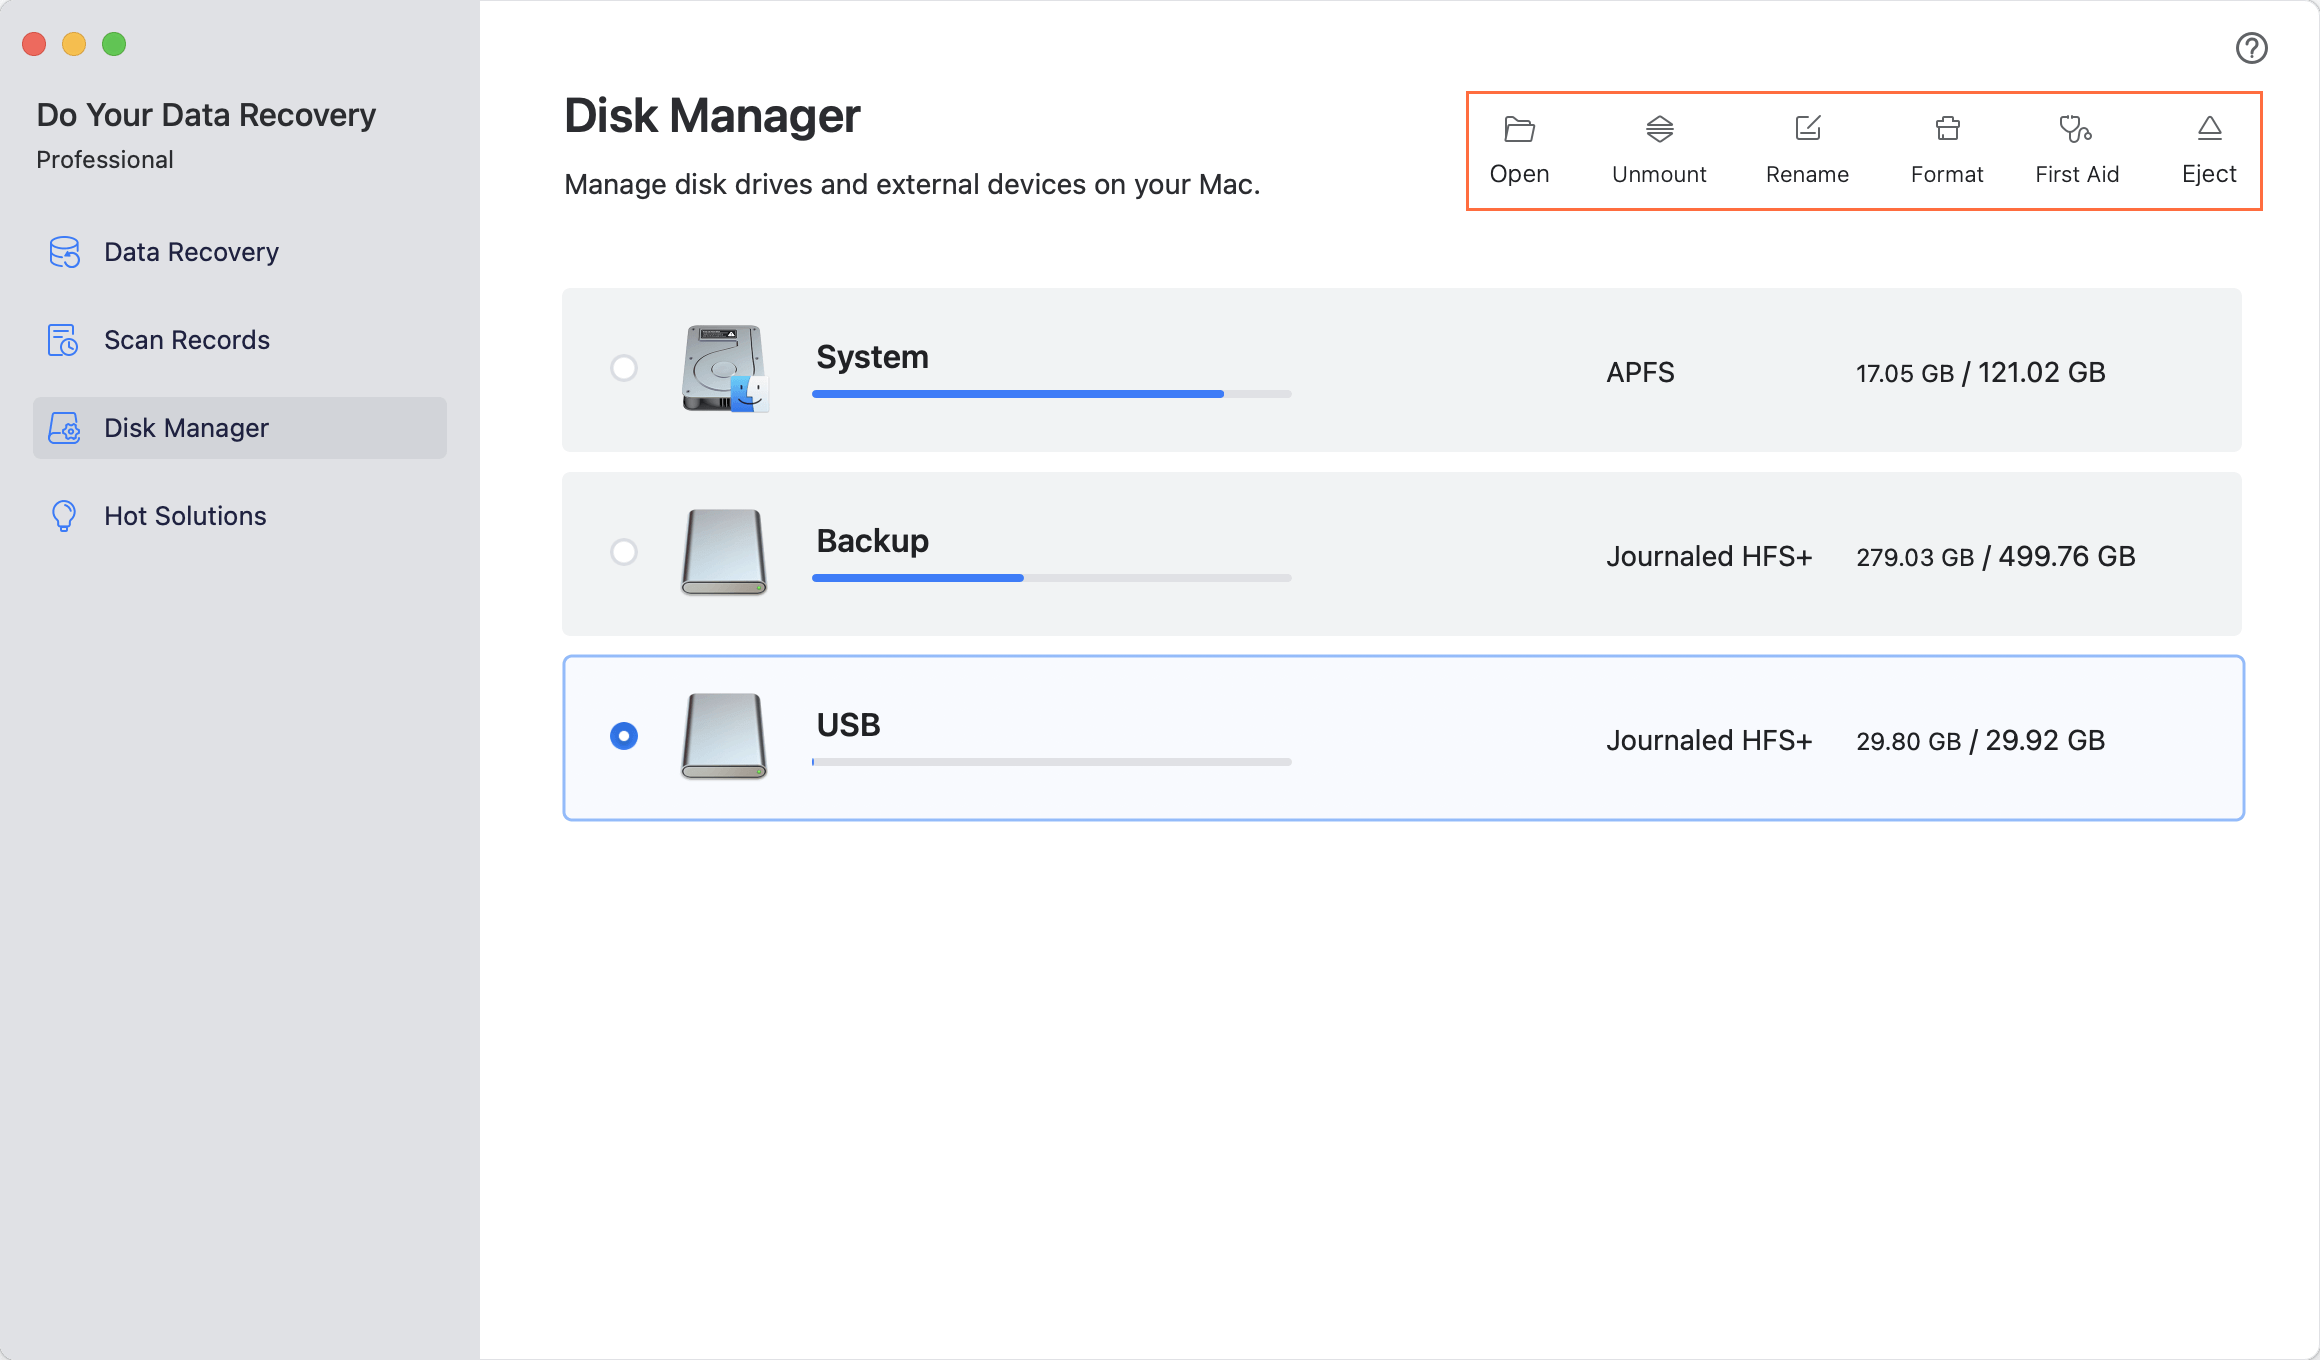
Do Your Data Recovery for Mac also can help you fix a RAW drive on Mac, just choose Disk Manager tool:
- Click on Mount button to mount the drive.
- Click on First Aid button to repair the RAW drive.
- Click on Format button to format the drive if necessary.
Preventive Measures:
Once you've resolved the issue with your RAW drive, it's important to take steps to prevent future occurrences:
- Regular Maintenance and Backups:
- Regular Backups: Implement a regular backup routine using Time Machine or another backup solution. Regular backups ensure that you don't lose important data in case of drive failures.
- Drive Health Monitoring: Use disk monitoring tools to check the health and performance of your drives regularly.
- Best Practices for Drive Health Management:
- Avoid Abrupt Shutdowns: Ensure your Mac is properly shut down or restarted to prevent sudden interruptions to the drive.
- Keep Software Updated: Regularly update macOS and any software you use to ensure compatibility and stability.
Conclusion
Dealing with a RAW drive on a Mac can be a challenging experience, but with the right approach, it's possible to diagnose, repair, and recover data from the drive. Understanding the nature of a RAW drive, using tools like Disk Utility and third-party software, and knowing when to seek professional help are crucial steps in resolving the issue.
To avoid future problems, ensure regular backups and maintain your drives properly. By following these practices, you can safeguard your data and reduce the likelihood of encountering similar issues down the road. If you have any lingering questions or need further assistance, don't hesitate to seek additional resources or professional help.
FAQs About Fixing a RAW Drive on Mac
1. How to fix a RAW drive on Mac?
Disk Utility can help you quickly fix a RAW external HDD/SSD, USB drive, SD card on Mac:
- Connect the RAW drive to your Mac.
- Go to Applications > Utilities > Disk Utility, open this app.
- Select the RAW drive, click First Aid.
- Click Run to start repairing the RAW drive.
2. Which tools can help fix and recover data from a RAW drive on Mac?
Here are 3 tools that can recover RAW drives and fix RAW drives on Mac:
| 1. Do Your Data Recovery for Mac |
|
| 2. Disk Drill |
|
| 3. Wondershare Recoverit |
|
Comparison of Features and Effectiveness:
When choosing a third-party tool, consider the following aspects:
- Functionality: Ensure the tool provides the specific features you need, such as RAW drive recovery or partition recovery. Some tools offer more advanced functionalities like file repair and system optimization.
- Ease of Use: User experience varies between tools. Opt for software with an intuitive interface and clear instructions, especially if you are not familiar with data recovery processes.
- Recovery Rate: The effectiveness of recovery can differ based on the condition of the drive and the tool’s algorithms. Look for software with high success rates and positive user reviews.
- Cost: Many recovery tools offer a free trial or demo version. Evaluate the cost of full versions and compare them with the features provided to determine if it meets your needs and budget.
Instructions for Using These Tools:
Here's a general guide on how to use third-party data recovery tools to address a RAW drive issue:
Step 1: Download and Install the Software
- Download the software from the official website or a trusted source.
- Follow the installation instructions to set up the tool on your Mac.
Step 2: Launch the Software and Select the Drive
- Open the data recovery tool.
- Locate and select the RAW drive from the list of available drives. Ensure you choose the correct drive to avoid any risk of data loss on other drives.
Step 3: Scan the Drive
- Initiate the scan process. Most tools will offer options for Quick Scan or Deep Scan. Quick Scan is faster but less thorough, while Deep Scan can find more files but takes longer.
- Wait for the scan to complete. The duration will depend on the drive’s size and the scan mode selected.
Step 4: Preview and Recover Files
- After the scan, review the list of recoverable files. Most tools provide a preview feature to view the content before recovery.
- Select the files you want to recover and choose a location to save them. It's advisable to save recovered files to a different drive to prevent overwriting any data on the RAW drive.
Step 5: Complete the Recovery Process
- Follow any additional prompts to complete the recovery process.
- Verify the integrity of the recovered files to ensure they are usable.
Data Recovery Options:
Recovering data from a RAW drive can be challenging but is often possible with the right tools and methods:
- Methods for Recovering Data:
- Using Data Recovery Software: As mentioned, tools like Disk Drill and Donemax can recover lost files from a RAW drive. These tools scan the drive for recoverable data and provide options to save it to a different location.
- Professional Data Recovery Services: If software tools fail or if the drive is physically damaged, professional data recovery services can be a last resort. These services have specialized equipment and expertise to recover data from severely damaged drives.
- Choosing the Right Data Recovery Solution:
- Consider factors such as the extent of data loss, the condition of the drive, and your budget when choosing a recovery solution.
- Look for reviews and recommendations to find reputable recovery services.
3. How to use NTFS drive on Mac without formatting?
In some cases, your Mac may recognize the NTFS drive as a RAW drive because NTFS file system is not compatible with macOS.
With an NTFS for Mac tool, you can use an NTFS drive on Mac without any limitation.
- Download and install DoYourData NTFS for Mac on your Mac.
- Open DoYourData NTFS for Mac, select the NTFS drive.
- Click on Enable Writable button to allow your Mac to read-write any NTFS drive without any limitation.

Written & Updated by Justin Kenny
Justin Kenny is a writer & editor of DoYourData. He joined DoYourData in 2016 and focuses on writing articles about Windows data recovery, Mac data recovery, external device data recovery, hard drive clone, data erasure, Mac cleanup, computer issue fixes, etc. He is a super fan of Apple devices and is big on testing new digital device and system utility software.