Quick Navigation:
- Reasons Mac External Hard Drives Won't Mount
- Solutions to Fix Could Not Mount Drive in Disk Utility on Mac
- Recover Lost Data from Unmounted or Erased Drive on Mac
- Mount NTFS Drive on Mac Without Formatting the Drive
- Conclusion
When you use Disk Utility on your Mac and get the "Could Not Mount Drive" error, it can be very annoying, especially if it stops you from getting to important data on an internal or external drive. This problem happens when macOS fails to mount the drive, making its files unavailable. File system corruption, hardware issues, program conflicts, or improper drive ejection are all common reasons for this.
There are several easy ways to fix this problem, from checking the connections to more complex options like using Terminal commands or restoring your Mac's settings. In this guide, We'll show you how to fix the "Could Not Mount Drive" error. That will let you get back to your drive and protect your data.

Reasons Mac External Hard Drives Won't Mount
That's what mounting a hard drive means: letting your Mac see and use the files on the drive. You might not be able to get to important files on your Mac if your portable hard drive won't mount. That is why your drive might not mount on your Mac, and what you can do about it:
- Faulty USB ports or cables: If your USB ports and cables are broken or not working right, the link between your hard drive and Mac may not work. Changing the wire or port is often enough to fix this problem.
- Incompatible file system: macOS might be unable to read hard drives made with NTFS or other file systems. Reformatting the drive with a file system that works with Disk Utility can help, but remember that this will delete all the data.
- Driver issues: Your Mac might not be able to see the hard drive if the necessary drivers are not loaded or are out of date. For the most recent driver changes, go to the hard drive maker's website.
- Corrupted drive: If the drive is corrupt, it might not be able to start. Disk Utility has a "First Aid" tool that can try to fix the drive. If Disk Utility can't fix it, you may need to hire a skilled data recovery service.
You can return to your external hard drive and its contents by learning how to fix these problems.
Solutions to Fix Could Not Mount Drive in Disk Utility on Mac
1. Change Drive Display Settings
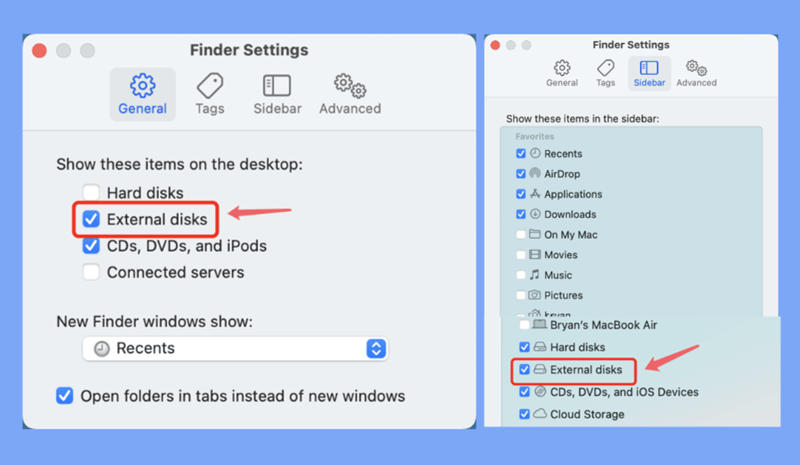
Your disk drive may not show up in your computer settings. If that's the case, and if it is, fix it by doing these things:
- Open a Finder on your Mac.
- Click Finder on Apple menu.
- Choose Settings.
- Click General and Sidebar, make sure External disks is selected.
2. Mount External Drive in Disk Utility
To fix a disk that won't mount on a Mac, you only have to remount it through Disk Utility. Here are the steps you need to take:
Go to Launchpad > Other > Disk Utility, open Disk Utility.
Select the external hard drive, click on Mount button.

3. Repair Corrupted External Drive Using First Aid
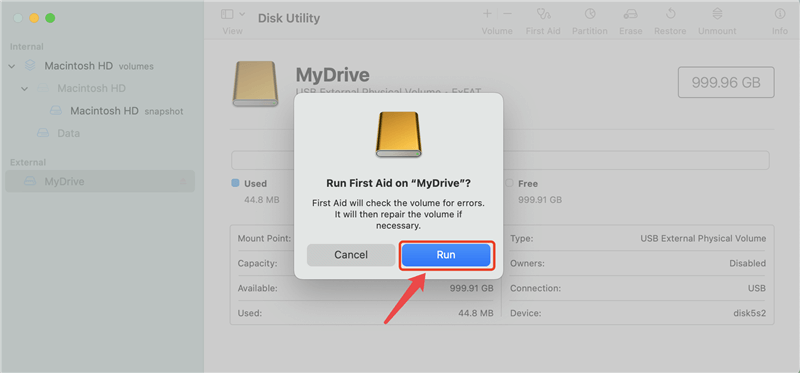
If your external hard drive is damaged, it might not be able to be mounted. So, you need to fix the issue to put it on your Mac. You can use the "First Aid" part of Disk Utility. Built to macOS, this tool can help you fix a broken external hard drive on your Mac for free. How to do it:
- Link your external hard drive to your Mac.
- Then click on Finder. Open up Disk Utility by going to and then Utilities.
- Choose the hard drive from the list on the left that won't connect to your Mac.
- At the top of the screen, click on First Aid.
- After that, click Run to confirm.
- Click "Done" when First Aid is done fixing your hard drive.
4. Reset Mac Firmware
The firmware on your Mac tells the computer how to do things. If the firmware is broken, your portable hard drive won't be able to mount. That's why you'll need to reset the software on your Mac to see if that helps. NVRAM and PRAM (parameter RAM) are both restarted in this process.
Steps to reset Mac firmware:
- Start your Mac again, then press Option + Command + P + R.
- Your Mac's SMC (System Management Controller) needs to be reset.
- Take off the power wire and take out the battery from a Mac Pro, Mac Pro, Mac Mini, or Mac laptop with a battery that can be taken out. After that, hold down the Power button for about 5 seconds.
- Hold down the Shift, Control, Option, and Power button for about 10 seconds on a MacBook Pro, MacBook Pro, or MacBook with a battery that can't be removed.
5. Format the External Drive
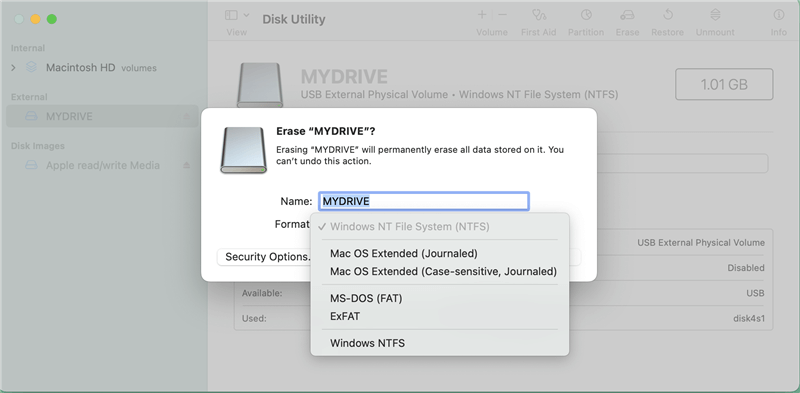
If nothing else works, you might have to format the drive. Formatting the drive eliminates all the data, so ensure important files are back before you do it.
- Start up Disk Utility. Go to Applications > Utilities > Disk Utility.
- Pick out the external drive. Pick the drive you want to format in Disk Utility.
- Click on Erase button.
- Pick out the format options. Pick the file system type you want (like APFS, Mac OS Extended or ExFAT) and give the drive a name.
- Click on Erase button again.
- Once the drive has been formatted, it should mount correctly. If necessary, you can restore your information from a backup.
Recover Lost Data from Unmounted or Erased Drive on Mac
Mac data recovery software can help you recover lost data from unmounted or erased drive on Mac. Follow the steps below:
Step 1. Download and install the reliable Mac data recovery software - Do Your Data Recovery for Mac.
Step 2. Open Do Your Data Recovery for Mac, then select the external drive to start data recovery.

Step 3. Click on Scan button. Do Your Data Recovery for Mac will deeply scan the unmounted or erased drive and find all recoverable files including existing files, deleted/formatted/lost data, inaccessible files, etc.

Step 4. Once the scan is completed, you can preview all recoverable files. Select the wanted files, click on Recover button to save them.

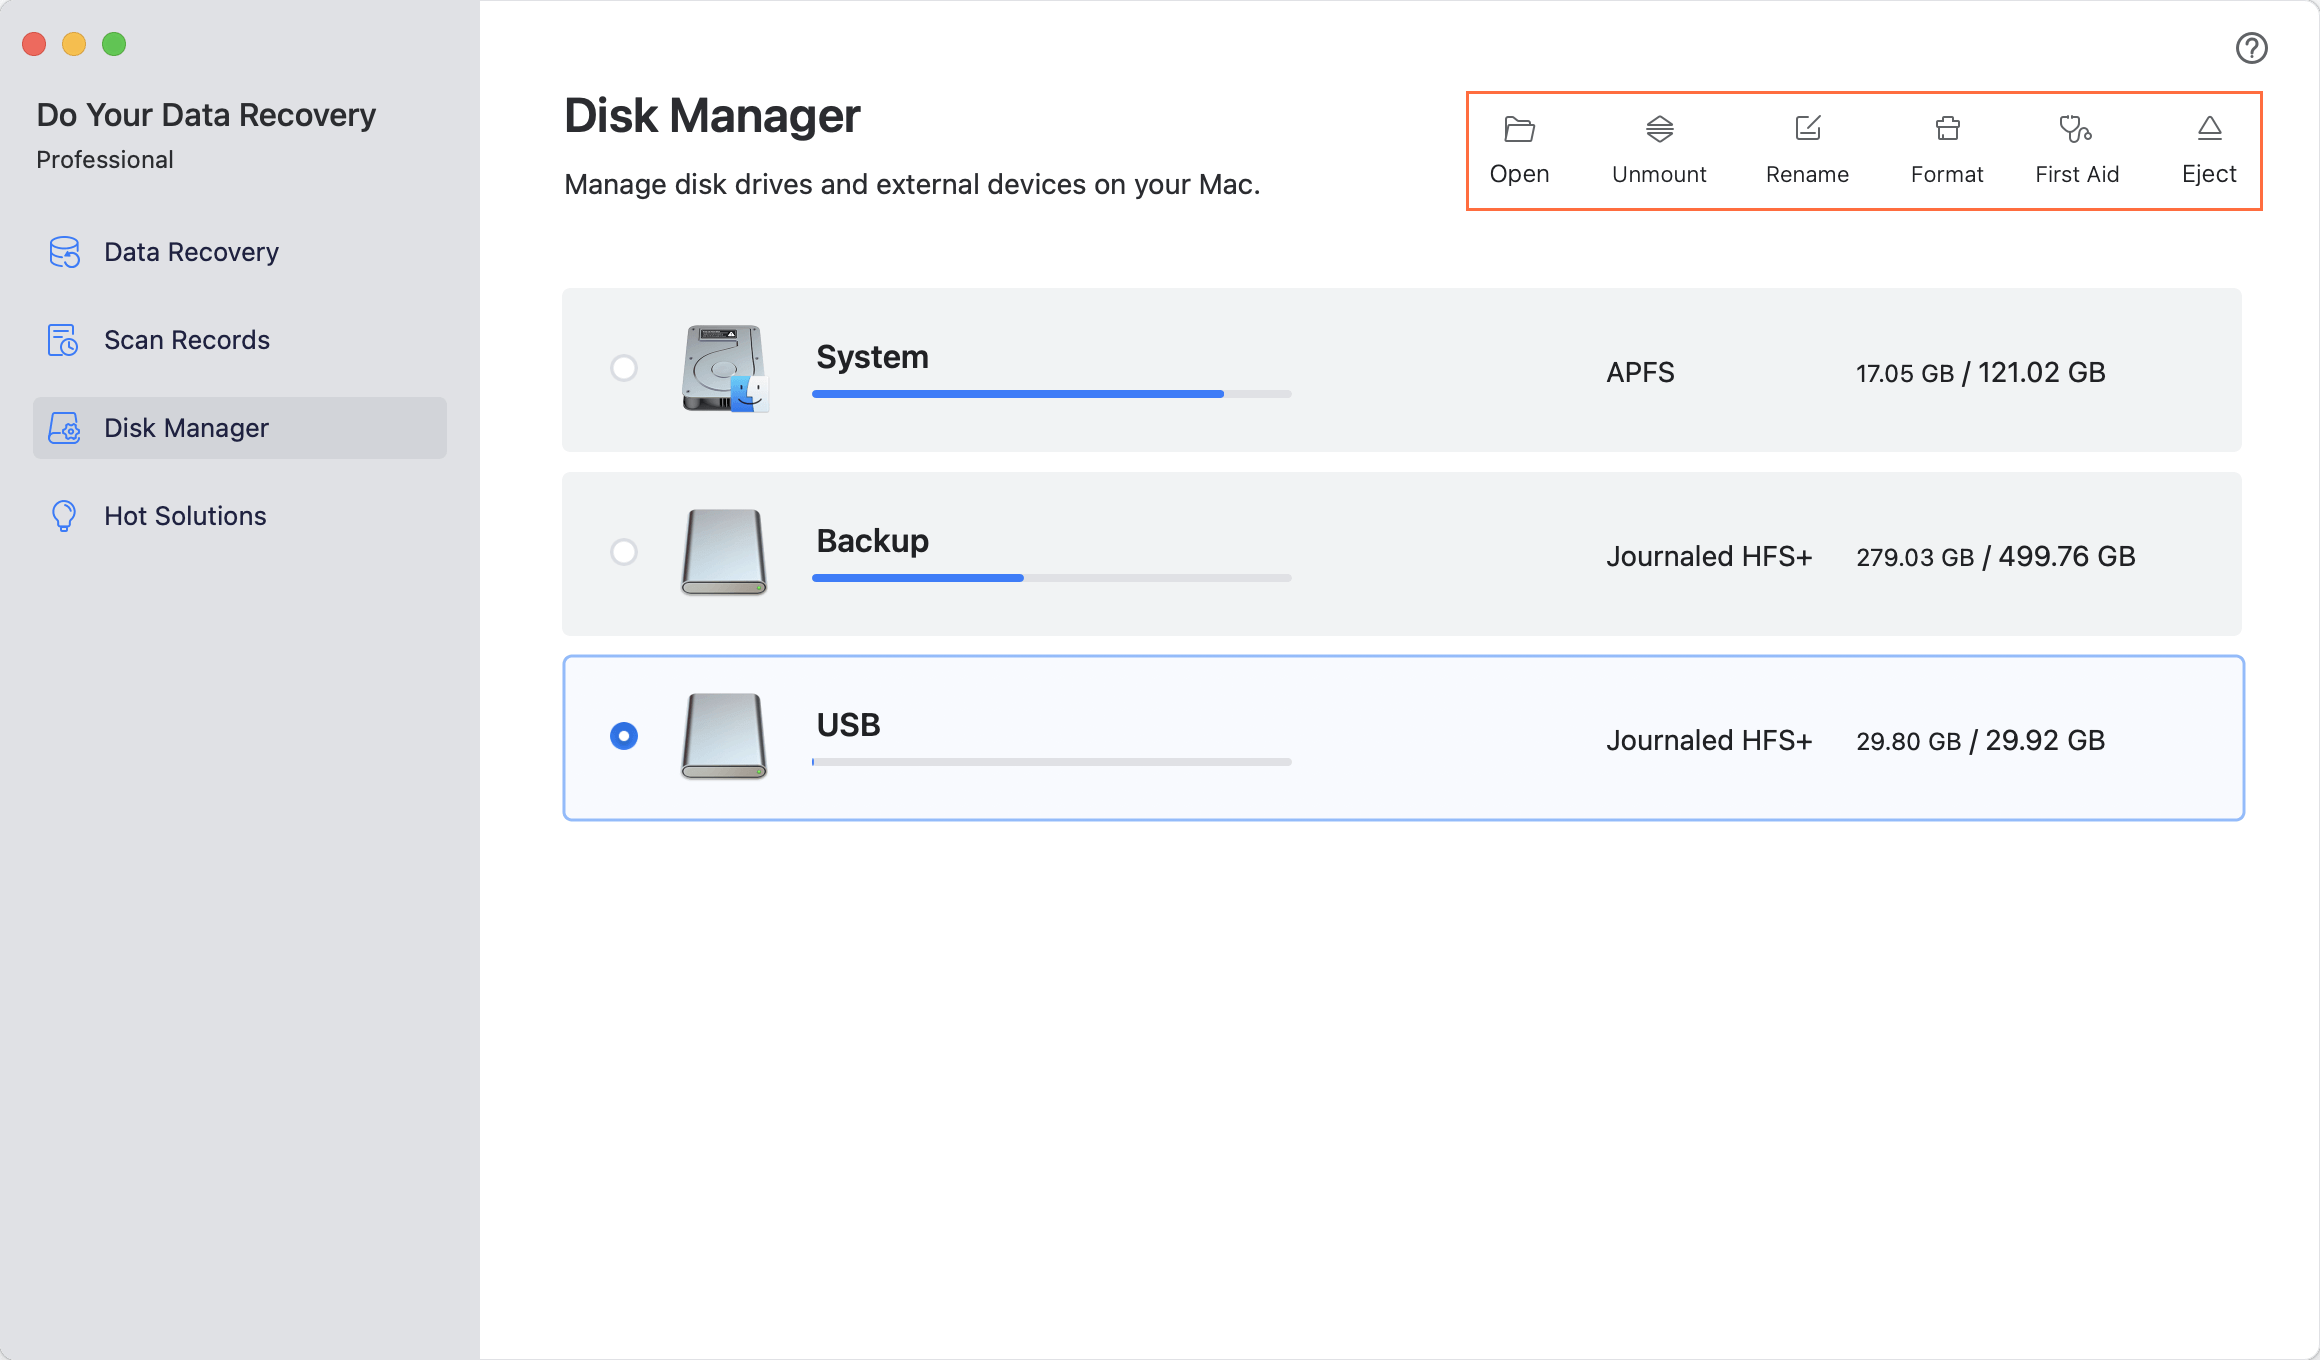
Do Your Data Recovery for Mac also can help you mount an external hard drive on Mac, repair a damaged drive on Mac, reformat an external hard drive, USB drive on Mac.
Mount NTFS Drive on Mac Without Formatting the Drive
NTFS for Mac tool can help you force mount any drive including NTFS drive on Mac. DoYourData NTFS for Mac tool is an easy-to-use and 100% safe NTFS for Mac tool. It can quickly mount NTFS drive on Mac and allow your Mac read-write NTFS drive without any limitation.
Step 1. Download and install DoYourData NTFS for Mac on your Mac, run it from Launchpad.
Step 2. Open DoYourData NTFS for Mac, find and select the NTFS drive, click on Mount button.
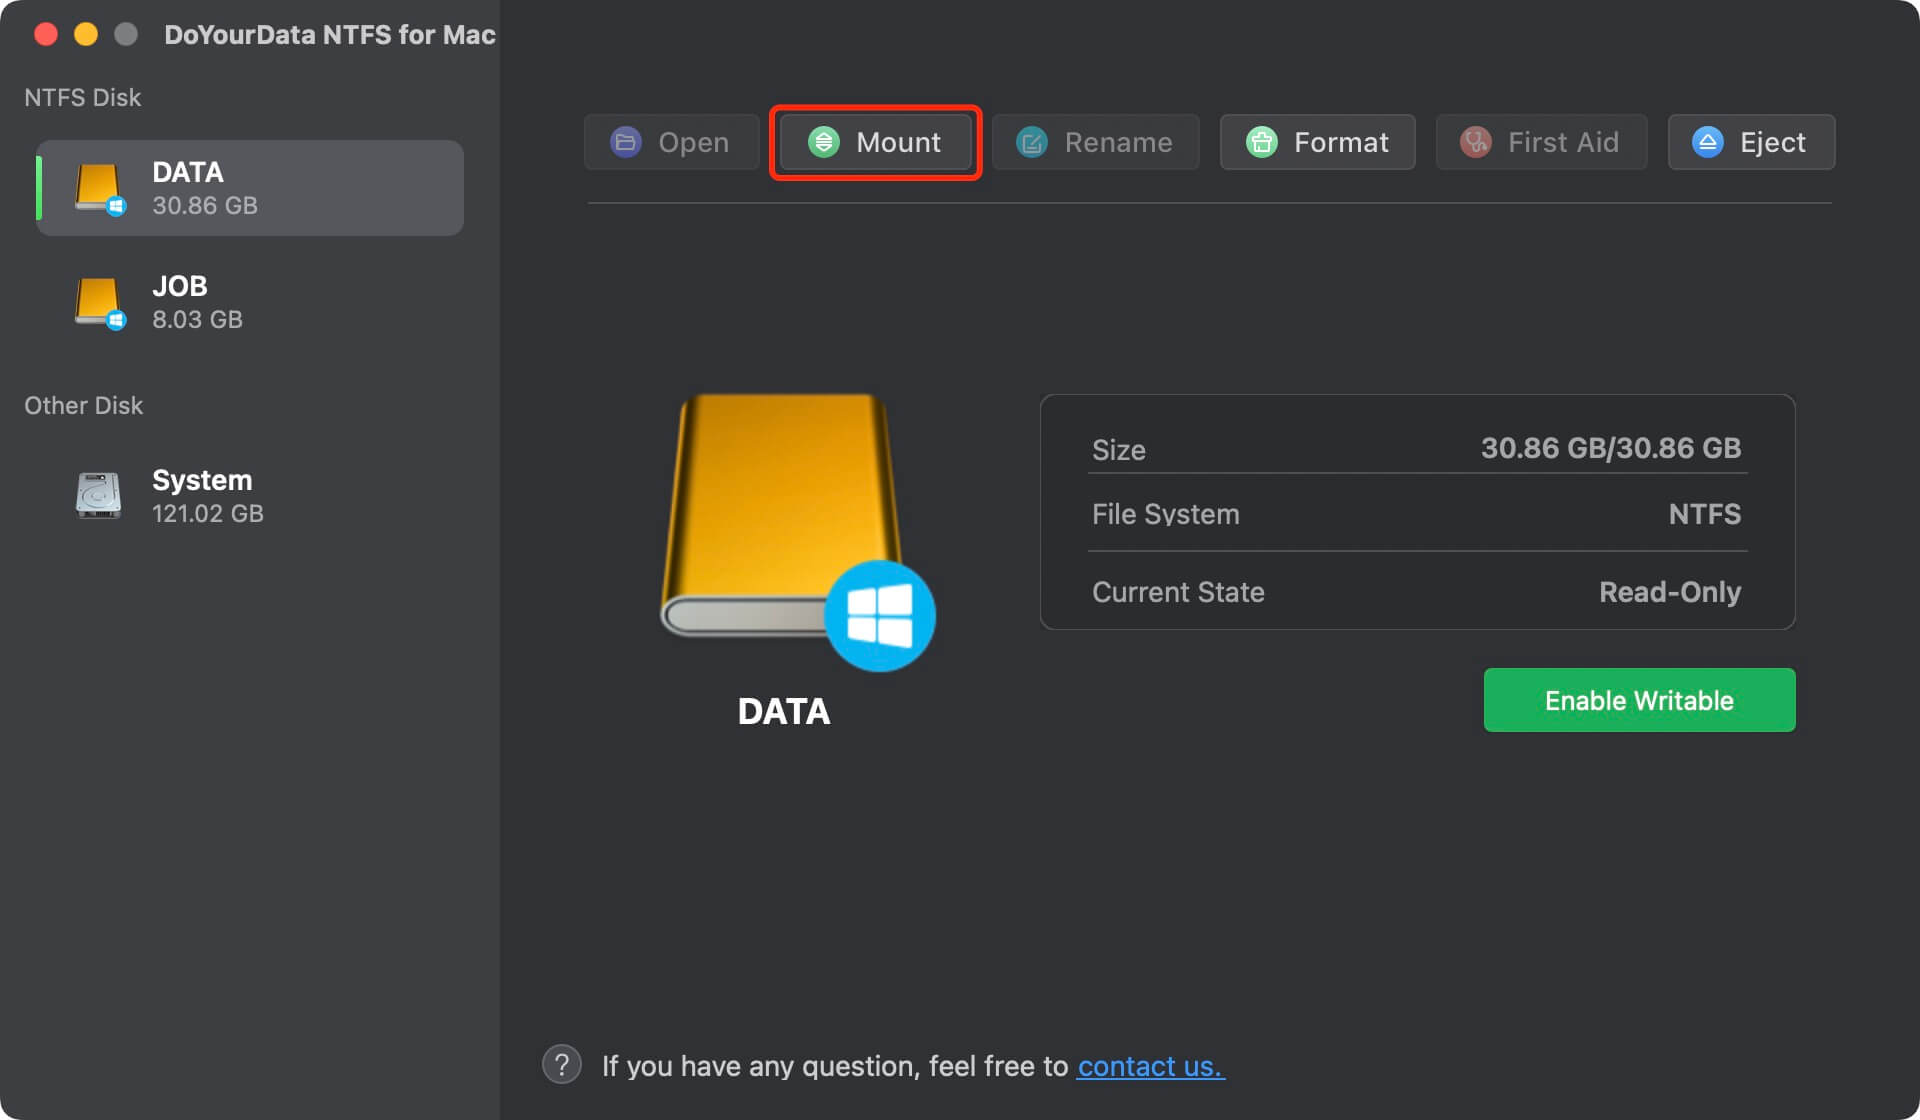
Step 3. Click on Enable Writable button to all your Mac read-write the NTFS drive without limitation.

If the external hard drive is not working on your Mac, click on First Aid to repair it.
Conclusion:
The "Could Not Mount Drive" problem in Disk Utility can be scary, but it can usually be fixed with the right steps. You can fix the problem and get back to your data by checking the physical connections, using Disk Utility, and trying more complicated methods like resetting the system settings.
You could try data recovery tools or format the drive if nothing else works. By making regular backups, keeping macOS up to date, and managing your drives correctly, you can avoid these problems in the future and keep your data safe and available.
If your external hard drive is an NTFS drive, you can use NTFS for Mac tool to mount the drive. Then you can enable writable with NTFS for Mac tool so that you can read-write the NTFS drive on Mac without any limitation.
DoYourData NTFS for Mac
DoYourData NTFS for Mac is a safe, powerful and easy-to-use NTFS for Mac tool. It allows macOS to read & write files on NTFS drives without any limitation. It is also a comprehensive disk management tool for Mac to mount/unmount disk, format disk, repair disk, read-write disk...on Mac.