Fix SanDisk Extreme Portable SSD Not Mounting on Mac
Open Disk Utility, find the SanDisk Extreme Portable SSD, if it is unmounted, click on Mount button. If the Mount button is grayed out, click on First Aid button to repair the damaged SanDisk Extreme Portable SSD. macOS may not mount & read-write NTFS drives. If the SanDisk Extreme Portable SSD has been formatted to NTFS file system, you can use NTFS for Mac tool to mount it and enable writable for it so that you can read-write the SanDisk Extreme Portable SSD without formatting it.
![]() Updated by Nancy on July 22, 2024
Updated by Nancy on July 22, 2024
Quick Navigation:
- Why Is the SanDisk Extreme Portable SSD Not Mounted on a Mac?
- Methods to Fix SanDisk Extreme Portable SSD Not Mounting on Mac
- How to Mount and Use NTFS SanDisk Extreme Portable SSD on Mac?
- Conclusion
Many people choose the SanDisk Extreme Portable SSD when they need fast and reliable storage. But sometimes, even the best technology has problems. An SSD that won't fit on a Mac is one of the most common. This problem can slow down and anger you, especially if you need to use the drive to store important data.
There are a few good ways to deal with this problem and fix SanDisk Extreme Portable SSD not mounting on Mac issue. This guide will look at several reasons why your SanDisk Extreme Portable SSD might not be mounting and give you full, step-by-step instructions on fixing the issue. You will know how to get your SanDisk Extreme Portable SSD working again by the end of this article. It will keep your data safe and accessible.
Why Is the SanDisk Extreme Portable SSD Not Mounted on a Mac?
Before looking at the options, you should know why your SanDisk Extreme Portable SSD might not mount on your Mac. Several things could be causing this problem:
- Connection Problems: Usually, it's because of a problem with the USB connection or port. If the link is loose or broken, your Mac might not be able to see the SSD. A fractured or incompatible USB cable can also make it hard to link.
- Power Supply Issues: The SSD might not get enough power, especially if it's linked through a USB hub or port that doesn't provide enough power. This could cause your Mac to not see the drive.
- Software Issues: Mounting can be slowed down by bugs in the operating system or problems with other programs. Updates to macOS or third-party apps can strangely mess up external drives.
- File System Errors: If the SSD's file system is damaged or doesn't work with other devices, it might not be identified. Malware or other software-related problems can cause this if the drive is ejected incorrectly.
- Hardware Faults: Mounting issues can be caused by damage or wear and tear on the SSD. Some examples of this are problems with the drive's internal parts or damage to the USB connection.
Methods to Fix SanDisk Extreme Portable SSD Not Mounting on Mac
Make sure the SanDisk Extreme Portable SSD is connected to your Mac, then the solutions listed below to fix SanDisk Extreme Portable SSD not mounting on your Mac.
Method 1: Verify the SanDisk SSD and Mac Interfaces
If your SanDisk Extreme Portable SSD doesn't mount on your Mac, you can fix the problem by ensuring all the connections and ports are correct.
Check The USB Connection
Ensure the SSD and your Mac are securely linked to the USB cable. Check the wire for damage or signs of wear and tear that you can see.
Try A Different USB Port
Connect the SSD using a different USB port on your Mac. If you use a USB hub, connect the SSD straight to the Mac to ensure the hub isn't bad.
Change The USB Cable
Replace the old wire with a new one or one you know works. USB-C to USB-A adapters sometimes fail, so use a straight USB-C connection.
Check Power Supply Issues
Make sure that your Mac is plugged in and getting power. If you have an older Mac, don't use USB ports or hubs that don't have control.
Try It On A Different Device
Check if the SSD mounts by connecting it to a Windows PC or another Mac. If it works on another device, there's probably something wrong with the USB ports or settings on your Mac.
Check Out The SSD
See if the SSD's connection is broken in any way. To remove dust or dirt, lightly clean the ports with compressed air.
Method 2: Force Mount the SanDisk SSD via Disk Utility
Sometimes, forcing the SSD to mount through Disk Utility can fix software bugs that prevent the drive from being properly recognized.
1. Open Disk Utility
Start by going to Applications > Utilities > Disk Utility. You could also use Spotlight by hitting Command + Space and typing "Disk Utility."
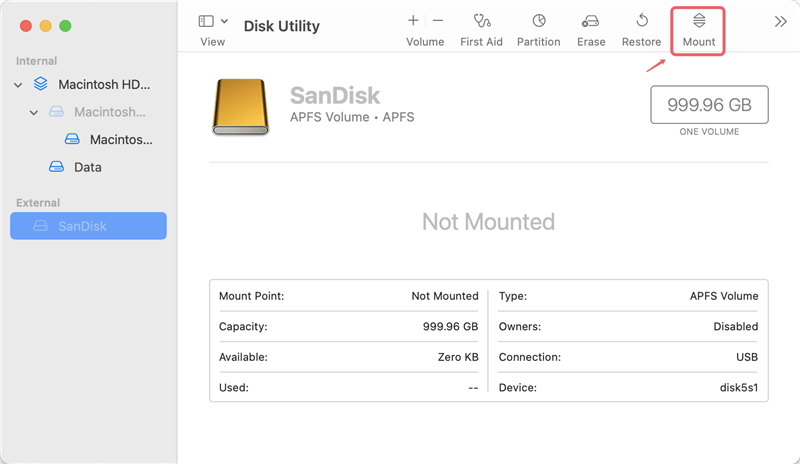
2. Find the SSD
Look for your SanDisk Extreme Portable SSD in the list of drives on the left side of Disk Utility. It will be greyed out if it shows up but isn't attached.
3. Force Mount the SSD
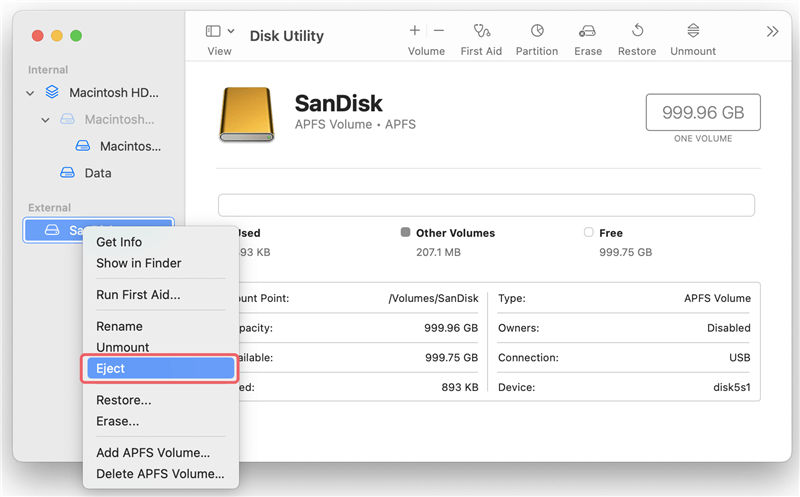
Select the SSD from the list. Right-click the drive and choose Mount from the menu that appears. If asked, type in your master password.
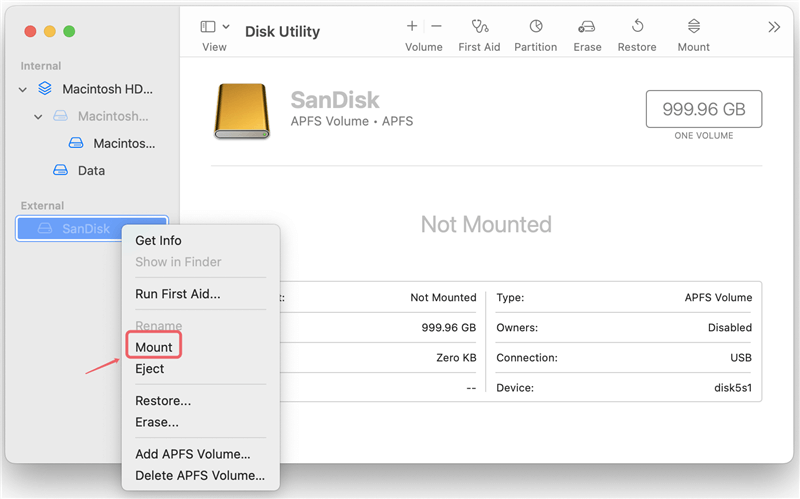
4. Check If The SSD Mounts
After you mount it, the SSD should appear on your screen and in the Finder. You can now get to the drive and what's on it.
Method 3: Use First Aid to Fix the SanDisk Extreme Portable SSD
The "First Aid" tool in Disk Utility can find and fix problems with disks, including your SanDisk Extreme Portable SSD.
Step 1. To open Disk Utility, go to Applications > Utilities and start it up.
Step 2. In Disk Utility, pick your SanDisk Extreme Portable SSD from the list of drives.
Step 3. Select "First Aid" from the menu and click on it. It will look for problems on the SSD and try to fix any.
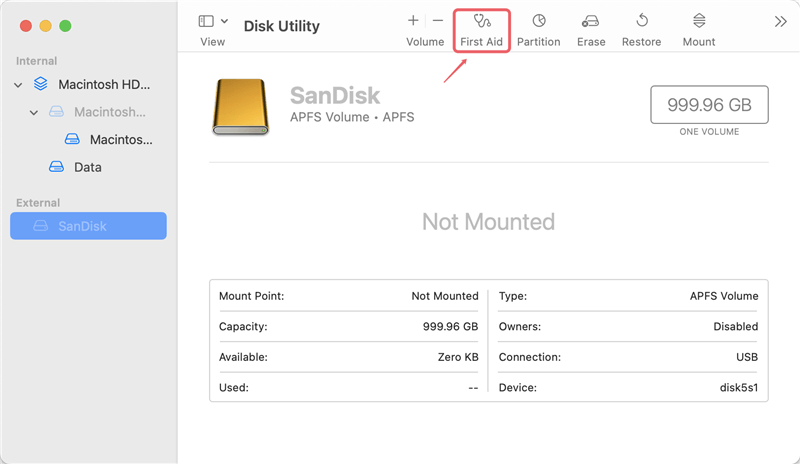
Step 4. Disk Utility will give you hints or steps to follow during the First Aid process. Based on how big and healthy your SanDisk Extreme Portable SSD is, it could take a while.
Step 5. If the SSD isn't already mounted, select it and click the Mount button after starting First Aid to try to mount it again.
Step 6. Ensure you properly remove the SanDisk Extreme Portable SSD from Disk Utility and connect it to your Mac to see if it mounts correctly.
Method 4: Format the SanDisk Extreme Portable SSD on Your Mac
If the SanDisk Extreme Portable SSD still doesn't work after trying the previous fixes, formatting it might fix the problem. When you format the SanDisk Extreme Portable SSD, all of its data will be erased, so ensure you have copies of everything.
Step 1. To open Disk Utility, go to Applications > Utilities and start it up.
Step 2. In Disk Utility's left panel, find your SanDisk Extreme Portable SSD.
Step 3. Press the "Erase" button in the window to erase the SSD. Pick an SSD system (like APFS or Mac OS Extended) and give it a name.
- APFS: for macOS 10.13 or later.
- Mac OS Extended: for older macOS or OS X versions.
- ExFAT: for both Windows and macOS.

Step 4. Once you know your choice, click "Erase." Disk Utility will format the SSD. It could take a while.
Step 5. Once the cleaning is done, safely remove the SSD from Disk Utility and connect it back to your Mac. It should now show up as a new drive and mount.
If you need to, you can return your backed-up data to the SSD that was just formatted.
Note: If you have lost data due to erasing the SanDisk Extreme Portable SSD on your Mac, you still can use a data recovery program to help you get the lost data back.
Step 1. Download and install Do Your Data Recovery for Mac, then connect the erased SanDisk Extreme Portable SSD to the Mac.
Step 2. Open Do Your Data Recovery for Mac, then select the SanDisk Extreme Portable SSD from the drive list.

Step 3. Click on Scan button to deeply scan the SanDisk Extreme Portable SSD and find all recoverable files including existing files, erased files and deleted/lost files.

Step 4. Once the scan is completed, you can preview all recoverable files. Then select the wanted files, click on Recover button.

How to Mount and Use NTFS SanDisk Extreme Portable SSD on Mac?
NTFS file system is a Windows-based file system and macOS does not support this file system. In most cases, the SanDisk Extreme Portable SSD will be pre-formatted to NTFS file system and can be used on Windows PC.
macOS, especially macOS Big Sur or later, may not mount NTFS drive on Mac. If you want to use an NTFS SanDisk Extreme Portable SSD without formatting it to APFS/ExFAT/Mac OS Extended, you should install a NTFS driver on your Mac.
Step 1. Download and install DoYourData NTFS for Mac, this tool is 100% safe and easy-to-use.
Step 2. Connect the SanDisk Extreme Portable SSD to your Mac and open DoYourData NTFS for Mac. If the SanDisk Extreme Portable SSD is unmounted, click on Mount button.
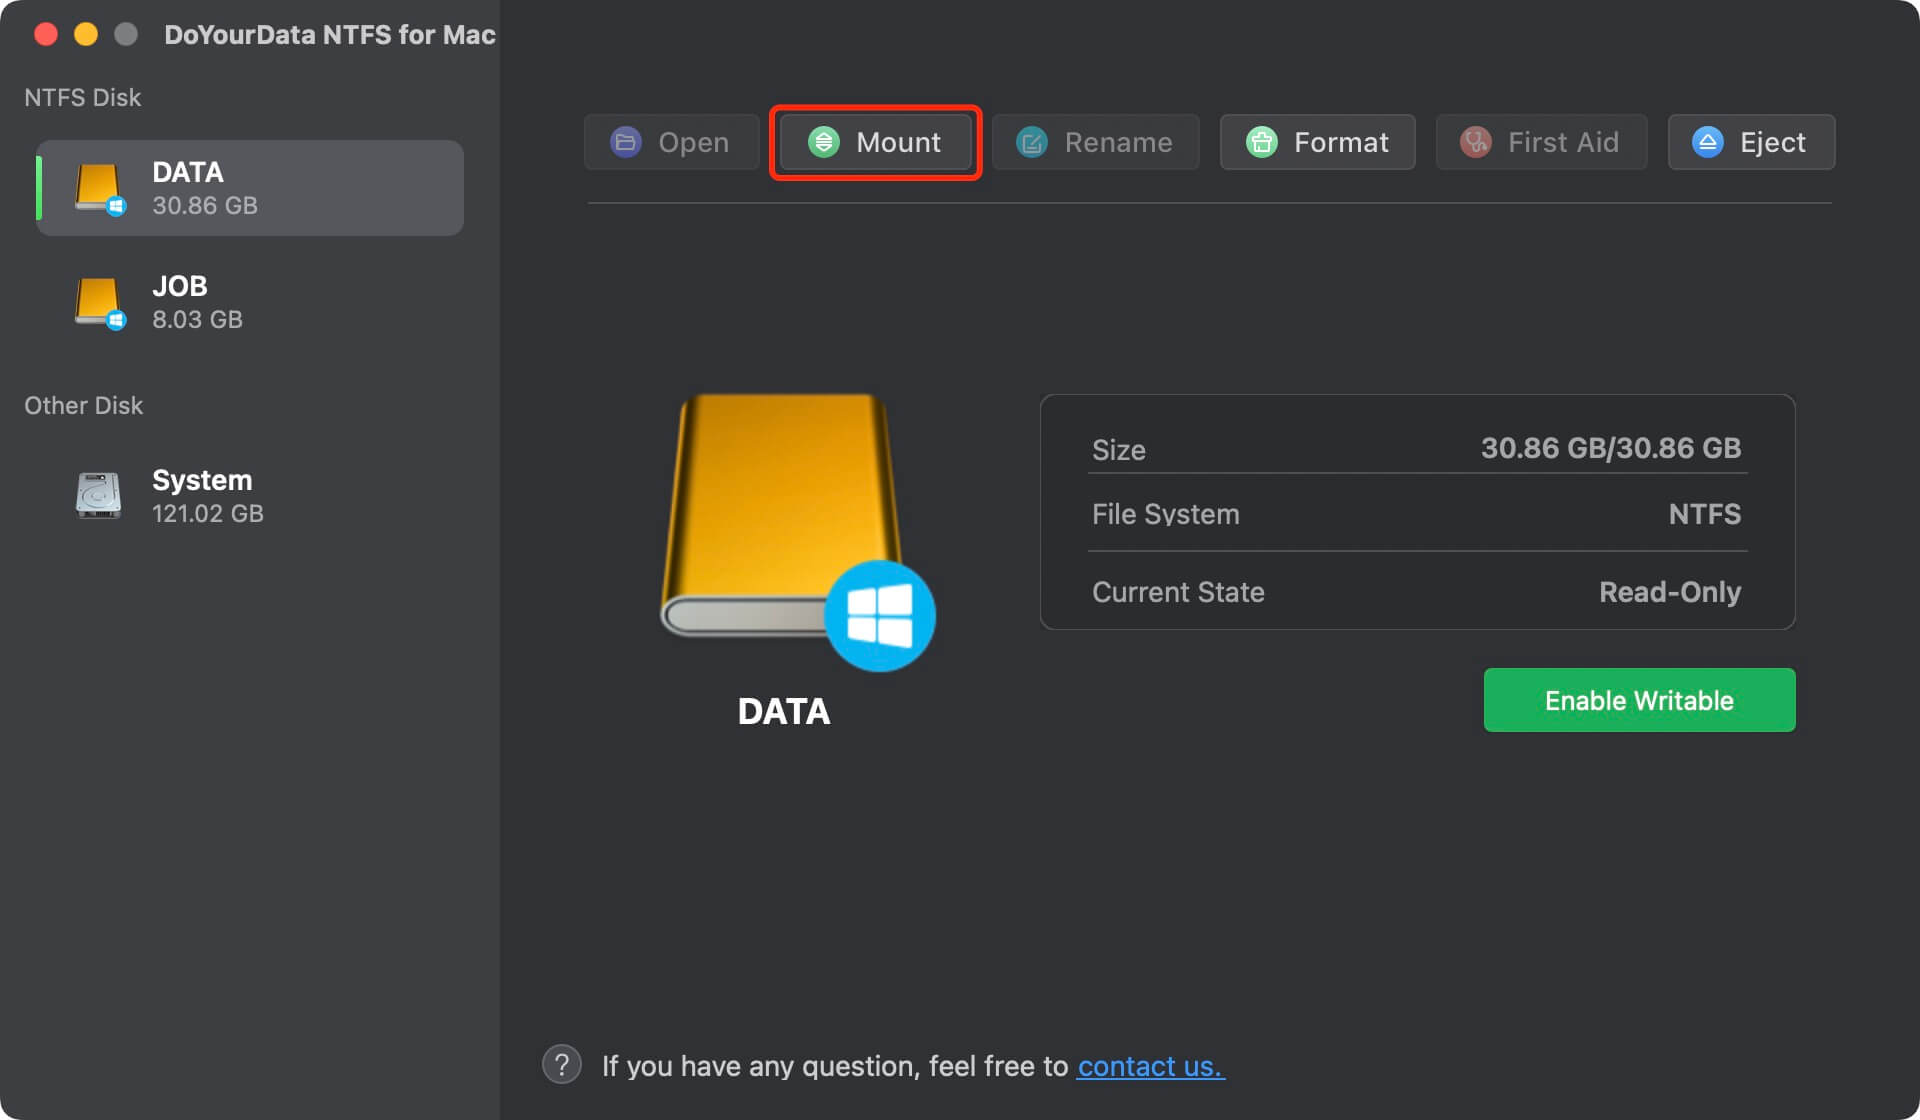
Step 3. To read-write SanDisk Extreme Portable SSD on your Mac, click on Enable Writable button. Then the NTFS SanDisk Extreme Portable SSD will become read-write, you can write data to it without any limitation.

DoYourData NTFS for Mac also can help you repair damaged SanDisk Extreme Portable SSD, format SanDisk Extreme Portable SSD to NTFS/ExFAT/APFS/Mac OS Extended, eject SanDisk Extreme Portable SSD, etc.
Conclusion:
In conclusion, if your SanDisk Extreme Portable SSD doesn't work on your Mac, you must carefully check for problems and make the necessary repairs. Fixing possible hardware and software problems can usually get your SSD working again.
You can check the connections, use Disk Utility to format or force-mount the drive and run First Aid to fix disk failures. It's important to follow all the steps carefully and consider backing up your information before formatting.
If you want to use an NTFS SanDisk Extreme Portable SSD on your Mac and don't want to format it, just try NTFS for Mac tool. This tool can help you quickly mount NTFS SanDisk Extreme Portable SSD on Mac and allow your Mac to read-write the NTFS drive without any limitation.
Written & Updated by Nancy
Nancy works as a tech columnist at DoYourData. She is familiar with macOS and Windows OS and writes computer solution, data recovery, disk clone, data erasure articles for DoYourData. She is a big fan of Mac products and is fond of testing utilities software (such as cleaner, recovery, eraser, NTFS for Mac, video editor, etc) on Mac.