Back Up Videos and Other Files with Time Machine
Learn how to back up your Mac data including videos, images, system, documents with Time Machine.
Quick Navigation:
When cleaning up files on your MacBook, you accidentally delete important videos. We've all felt that sinking feeling. Losing important things, like a favorite memory, a work project, or a creative masterpiece, can be stressful. Don't worry! It's easier to get back videos you deleted on a MacBook. macOS has many built-in tools that can help you get back lost files.
If those don't work, powerful third-party Mac data recovery tools can also get back files you thought were lost forever. You can do many things to regain your videos, from restoring items from the trash to using advanced data recovery software. It will help you get back your important movies and keep your data safe in the future by showing you the best ways to do it.

Before you look into ways to recover lost videos on MacBook, you need to know how macOS deletes files. It takes a while for a file to disappear after you delete it on your MacBook. Instead, the file is sent to the Trash, where it stays until you empty it manually.
The file is still on your hard drive even after you empty the trash; it's just marked as free space so that new data can be written over it. It means that the file can be recovered with special software as long as no new data has been added to it.
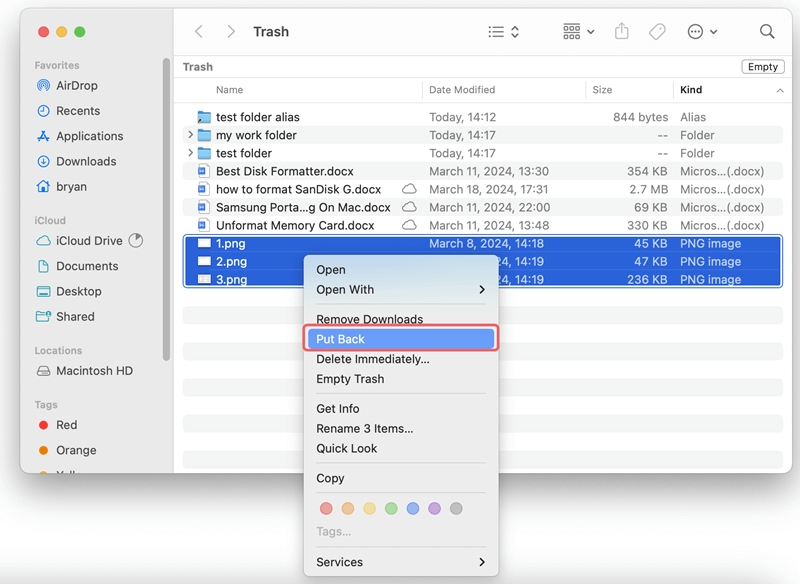
If you want to recover deleted videos, the first place you should look is the Trash. If you haven't cleaned them, they might still be there.
Steps to Recover Videos from the Trash:

It is the fastest and easiest way to retrieve deleted videos, but it only works if you haven't already emptied them.
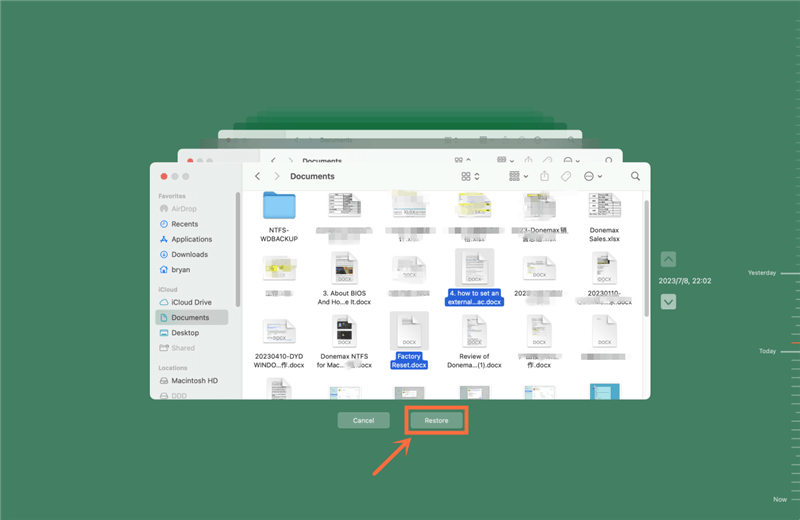
Time Machine is a built-in backup program for macOS. If you regularly back up your MacBook with Time Machine, you can recover deleted videos from an older backup.
How to Recover Videos Using Time Machine:

You can only use this method if you have a Time Machine backup before you delete the file. By backing up your info regularly, you can always get it back.
If you have set up iCloud Drive or Photos to sync videos, you might still be able to find deleted videos in your iCloud storage. iCloud will keep lost files for up to 30 days before getting rid of them.
Steps to Recover Videos from iCloud:

iCloud can save you a lot of trouble, especially if you lose or damage your MacBook and can't access your original files.
Professional data recovery software can help you find lost videos on MacBook even if you've cleaned out the trash or looked through backups. A famous recovery tool for macOS called Do Your Data Recovery for Mac is a great way to retrieve deleted videos.
Step 1. Download and Install: Go to the Do Your Data Recovery for Mac website, download the software and install it.
Step 2. Launch Do Your Data Recovery for Mac: Open the app and choose the drive where the videos were saved, which is usually your MacBook's internal drive.

Step 3. Start a Scan: Click the "Scan" button to begin the scan. Do Your Data Recovery for Mac will do a deep check to find video files that can be recovered.

Step 4. Preview and Recover: When the scan is done, you can see a preview of the videos that can be recovered. Pick out the files you want to get back, then click "Recover" to save them somewhere else.

Do Your Data Recovery for Mac also can help you recover deleted images, documents, folders, audio files, emails, archives on MacBook.
It can be stressful to try to get back videos that you deleted. Here are some ways to keep your important movie files safe so that this doesn't happen again:
1. Enable Time Machine Backups
Set up a Time Machine to back up your MacBook regularly. With backups, you can retrieve information even if you delete it permanently or your hardware breaks.
Back Up Videos and Other Files with Time Machine
Learn how to back up your Mac data including videos, images, system, documents with Time Machine.
2. Use iCloud or External Drives
Keep your videos in sync with iCloud or a cloud service. You could also save them on a portable drive to ensure you have extra copies of important files.
3. Avoid Overwriting Deleted Files
If you realize you removed a file by accident, you should stop using your MacBook immediately so that new data doesn't overwrite the deleted file and make it harder to get it back.
In conclusion, losing important movies on your MacBook can be upsetting, but they are easy to get back if you know what to do. There are several built-in ways to get back lost files in macOS. You can start by checking the Trash, using Time Machine, or looking through iCloud backups. If these tips don't help, you can use a strong tool like Do Your Data Recovery for Mac to get back movies you accidentally deleted.
You can help keep your data safe by setting up Time Machine backups, syncing with iCloud, and keeping files on external drives. If you know how to use these methods, you can recover your important videos and keep your data safe for future use. This will give you peace of mind the next time you accidentally delete something.

Do Your Data Recovery for Mac
Do Your Data Recovery for Mac, one of the best Mac data recovery software, can help you easily and completely recover deleted, formatted or lost files from Mac HDD/SSD, external HDD/SDD, USB drive, memory card, digital camera, or other storage devices.
