Does My Mac support macOS Sequoia? How to install macOS Sequoia on unsupported Mac?
![]() Ricky Lin updated on July 24, 2024
Ricky Lin updated on July 24, 2024
Quick Navigation:
- Check Compatibility for macOS Sequoia
- Prepare Your Mac for macOS Sequoia
- Install macOS Sequoia on Unsupported or Supported Macs
- Conclusion
As long as Apple keeps releasing new macOS versions, users will be eager to upgrade for better features and faster speeds. The most recent version, macOS Sequoia, adds many new features but requires special hardware. That can make people with older Macs wonder if their gadgets will still work together.
This article is about checking whether your Mac can run macOS Sequoia. For people who have Macs that aren't supported, we also have a thorough, step-by-step guide on how to install macOS Sequoia differently. We can help you whether you want to give an old computer a new lease on life or check out the newest OS.
Check Compatibility for macOS Sequoia
Official Compatibility List:
With each new macOS version, Apple usually lists the types it works with. The list of programs that work with macOS Sequoia includes:
- MacBook Air (2020 and later)
- MacBook Pro (2018 and later)
- Mac Mini (2018 and later)
- iMac (2019 and later)
- iMac Pro (2017 and later)
- Mac Pro (2019 and later)
- Mac Studio (2022 and later)
If your Mac is on this list, you can run macOS Sequoia. If not, you must find another way to run the newest OS.
Normally, if your Mac can run macOS Sonoma, it can run macOS Sequoia. If you want to use a Mac that can run macOS Sequoia, you'd better purchase a Apple silicon Mac. The only Intel-based Macs that can run Sequoia are the 2018 and later MacBook Pros. If you will buy a MacBook Air, just purchase one with M1, M2, M3, M4 or M5 chip.
System Requirements:
For macOS Sequoia, you need to make sure that the following system requirements are met on your Mac:
- Processor: You need an Intel 64-bit chip.
- RAM: You need at least 4GB of RAM, but 8GB or more is suggested for the best results.
- Storage: You need at least 20GB of free room on your hard drive for installation.
To see what kind of hardware your Mac has, do these things:
- In the upper left corner of your screen, click on the Apple menu.
- Click on "About This Mac.
- Look over the "Overview" tab, which tells you about your Mac's model, year, processor, memory, and storage.
Prepare Your Mac for macOS Sequoia
Back Up Your Data:
It is important to back up your files before upgrading to a new macOS. It will prevent you from losing important files during the download process. You can use any backup software, not just Time Machine, Apple's built-in backup tool.
- Connect a hard drive from outside your Mac.
- Pick up System Settings > General and click on "Time Machine."
- Click "Select Backup Disk" and pick out your external hard drive.
- Press "Back Up Now" to begin the backup process.
Install macOS Sequoia on Unsupported or Supported Macs
Step 1: Get the macOS Sequoia Resource
The first and most important thing you need to do to start installing macOS Sequoia on a Mac that isn't enabled is to download the installer. These are the exact steps you need to take to get the software from Apple using a reliable source:
- Step 1: Go to the macOS Sequoia Installer Database in your web browser.
- Step 2: find the macOS Sequoia BETA Installer area and download the right file. The "Install macOS.app" file is stored in the InstallAssistant.pkg file on Apple's computers.
- Step 3: Install the pkg file to find the full macOS software in your programs folder. You can also install macOS Sonoma on Macs that aren't enabled.
Step 2: Make a macOS Sequoia USB that can start up
To install macOS Sequoia on a Mac that isn't supported, you need to make a bootable USB on a Mac. If you're not using an empty USB, make sure you back up your important files ahead of time and protect them before you install macOS Sequoia! The installation process could fail, especially on Macs, which aren't allowed, meaning that data would be lost.
Steps to create a bootable USB:
Step 1: Connect a 16GB USB flash drive to your Mac. If you try to make a working USB flash drive, you will lose all the data on it, so use an empty USB or back up important data first.
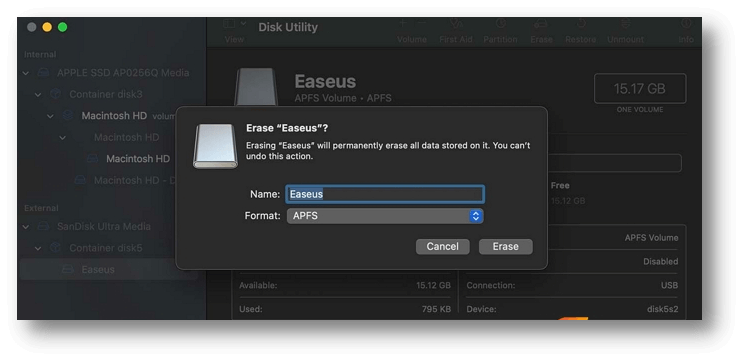
Step 2: Use Spotlight or search "Applications > Utilities > Disk Utility" to find it. You can also ask Spotlight to wake you up.
Step 3: Find your USB drive in the list on the left side of Disk Utility. From the menu that appears, pick "Mac OS Extended (Journaled)" and name it "Sequoia." Press "Erase" to move on.
Step 4: After formatting the USB drive, open "Terminal" and run the following command, replacing "/Applications/Install macOS Sequoia.app" with the path of the installation file you downloaded:
sudo /Applications/Install\ macOS\ Sequoia.app/Contents/Resources/createinstallmedia --volume /Volumes/Untitled
Step 3. Install OpenCore Patcher
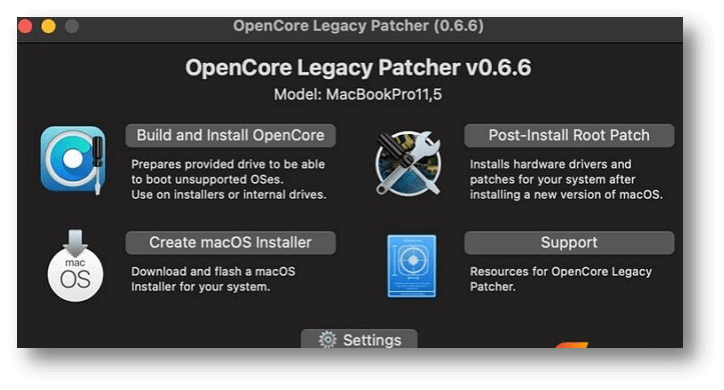
Step 1: Go to the OpenCore Legacy page and click the "Getting Started" button to get the most up-to-date version. Click "Build and Install OpenCore" when opening Core-Patcher (GUI). To make the Mac OpenCore package, follow the steps shown on the screen.
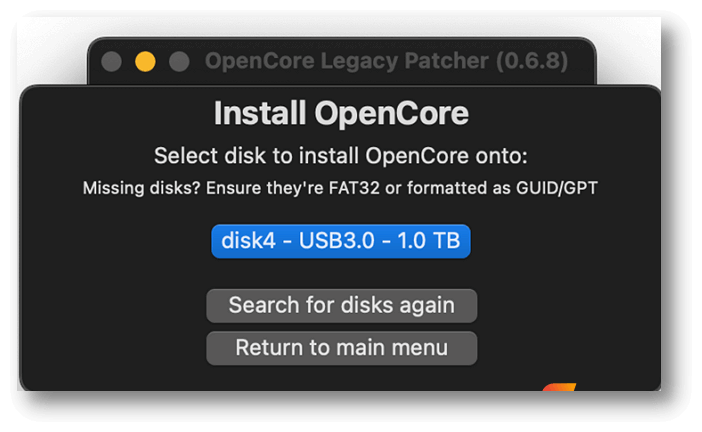
Step 2: Go to the Install OpenCore step once OpenCore Legacy makes the OpenCore package for your Mac.
Step 3: Install the package on the USB stick you formatted in the last step by following the on-screen directions. It will turn the Sequoia installer you downloaded into a bootable USB installation.
4. Once OpenCore Legacy is done making the launcher, take the USB stick out of the Mac that you want to install Sequoia into the Mac you want to install it on.
Step 4. Install macOS 15 on Unsupported Mac
You can install it on an unsupported Mac after making a bootable Sequoia USB and putting OpenCore Legacy Patcher on it.
- Step 1: Put the macOS Sequoia USB drive into the Mac that isn't supported by the update.
- Step 2: Turn on your Mac or restart it, and hold down the "Option" key until the boot option screen shows up. Press Enter to choose the "USB drive" with macOS Sequoia.
- Step 3: Locate the macOS Utilities window and select "Install macOS." Select your Mac's internal drive and follow the steps to start the download. Wait a little while longer if necessary.
Conclusion:
Upgrading to macOS Sequoia gives you better performance and more options. Officially approved Macs can easily install the new OS, but people with models that aren't supported can still use patcher tools to get the latest macOS. Using this guide, you can find out if macOS Sequoia will work on your Mac and install it smoothly, even if it is old.
Ensure you back up your Mac data and install an installer that can run from a bootable disc. Also, be ready for problems with performance or apps that won't work with your computer. If you plan, you can enjoy the new features of macOS Sequoia on your Mac.
Written & Updated by Ricky Lin
Ricky Lin is an senior editor of DoYourData who lives in Adelaide, Australia. He is interested in writing technology articles related with data recovery, computer issue fixes, disk clone, iPhone data recovery, video edit, Mac optimization, etc. He Joined DoYourData in 2019 and have written 500+ articles to help both Windows users and Mac users to solve data or computer problems.