Quick Navigation:
- Understanding the Importance of Emptying Trash Automatically
- Built-in macOS Options to Empty Trash Automatically
- Third-party Solutions to Empty Trash on Mac Automatically
- Conclusion
Does the fact that your Mac's Trash is full make you feel stressed? Having to empty it all the time can be a pain, but what if there was a way to make it happen automatically? If you want to know more about how to set up regular Trash emptying on your Mac, this guide has a lot of information.
We'll look at some built-in macOS tools that use Automator and Calendar to set up regular cleanups. For people who want more power, we'll discuss some well-known third-party apps that give you more options and settings. For the most advanced users, we'll even show you how to use coding with AppleScript to make your changes exactly how you want them.
This guide will give you the information and tools to keep your digital Trash under control and your Mac running smoothly, no matter how much or little you use it.
Understanding the Importance of Emptying Trash Automatically:
Before getting into the details of automating Trash emptying, Mac users need to understand why this job is important. Because of these main points:
1. Freeing Up Disk Space:
Before it's deleted, every file you put in the Trash still occupies a room on your Mac. By setting up automatic trash dumping, you can be sure that these files are quickly deleted, making room on your hard drive for important files and programs.
2. Enhancing System Performance:
When the Trash bin is full, it can slow down the system and cause speed problems, especially on Macs with limited storage space. By emptying the Trash often, you can keep the system running smoothly and quickly.
3. Protecting Privacy and Security:
You can still get to files in the Trash, and if you leave them there too long, they could be a privacy or security risk. Sensitive or private information is less likely to be accidentally shared when you set up automatic trash removal.
Built-in macOS Options to Empty Trash Automatically
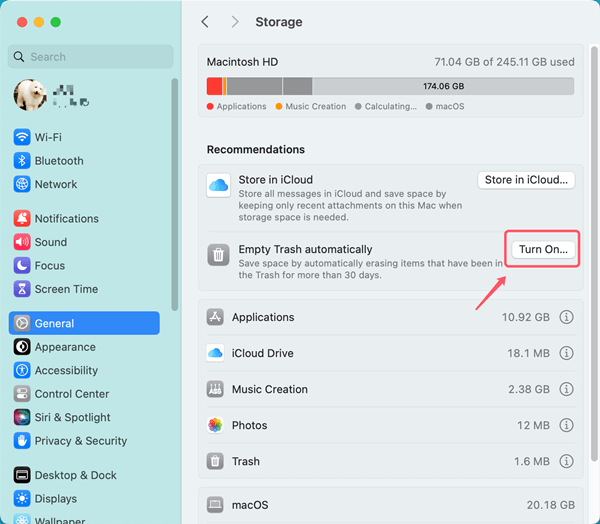
Automatically Empty Trash via Storage Settings or Finder Settings:
macOS has a built-in feature that lets users set regular times to empty the Trash.
- Click Apple menu, choose System Settings.
- Choose General, then click Storage on the right side.
- Then turn on Empty trash automatically.
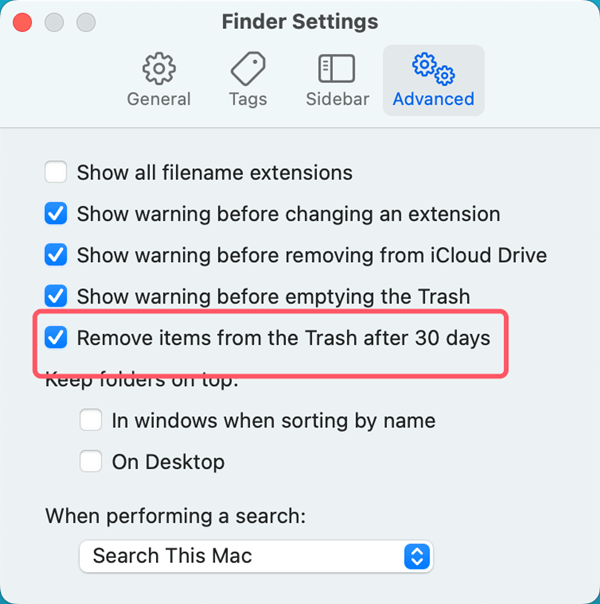
You also can set trash regular cleanup in Finder Settings:
- Open a Finder, click Finder on Apple menu, choose Settings.
- Open Finder Settings.
- Click Advanced.
- Tick Remove items from the trash after 30 days.
Automator:
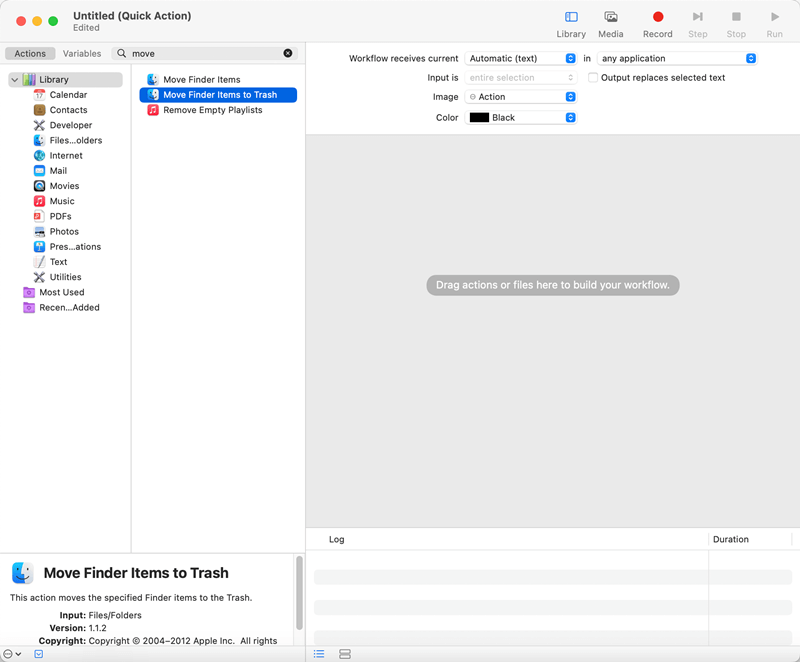
Automator is a strong automation tool that comes with macOS. It lets users make their workflows that execute repetitive tasks automatically. You can set up an Automator workflow to empty the Trash on a set date or when certain conditions are met. Start Automator from the Applications folder, pick "Application" as the document type, and then drag the "Empty Trash" action from the Library pane to the workflow area. It will create a workflow that will empty the trash. You can save the workflow as an app and then use the Calendar app or other scheduling tools to set a time for it to run.

- Start up, Automator. It's typically in the folder called Applications > Utilities.
- Pick out a new document and click on "Quick Action."
- To find the "Move to Trash" action, type it into the search bar and then drag it to the workflow area.
- Next, look for "Empty Trash" and put it below the "Move to Trash" action.
- If you want to save your Quick Action, name it "Empty Trash Daily."
Now, you can use "Calendar," macOS's built-in scheduling tool, to set this Quick Action to run regularly. How to do it:
- Open the Calendar.
- Open Calendar and click on Preferences.
- Choose Tab and click the plus sign (+) to make a new calendar. Let's call it "Trash Emptying."
- Make a regular event in this new Calendar named "Empty Trash" and choose how often it should happen (e.g., daily, weekly).
- When you're making the event, click the "Location" field and choose "Empty Trash Daily" from the dropdown menu that appears.
Third-party Solutions to Empty Trash on Mac Automatically:
1. Hazel:
Hazel is a well-known third-party app for macOS that organizes and manages files automatically. You can set up rules in Hazel to automatically empty the Trash based on things like a file's age, type, or position in a folder. Hazel is flexible and has many advanced tuning options, which makes it a useful tool for automating tasks like emptying the Trash and managing files.
2. CleanMyMac X:
CleanMyMac X is an all-in-one cleaning tool for macOS. It has a "Smart Scan" feature that can eliminate junk files automatically, even ones in the Trash. CleanMyMac X also lets users plan regular system cleanups, such as emptying the Trash, to keep their computers running at their best and free up disk space.
3. AppCleaner & Uninstaller:
AppCleaner & Uninstaller is mostly known for being able to remove programs, but it also lets you empty the Trash immediately when you remove an app. This function ensures that all related files and folders are deleted so the Trash bin is not cluttered.
4. TrashIt!:
This small app lets you set different rules for clearing, such as having files deleted automatically after a certain amount of time in the Trash or when the storage limit is reached.
5. DaisyDisk:
DaisyDisk shows you how much space you're using, but it's not just about cleaning your Trash. Using the Automator interface, it's easy to find big files in the Trash and set them to be deleted automatically.
Advantages of Third-Party Apps:
- Often gives you more precise control over automatic emptying than the choices that come with macOS.
- It may offer extra features like safe deletion or schedule based on certain situations.
Considerations:
- Most of the time, you must buy or subscribe to these apps.
- Before installing an app, do a lot of research to ensure it fits your wants and security preferences.
Conclusion:
Setting your Mac's Trash to empty itself automatically is an easy but effective way to keep your digital workspace clean and well-organized. Automated Trash management can help free up disk space, speed up your system, and protect your privacy and security, and it does not matter if you use built-in macOS choices or third-party solutions. You can make the most of your Mac experience and focus on what's most important: being busy and efficient in your digital work by picking the best method.
If you want to quickly clean up all junk data on Mac, just try MacClean360, it can find all types of junk data and delete it by only 1-click.
MacClean360
All-in-one Mac maintenance tool to clean up all types of junk data by 1 click, remove old/duplicate files, uninstall unwanted apps, clean up browser junk data, manage disk, permanently shred files, speed up slow Mac, manage startup items on Mac.
Hot Articles
- Fix External Hard Drive Read-Only Issue on Mac
- How to Wipe Trash Bin on Mac?
- Recover Lost Data from WD (Western Digital) External Hard Drive on Mac
- Fix External Hard Drive Not Showing Up on Mac
- How to Wipe SD Card on Mac?
- Mount and Unmount the External Hard Drive on the Mac
- Run First Aid on Mac to Repair Disks
- Fix Can't Save Files to An External Hard Drive on Mac
- (Solved) External SSD Not Detected in Disk Utility on Mac
- Why Can't Format A Hard Drive To NTFS on Mac? Can We Fix It?