How to recover deleted files after emptying Trash?
Using the software Do Your Data Recovery for Mac, it's easy to get back the deleted files after emptying the Trash.
Quick Navigation:
Deleting a Word document on a Mac is usually easy, but extra steps must be taken to ensure it can't be recovered. You can't delete a file when you empty the Trash. The room it takes up is marked for overwriting, but you can get it back with special tools. To remove a Word document permanently on Mac, you need to use secure deletion techniques that make it almost impossible to get it back.
This guide will show you several ways to completely delete a Word file from your Mac, including the standard and secure way to do it through Finder and using third-party data erasure apps for extra safety. By doing these things, you can be sure your papers are gone permanently and can't be found again with any recovery method.
If you want to remove a Word document on Mac, there are several ways to do that. Here we will show you the common methods and detail steps to deleted a Word document on Mac:
The following steps will show you how to use the built-in feature on your Mac to delete something simple. Remember that any professional Mac data recovery tool can easily recover the files that you deleted this way. Therefore, move on to the next option if you want a long-lasting answer.
Step 1: Open the folder that has the papers. If you are saving them in the default location, go to /Users/username/papers.
Step 2: Use the function key on your Mac to pick all the files you want to delete.
Step 3: Use the cursor to drag the files to the trash.
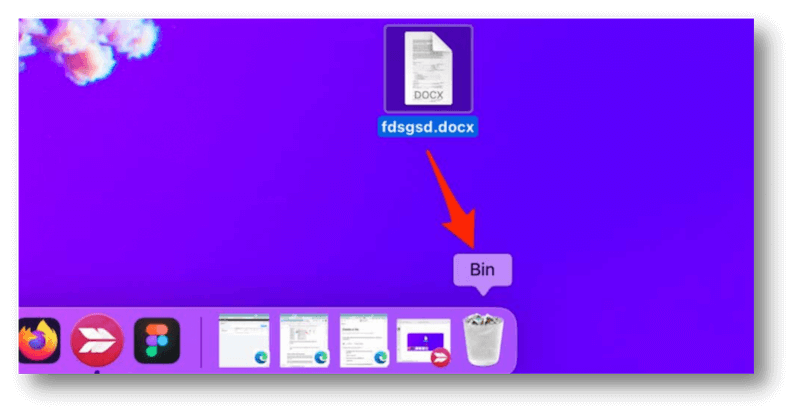
Step 4: Click "Empty Trash" in the Finder menu to remove all your chosen files.

The Microsoft Word app lets you get rid of files saved on your Mac's hard drive or OneDrive.
1. Open the Microsoft Word app on your Mac and choose Home from the menu bar.
2. Right-click the file in the "Recent" list and choose "Delete." You can also move your mouse over the file, click the three-dot menu button, and choose "Delete."
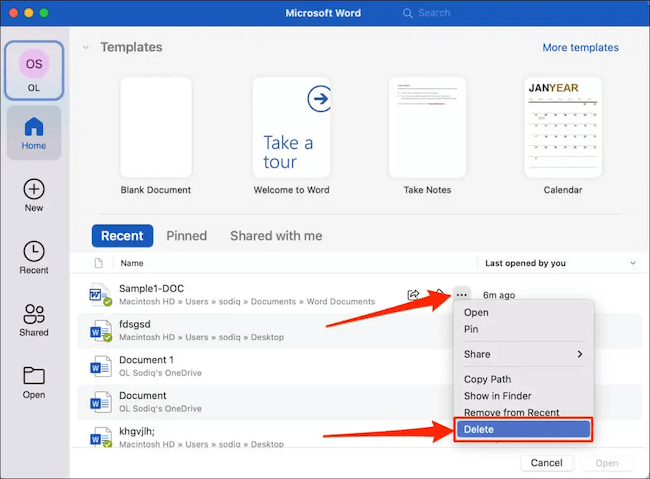
3. To remove the file, click "Delete" on the confirmation window.
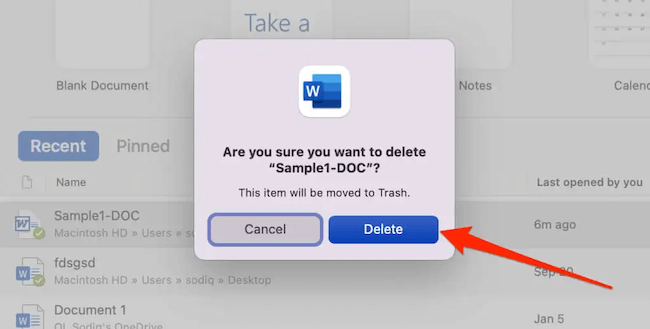
The Microsoft Word app will put the file in the Bin or Trash folder on your Mac. If it is in your account, Microsoft moves the file to the garbage bin in OneDrive. Ensure to empty the Trash in local computer an OneDrive.
Closing the paper in Word or any other program is necessary before continuing with the steps below.
1. In the Finder app, go to where the file is stored. If you can't remember where you saved the file, use the search button to find it.
2. The Word app also lets you use Finder to find a file's location. To do so, click on the "Recent" tab, right-click on the file, and choose "Show in Finder."
3. To remove a Word file, right-click it and choose "Move to Bin."
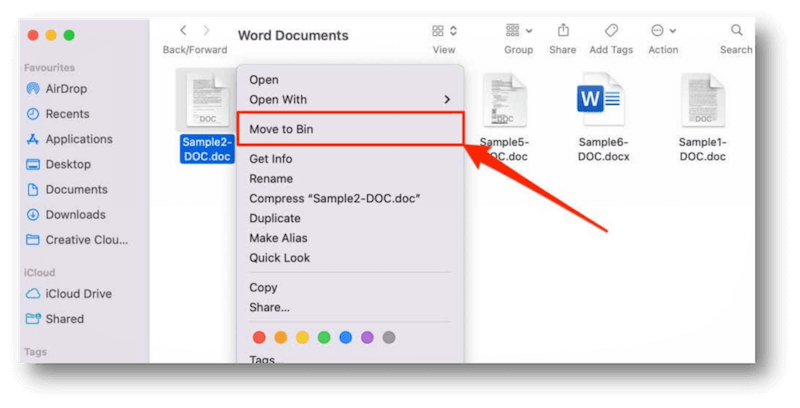
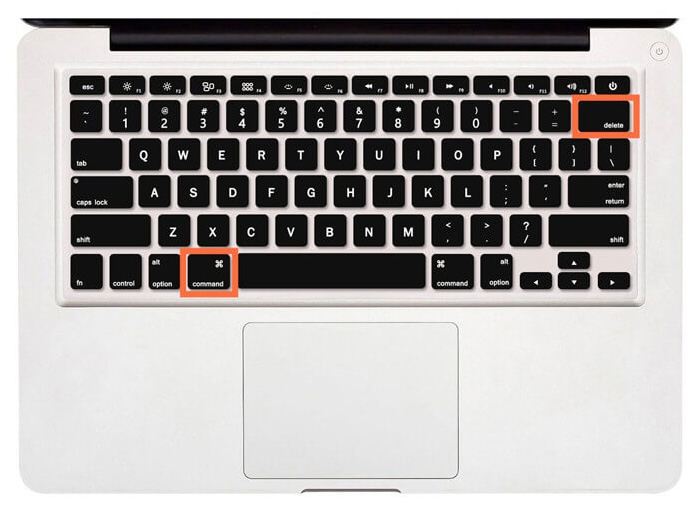
You could also pick out the file, press the Command, and Delete keys simultaneously. You can also drag the file to the Bin/Trash in the Dock of your Mac to delete it.
macOS doesn't remove deleted files from your Mac's storage for good. When you delete a document in the Finder or Word app, it goes to the trash or recycle bin. When you empty the Trash or delete something by hand, it stays there until you empty the box again. You can return a Word file you removed by accident by going to the Trash folder.
1. In the Dock, click on the Bin/Trash button.
2. Find the Word file you want to get back, right-click it, and choose "Put Back."
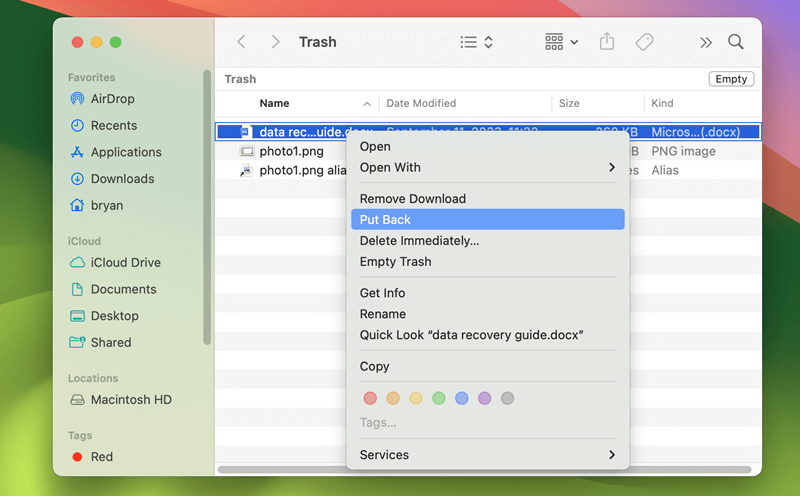
macOS will move the file back to its original location. Now, you can open the file in the Word app or any other tool that works with it. However, you can't get it back once you delete something from the Trash box, so make sure you don't delete the file again.
Even if the Trash was emptied, before the deleted files are overwritten by new data, it's still able to recover the files with data recovery software.
How to recover deleted files after emptying Trash?
Using the software Do Your Data Recovery for Mac, it's easy to get back the deleted files after emptying the Trash.
It has been shown that deleting a Word document is not enough to eliminate it. DoYourData Super Eraser for Mac, on the other hand, is the best new data-erasing tool that can permanently delete all types of data from a hard drive or logical disk. Once you use this software, you can't go back.
To avoid losing important files, you should make a copy of them before using this software since no data recovery tool can ever bring them back. It uses very strong algorithms and plans to safely and securely get rid of the files on your computer.
The software is easy to handle with simple and wizard-style interface. Also, the software offers 3 different data erasure modes for different scenarios. You can choose a proper mode to wipe data depending on your own needs.
To remove and shred Word documents on Mac with the DoYourData Super Eraser, you can refer to the following guide step by step:
Step 1: Select the data erasure Mode.
Download the app and install it on your Mac. It is important to ensure you download the right version because it works on Windows and Mac. This time, we'll use a Mac to show you how it works. As you can see, it gives you three ways to wipe. On a Mac, click "Erase Files/Folders" on the left side of the software screen to delete a Word document.
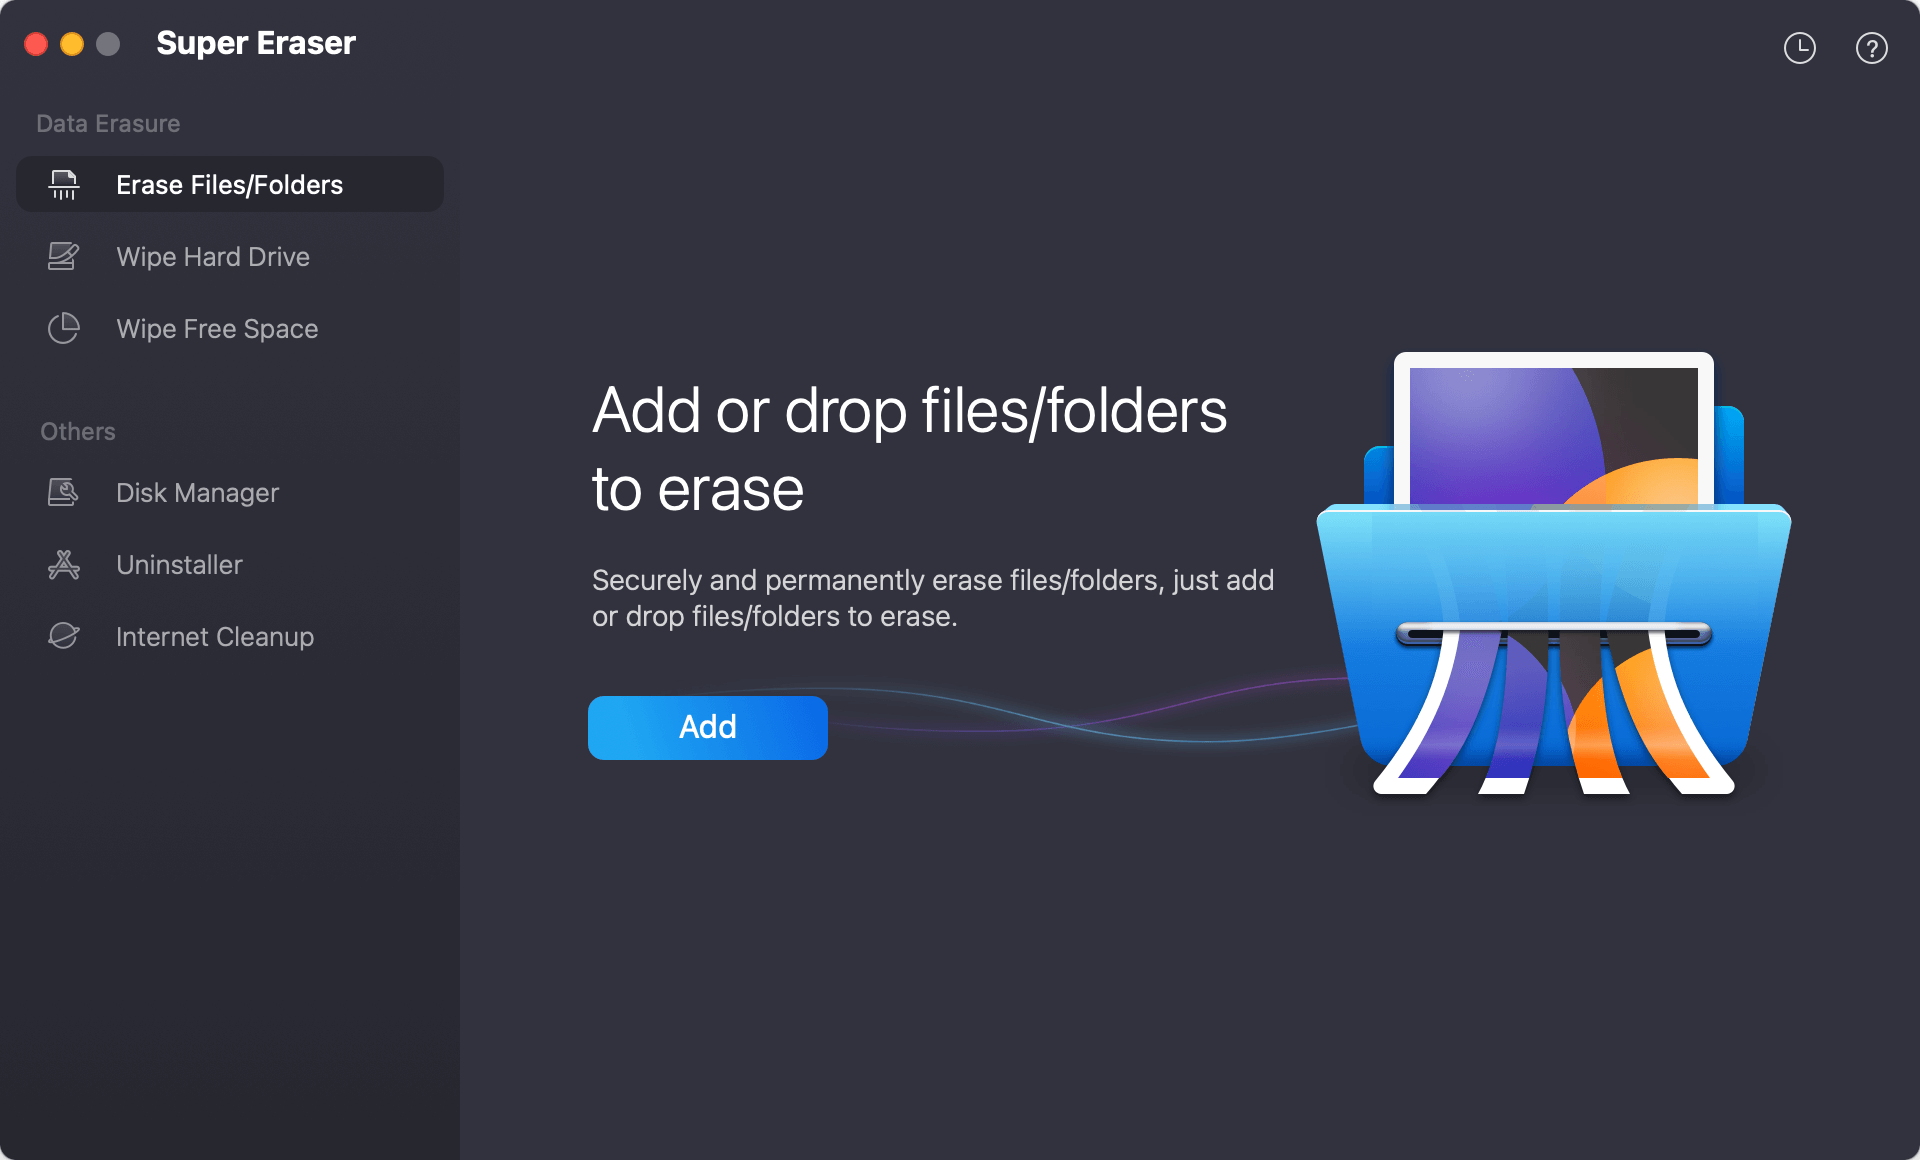
Step 2. Add the Word files to shred.
Click the Add button to locate and add all the Word documents you want to shred to the software. Or you can drag the files to the software to add directly. You will see all the added files in the list. You can check and ensure the right files are added. You can remove the unwanted files and add more before you process the data wiping.
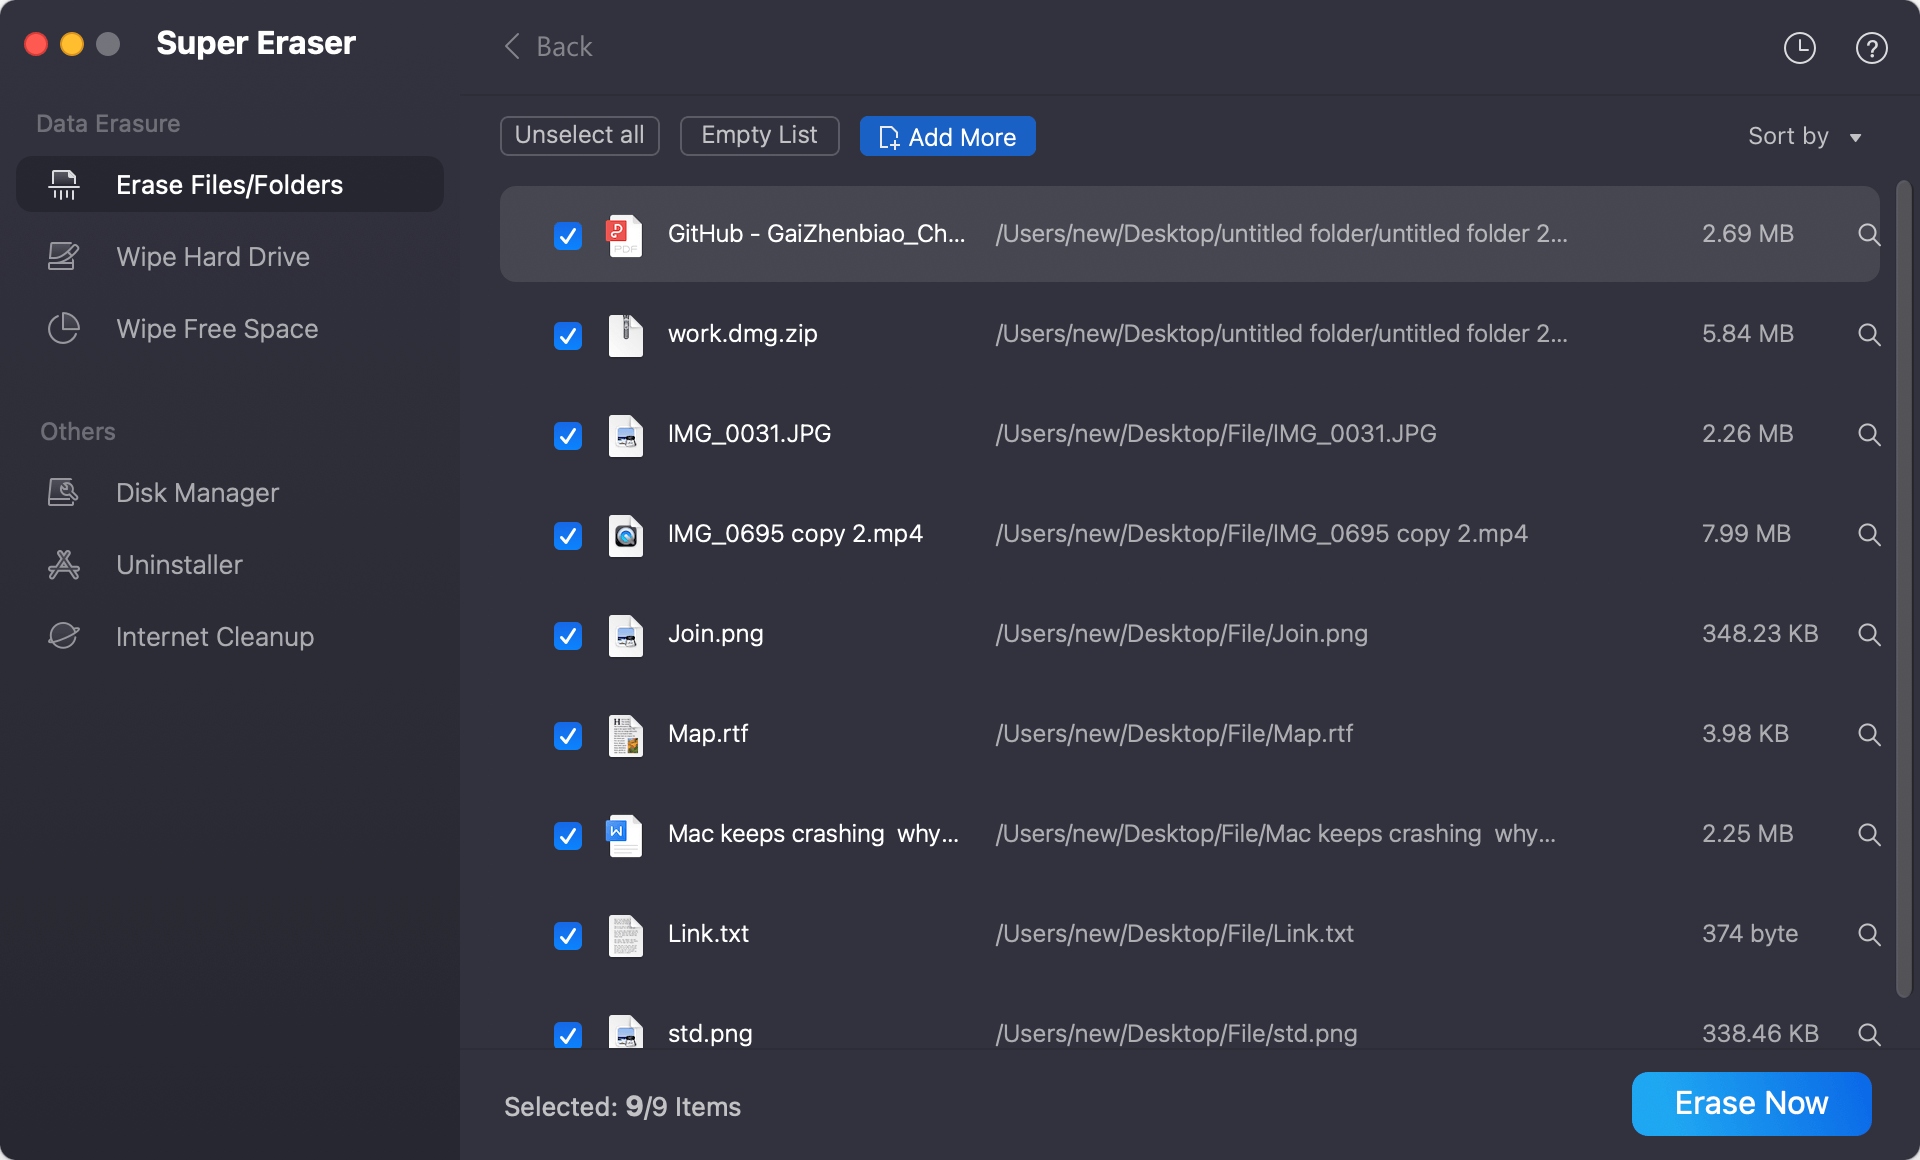
Step 3: Pick a data wiping algorithm.
On the next page, you should choose the way to wipe. You will be given multiple data wiping algorithms: HMG and the U.S. Army, the Peter Guttmann method, DoD, and others. We suggest that you use the wiping method with multiple passes to ensure the data will be shredded more completely. Then, make sure of it.
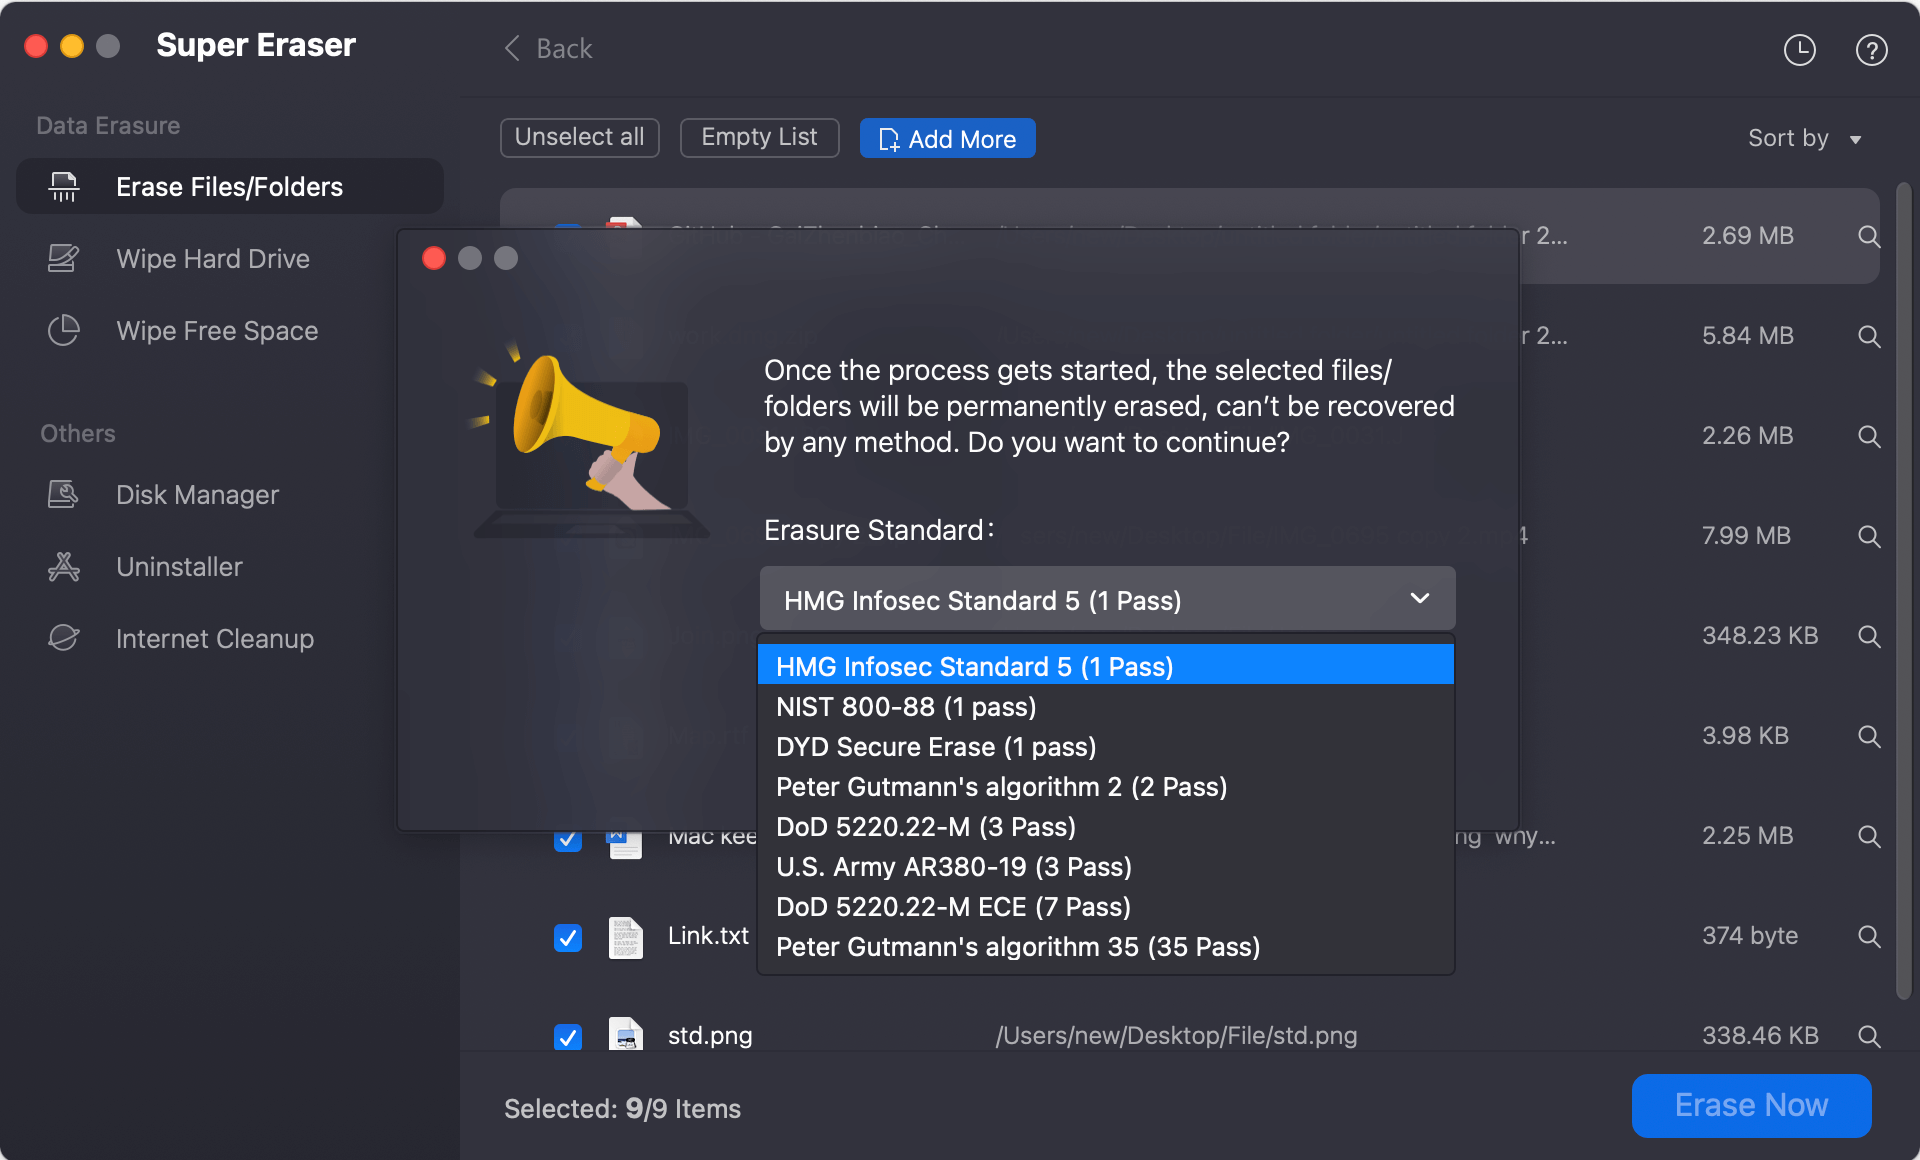
Step 4: Delete Word documents.
Once you've chosen the way to wipe, click "Erase Now" and wait for the tool to delete all your files automatically. Depending on how much data it's deleting, it could take a few minutes.
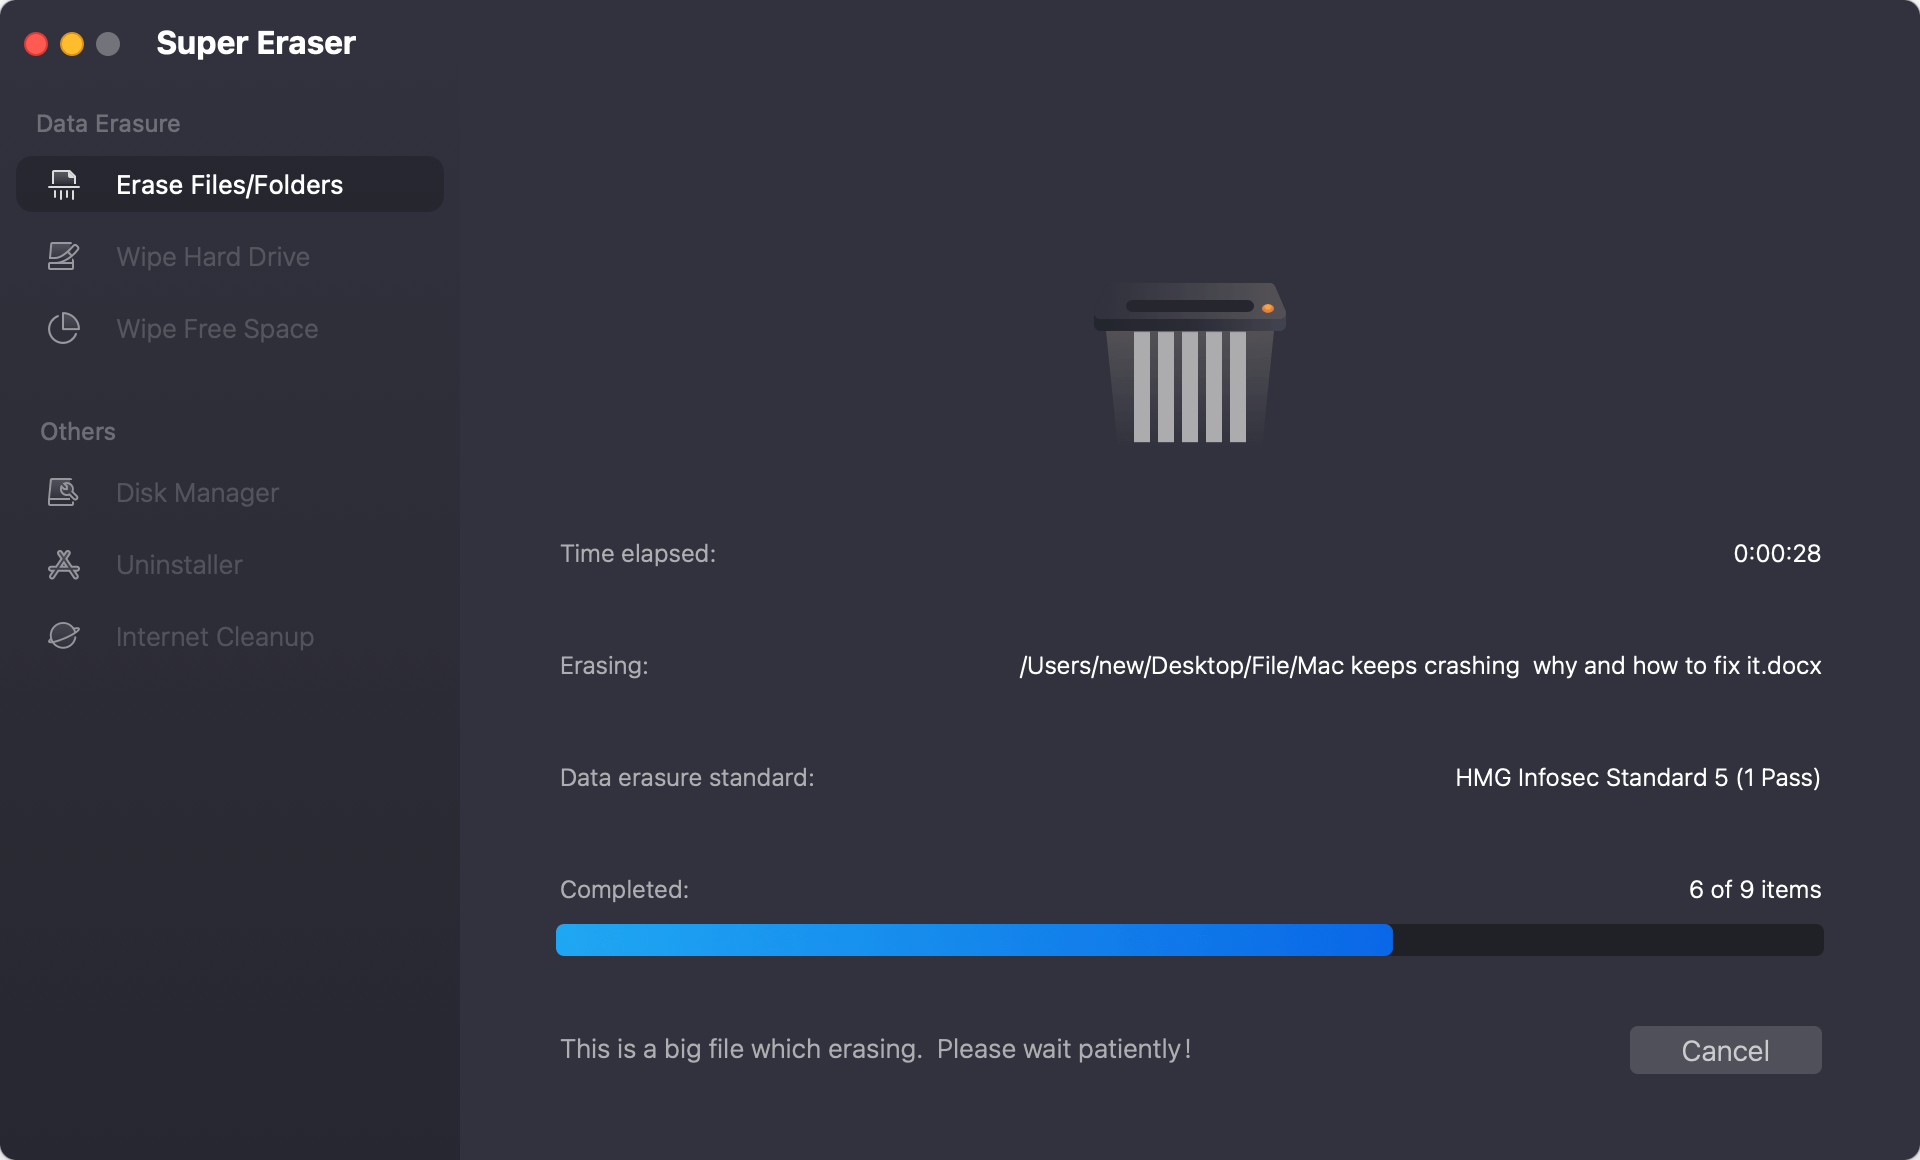
Once the deletion is done, you can check the computer to ensure all the files have been fully deleted. You can use a data recovery tool to look through your whole computer, but you can be sure you will never get back any lost data.
Regular Maintenance
Secure deleting methods and regularly emptying the trash can help keep your data safe. Plan regular clean-ups to keep track of your files and eliminate papers you don't need.
Backups and Redundancy
Before you delete files for good, ensure you have backups if needed. Keep copies of important papers using Time Machine or other backup tools.
On a Mac, you must do more than empty the Trash to permanently delete a Word document. You can use secure deletion in Finder or certain third-party file shredder app to ensure you can't regain your file. Each method provides a different amount of security to keep your data from being recovered.
For effective data control and protection, it's also important to do regular maintenance and backups. By doing these full steps, you can safely delete private files from your Mac, ensuring they are gone for good and can't be recovered by anyone else.

DoYourData Super Eraser for Mac
DoYourData Super Eraser for Mac is a 100% safe, powerful and easy-to-use data erasure program. It offers certified data erasure standards including Peter Gutmann, U.S. Army AR380-19, DoD 5220.22-M ECE to permanently erase data from Macs and external devices, making data recovery be impossible.
