Quick Navigation:
- Make a Backup Before Formatting Your Mac
- Preparation for Formatting
- Step-by-step Guide: How to Format a Mac
- Can I Recover Lost Data after Formatting My Mac?
- How to Make Files Be Unrecoverable on Mac?
- Conclusion
- FAQs About Formatting a Mac
In today's digital age, ensuring that your computer runs smoothly and efficiently is crucial. Formatting can resolve performance issues, remove malware, or prepare the device for sale. This guide will walk you through the steps to format both a MacBook and a desktop Mac computer, ensuring a smooth and successful process.
Make a Backup Before Formatting Your Mac
Before formatting your Mac, it's imperative to back up your data. Formatting will erase all the information on your device, so preserving important files is essential.
Why Backup is Important?
Backing up your data ensures that you don't lose valuable information. Photos, documents, music, and other files should be safely stored to avoid any irrecoverable loss.
Methods to Backup Your Data
- Time Machine: Time Machine is a built-in backup feature of macOS designed to protect your files. To use Time Machine, you need an external hard drive. Connect it to your Mac, then navigate to System Preferences or System Settings > General > Time Machine. Turn on Time Machine and select the external drive as your backup disk. Time Machine will then create a complete backup of your system, allowing you to restore files and settings if needed.
- iCloud: iCloud offers a seamless way to store files in the cloud. This option is particularly useful if you want to access your data across multiple devices. Ensure that your iCloud account has sufficient storage space to accommodate your files. To back up using iCloud, go to System Preferences > Apple ID > iCloud, and check the boxes for the files and documents you want to back up. iCloud will automatically synchronize your data with Apple's servers.
- Disk Clone Software: If you want to create a full bootable clone backup for your Mac before you format it, you can use Mac disk cloning software to clone the internal drive to an external hard drive.
- External Storage: Using an external hard drive or USB stick is a straightforward way to manually back up your files. Simply connect the storage device to your computer and copy important files and folders. This method is particularly useful if you prefer having a physical copy of your data.
- Cloud Storage Services: Services such as Google Drive, Dropbox, and OneDrive provide cloud storage solutions that can be used for backing up your files. These platforms offer the convenience of accessing your data from any device with an internet connection, and they often include features for sharing and collaborating on documents.
Preparation for Formatting
Proper preparation is key to a successful formatting process.
Ensure Power Connection:
Make sure your device is plugged in during the formatting process to prevent any interruptions that could cause errors or corruption.
Gather Necessary Tools and Information:
- Internet Connection: Some formatting processes require internet access to download necessary files or updates.
- Apple ID Credentials: You'll need your Apple ID and password to reinstall macOS or to access iCloud.
Step-by-step Guide: How to Format a Mac
Formatting a MacBook involves erasing the hard drive and reinstalling macOS. Here are the steps:
Step 1. Access macOS Recovery Mode
- Restart Your MacBook: Click on the Apple logo in the top-left corner and select Restart.
- Enter Recovery Mode: As your MacBook restarts, immediately press and hold the Command and R keys simultaneously (for Intel-based Macs) or Power button (for Apple silicon Macs). Continue holding these keys until you see the Apple logo or a spinning globe or Loading Startup Options, indicating that your Mac is booting into macOS Recovery Mode. This mode allows you to perform system maintenance tasks, including formatting your drive.
Step 2. Erasing the Hard Drive Using Disk Utility
If you are using a Mac with Apple silicon, select Options and click on Continue button.
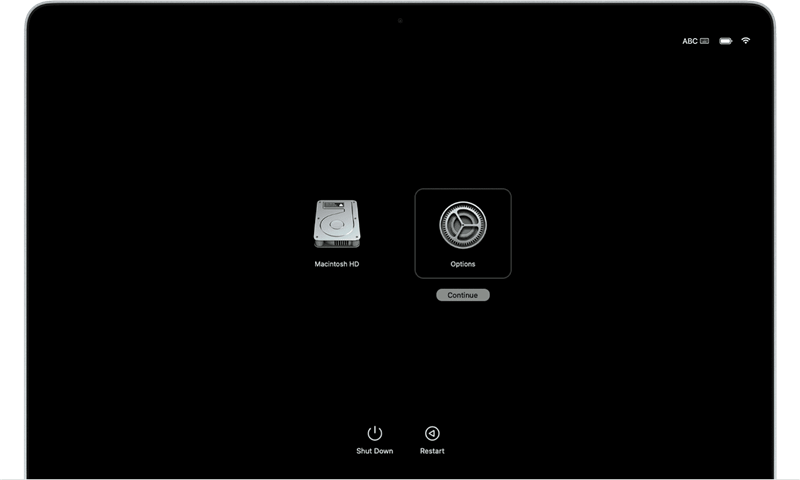
- Open Disk Utility: In the macOS Utilities window, select Disk Utility and click Continue.
- Select Your Startup Disk: In Disk Utility, select your startup disk (usually named "Macintosh HD") from the sidebar.
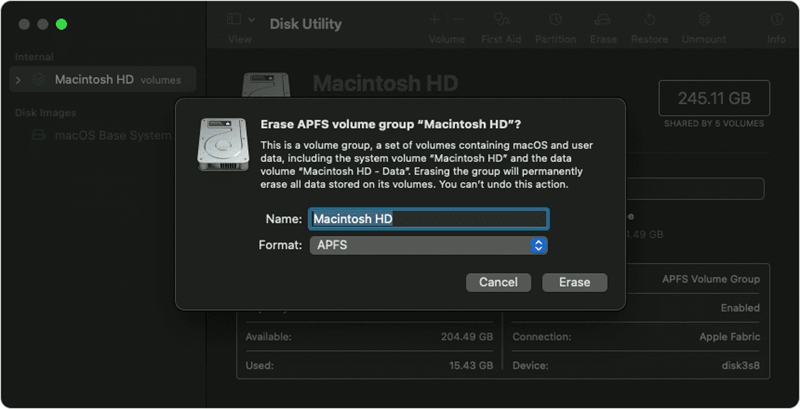
- Erase the Disk: Click the Erase button at the top of the Disk Utility window. You will be prompted to enter a name for the disk and choose a format (APFS is recommended for macOS 10.13 or later, while Mac OS Extended is suitable for earlier versions). After making your selections, click Erase to begin the process.
Step 3. Reinstalling macOS
- Quit Disk Utility: Once the disk is erased, quit Disk Utility to return to the macOS Utilities window.
- Reinstall macOS: Select Reinstall macOS and click Continue. Follow the on-screen instructions to install a fresh copy of macOS. You may need to connect to a Wi-Fi network during this process to download the necessary files.
- Click Continue: You'll need to follow the installation prompts, which include accepting the terms of service and selecting the drive where the OS will be installed. Most MacBooks will only have one drive available for this selection.
Post-Formatting Steps
After formatting your device and reinstalling the operating system, there are several steps you should take to get your computer up and running smoothly.
Restoring Backed-Up Data:
If you used Time Machine to back up your data, you can restore it during the initial setup of macOS. Select the option to transfer information from a Time Machine backup, and follow the on-screen instructions. If you used iCloud or another cloud service, sign in to your account and download your files.
Reinstalling Essential Applications:
Reinstall the applications you use regularly. For MacBooks, you can download them from the App Store or the developer's website.
Configuring System Settings and Preferences:
Take some time to customize your system settings to your liking. This includes setting up user accounts, adjusting display and power settings, and configuring security options.
Troubleshooting Common Issues
While formatting a computer is generally straightforward, you may encounter some issues. Here are a few common problems and their solutions:
- Installation Errors: If you encounter an error during the macOS installation, restart your Mac and try again. Ensure you have a stable internet connection if you're downloading macOS.
- Device Driver Issues: macOS typically includes drivers for most hardware. If you encounter issues, check the Apple support website for updates or patches.
- Connectivity Problems: If you have trouble connecting to Wi-Fi after reinstalling macOS, ensure that your Wi-Fi network is working and that you've entered the correct password. You can also reset the network settings by going to System Preferences > Network.
Can I Recover Lost Data after Formatting My Mac?
Yes, Mac data recovery software can easily recover lost data which is erased by Disk Utility or lost due to reinstalling macOS.
Step 1. Download and install the reliable Mac data recovery software - Do Your Data Recovery for Mac.
Step 2. Open Do Your Data Recovery for Mac, select the internal drive to start data recovery.

Step 3. Click on Scan button to deeply scan the erased drive.

Step 4. Once the scan is completed, you can preview all the recoverable files. Then select the wanted files and click on Recover button to save them.

How to Make Files Be Unrecoverable on Mac?
After formatting your Mac, you can use Mac data erasure software - such as DoYourData Super Eraser for Mac to wipe free disk space of the internal drive and permanently erase all deleted/formatted/lost data from your Mac.
Step 1. Download and install DoYourData Super Eraser for Mac on your Mac, then open it.
Step 2. Choose Wipe Free Space mode, select the Macintosh HD, click on Wipe Now button.
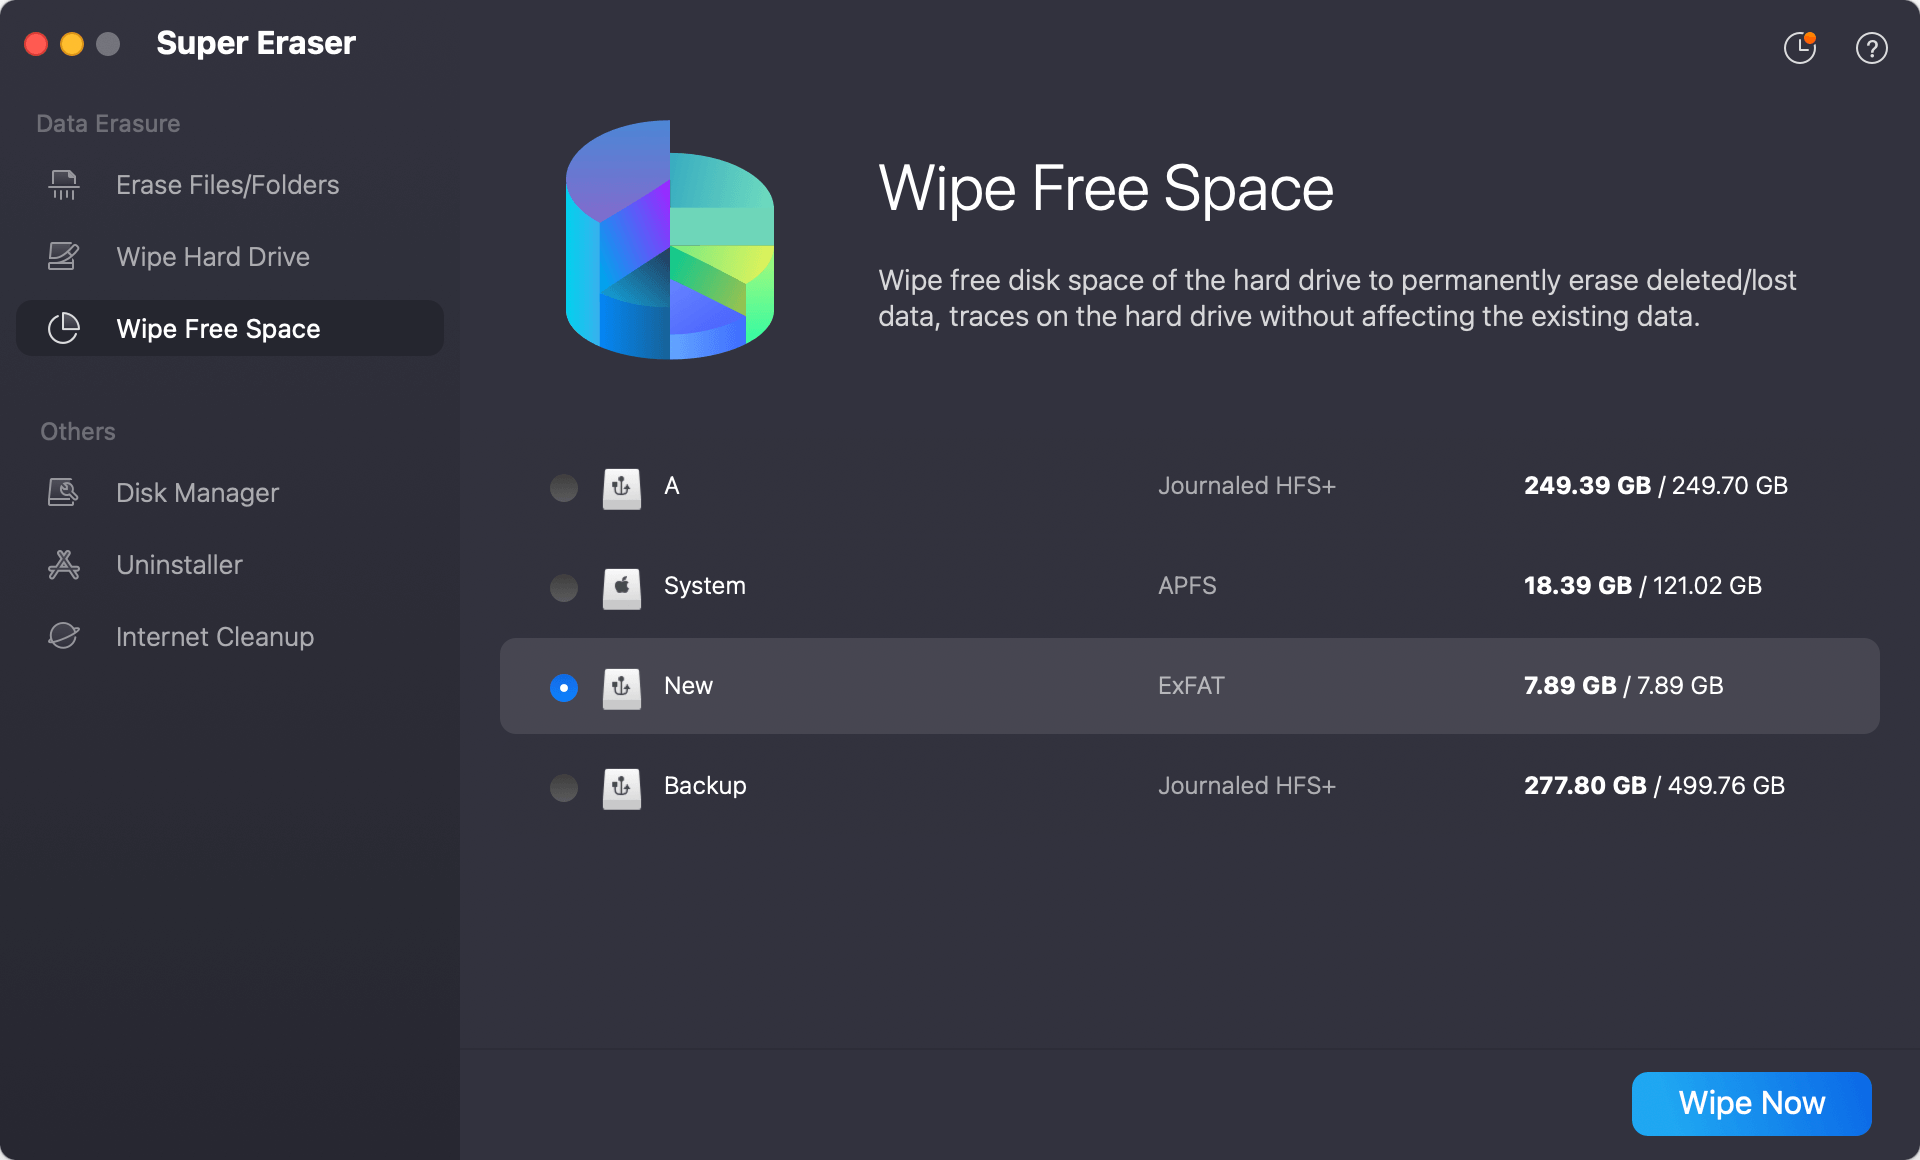
Step 3. Select a data erasure standard, then click on Continue button.
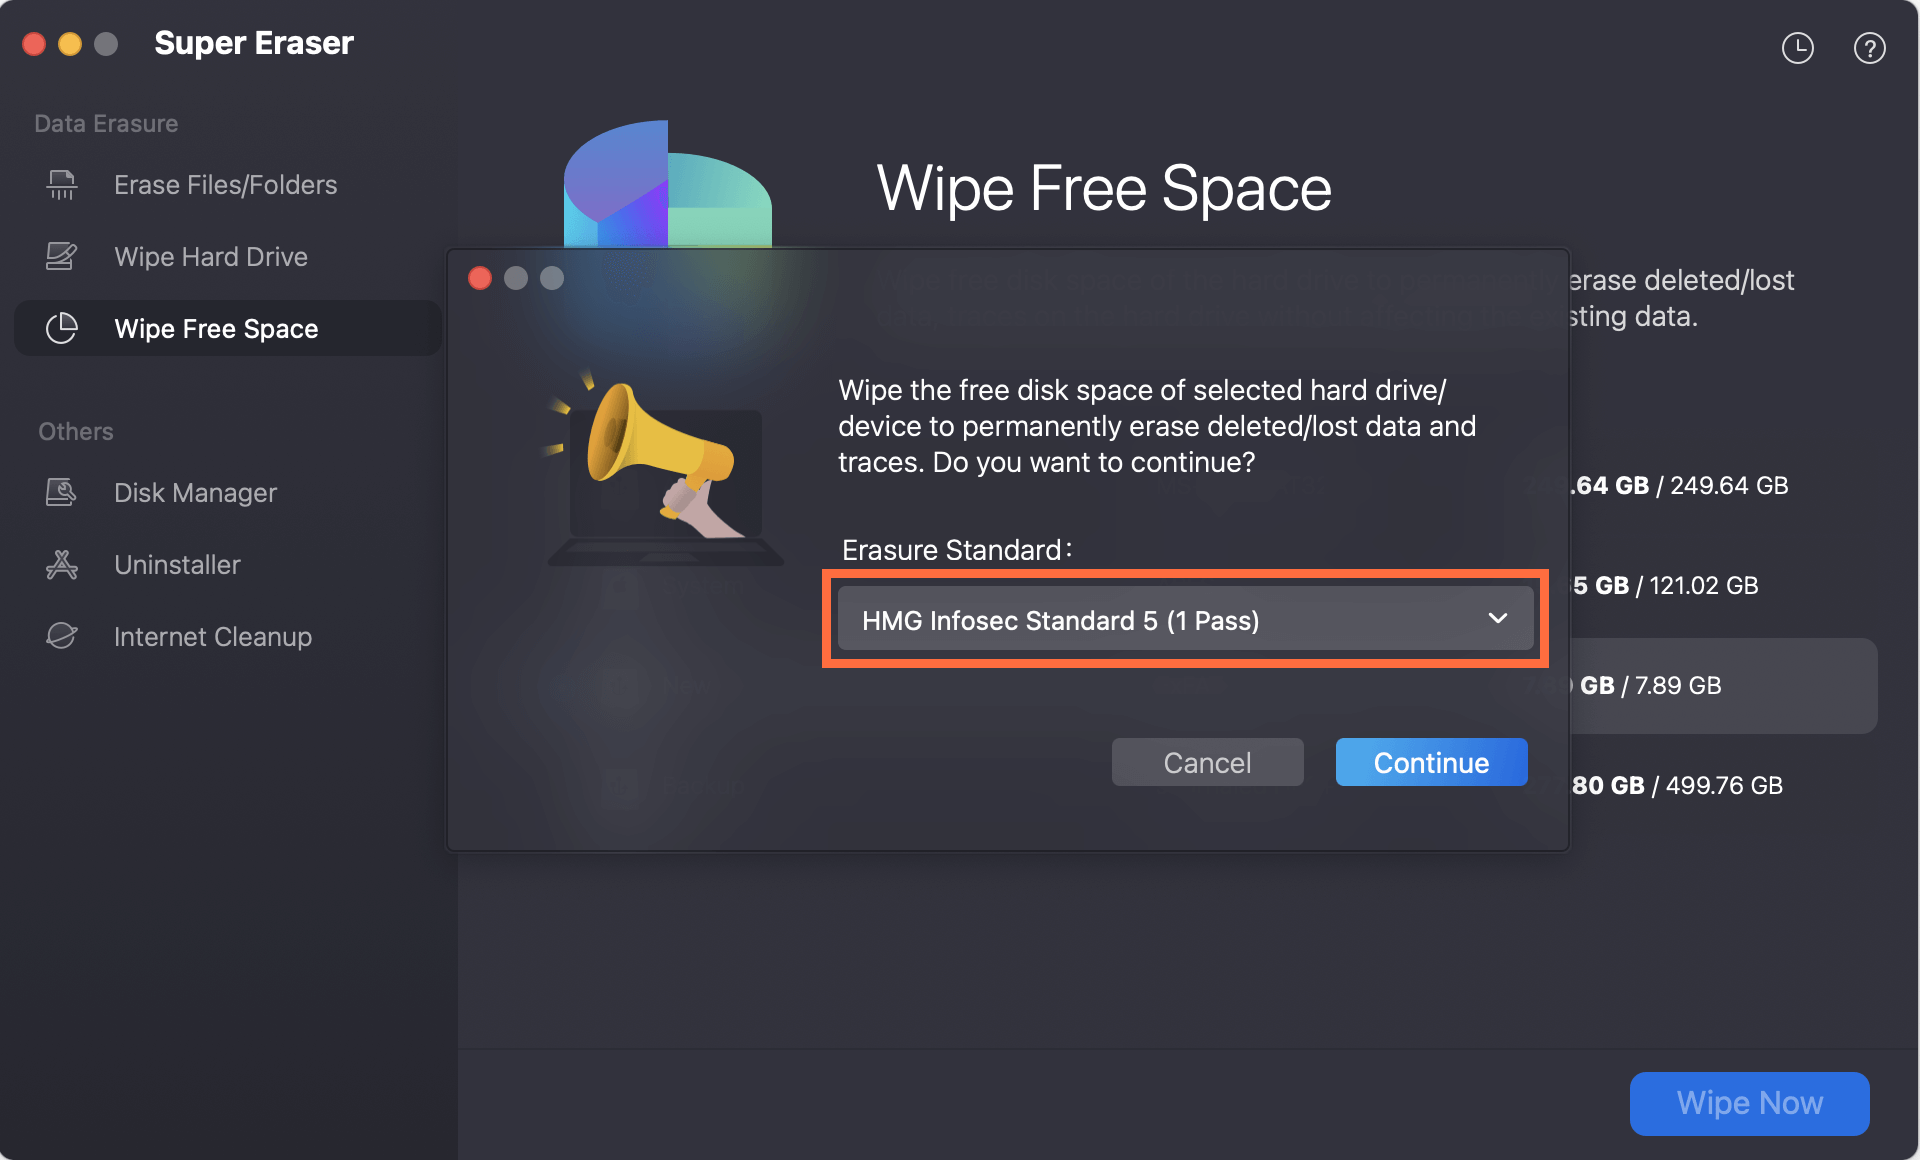
It will wipe free disk space of the Mac's internal drive and permanently erase all deleted/formatted/lost data, making data recovery be impossible.

Conclusion
Formatting a MacBook or Mac desktop can seem daunting, but with the right preparation and steps, it can be a smooth and beneficial process. By backing up your data, properly preparing for the format, and following the detailed steps for your specific device, you can ensure a successful outcome. After formatting, remember to restore your data, reinstall essential applications, and configure your system settings to enjoy a refreshed and efficient computer. Whether you're looking to resolve performance issues, remove malware, or prepare your device for a new owner, formatting can be an effective solution.
FAQs About Formatting a Mac
1. How to format a Mac?
Follow the steps below to format a Mac:
- Start the Mac into macOS Recovery mode.
- Select Disk Utility and use it to erase the internal drive.
- Reinstall macOS.
If you are using a Mac with Intel chip, press and hold Command+R keys when restarting the Mac. If you are using a Mac with M-chip, press and hold Power button when it turns on to enter into macOS Recovery mode.
2. Can I unformat a Mac?
Yes, you can use Mac data recovery software - such as Do Your Data Recovery for Mac to deeply scan the formatted Mac drive, and recover all lost files.
3. How to wipe all deleted/formatted data on Mac?
Mac disk wipe software - such as DoYourData Super Eraser for Mac can help you wipe all deleted/lost data from your Mac.
- Download and install DoYourData Super Eraser for Mac.
- Open DoYourData Super Eraser for Mac, choose Wipe Free Space mode.
- Select the internal drive, click on Wipe Now button.
- It will wipe free disk space of the internal drive and permanently erase all deleted/formatted/lost data from the drive.

DoYourData Super Eraser for Mac
DoYourData Super Eraser for Mac is a 100% safe, powerful and easy-to-use data erasure program. It offers certified data erasure standards including Peter Gutmann, U.S. Army AR380-19, DoD 5220.22-M ECE to permanently erase data from Macs and external devices, making data recovery be impossible.