How to Format USB Flash Drive on macOS Monterey?
Formatting a USB flash drive will assign a new file system to the drive and remove all the data. It's necessary to format the USB flash drive in some cases. The guide will lead you to format the USB drive with Disk Utility and Terminal on macOS Monterey. What's more, there is another software DoYourData Super Eraser for Mac recommended. The software can not only format the USB flash drive, but also erase the data permanently and there will be no chance to recover the data.
![]() Updated by Shirly Chen on May 6, 2025
Updated by Shirly Chen on May 6, 2025
Quick Navigation:
- #1 Format USB flash drive on macOS Monterey with Disk Utility.
- #2 Format and wipe USB flash drive on macOS Monterey with Data Eraser.
- #3 Format USB flash drive with Terminal on macOS Monterey
- Conclusion:
- FAQs abut Formatting USB flash drive on macOS Monterey
Formatting your USB flash drive is the quickest way to clean up your USB flash drive, it is also a good method to fix logical errors on your USB flash drive or create a compatible file system so that it could be used on your Mac. In this article, we will introduce three methods to help you securely and quickly format USB flash drive after upgrading to macOS Monterey.
Now, many Mac users have upgraded their Mac OS to macOS Monterey. There are many reasons why a Mac user wants to format an USB flash drive after upgrading to macOS Monterey. For example:
- The USB flash drive is not compatible with macOS Monterey.
- The USB flash drive gets corrupted or shows not initialized.
- Quickly remove all data from the USB flash drive.
- Will sell, donate or dispose of an old USB flash drive.
How to format an USB flash drive after upgrading to macOS Monterey? Don't worry, here, we will introduce two easy methods to help you securely format USB flash drive on macOS Monterey. Before you format your USB flash drive, you'd better back up your important files.
#1 Format USB flash drive on macOS Monterey with Disk Utility.
Disk Utility is the best tool for you to quickly format an USB flash drive on macOS Monterey. Now, follow the steps below to format your USB flash drive.
Step 1. Insert your USB flash drive into your Mac stably and ensure it's detected by Mac.
Step 2. Open Disk Utility, click View and choose Show All Devices option. Then click to choose the USB flash drive you want to format. Click on Erase button at the top of the interface of Disk Utility.
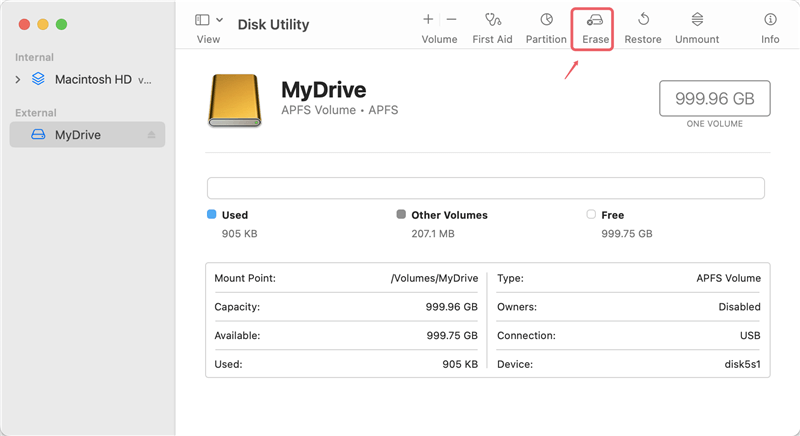
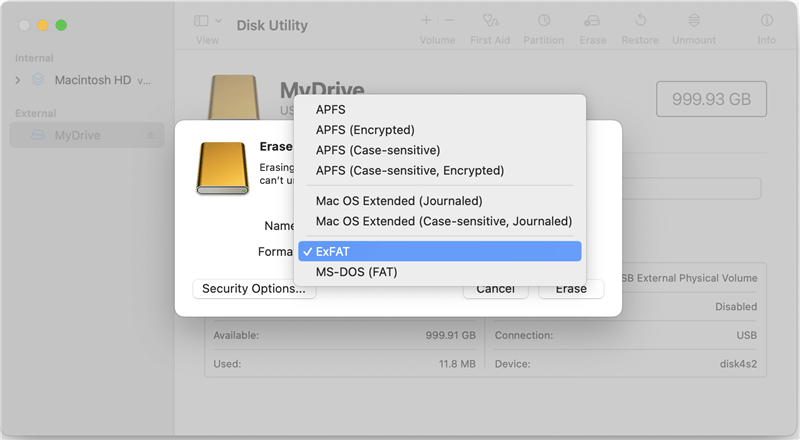
Step 3. If you want, you can edit the USB flash drive name and choose a file system. Or you can leave them as what they were.
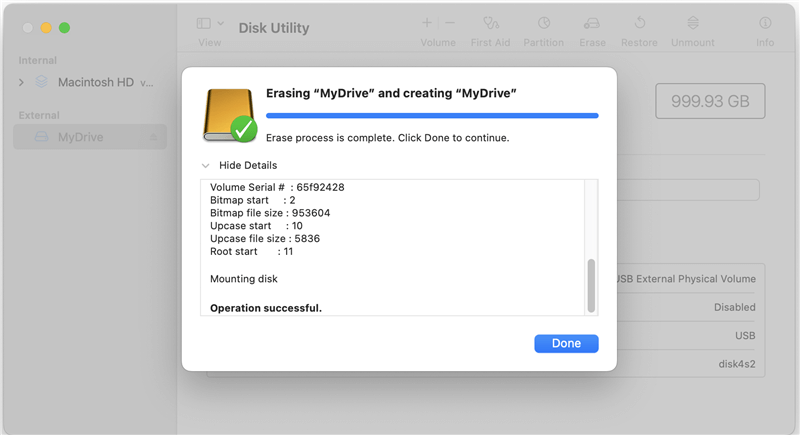
Step 4. Click on Erase button again, then Disk Utility will securely erase and format your USB flash drive. Normally, it will be quick to finish the formatting process.
🎯 Note: The data is still recoverable after formatting the USB flash drive in this way. Using professional data recovery software or methods, it's easy and quick to recover the data from the formatted USB flash drive.
#2 Format and wipe USB flash drive on macOS Monterey with Data Eraser.
Disk Utility can help you quickly format USB flash drive on macOS Monterey. However, the formatted or erased data in the USB flash drive is not lost forever and still can be recovered by data recovery software. Before you sell, donate or dispose of an old USB flash drive, you'd better permanently erase all your sensitive data from it to prevent potential data recovery.
How to permanently erase data from USB flash drive on macOS Monterey? Don't worry, just try data eraser - DoYourData Super Eraser for Mac. This software offers certified data erasure methods to help you format and wipe your USB flash drive. Please note that once your data on the USB flash drive is erased by DoYourData Super Eraser for Mac, the data is lost forever, can't be recovered by any data recovery method.
DoYourData Super Eraser for Mac
- Safe and easy-to-use data erasure software for macOS Monterey.
- Format USB flash drive, external drive, SSD, memory card and wipe data permanently.
- Securely wipe data with international data erasure algorithms.
Now, follow the steps below to format and wipe USB flash drive on macOS Monterey:
Step 1. Download and install DoYourData Super Eraser on your Mac. Insert your USB flash drive into your Mac.
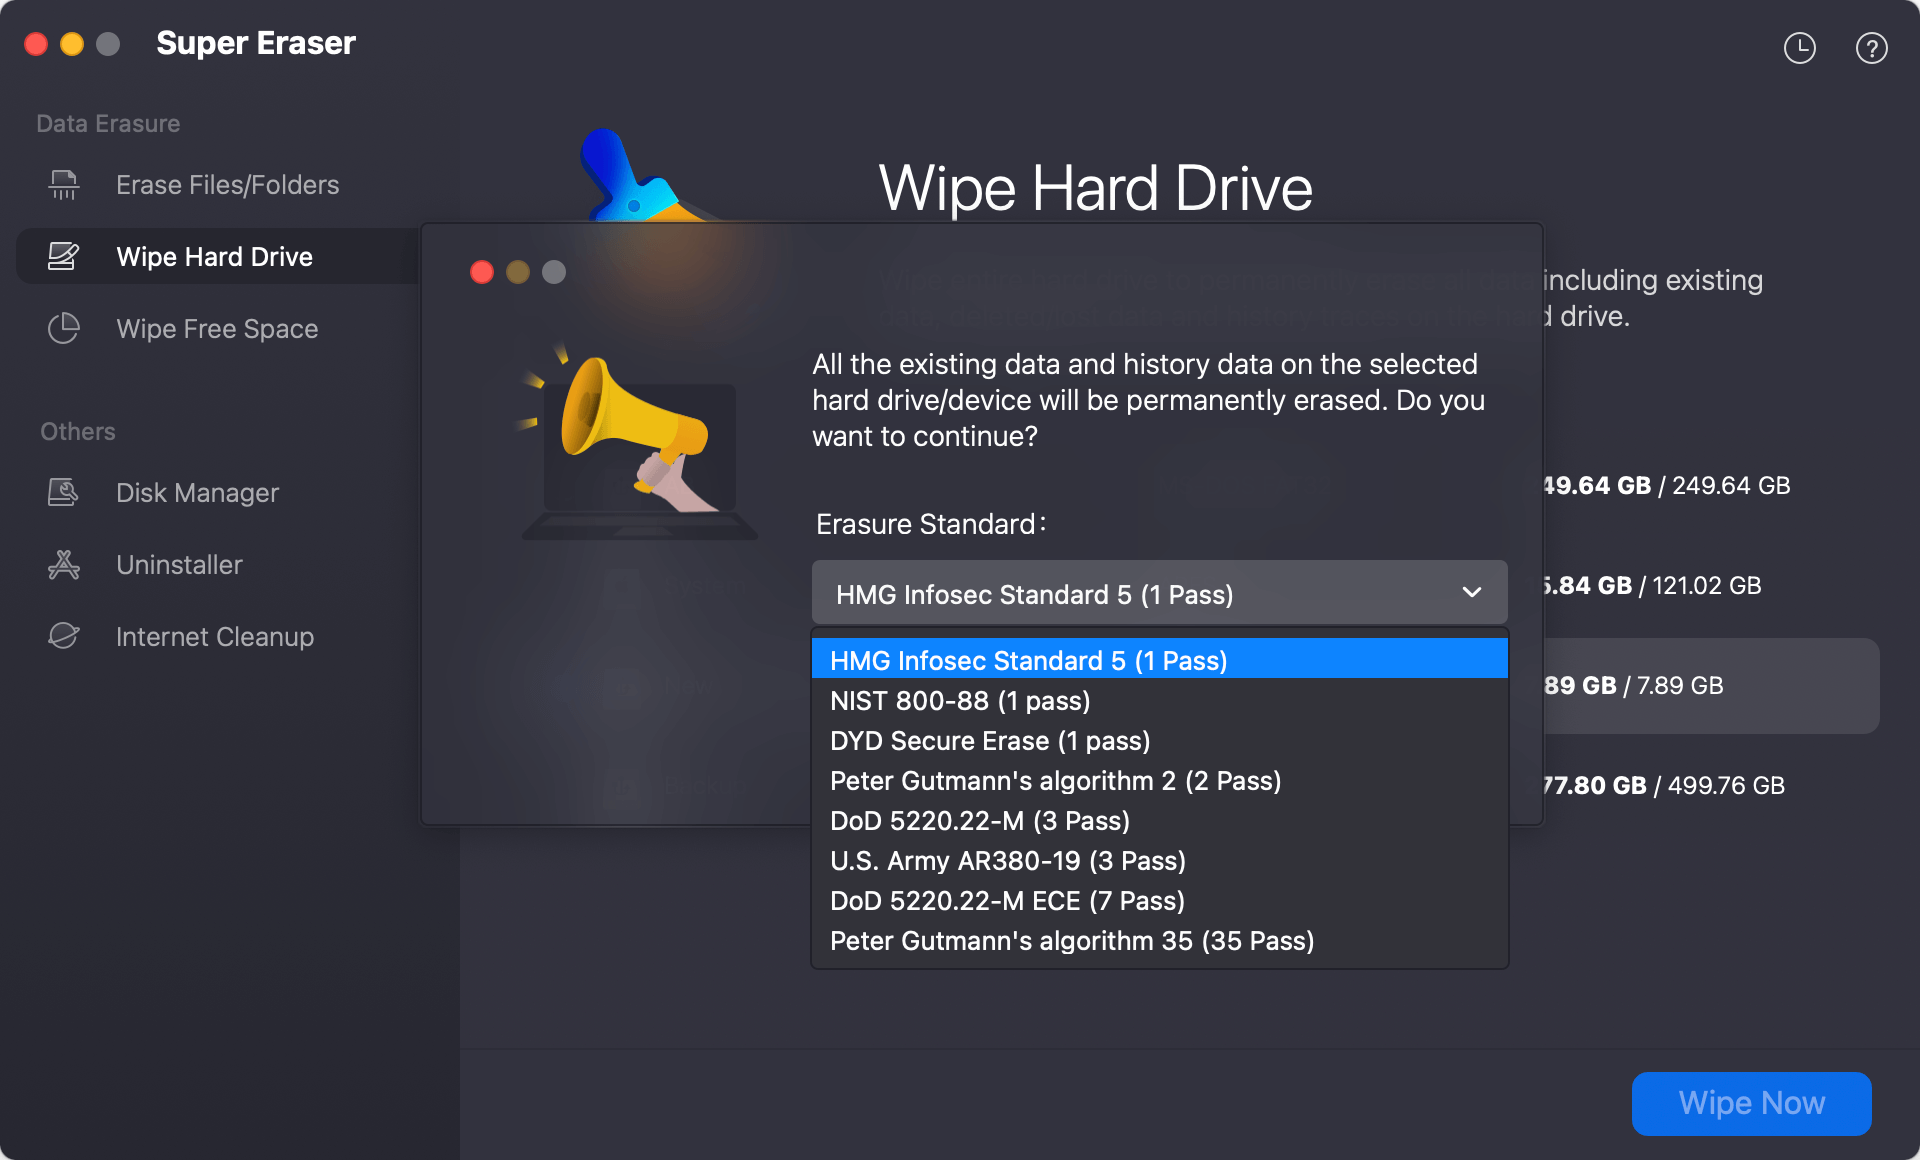
Step 2. Open DoYourData Super Eraser for Mac and choose data erasure mode - Wipe Hard Drive. This mode will help you format and wipe the USB flash drive. All data on the USB flash drive will be gone forever, can't be recovered by any data recovery software. Select the USB flash drive, then click on Wipe Now button.

Step 3. At this step, you will be asked to select a data erasure standard. You can select any data wiping algorithm from the drop-list. They are all international data erasure standards which can ensure the data will be destroyed permanently.
Step 4. The last step is to start formatting the drive and wiping data. It will take a while depending on the size of the drive. Just leave it running and wait patiently.
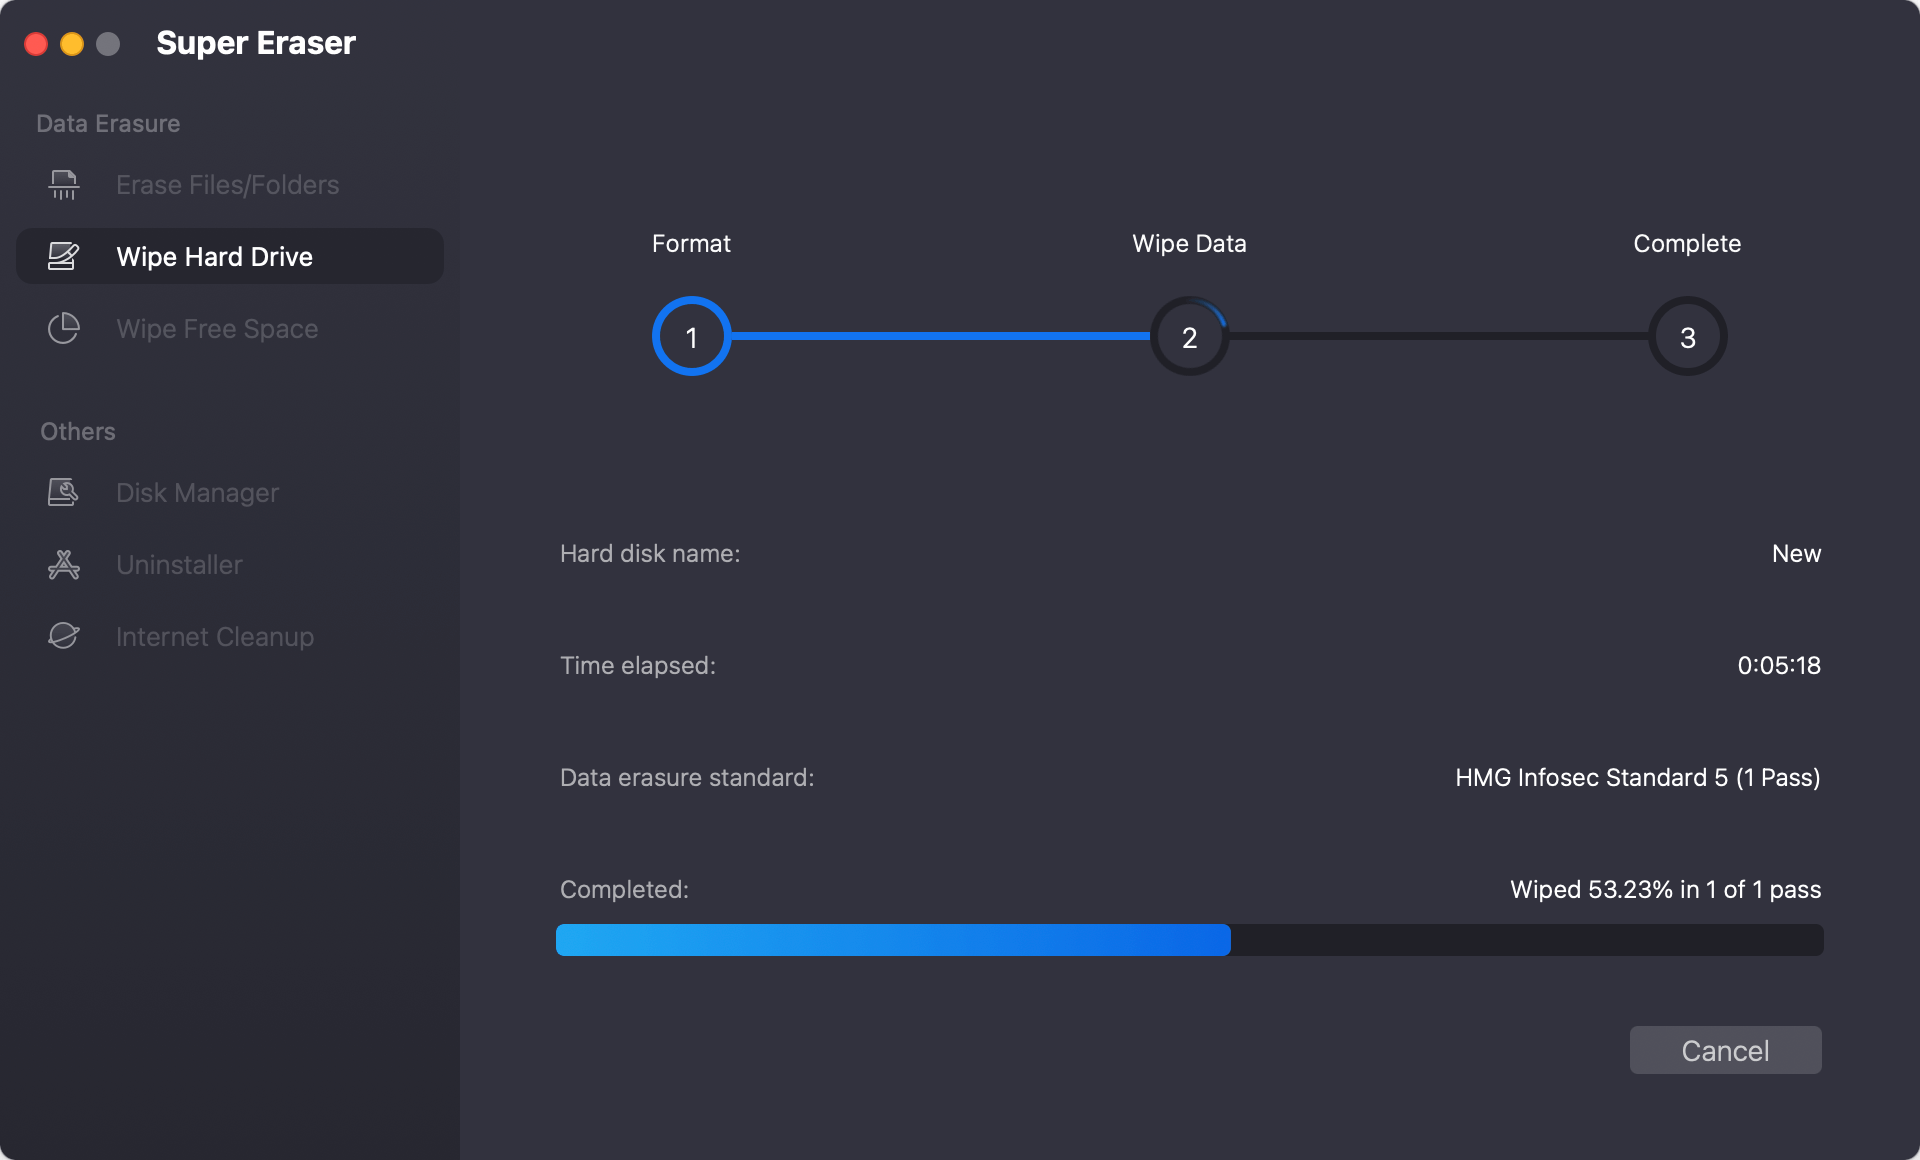
Once the process gets finished, all data on the USB flash drive is lost forever, can’t be recovered by any data recovery software. DoYourData Super Eraser for Mac also can help you wipe data from memory card, HDD, SSD, digital camera, external disk, etc.
#3 Format USB flash drive with Terminal on macOS Monterey
There is another way to format a USB flash drive on macOS Monterey. Maybe it's not easy and intuitive for some users. However, it's an effective to format USB flash drive on Mac. Terminal is a macOS built-in and free tool to run different tasks via commands. You can also use it to format USB flash drive or other drives on macOS Monterey.
Connect the USB flash drive to Mac first and ensure it's recognized. Then start Terminal from Applications and then Utilities folder. Do as follows to format the USB flash drive with commands:
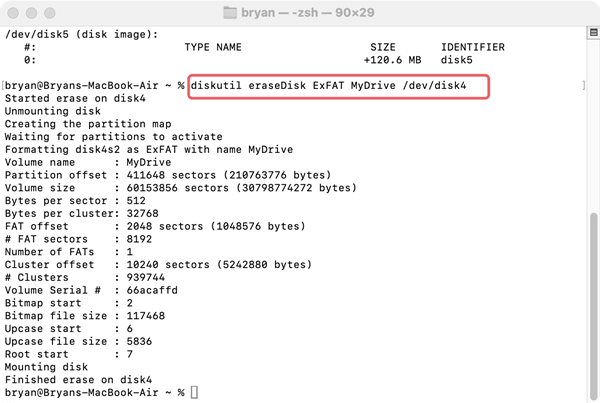
Step 1. First you need to locate the disk information for the USB flash drive by command: diskutil list
The command will show you the information for the drives connected to the Mac. Check and find the right disk number for the USB flash drive which you want to format.
Step 2. Then you can start to format the USB flash drive. Here is the command for disk formatting: diskutil diskErase ExFAT DriveName /dev/diskX
You can change the file system ExFAT to another one based on your needs, such as FAT32, HFS+ etc. Also, change the DriveName to any name as you want. Replace X with the right disk number of the USB flash drive on your own Mac.
🎯 Note: Be careful when using commands to format drive or do other jobs. Mistyping may lead to format wrong drive and cause data loss.
Conclusion:
It's necessary to format the USB flash drive on Mac if you want to convert the file system to a different one, fix file system errors, etc. Before formatting USB flash drive on macOS Monterey, it's important to check and back up important files to another safe place first. Then you can try to format it with the Disk Utility or Terminal by following this guide.
After formatting the USB flash drive, the data is still recoverable by using data recovery software. If you want to also wipe the data permanently from the USB flash drive, a simple formatting is not enough. You need to wipe the USB flash drive with data erasure tool. It can help you wipe the sensitive or private information from the drive and ensure the data is unrecoverable.
FAQs abut Formatting USB flash drive on macOS Monterey
- Open Finder, find Applications and access Utilities folder. Start Disk Utility.
- Connect the USB flash drive to the Mac machine and ensure it's detected.
- Select the USB flash drive in Disk Utility and click the "Erase" button.
- If needed, change the name and file system for the USB flash drive.
- At last, click "Erase" button to quickly format the USB flash drive.
- Download and install the software.
- Connect the USB flash drive to the Mac.
- Run the data erasure software from launchpad.
- Choose the "Wipe Hard Drive" mode.
- Select the USB flash drive and then choose data erasure algorithm.
- Start to format the USB flash drive and permanently wipe all data.

DoYourData Super Eraser for Mac
DoYourData Super Eraser for Mac is a 100% safe, powerful and easy-to-use data erasure program. It offers certified data erasure standards including Peter Gutmann, U.S. Army AR380-19, DoD 5220.22-M ECE to permanently erase data from Macs and external devices, making data recovery be impossible.
Written & Updated by Shirly Chen
Shirly Chen has been writing data recovery, data erasure articles for DoYourData over 4 years. She has been working as a professional website content writer & editor for quite a long time. She also writes articles about disk clone, Mac optimization, disk backup, etc.