Quick Navigation:
- About File System: Which Can Be Used on Mac Studio?
- Things Need to Do before Formatting External Device on Mac Studio
- Format an External Storage Device on Mac Studio Using Disk Utility
- How to Formt and Wipe an External Storage Device on Mac Studio?
- Troubleshooting Common Issues
- Conclusion
When using an external storage device, formatting it correctly is crucial for ensuring compatibility and optimal performance. Formatting prepares the drive for use, enabling your system to read and write data efficiently. Whether you're using the device for backups, file transfers, or expanding your storage capacity, proper formatting ensures that the device works seamlessly with your computer.
For Mac Studio users, the formatting process is straightforward and can be done using the built-in Disk Utility. This guide will walk you through the steps necessary to format an external storage device on your Mac Studio, ensuring that it's set up correctly and ready for use.

About File System: Which Can Be Used on Mac Studio?
Choosing the right file system for your external storage device is essential, as it affects compatibility, performance, and how data is managed. Here are the main file systems you may encounter:
- APFS (Apple File System): This is the default file system for macOS. It's optimized for solid-state drives (SSDs) and provides enhanced performance, security, and reliability. APFS is ideal if the drive will be used exclusively with macOS.
- Mac OS Extended (HFS+): The previous default file system for macOS, Mac OS Extended is suitable for both hard disk drives (HDDs) and SSDs. It's compatible with older macOS versions (macOS 10.12 or earlier) and is a good choice if you need to use the drive with older Macs.
- ExFAT: This file system is widely compatible with both macOS and Windows. It's suitable for flash drives and external drives that need to be used with multiple operating systems. ExFAT supports larger file sizes and partitions than FAT32.
- FAT32: An older file system that offers broad compatibility across different platforms, including macOS, Windows, and Linux. However, FAT32 has limitations on file size (4GB maximum) and partition size (8TB maximum), making it less suitable for modern usage.
Things Need to Do before Formatting External Device on Mac Studio
Before you begin formatting your external storage device, it's essential to prepare properly to ensure a smooth process and avoid data loss. Here are the key steps to take:
Checklist of Prerequisites:
- Backup Data: Ensure that all important data on the external storage device is backed up. Formatting will erase all existing data on the drive, so it's crucial to store any valuable information elsewhere before proceeding.
- Ensure the Drive is Connected: Verify that the external storage device is securely connected to your Mac Studio. Use the appropriate USB, Thunderbolt, or other connection cables to ensure a stable connection.
- Check Available Storage: Confirm that your Mac Studio has sufficient internal storage space if you need to temporarily move data from the external drive before formatting.
- Close Open Files and Applications: Make sure that no files on the external drive are currently in use, and close any applications that might be accessing the drive to prevent interruptions during the formatting process.
- Update macOS: Ensure that your Mac Studio is running the latest version of macOS. Updates often include improvements and fixes that can facilitate a smoother formatting process.
- Familiarize Yourself with Disk Utility: Open Disk Utility on your Mac Studio and familiarize yourself with its interface. This will help you navigate the formatting process more easily.
Importance of Backups and Potential Data Loss:
Formatting an external storage device will erase all data stored on it. This process is irreversible, so it's imperative to back up any important files before you begin. Here's why backups are crucial:
- Prevent Data Loss: Any data not backed up will be permanently lost once the drive is formatted. Regular backups ensure that your valuable information is always safe.
- Avoid Unexpected Issues: If something goes wrong during the formatting process, having a backup means you won't lose important files. Technical glitches, power failures, or user errors can happen, and a backup provides a safety net.
- Ease of Restoration: Once the drive is formatted, you can quickly restore your data from the backup, ensuring minimal disruption to your workflow.
Format an External Storage Device on Mac Studio Using Disk Utility
How to Properly Connect the Device to the Mac Studio:
- Identify the Correct Port: Determine whether your external storage device uses USB, Thunderbolt, or another type of connection. Match the cable with the corresponding port on your Mac Studio.
- Secure the Connection: Firmly connect the cable from your external storage device to the appropriate port on your Mac Studio. Ensure the connection is stable to avoid interruptions during the formatting process.
- Power On the Device: If your external storage device has a power switch, ensure it is turned on.
Verifying the Device is Recognized:
- Check the Desktop: Look for the icon of your external storage device on the desktop. This indicates that the device has been recognized by your Mac Studio.
- Open Finder: In Finder, navigate to the left sidebar under "Locations" to see if your external storage device is listed.
- System Information: If the device is not visible, you can open "System Information" from the Apple menu, then select "USB" or "Thunderbolt" (depending on your connection type) to check if the device appears there.
Opening Disk Utility:
Instructions to Locate and Open Disk Utility
- From Applications: Open "Applications" from the Finder. Navigate to the "Utilities" folder and double-click on "Disk Utility" to open it.
- Using Spotlight Search: Press "Command + Space" to open Spotlight Search. Type "Disk Utility" and press "Return" when it appears in the search results.
Selecting the External Storage Device:
How to Identify and Select the Correct Drive in Disk Utility
- Locate the Device in Disk Utility: In the Disk Utility sidebar, you will see a list of drives. External drives are typically listed under the "External" section.
- Select the Drive: Click on the name of your external storage device to select it. Ensure you select the correct drive to avoid formatting the wrong device.
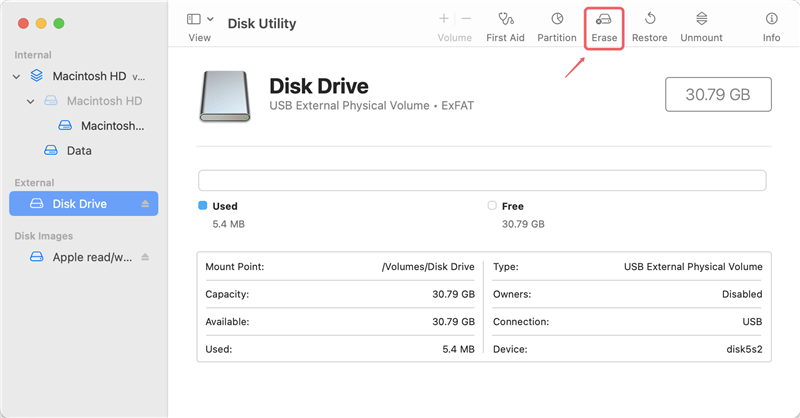
Erasing the Drive:
Clicking the Erase Button
- Open the Erase Menu: With your external storage device selected, click the "Erase" button at the top of the Disk Utility window.
- Choosing the Appropriate File System:
- APFS: Best for SSDs used exclusively with macOS, for macOS 10.13 or later.
- Mac OS Extended (Journaled): Ideal for HDDs or SSDs used with older macOS versions.
- ExFAT: Suitable for cross-platform compatibility with macOS and Windows.
- FAT32: Use for older systems or devices with file size limitations.
- Naming the Drive: Enter a name for your external storage device in the "Name" field.
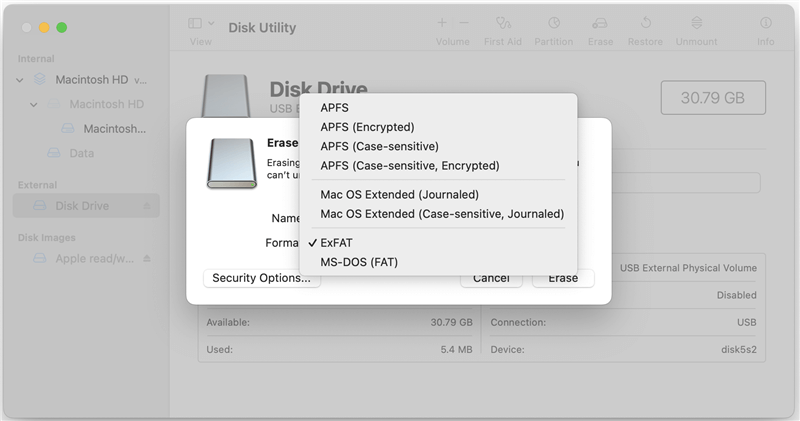
Advanced Options (if applicable)
Setting a Partition Scheme (GUID, MBR, etc.):
- GUID Partition Map: Recommended for drives used with Intel-based Macs.
- Master Boot Record (MBR): Use for compatibility with Windows PCs.
- Apple Partition Map: Older partition scheme for PowerPC-based Macs.
- Explanation of When and Why to Use Advanced Options: Choose the partition scheme based on the devices and systems you plan to use with your external storage device. GUID is the most versatile for modern macOS usage.
Security Options:
If you want to erase the drive more than once, click Security Options to choose a data erasure level.
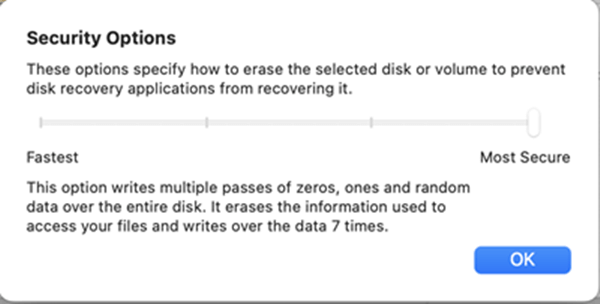
Confirming the Format
Reviewing the Chosen Settings
- Double-Check Your Choices: Verify the file system, drive name, Security Options and partition scheme settings before proceeding.
- Confirming the Erase Process: Click the "Erase" button to start the formatting process. Disk Utility will erase and reformat the drive based on your settings.
- Wait for Completion: Allow the process to finish. You will receive a notification when the formatting is complete.
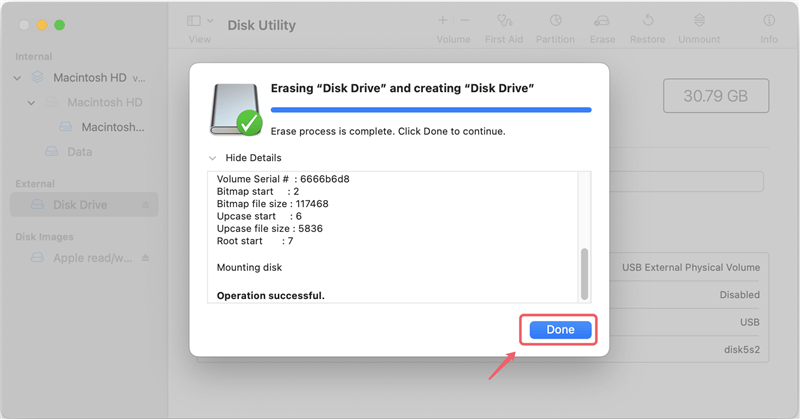
Post-Formatting Steps
Verifying the Formatted Drive:
- Check the Desktop and Finder: After formatting, the newly formatted drive should appear on your desktop and in the Finder under "Locations."
- Verify in Disk Utility: Open Disk Utility again to ensure that the drive appears with the correct name and file system. Check the drive's information to confirm it matches your chosen settings.
- Run First Aid: In Disk Utility, select your external storage device and click "First Aid" to check for any errors on the newly formatted drive.
Restoring Backed-Up Data (if needed):
- Locate Backup Data: Find the location where you stored your backup data before formatting.
- Copy Data to the External Drive: Drag and drop or use copy and paste to transfer the backup data back to the formatted external storage device. Ensure the data transfer is complete before proceeding to the next step.
Safely Ejecting the Drive:
- Eject from Finder: In Finder, click the eject button next to the external storage device under "Locations."
- Right-Click Eject: Alternatively, right-click the drive icon on the desktop and select "Eject."
- Wait for Confirmation: Wait until macOS confirms it is safe to remove the device before physically disconnecting it.
How to Formt and Wipe an External Storage Device on Mac Studio?
DoYourData Super Eraser for Mac is a powerful disk management tool for Mac OS. It can help you easily and securely format external hard drive, memory card, USB flash drive on Mac Studio. Download this software:
DoYourData Super Eraser for Mac
- Format any external storage device on Mac Studio.
- Mount, repair, eject external storage device on Mac Studio.
- Wipe external device on Mac Studio to permanently erase all data from the device.
Just open DoYourData Super Eraser for Mac on your Mac Studio, and then choose Disk Manager. Select the external device you want to format, then click on Format button.
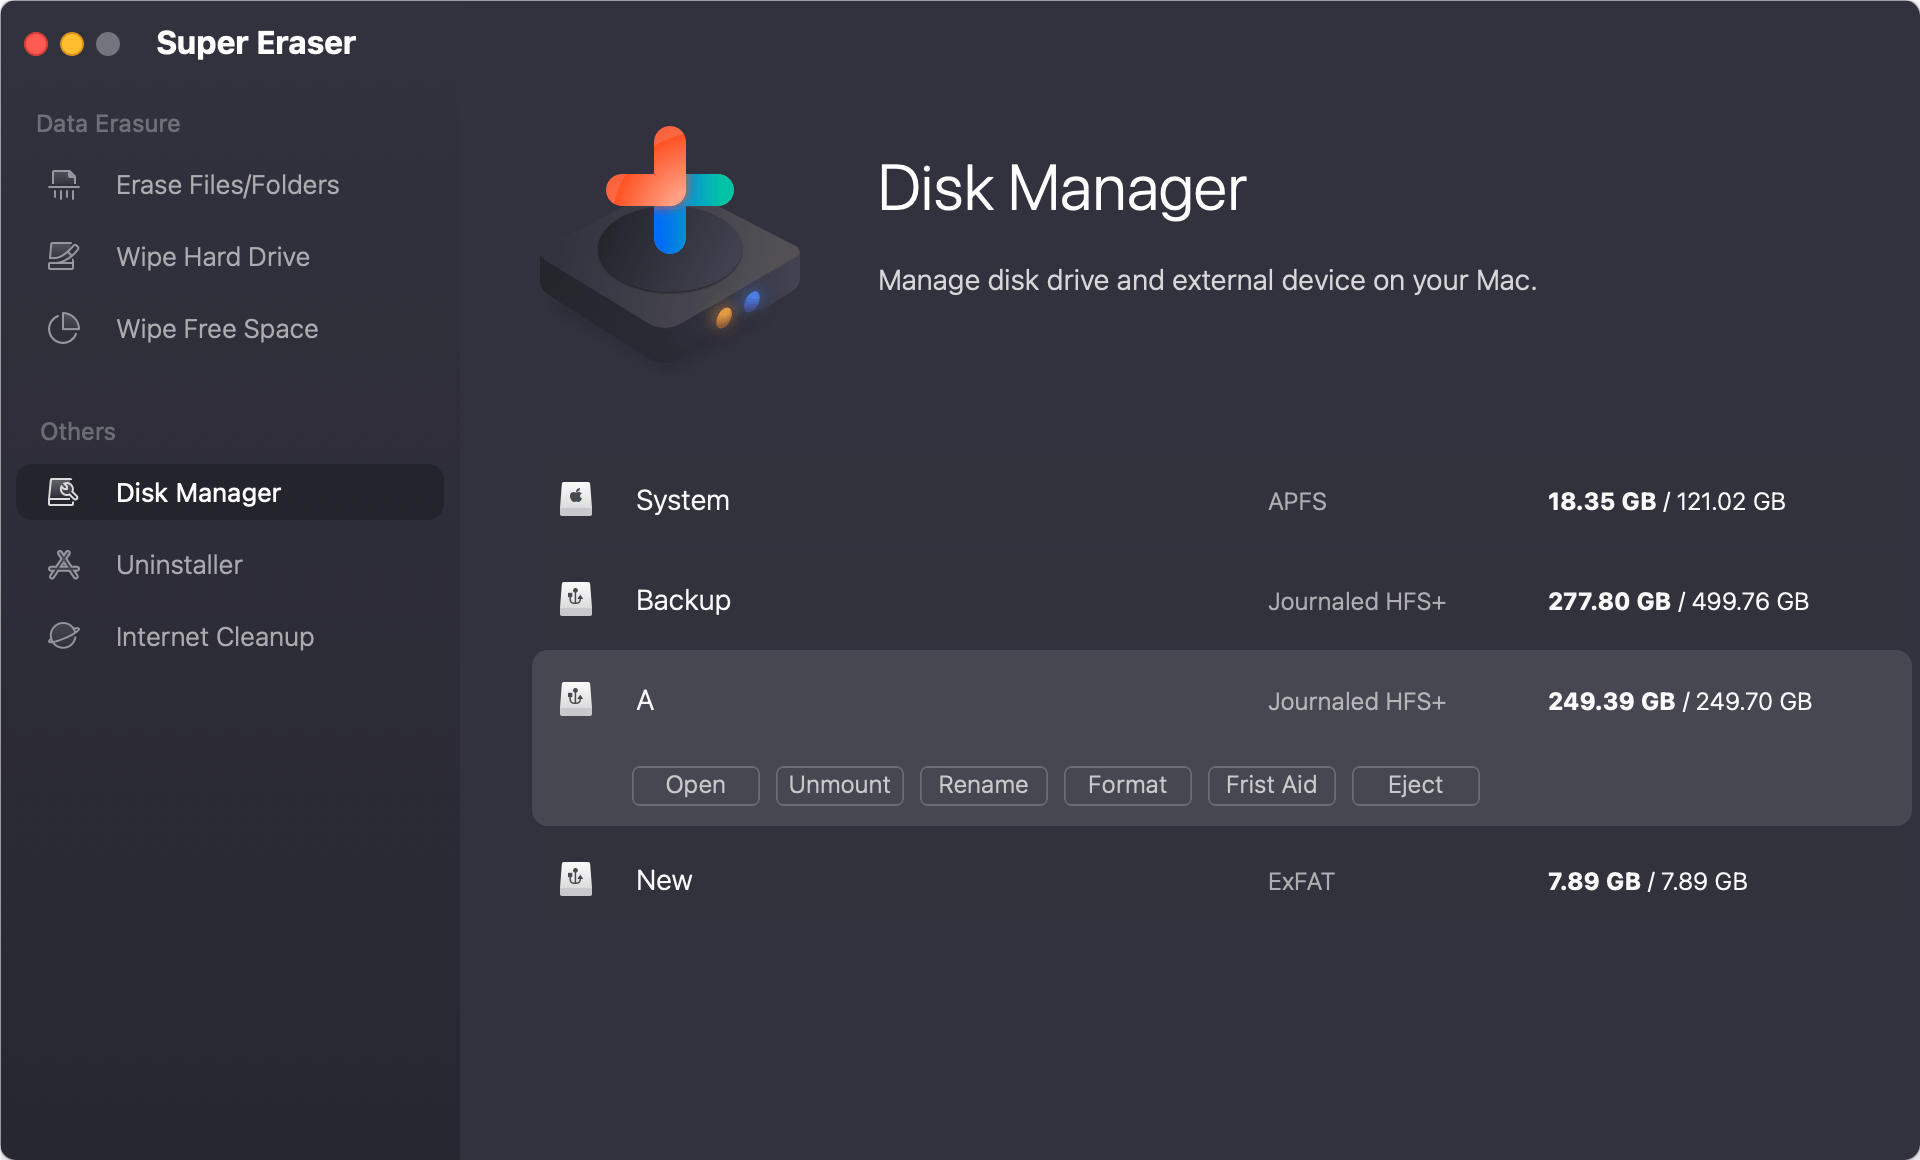
Please note that, whether your external device is formatted by Disk Utility or formatted by DoYourData Super Eraser for Mac, the lost data on the external device still can be recovered by data recovery software - such as Do Your Data Recovery for Mac.
If you are going to sell or dispose of your old external hard drive, memory card, USB flash drive, etc, you should permanently erase all sensitive data from it. DoYourData Super Eraser for Mac offers certified data erasure methods to help you securely and permanently wipe data from external HDD/SSD, USB flash drive, memory card, digital camera or other storage device.
Step 1. Download and install DoYourData Super Eraser for Mac on your Mac Studio, then open it. Choose Wipe Hard Drive mode. This mode can help you securely and permanently erase all data from a drive.
Step 2. Select the external storage device you want to wipe, then click on Wipe Now button.

Step 3. Select a wanted data erasure standard, click on Continue to format and wipe the selected external storage device.
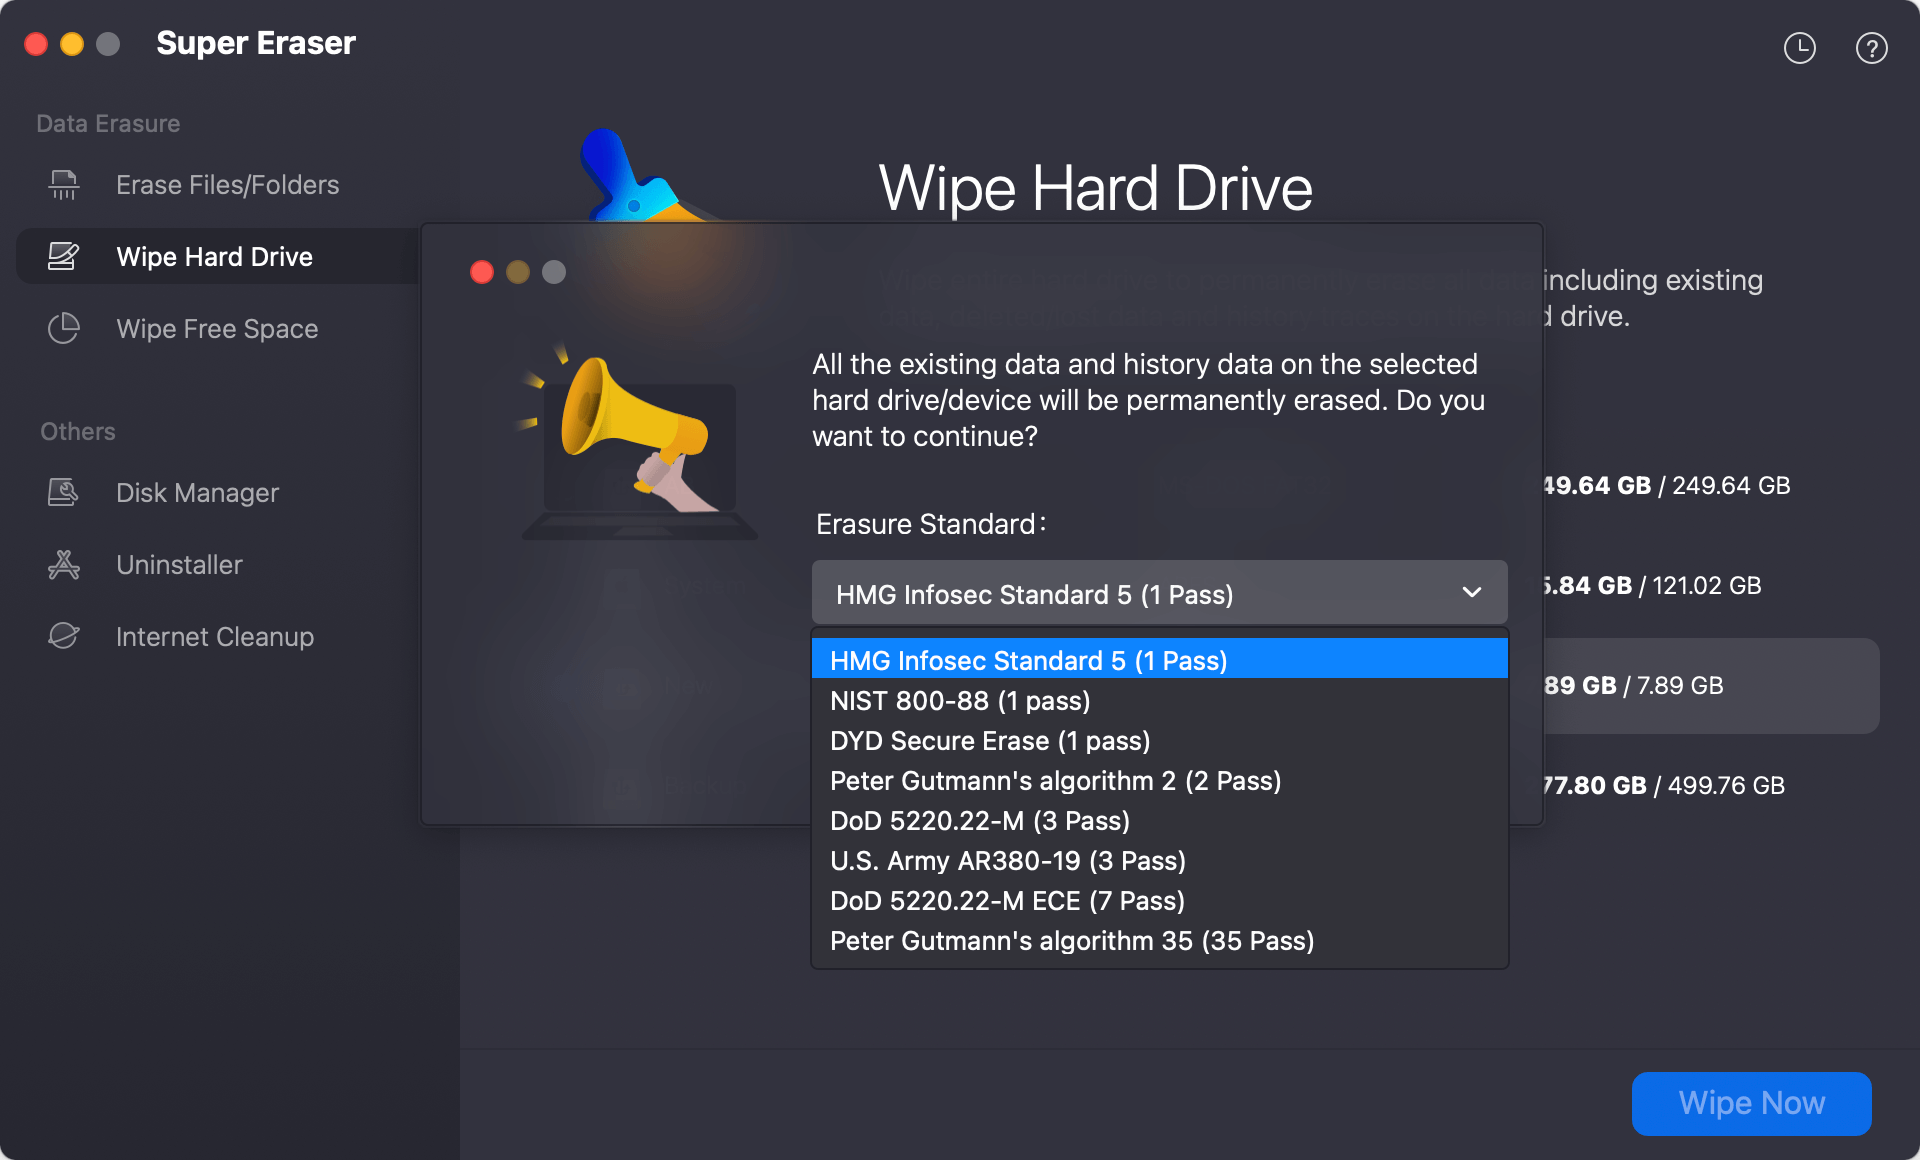
It will securely and permanently erase all data from the external storage device.
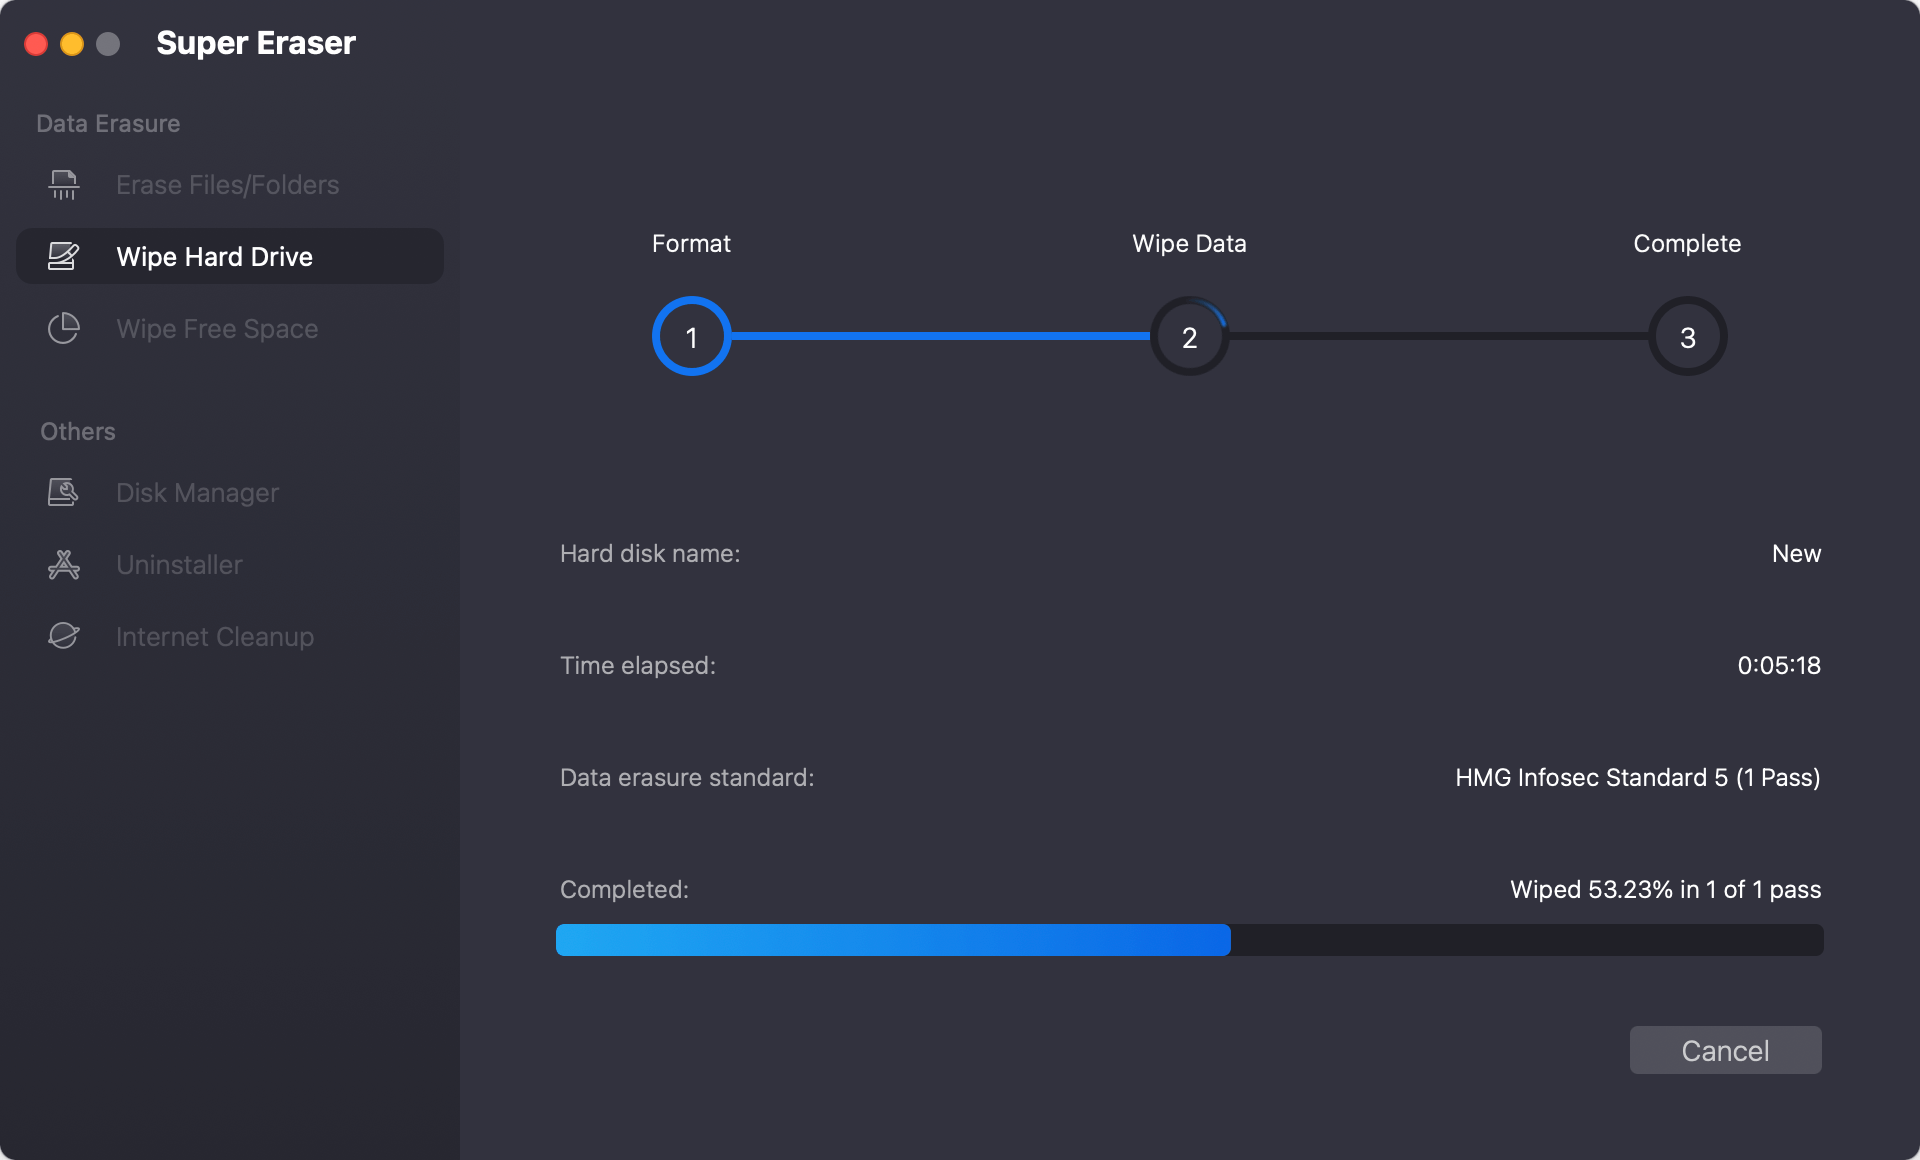
Once the process gets finished, all data (existing data, deleted/lost data included) stored on the external device will be lost for good, can't be recovered by any data recovery software.
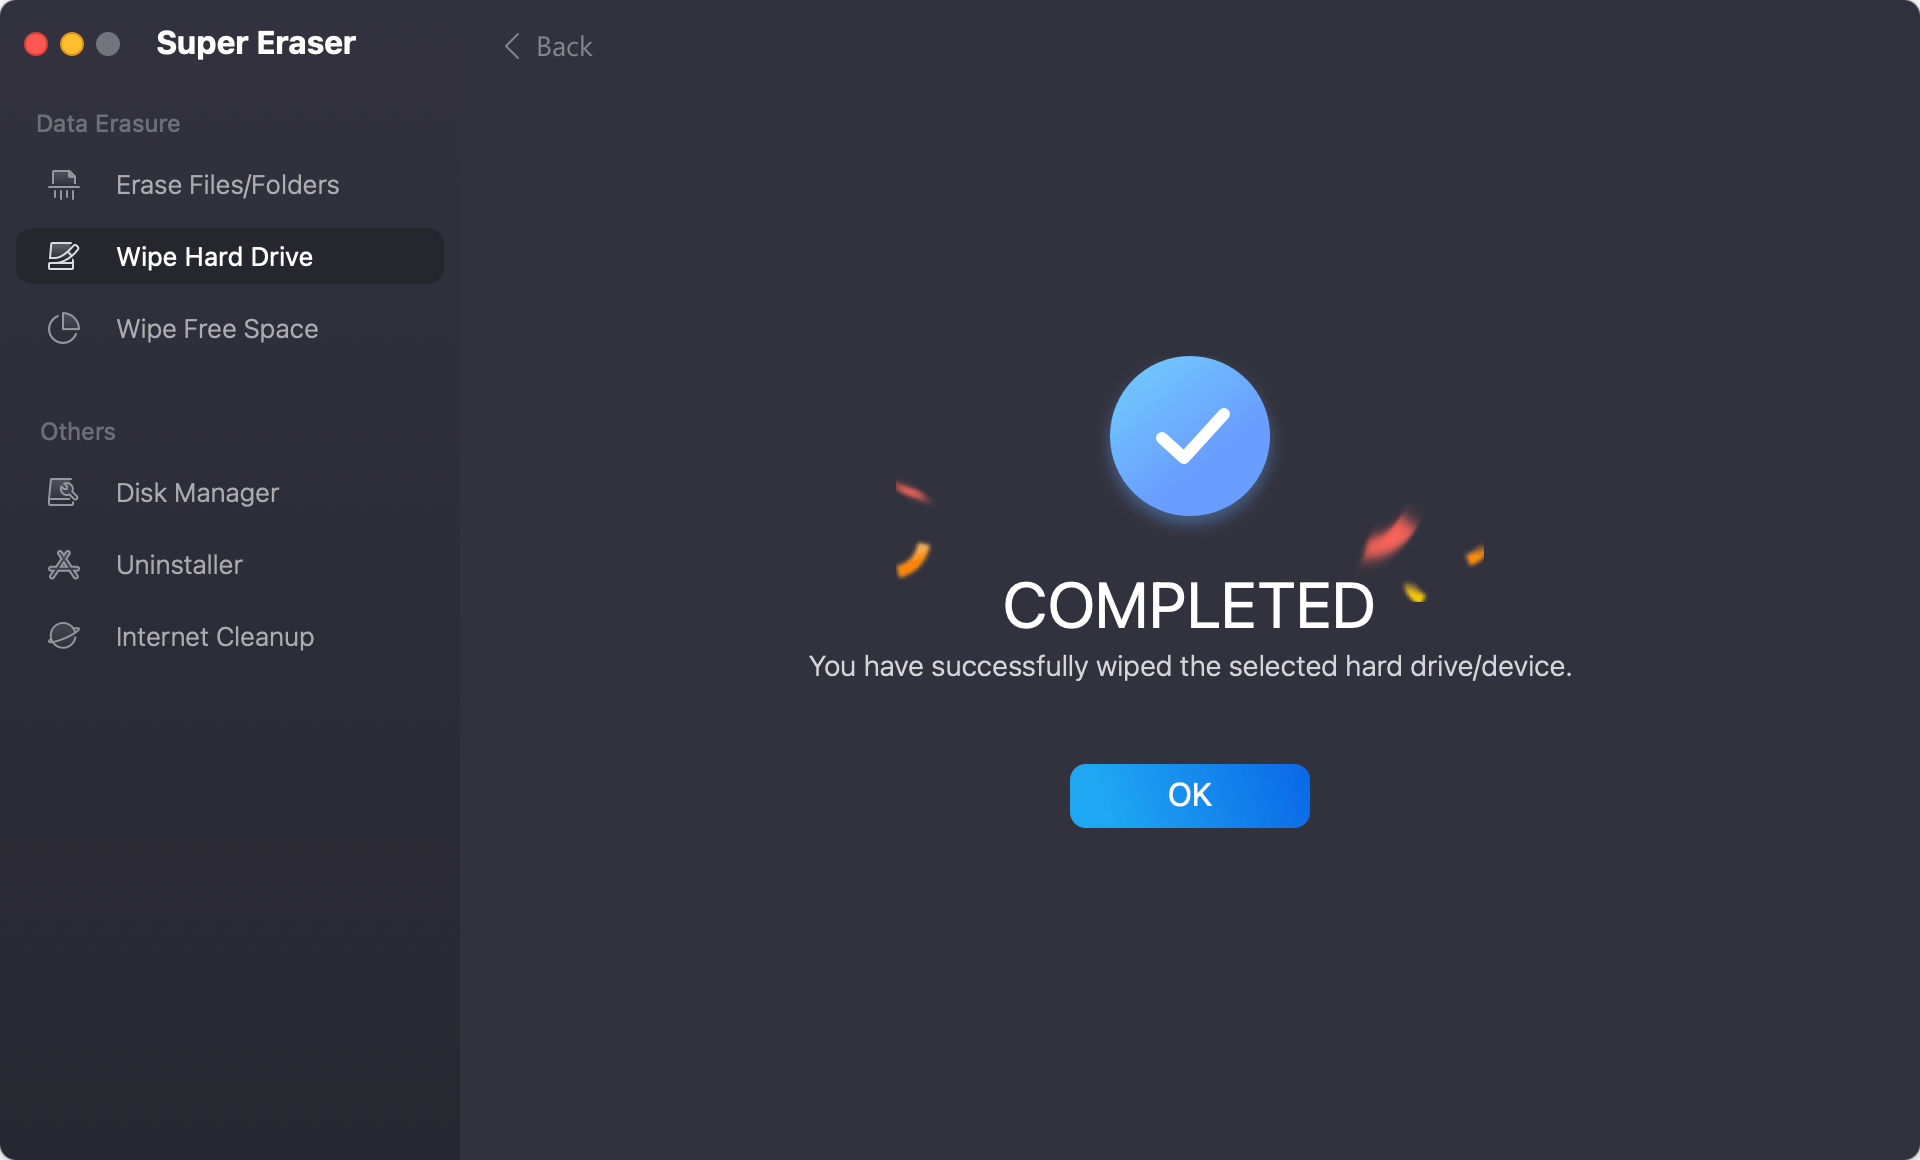
"Please note that once the data is erased by DoYourData Super Eraser for Mac, the data is gone forever, can't be recovered by any data recovery software. DoYourData Super Eraser for Mac also supports to shred files, erase deleted/lost files on Mac Studio."
Troubleshooting Common Issues
What to Do if the Drive is Not Recognized
- Check Connections: Ensure the drive is securely connected to your Mac Studio. Try using a different port or cable if necessary.
- Power Cycle the Device: Turn the external storage device off and then back on. Disconnect and reconnect the cable.
- Restart Mac Studio: Sometimes a simple restart can resolve recognition issues.
Solutions for Formatting Errors
- Check Disk Utility Messages: Review any error messages displayed by Disk Utility for clues on what went wrong.
- Reformat the Drive: Try the formatting process again. Ensure all steps are followed correctly.
- Update macOS: Make sure your system is running the latest version of macOS. Updates can include fixes for Disk Utility and formatting issues.
Steps to Take if the Process Fails or if There Are Compatibility Issues:
- Reset the SMC and PRAM: Sometimes, resetting the System Management Controller (SMC) and Parameter RAM (PRAM) can resolve hardware and software issues. Instructions for resetting these can be found on Apple's support site.
- Try Another File System: If the drive cannot be formatted with the desired file system, try a different one to see if the issue is specific to that file system.
- Use a Third-Party Tool: Sometimes third-party disk management tools can handle formatting and partitioning tasks better than Disk Utility.
- Check Drive Health: Use a tool like DriveDx to check the health of the external storage device. There might be hardware issues causing the problems.
- Contact Support: If all else fails, reach out to Apple Support or the drive manufacturer's support for further assistance.
Conclusion
Properly formatting an external storage device is essential for ensuring compatibility, performance, and data management efficiency on your Mac Studio. By following the steps outlined in this guide, you can confidently format your external drive or other storage devices, whether you need it for backups, data transfers, or expanding your storage capacity.
If you will sell, donate or dispose of an old external device, you can use Mac disk wipe software, such as DoYourData Super Eraser for Mac to wipe the drive.
From understanding the different file systems and preparing your device to executing the formatting process and troubleshooting any potential issues, this comprehensive guide covers all aspects to help you achieve a successful format. Always remember to back up your data before starting, choose the appropriate file system for your needs, and verify the formatted drive to ensure everything is set up correctly.
With your external storage device properly formatted and ready to use, you can enjoy the full potential of your Mac Studio's capabilities, maintaining optimal performance and data security. Whether you're a casual user or a professional, these steps will help you manage your storage devices effectively, making your Mac Studio experience smoother and more efficient.

DoYourData Super Eraser for Mac
DoYourData Super Eraser for Mac is a 100% safe, powerful and easy-to-use data erasure program. It offers certified data erasure standards including Peter Gutmann, U.S. Army AR380-19, DoD 5220.22-M ECE to permanently erase data from Macs and external devices, making data recovery be impossible.