Quick Navigation:
- Recover Lost Data in macOS Sierra Without Software
- Recover Lost Data with Best macOS Sierra Data Recovery Software
- Prevent Future Data Loss on macOS Sierra
- Conclusion
- FAQs About macOS Sierra Data Recovery
In this modern world of technology, data loss can happen to anyone at any time. Whether it's due to accidental deletion, system crashes, or other unforeseen issues, losing important files can be a significant setback. For users of macOS 10.12 Sierra, understanding how to recover lost files is crucial. macOS Sierra, released in 2016, introduced several features aimed at improving user experience and system efficiency. Despite its advanced functionalities, data loss remains a common issue. This article explores how to recover lost files in macOS 10.12 Sierra, covering both built-in options and third-party macOS Sierra recovery software solutions.

About macOS Sierra's File System:
macOS Sierra utilizes a file system structure that impacts how files are stored and deleted. During this time, Apple was transitioning from the HFS+ (Hierarchical File System Plus) to the new APFS (Apple File System) that would be fully implemented in later macOS versions. Understanding these file systems can help in the recovery process.
APFS vs. HFS+:
- HFS+: The file system used in macOS Sierra is HFS+, which organizes files and directories in a way that allows for efficient data retrieval and storage. HFS+ maintains a catalog of file locations, metadata, and other essential information. When a file is deleted, it is typically removed from this catalog but may remain physically on the disk until overwritten by new data.
- APFS: Introduced in macOS High Sierra, APFS was designed to optimize the performance and security of SSDs and flash storage. It includes features such as space sharing, snapshots, and improved encryption. While Sierra does not use APFS, understanding its future implications helps users anticipate changes and updates in file recovery methods.
Implications for Data Recovery: In macOS Sierra, when a file is deleted, it is moved to the Trash. If not emptied, files can be restored easily. However, once the Trash is emptied or files are deleted beyond the Trash, the operating system marks the space as available for new data, potentially making recovery more complex.
Recover Lost Data in macOS Sierra Without Software
When you realize that you've lost a file, it's crucial to act promptly. Your odds of a successful recovery decrease with time, particularly if newly added data replaces the deleted files.
Here are the first steps you should take:
1. Check the Trash
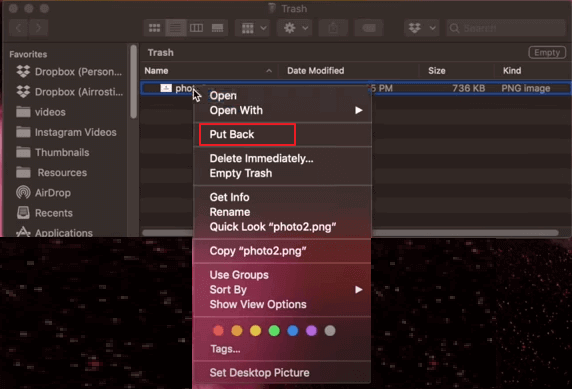
The Trash in macOS Sierra is the first place to look when you lose a file. When you delete a file, it isn't immediately removed from your system but rather moved to the Trash. To check:
- Open the Trash from the Dock.
- Look for the file you deleted.
- If you find it, right-click the file and select Put Back to restore it to its original location.
![Check the Trash]()
If the Trash has been emptied, you will need to use other methods to recover the files.
2. Use Time Machine Backup
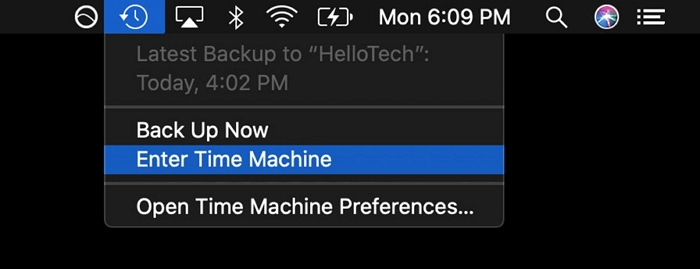
Time Machine is macOS's built-in backup feature, and it's one of the most effective ways to recover lost files. If you have Time Machine set up, follow these steps:
- Connect Your Backup Drive: If you're using an external drive for Time Machine backups, connect it to your Mac.
- Enter Time Machine: In the menu bar, click the Time Machine icon and choose Enter Time Machine.
![Use Time Machine Backup]()
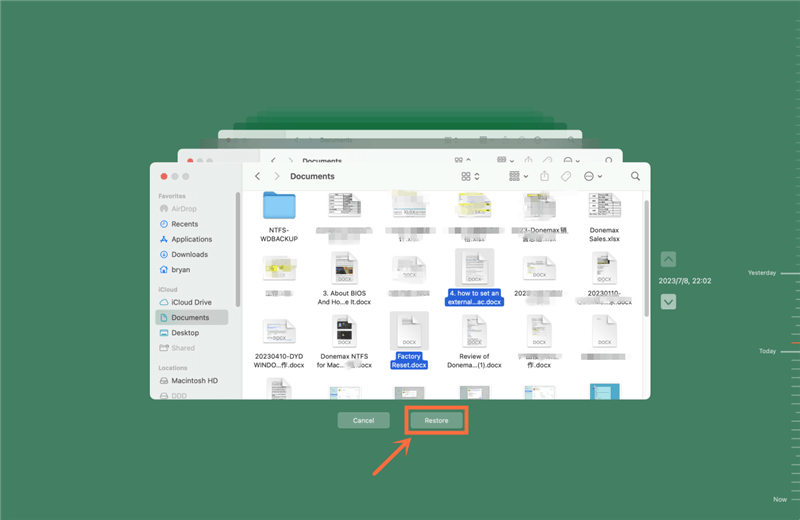
- Move to the Folder: To return to the period when the file was still accessible, use the timeline shown on the right side of the screen.
- Select and Restore: Once you locate the file, select it and click Restore. The file will be restored to its original location.
![recover lost data on macOS Sierra]()
Time Machine makes recovering files easy, provided you've been regularly backing up your data.
3. Search with Spotlight
If you're unsure whether the file was deleted or just misplaced, you can use Spotlight to search your entire Mac:
- Using Command + Space, launch Spotlight.
- Enter the file name or associated keywords.
- If Spotlight locates the file, you can click on it to open or see its location in Finder.
4. Check Recently Deleted in Specific Apps
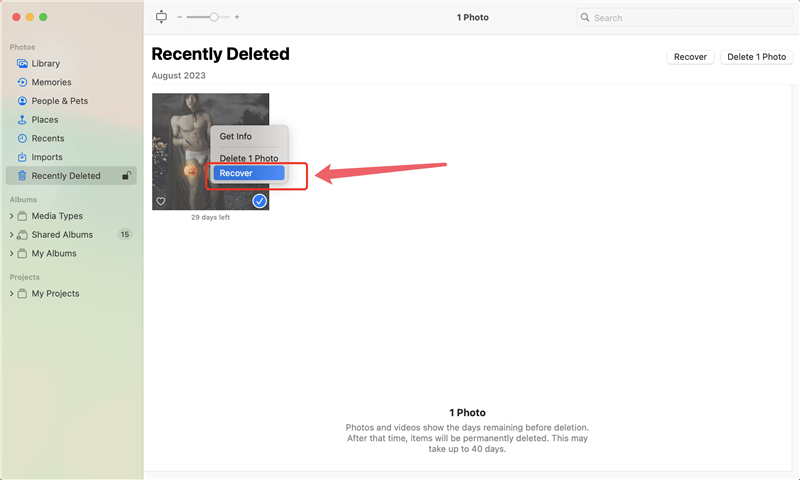
Some macOS applications, like Photos and Notes, have their own "Recently Deleted" folders. If you lost a file within a specific app, check its Recently Deleted section. For example:
- Open the Photos app.
- Go to the Recently Deleted album.
- Select the photos you want to recover and click Recover.
5. Recover from iCloud
If you have been using iCloud to sync files, you might be able to recover lost files from your iCloud account:
- Visit iCloud.com: Log in to iCloud.com with your Apple ID.
- Go to Settings: Click on your name in the upper-right corner, then choose Account Settings.
- Recover Files: Scroll down to the "Advanced" section and click Restore Files. Here, you can select files you want to restore, which were deleted in the last 30 days.
iCloud recovery is particularly useful if your files were stored in iCloud Drive.
Recover Lost Data with Best macOS Sierra Data Recovery Software
You can increase the chance of retrieving your lost data if you use the right Mac OS 10.12 Sierra data recovery software. At least, you need to double check several things prior to using it. Compatibility is the most important aspect. It's no brainer. You need to check the technical specifications and the user manual. It's easy to find out if it's compatible with macOS Sierra. Also, you need to check its multi-disk drive support. The best Mac OS 10.12 Sierra data recovery software supports all kinds of hard drives. These include Mac hard drive, HDDs, SSDs, SD cards, cameras, USB drives, SATA, IDE, etc.
The next aspect is partition recovery. Good Mac OS 10.12 Sierra data recovery software is able to recover formatted or lost hard drive partition. Some applications can only retrieve lost files from existing partition. You don't want this kind of software, for sure. Next, make sure that it supports email recovery. It should work for Macintosh files and MS office. Not to mention you must pick software that's able to recover all types of files. Finally, make sure whether it offers a demo version or not. The reliable software comes with a free trial. You can test and check whether it's worth your money or not.
Do Your Data Recovery for Mac gives you a good chance to recover lost files under Mac OS 10.12 Sierra. This Mac OS 10.12 Sierra data recovery software works perfectly on your Mac computer. As a precaution, always backup your important files for use. Stop the use of your Mac right away prior to recovering the lost files. Any overwritten files are impossible to retrieve, after all. In the case of any damaged storage device, don't take the risk. You are likely to cause more harm than good. In such case, you should call in an experienced technician. He helps you determine whether your files and hard drive are recoverable or not. Overall, be safe with your macOS Sierra.
Do Your Data Recovery for Mac
- Recover permanently deleted, erased, formatted, lost or inaccessible files on macOS Sierra.
- Recover lost data from Mac HDD/SSD, external drive, USB drive, digital camera, SD card, etc.
- Recover all types of files including photos, documents, videos, audio files, emails, archives, etc.
- 100% safe and easy-to-use data recovery software (free scan & test).
Follow the steps below to recover lost data on macOS 10.12 Sierra:
Step 1. Download and install Do Your Data Recovery for Mac on your Mac. Open it after installing, choose the hard drive where you delete or lose your files.

Step 2. Click on Scan button. Do Your Data Recovery for Mac will deeply scan the hard drive and find all recoverable files including existing files, deleted/lost files, etc.

Step 3. Once the scan is completed, you can preview all recoverable files. Then select the wanted files, click on Recover button to save them.

Prevent Future Data Loss on macOS Sierra
Recovering lost files can be a stressful and time-consuming process. To avoid future data loss, consider implementing the following preventive measures:
1. Regular Backups
Regular backups are the most effective way to protect your data. Set up Time Machine to back up your Mac automatically. For further security, think about utilizing an external hard drive or cloud-based backup services like Backblaze.
2. Use Multiple Backup Solutions
Relying on a single backup solution is risky. Combine Time Machine with other methods, such as cloning your drive with software like DoYourClone for Mac, Carbon Copy Cloner or using cloud storage services like Google Drive or Dropbox.
Check how to clone all data from macOS Sierra to an external hard drive, making a full bootable clone backup >>
3. Be Cautious with System Updates
Before updating macOS, ensure you have a full backup of your system. This precaution helps safeguard your files in case something goes wrong during the update.
4. Monitor Disk Health
Regularly check the health of your drives using built-in tools like Disk Utility or third-party software like MacClean360. Early detection of disk issues can prevent data loss.
5. Enable FileVault
FileVault encrypts your drive, protecting your data in case of theft. However, ensure you have your recovery key stored securely, as losing it could result in permanent data loss.
6. Avoid Overwriting Data
When you realize you've lost a file, stop using the affected drive immediately. Continued use can overwrite the lost data, making recovery impossible.
Conclusion
Recovering lost files on macOS 10.12 Sierra is achievable with the right tools and approach. By leveraging built-in recovery options like Time Machine and Disk Utility, as well as utilizing third-party macOS Sierra data recovery software, you can retrieve lost files effectively. Preventing future data loss through regular backups and best practices for data management ensures that your valuable information remains secure. Whether you're dealing with accidental deletions or more complex data loss scenarios, acting promptly and choosing the appropriate recovery method are key to successful file restoration. With the right strategies in place, you can safeguard your data and minimize the impact of unexpected file loss.
FAQs About macOS Sierra Data Recovery
1. Is it possible to recover deleted files on macOS Sierra after emptying trash bin?
Yes, Mac data recovery software, such as Do Your Data Recovery for Mac, can help you deeply scan the Mac-based SSD and find the deleted files. You can select the wanted files, then recover them.
2. How to recover lost data with macOS Sierra data recovery software?
Preparing for Recovery:
- Selecting and Installing Recovery Software: Choose recovery software based on your needs, such as file types, extent of data loss, and software compatibility. Download and install the software from a reliable source.
- Preparing Your Mac for the Recovery Process: Ensure your Mac is connected to a stable power source and that the drive to be scanned is not being used for new data. This prevents overwriting and improves the chances of successful recovery.
Performing the Scan:
- Quick Scan vs. Deep Scan:
- Quick Scan: Ideal for recent file deletions, this scan looks for files that were recently removed but not yet overwritten.
- Deep Scan: Required for more severe data loss, this scan searches for remnants of files in sectors of the drive where data might still exist.
- Monitoring and Managing the Scan Process: During the scan, monitor progress and ensure that the software is functioning correctly. Avoid using your Mac or performing other tasks that could affect the recovery process.
Recovering and Verifying Files:
- Previewing and Selecting Files to Recover: Use the preview feature to review recoverable files and select those that are important. This helps in avoiding unnecessary recovery and managing storage space.
- Restoring Files to a Different Location: Save recovered files to a different drive or partition to avoid overwriting existing data and ensure a clean recovery.
- Verifying the Integrity of Recovered Files: Check the recovered files for completeness and usability. Verify that they open and function correctly to ensure successful recovery.
3. What is the best macOS Sierra data recovery software?
Here is the list of top 5 free & paid data recovery software for macOS Sierra:
- Do Your Data Recovery for Mac
- PhotoRec
- Magoshare Data Recovery for Mac
- Disk Drill
- iBeesoft Data Recovery for Mac
4. How to recover a formatted hard drive on macOS Sierra?
- Download and install Do Your Data Recovery for Mac, open it.
- Select the formatted hard drive.
- Click on Scan button.
- Preview and recover lost files after scanning.
Do Your Data Recovery for Mac
Do Your Data Recovery for Mac, one of the best Mac data recovery software, can help you easily and completely recover deleted, formatted or lost files from Mac HDD/SSD, external HDD/SDD, USB drive, memory card, digital camera, or other storage devices.
