Quick Navigation:
- Fix NTFS Format WD My Passport Drive Read-Only Issue
- Change WD My Passport's Read-Only Permission Settings
- Use First Aid to Fix Read-Only WD My Passport
- AAddress Security and Privacy Settings
- Format WD My Passport HDD with Disk Utility.
- Final Words
- FAQs About Fixing WD My Passport Read-Only on Mac
External hard drives, like the WD My Passport, are necessary to protect files and add more space to your computer. But Mac users sometimes have an annoying problem: the drive mounts as read-only. You can't add, delete, or change files because of this problem, which makes the drive less useful. The main reason is that it is usually a file system that doesn't work with macOS.
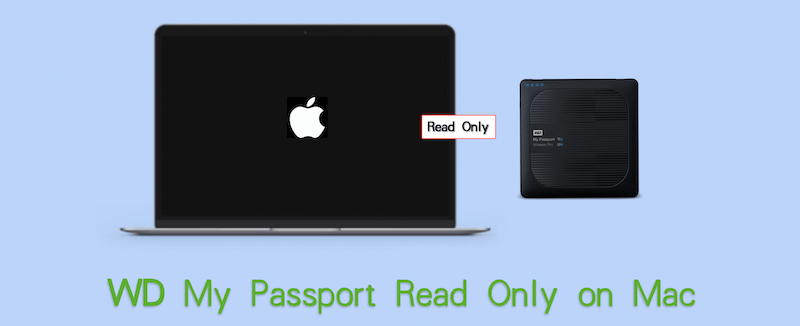
That is especially true if the drive is written in NTFS, which macOS can only read. Other things, like clearance settings, a damaged drive, or macOS security features, can also play a role. This article discusses a few different ways to fix the WD My Passport read-only issue on Mac so that it works properly on your Mac. By following these steps, you can get back in charge of your external storage device and get the most out of it.
Fix NTFS Format WD My Passport Drive Read-Only Issue
The typical reason for the WD My Passport external hard drive ready-only issue is the file system is NTFS. NTFS drive can only be readable on Mac be default. The writable access is not natively supported by Mac. If you want to make an NTFS format external hard drive writable on Mac without affecting the data on the drive, we suggest you use a reliable third-party NTFS driver software for Mac.
The best and easiest NTFS disk control tool for Mac is DoYourData NTFS For Mac. With its help, users can read/ write to both NTFS and non-NTFS files. It works with all macOS versions and lets you change permissions easily without limiting what you can write.
DoYourData NTFS for Mac
- Stable and fast third-party NTFS driver for macOS.
- Make WD My Passport or other external NTFS drive writable on Mac.
- Simple interactions make it easy to manage NTFS drive on Mac.
After using the software, you can enable the writable access for NTFS drives on Mac. Also, it will be integrated into the system and enable the NTFS management feature in Disk Utility. Here are the steps:
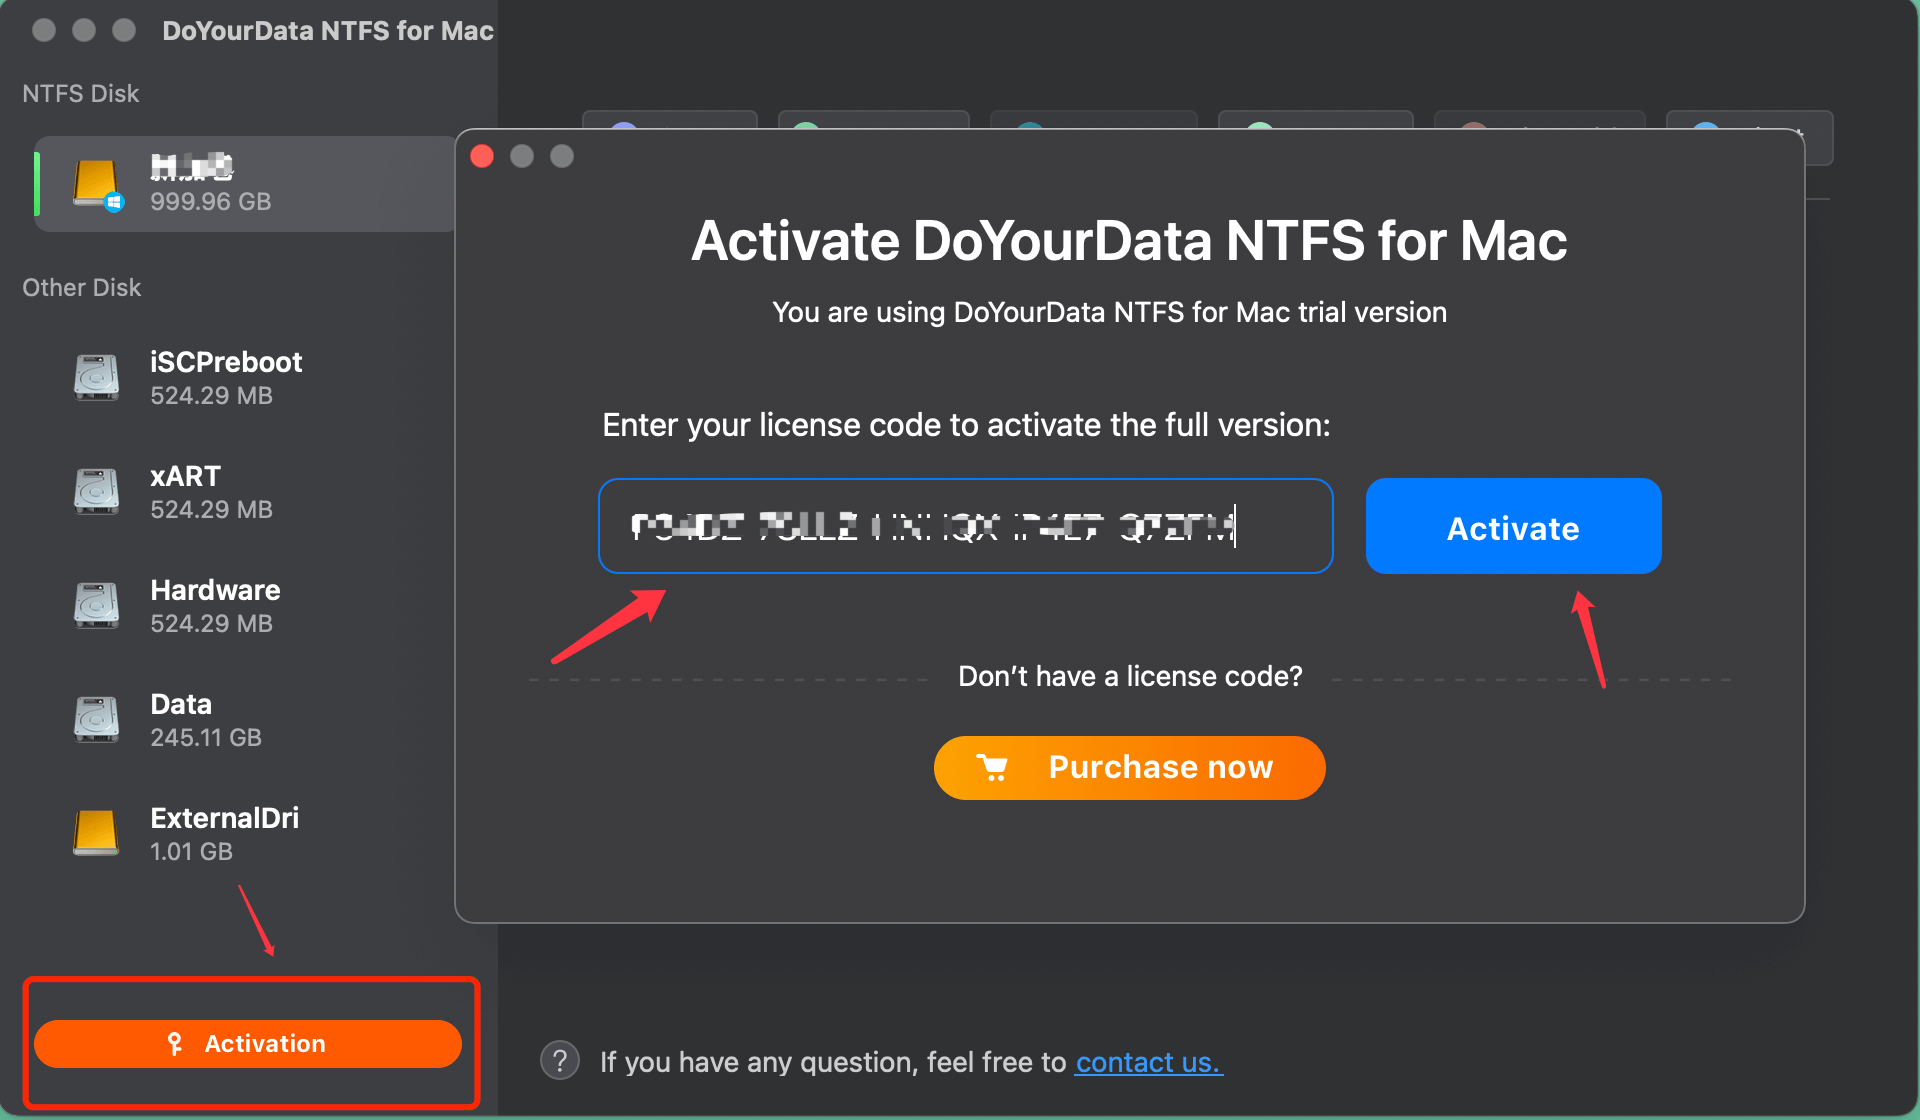
Step 1: Launch DoYourData NTFS for Mac and ensure it's turned on. Press "Activation" button to enter the license code and get this software to work.
Step 2: Connect an NTFS drive to your Mac. DoYourData NTFS for Mac will find the drive immediately. When you choose the drive, it will be marked as "Read-only." Click Enable Writable button to give it the ability to read and write.

Step 3: Do as the onscreen instructions to allow DoYourData NTFS driver on your Mac and you will need to quit and reopen the software, and you may also need to restart the Mac for Apple silicon computers. For More Information...
Step 4: After restarting the software or Mac, you can click the Enable Writable button again. Then just open the NTFS drive to check, read, write, and even change saved data.
If your drive is not in NTFS format and the file system is fully supported by macOS, there might be some other issues that cause the read only issue for WD My Passport external hard drive. You can refer to the following methods and find the workaround.
Change WD My Passport's Read-Only Permission Settings
If the WD My Passport drive's write protection is turned on, the Mac won't let you view the external HDD. The system settings must be changed to make WD My Passport write support work on a Mac so that rights don't matter.
- Connect your WD My Passport portable disk to your Mac first.
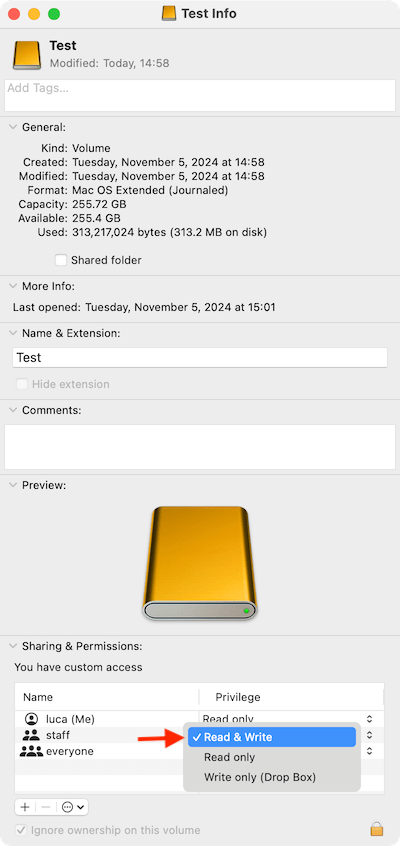
- Second, look for the WD Passport icon on your Mac. Right-click it and select Get Info from the menu that appears.
- Type in the password if asked.
- Afterward, go to the option "Sharing & Permissions."
- In the table of privileges, choose "Read & Write" from the "Read Only" list.
- Choose "Ignore ownership on this volume."
![WD My Passport is ready-only on Mac]()
Now, you should be able to read and write to the WD My Passport drive.
Use First Aid to Fix Read-Only WD My Passport
The WD My Passport hard drive read-only error could also be caused by a hard drive that is broken or corrupted or has bad sectors. If nothing works, you can use Disk Utility to find and fix the problem. To get your drive back to normal, take these steps:
Step 1: Open the main Menu on your Mac and connect your WD drive.
Step 2: On the Apps screen, find Utilities and double-click Disk Utility. OR, to use Disk Utility, press Command + Space and type the word, "Disk Utility." Then press Enter.

Step 3: Pick out the WD My Passport drive that needs fixing.
Step 4: In the menu bar at the top, click First Aid. You will then be prompted to fix the chat box.

Step 5: Run "First Aid" by clicking the Run button and wait until the fix is done.
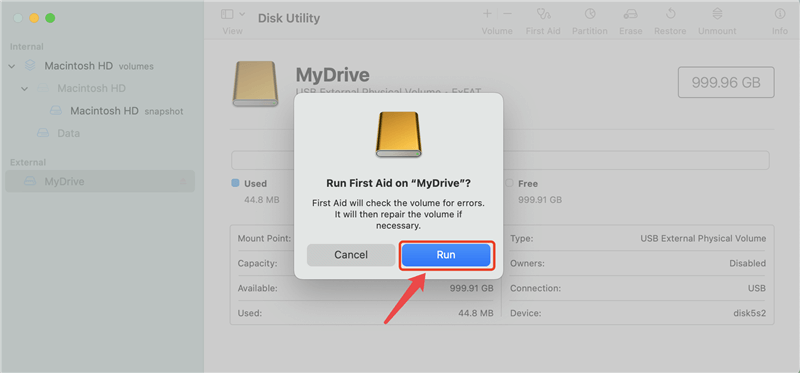
Step 6: Click the Done button when the process is done.
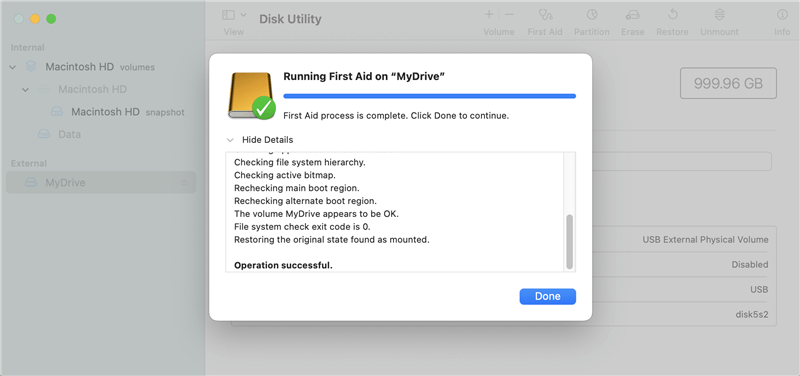
If the disk errors of your WD My Passport drive is fixed with the tool, then you should be able to read and write to the drive normally.
Address Security and Privacy Settings
Some portable drives, especially those released after macOS Catalina, may not work with newer versions of macOS because they have strict security settings.
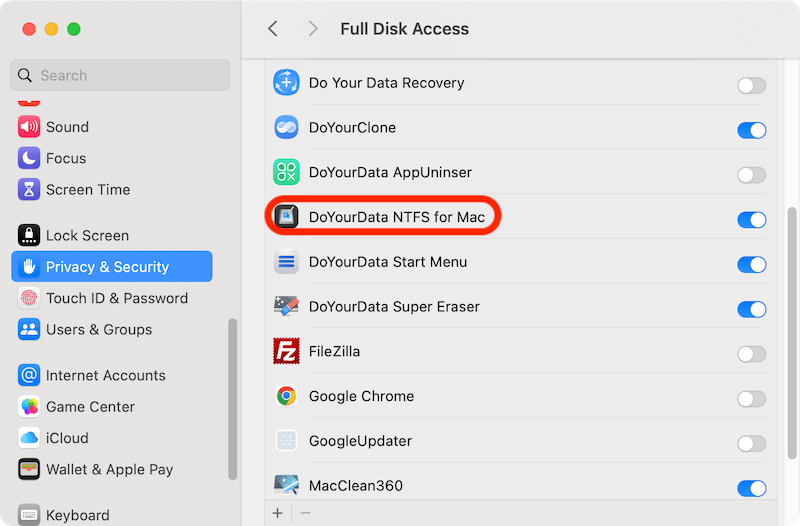
- Go to System Settings and then click on Privacy & Security.
- Choose Full Disk Access from the list on the left.
- Ensure the Finder and any third-party NTFS drivers can view the whole disk. If not, enter your password, click the lock button, and add the apps to the list.
![WD My Passport is ready-only on Mac]()
After making these changes, turn your Mac back on and see if the WD My Passport drive is still read-only.
Format WD My Passport HDD with Disk Utility.
If there are file system errors, the WD My Passport external drive might also become read only. You can fix this problem by setting the WD portable hard drive's file system to work with macOS. Here is how:
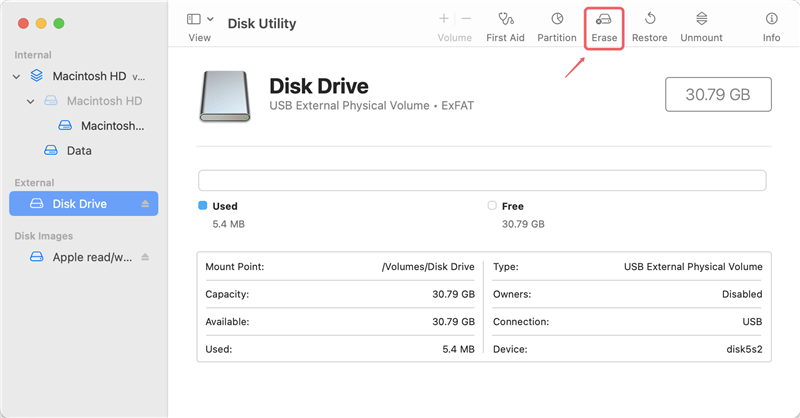
1. On your Mac, open Disk Utility and click on the WD portable hard drive.Press the Erase button now.
2. Pick the file system you want to use, like exFAT, APFS, Mac OS Extended. If you want to use the drive in different operating systems, you can choose exFAT.
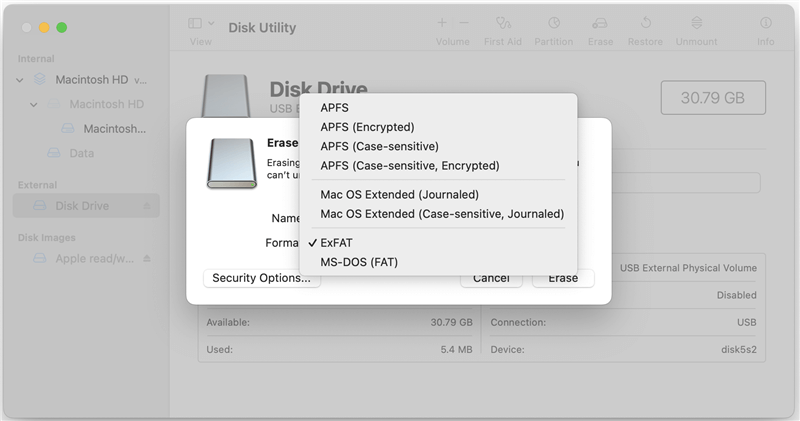
3. Then click the Erase button to start the formatting process.

After the process, you can write new files to your WD portable hard drive. Also, if your drive is in NTFS format, you can format it with a file system supported by Mac. However, the formatting process will remove all the files on the drive, so ensure to back up your drive data first before you format it.
Final Words
You can fix the WD My Passport's read-only problem and get full access again by reformatting the drive, using third-party NTFS driver, or changing the security settings on macOS. To keep your Info from getting lost, you should always back it up before making changes. If you follow the right steps, you can ensure that your WD My Passport works well and that your data on your Mac is safe and easy to reach.
FAQs About Fixing WD My Passport Read-Only on Mac
1. What are the common reasons for WD My Passport drive ready only issue on Mac?
There are different reasons that will lead to WD My Passport drive ready only problem, for example:
- Files system incompatible - If the drive is in NTFS format, you can only read the data from the drive on macOS.
- Permission issue - The permission of the drive was changed to read only somehow.
- Security settings - The Finder or third-party NTFS driver for Mac is not allowed to have full disk access.
- Disk issues - If there are issues with the file system or the file system was damaged somehow, you may lose the writable access to the drive.
2. How to make NTFS drive writable on Mac?
If the file system of the drive is in NTFS, the writable access for the drive is not supported natively on Mac. If you want to make the drive writable, you can simple install the third-party NTFS driver for Mac. Professional NTFS driver for Mac can make NTFS drives writable on Mac without changing the drive.
3. What are the best third-party NTFS Drivers for Mac?
- DoYourData NTFS for Mac
- Donemax NTFS for Mac
- Paragon NTFS for Mac
- iBoysoft NTFS for Mac
- NTFS-3G
DoYourData NTFS for Mac
DoYourData NTFS for Mac is a safe, powerful and easy-to-use NTFS for Mac tool. It allows macOS to read & write files on NTFS drives without any limitation. It is also a comprehensive disk management tool for Mac to mount/unmount disk, format disk, repair disk, read-write disk...on Mac.
