Home > Hard Drive Solutions for Mac
How to Use External Hard Drive on Mac Studio?
What to do if the external hard drive is not showing up or shows read-only on your Mac Studio? This article will tell you how to correctly use an external hard drive on Mac Studio and if the external hard drive is an NTFS drive, you don’t want to format it, you can use an NTFS for Mac tool to help you mount external hard drive, grant full read-write access to the NTFS drive on Mac Studio.
![]() Updated by Justin Kenny on September 7, 2023
Updated by Justin Kenny on September 7, 2023
Quick Navigation:
- #1 Causes of Mac Studio Not Recognizing External Hard Drive
- #2 How to Use An External Hard Drive on a Mac Studio?
- #3 Fix External Hard Drive Not Showing Up on Mac Studio
- #4 Fix External Hard Drive Read-only on Mac Studio
- #5 FAQs About Using External Hard Drive on Mac Studio
One reason to buy an external hard drive for a new Mac Studio is to move data off the primary drive and into a centralized, unrestricted location that all user accounts can access. While this is a typical and often-recommended technique, you may be missing a crucial step if you buy an external drive, plug it in, and start using it.
The FAT32 file system is commonly used on external hard drives designed for use with Macs. This file system is the most widely supported by most OSes, so you can easily connect the drive to most computers and access its contents.
Apple's FAT32 support is enough for reading and writing to flash drives and other commonly shared storage media between Macs and PCs. However, this compatibility is largely for use with temporary files. Therefore, its primary use is to provide rapid access to a drive you want to attach and afterward disconnect rather than one you intend to leave permanently attached.
Causes of Mac Studio Not Recognizing External Hard Drive
Suppose you've run into the issue of external HDD or SSD not being shown. There are a few possible explanations for why HDD or SSD hasn't made an appearance:
- The cable has a malfunction.
- There's an issue with the electricity.
- Your storage device is damaged or corrupted.
- Mac OS cannot read the disk.
- Inability to write to NTFS.
If your Mac's internal SSD fails, you cannot boot into macOS, a serious risk with Apple Silicon CPUs.
How to Use An External Hard Drive on a Mac Studio?
Your external hard drive should be ready to use when you connect it to your new Mac Studio. However, before mounting your drive, you may want to take certain precautions to ensure the best possible outcomes. You'll need to remember a few things, like the disk you're using is readable and written on both Windows and macOS computers since it's been pre-formatted to FAT32 or ExFAT.
The drive will continue to function across all supported systems. One drawback of FAT32 drives is that the Master Boot Record partition scheme prevents the device from interacting with Apple's Core Storage procedures, preventing the external hard drive's encryption from being supported by the operating system.
- Join your external hard drive to the computer. The hard drive may include a USB cable, a Firewire cable, or both. Connect the connection to the appropriate ports on your computer and hard drive.
- The disk utility may be accessed by clicking the icon in the upper right corner of your screen.
- The hard drive icon should be on the left side of the user interface. To access your hard drive, select its name from the drop-down menu.
- The next step is to choose the Erase button. Please be patient while the Volume format menu loads.
- Feel free to pick a disk layout for your computer's hard drive. Select Mac OS Extended if you only intend to use the hard drive with a Mac.
- To prepare your Hard Drive for reading and writing, choose Erase, then follow the on-screen instructions to finish formatting.
Choose Format and Partition Scheme.
Using Apple Disk Utility, you may format a disk by selecting a Partition Scheme and a File System Format. This Partition Scheme is for the full hard disk. In addition, you format a single partition according to a certain standard. Afterward, you may create either fixed-size partitions or dynamic-sized volumes to organize your data.
The disk must be formatted with APFS (Apple File System) for flexible volumes.
Partitions that can be read by both a Mac and a Windows PC may be made with the help of Disk Utility. A disk in this format can transfer files across different operating systems.
File System Formats in Disk Utility:
The current Mac file system is APFS. Unless you have a good cause to the contrary, go with this. Only Macs running macOS 10.13 High Sierra (released in 2017) or later are compatible with APFS. Select APFS (Encrypted) and provide a password to encrypt the volume.
Mac OS Extended is an obsolete file type. Select it only if you need compatibility with Macs running macOS 10.12 Sierra (released in 2016) or previous operating system versions.
HFix External Hard Drive Not Showing Up on Mac Studio
Connect the external hard drive to your Mac Studio, but you can’t see it? Follow the steps below to fix this issue:
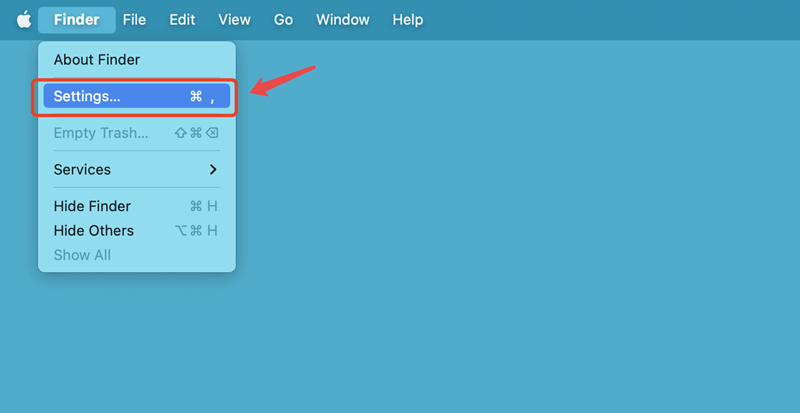
Open a Finder, click Finder on Apple menu.
Select Settings, then you will see Finder Settings.
Click General, select External disks.

Click Sidebar, select External disks.

Close Finder settings, check if you can see the connected external hard drive on desktop and Finder’s sidebar.
Fix External Hard Drive Read-only on Mac Studio
NTFS file system is the main reason why the external hard drive is read-only on your Mac. There are two methods to fix external hard drive read-only issue on Mac Studio issue.
Method 1. Format the external hard drive to Mac-compatible file system
Back up the external hard drive data.
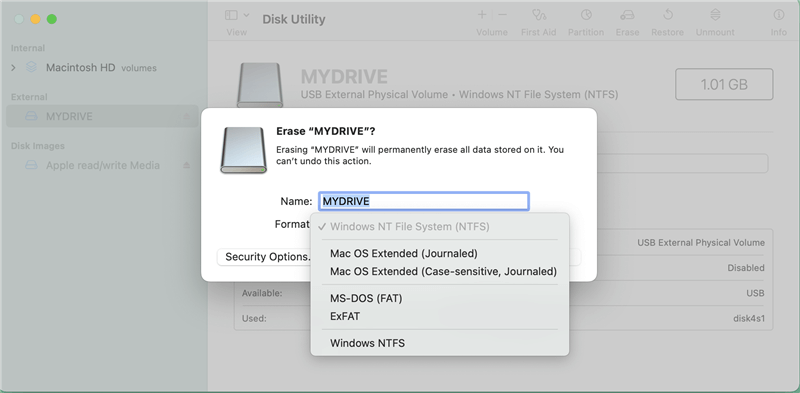
Open Disk Utility, select the external hard drive.
Click Erase, select a file system, click Erase again.
Click Done button.
If you have not backed up the external hard drive before formatting it and lost important data, just download a data recovery application, install, open it to scan the erased external hard drive. It will find all recoverable files, select the wanted ones and save them.
Method 2. Install a NTFS for Mac tool
NTFS for Mac tool is a third-party application which can enable read-write support on Mac. If you want your Mac Studio to read-write NTFS drives, you can install a NTFS for Mac tool - such as DoYourData NTFS for Mac. Then follow the steps below to fix external hard drive read-only issue on Mac Studio.
Step 1. Connect the external hard drive to your Mac Studio and open DoYourData NTFS for Mac.
Step 2. Select the external hard drive and click Enable Writable. Then you can read-write the external hard drive on your Mac Studio without any limitation.

This software also can:
- Open external hard drive on Mac Studio.
- Mount/unmount external hard drive on Mac Studio.
- Repair damaged external hard drive on Mac Studio.
- Format external hard drive on Mac Studio.
- Eject external hard drive on Mac Studio.
FAQs About Using External Hard Drive on Mac Studio
1. How to format an external hard drive for Mac Studio?
To use an external hard drive on a Mac Studio without any issue, you can open Disk Utility, find and select the external hard drive, click on Erase button to format the external hard drive to ExFAT, FAT32, Mac OS Extended, APFS, etc. Please back up the data before you format the external hard drive.
2. Can I clone Mac startup disk to an external hard drive on Mac Studio?
Yes, you can download and install a disk cloning application, then try OS Clone mode to clone the startup disk to the external hard drive and create a bootable clone backup for Mac Studio. Check full guide >>
3. How repair a damaged external hard drive on Mac Studio?
- Connect the external hard drive to your Mac Studio.
- Open Disk Utility, select the damaged external hard drive.
- Click First Aid, then click Run to repair the damaged external hard drive.
4. Can I unformat an external hard drive on Mac Studio?
Yes, the data which is erased by Disk Utility is not lost forever, with right data recovery software, you are able to unformat the external hard drive on Mac Studio.
Download and install Do Your Data Recovery for Mac, open it.
Select the external hard drive to start data recovery.

Click on Scan button.

Preview and recover lost files.

5. Why can’t I copy files from Mac Studio to an external hard drive?
If the external hard drive is read-only, you can’t write data to it so you can not copy files from your Mac Studio to the external hard drive. You can install a NTFS for Mac tool and enable NTFS read-write support for NTFS drives.
If it still does not work, just format the external hard drive and try again.
Conclusion:
Comparing a Hard drive to a few years ago may reveal beneficial modifications. Adding an external or internal hard disk is the easiest approach to extend the life of a computer running out of space. Plug in an external hard drive to increase system storage. It stores applications and information and serves as supplementary computer storage. A large hard drive is needed to store films, photos, music, and crucial information. This tutorial will help install and operate an external hard drive on Mac Studio. You'll have no issues.
Written & Updated by Justin Kenny
Justin Kenny is a writer & editor of DoYourData. He joined DoYourData in 2016 and focuses on writing articles about Windows data recovery, Mac data recovery, external device data recovery, hard drive clone, data erasure, Mac cleanup, computer issue fixes, etc. He is a super fan of Apple devices and is big on testing new digital device and system utility software.