Quick Navigation:
- #1 Why does my MacBook Air not see my external hard drive?
- #2 How to fix external hard drive not working on MacBook Air?
You would normally expect your external hard drive to appear in Locations in Finder alongside your remote disk on your MacBook Air. But suppose it's not there.
There are several potential causes for a MacBook Air not reading a hard drive, including a bad connection, a malfunctioning cable, or damaged data on the drive itself. We have compiled the most efficient strategies to cope with any situation, and we hope you find them useful.
Why does my MacBook Air not see my external hard drive?
The disk drive isn't connected correctly. Problems with connectivity are possible if the external device isn't linked to the computer correctly. Verify that the hard drive disk utility's connection cable (USB drive cable or HDMI cable) is securely inserted into your device.
- It could be that the connection cord is broken or the cable itself is malfunctioning. Damage to the external hard drive's connection will prevent it from being used. If you can't see any obvious signs of damage, consider trying with an alternative cable.
- You haven't restarted your MacBook Air. If you don't restart your MacBook Air every once in a while, it could start having problems after a while.
- MacBook Air hardware issues include a faulty power supply or malfunctioning USB port. If you can access another external disk, attach it to your MacBook Air and see if the problem persists. If the drive appears to be working properly, the damaged drive could be at fault.
- There is no way for MacBook Air to access the external hard drive.

How to fix external hard drive not working on MacBook Air?
There are lots of reasons behind why an external hard drive not working on your MacBook Air. To solve the external hard drive issues, you may need to format the external hard drive or just change to another USB hub or reset the Finder settings or install an NTFS for Mac tool. No matter what you will do, remember to keep your data safe.
Fix1. Verify your USB IDE/SATA connections
Ensure the external hard drive is properly attached to your MacBook Air before proceeding with the rest of the inspection. The issue may be as simple as a broken USB cable or a malfunctioning port. In such a scenario, your MacBook Air won't recognize your external hard drive, giving a false impression that the drive is corrupted.
Follow these procedures to check that your internet connection is stable.
- The external hard disk must be disconnected and reconnected.
- The external hard disk may need to be connected to a different port.
- To rule out a faulty cable as the source of the problem, you should replace it. Before you put your external hard drive through its paces, check the App Store for updated drivers and ensure all your apps are current.
- If the problem persists after trying these solutions, it may be due to broken ports on your MacBook Air system. In this case, you should connect the external hard drive to another MacBook Air or even Windows PC.
Fix2. Change preferences and settings
That should not be a problem if this is not your first time utilizing an external hard drive with a disk utility. Still, it's a good idea to double-check your settings, just in case. Why?
Your MacBook Air isn't configured to show removable media in the Finder. Thus, to fix that.
The Finder can be accessed by selecting it from the menu bar.
Go to Preferences/Settings, General, and select Display desktop items to do this.

Make sure the checkboxes for both external and internal drives are selected.
Then, in the sidebar, look for Internal and External Disks.

That should resolve the MacBook Air's issue of not recognizing the external hard drive. If not, continue to the next option for fixing an external hard disk that won't load.
Fix3. Try other devices for power supply
It could be a hardware issue with your MacBook Air if the local hard disk or external hard drive fails to appear, no matter what cable you use. If it only works on a PC, your hardware probably isn't formatted to be launched on a MacBook Air device, and you should try it out on another MacBook Air or Windows PC.
Fix4. Repair the external hard drive in Disk Utility
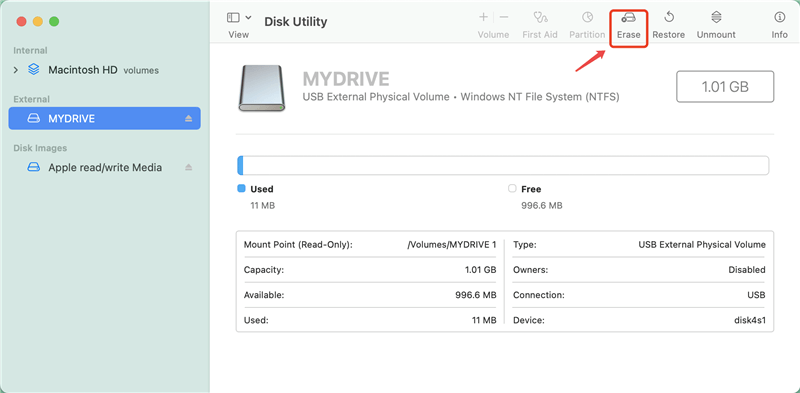
Disk Utility is a program built into every MacBook Air that may be used to manage hard drives and other related activities. If your external hard drive fails to mount on your MacBook Air and you suspect file system issues are to blame, you can use this program to investigate and fix the problem.
What you need to do is as follows:
Disk Utility may be accessed in the MacBook Air's Finder by clicking the Applications > Utilities > Disk Utility option.
From the menu on the left, choose the external hard disk you want to use.
If the external hard drive is not mounting on your MacBook Air, just click Mount.

If the Erase is available, just select Erase to reformat the external hard drive.

You also can click First Aid to repair the damaged external hard drive.

However, if you click Erase or First Aid, all data stored on the external hard drive will be erased. Before or after erasing the external hard drive, you can recover lost data from the external hard drive with data recovery application.
Step 1. Download and install data recovery application - Do Your Data Recovery for Mac, then open it.
Step 2. Select the external hard drive to start data recovery.

Step 3. Click on Scan button. The deep scan ensures finding all existing files, deleted or erased files on the external hard drive.

Step 4. Once the scan is completed, you can select the wanted files and recover them to your Mac.

Fix5. Fix NTFS external hard drive with NTFS for Mac tool
If the external hard drive is an NTFS drive, it may not mount on your MacBook Air and you can’t write data to the external hard drive because NTFS is Windows file system, not compatible with macOS. You don’t need to reformat the external hard drive to Mac-compatible file system, just install a NTFS for Mac tool to solve this issue.
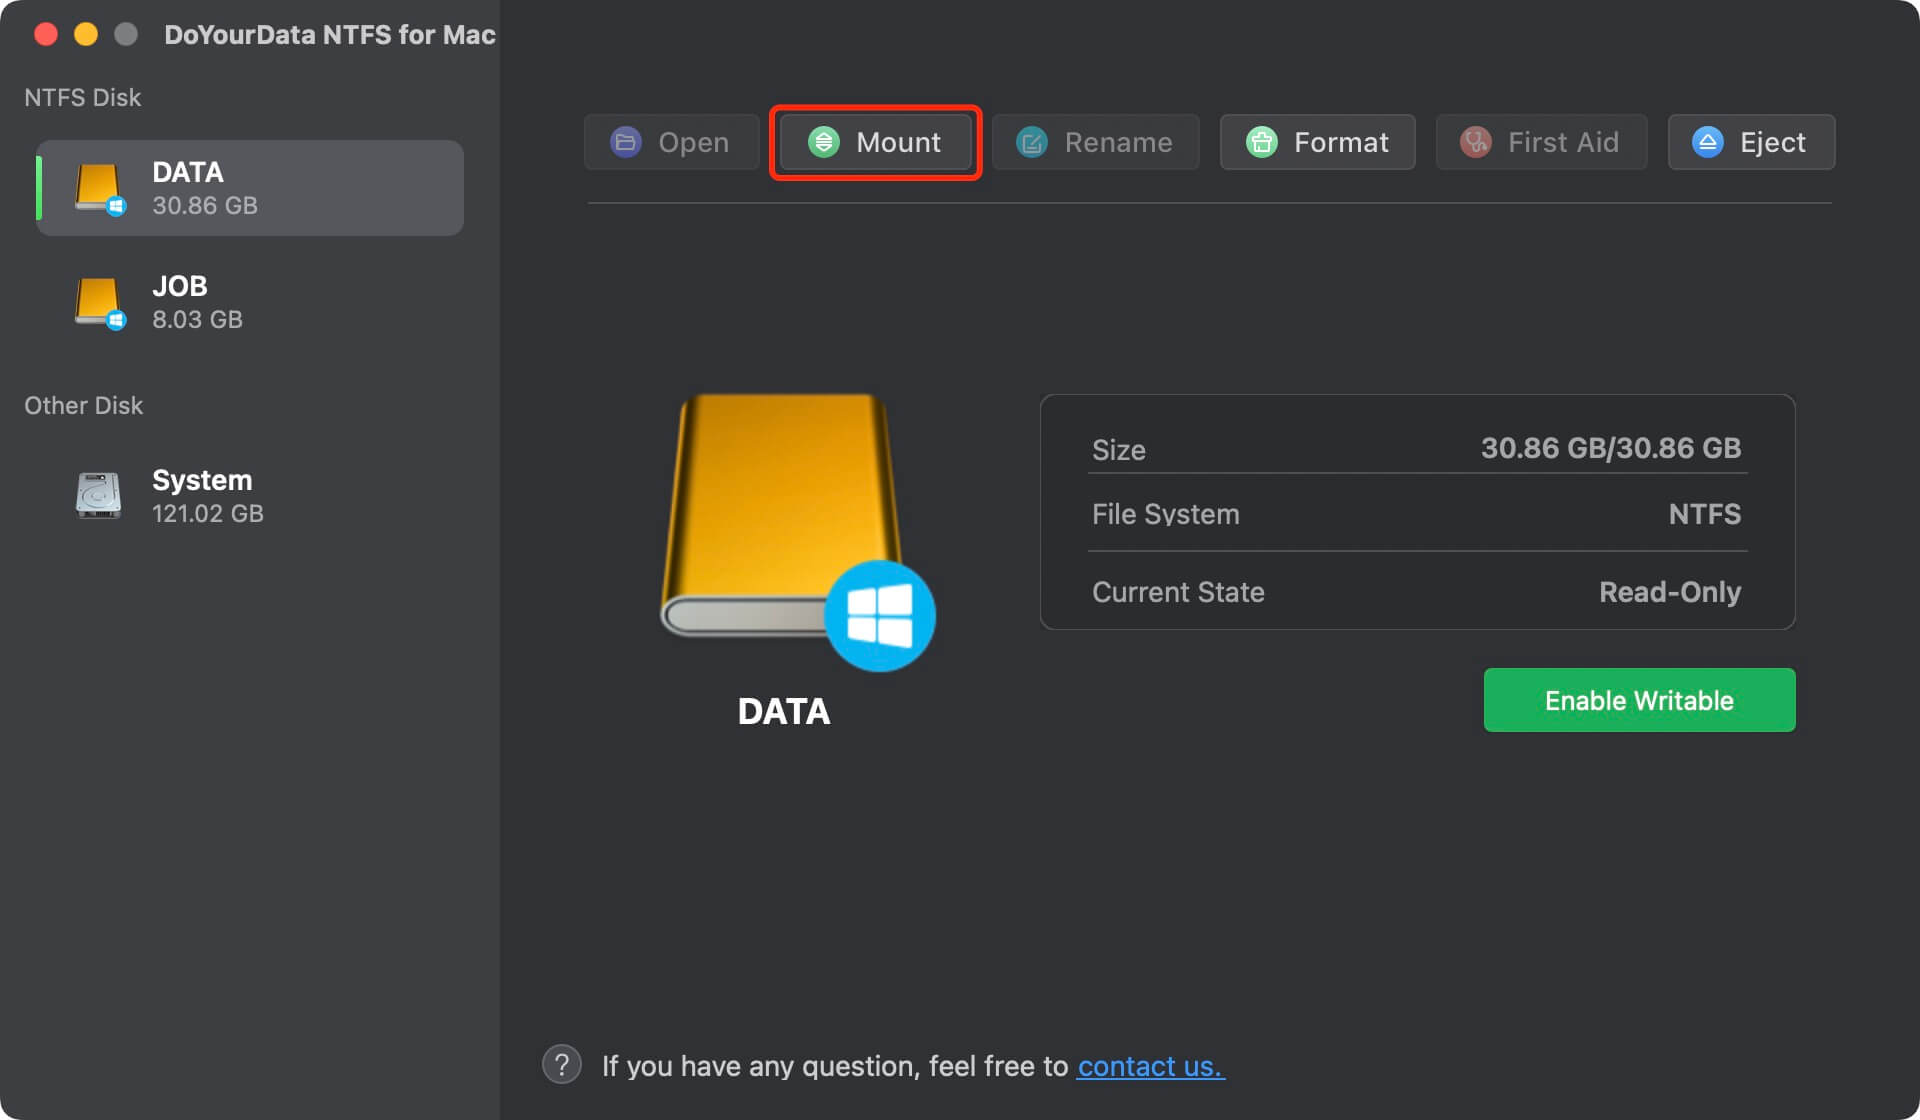
Step 1. Download and install DoYourData NTFS for Mac, then open it. Make sure the external hard drive is connected to your MacBook Air.
Step 2. Select the external hard drive, if it is not mounting on your MacBook Air, just click Mount.

Then click Enable Writable for NTFS drives, it can quickly grant full read-write access to the external hard drive.

Conclusion:
Not being able to access the files on your external hard drive because your MacBook Air won't mount it can be very frustrating. No matter what caused the problem - a corrupted drive, improper MacBook Air settings, an incompatible file system, or anything else—you can now access a few options that should help you get beyond it.