Back up your Mac Studio or other Mac machines.
Best Mac cloning software to create bootable copy of your macOS machine. Read more >>

Quick Navigation:
It is very common to accidentally lose your data from your computer. This is true whether you are a Mac user or own a Windows-based computer. For example, it's a common reason to lose important files by mistaken deletion. There are many accidental reasons attributing to this phenomenon. An accidental click on your Mac's 'Empty Trash' command can leave you stunned as you may not be ready to completely delete that data from the Trash yet.
You were looking to delete some unnecessary stuff using the Command (![]() ) + Delete combination but accidentally deleted some important file/s too; that should be a painful event, without a doubt.
) + Delete combination but accidentally deleted some important file/s too; that should be a painful event, without a doubt.
Conversely, files can also disappear in case you have unknowingly sent them to the Trash. You may also have misplaced file(s) or folder(s) in the adjacent folder. Also, some other issues or unexpected reasons would also cause data loss on your computer.
In this article, we are going to give a brief look at some methods that Mac users can try to recover their lost data from Mac Studio. This guide includes the devices that are using Apple’s new M serial chips and the new macOS Tahoe, therefore, also including the newly launched desktop, Mac Studio. So, let us head towards different methods to help recover lost data from Mac Studio.
The Mac Studio is a small-form-factor workstation made by Apple Inc. Mac Studio is the latest offering of Apple in the desktop segment of the computer world. It lies in the middle of the previously launched Mac Pro and Mac Mini. However, Mac Studio is a high-performance desktop unlike any other. Designed to fit perfectly under most displays, it runs completely unrestrained within an unbelievably small footprint, putting prodigious power and connectivity at arm's.
The Mac Studio was announced on March 8, 2022. There are two models which are driven by the M1 Max or the M1 Ultra. The second generation of Ma Studio is powered by the newer M2 Max or M2 Ultra chipsets from Apple, comes in two versions. You can either buy a 12 core M2 Max/512 GB storage combo for $1999, or you can opt for a 24 core M2 Ultra/1 TB configuration for an extra $ 3999. Both versions can be upgraded with up to 8 TB of storage.
Apple describes this new entry of Mac Studio to contain 'outrageous and outsized performance' and host some of the most powerful chipsets ever 'in a personal computer'. It has the capability of running up to six 6K monitors, and support for 8K displays over Thunderbolt and HDMI. Overall, the new Mac Studio promises to be a great addition to Apple's desktop family.
If you own a Mac Studio already and have lost some important files, then you can try various methods depending on the cause of the disappearance. These methods are given below in a brief fashion.
It is however possible that none of these methods will work for you if the cause is not related to the problems mentioned in this article. Therefore, if you still find it hard to spot your lost files, then you should ask for some expert help, instead of trying different schemes that may render your data to stay hidden permanently.
In case, the file you thought lost is not really missing, instead, you may have accidentally pushed them to one of the adjoining folders. If this seems to be the reason, then you should check the folders next to the file or folder that you lost.
If your file is there, then you are in luck and just put the the file back to the correct location. Otherwise you can check the remaining steps below.
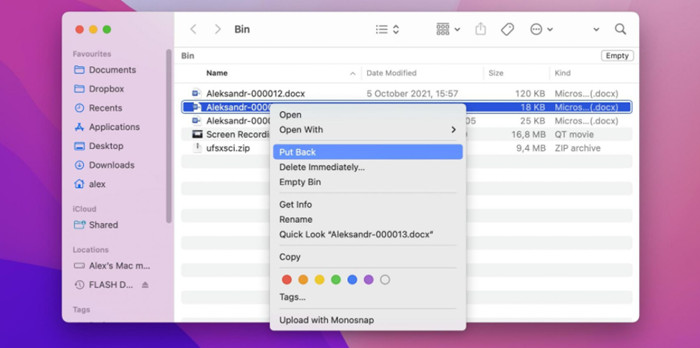
If you are struggling to find and recover lost data from Mac Studio, then you can also check your Mac's Trash first. You may accidentally delete the data and the data was put into Trash. To recover the deleted files from Trash, open the Trash of your Mac Studio and try to find your lost file(s) or folder(s). If you can find the required stuff, then right click the file(s) and click Put Back to restore the files to the original location directly. You can choose the option to copy the file(s) to someplace where you are not afraid to lose it again.

If the files were lost due to other reasons or the Trash was emptied after deleting files, then this method won't work for you. In such a case, how to recover the missing files on Mac Studio? Don't be worried, there are still other methods to recover the lost files. You can check the remaining procedures given below.
If you have lost an important file, then you may need to check your cloud storage such as Google Drive or Dropbox. There is a chance that you have made a backup of your important files, and your lost file or folder is also backed up among them.
Hence, it is a good idea to visit your cloud storage before you decide to use the advanced method given in the next step. If you have backed up Mac Studio using Time Machine, just try to restore the lost data from Time Machine backup. Here are the steps:
Step 1. Connect your external drive for Time Machine backups.
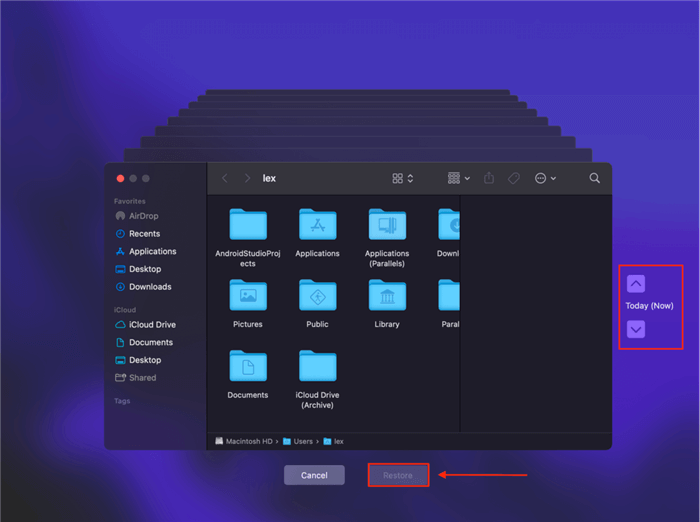
Step 2. Navigate and open the location where you lost data. Click the Time Machine icon from the top taskbar on Mac, click the option Browse Time Machine Backups.

Step 3. Check and choose a previous version of backups which contains the missing files you want to restore. Select the files and then click the Restore button to put the files back to the original location.

🎈Tip: You also can use a data backup software - such as DoYourClone for Mac to help you quickly back up data on Mac Studio. It even can help you clone Mac OS and create a bootable disk for Mac Studio.
Back up your Mac Studio or other Mac machines.
Best Mac cloning software to create bootable copy of your macOS machine. Read more >>
Facing no luck by trying the above-given procedures? It is time that you use a 3rd party recovery software or service that can recover lost data from Mac Studio. There are certain factors that you should keep in mind before you opt for a recovery software or service.
For recovery software, keep in mind that it should support the latest macOS. Moreover, it should also have the ability to work on Apple Silicon chips as the latest Mac Studio requires both these options to tick, in order for recovery software to work. The same is true for a recovery service in case you are looking for one.
Do Your Data Recovery for Mac complies with both conditions and supports both latest macOS and latest Apple Silicon chips. It promises to recover multiple file types such as documents, photos, videos, etc.
Deleted the files accidentally from the Trash? Don't worry as Do Your Data Recovery for Mac promises to recover lost files even if they were deleted from Trash. Download it here:
Don't save new files to the hard drive where you lose your files. Now, just immediately open Do Your Data Recovery for Mac to help you recover lost files from Mac Studio.
Step 1. Open Do Your Data Recovery for Mac from Launchpad, then select the hard drive where you delete or lose your files.

Step 2. Click on Scan button. The software will deeply scan the drive to find the lost files from the drive. It will take some time depending on the size of the drive. Just wait patiently.

Step 3. Once the scan is completed, you can preview all recoverable files. Then select the wanted files and save them to another hard drive.

If you are looking for a recovery service, then you can find one by searching on Safari or another browser. But again, keep in mind to verify whether the service provider can do the job for your Mac Studio as it is a very new entry in Apple's ecosystem. Moreover, you can also look for another suitable alternative recovery software by searching on the web.
In this article, we tried to help our readers to find and recover lost data from Mac Studio with 4 different methods. If you lost data on Mac Studio, stopping any further writing operations to the drive to prevent further damaged to the missing files. Then try the methods to check if you can find or recover the wanted files. What's more, it is always a good idea to keep backing up your important files on a safe storage device regularly, so that you can regain its access in case you lose it to some mishap.
1. Possible reasons for data loss on Mac Studio.
Data loss on a Mac Studio can happen due to various reasons, ranging from software issues to hardware failures. Here are some possible causes:
2. How to restore files from a Time Machine backup on Mac Studio?
If you created backups for your data with Time Machine, it will be very easy to restore any specified files from the backup. Here's how:
3. How to recover lost files without backups on Mac?
You can only try to recover the lost files with a Mac data recovery software if you didn't back up your data anywhere. The software Do Your Data Recovery is a reliable software can help you rescue data effectively. Do as follows to recover data with the software:
4. Reliable data backup tool for Mac Studio.
To backup data on Mac Studio, you can use the system built-in utility Time Machine, it's a free tool. Also, you can try the third-party software DoYourClone for Mac which can create bootable macOS clone directly.

Do Your Data Recovery for Mac
Do Your Data Recovery for Mac, one of the best Mac data recovery software, can help you easily and completely recover deleted, formatted or lost files from Mac HDD/SSD, external HDD/SDD, USB drive, memory card, digital camera, or other storage devices.
