Home > Hard Drive Solutions for Mac
How to Format Samsung Portable SSD T9 for Mac Without Losing Data?
If you want to use a Samsung portable SSD T9 for Mac, just format it to ExFAT, FAT32, APFS, Mac OS Extended, etc. Here are three methods to help you format Samsung portable SSD T9 for Mac. If you want to use an NTFS Samsung portable SSD T9 on both Windows and macOS, just install an NTFS for Mac tool on your Mac.
![]() Updated by Justin Kenny on December 13, 2023
Updated by Justin Kenny on December 13, 2023
Quick Navigation:
- Before formatting Samsung portable SSD T9 for Mac
- Three Methods to Format Samsung Portable SSD T9 for Mac
- Method 1. Format Samsung portable SSD T9 on Mac with Disk Utility
- Method 2. Format Samsung portable SSD T9 on Mac with NTFS for Mac tool
- Method 3. Format Samsung portable SSD T9 with Data Eraser
- FAQs about formatting Samsung portable SSD T9 on Mac
- Final Words
If you are looking for an external storage device for your Intel-based, Apple T2 Security or Apple Silicon chip Macs, Samsung portable SSD T9 is a good choice. With fast data transfer speed (up to 2000MB/s), you can quickly back up all documents from your Mac to a Samsung portable SSD T9 or you can use the Samsung portable SSD T9 as a data transfer device between Windows PCs and MacBooks.
However, if the T9 SSD has not been formatted for Mac, you may can not use it on your Mac or it only can be used as a read-only device due to incompatible file system. In this article, we will introduce three methods to help in formatting Samsung portable SSD T9 for Mac without losing data.
Before formatting Samsung portable SSD T9 for Mac
- Before you format your Samsung portable SSD T9, you should make a backup of the data stored on the Samsung portable SSD T9.
- Make sure you can connect the Samsung portable SSD T9 to your Mac.
- Find a right Mac disk formatting tool such as Disk Utility, third-party disk manager, etc.
Note: If you want to use a Samsung portable SSD T9 which has been formatted to NTFS, you don’t need to format it. Just install a third-party NTFS for Mac tool to help you enable NTFS read-write for Mac. Check guide: fix Samsung portable SSD T9 read-only on Mac >>
Three Methods to Format Samsung Portable SSD T9 for Mac
Method 1. Format Samsung portable SSD T9 on Mac with Disk Utility
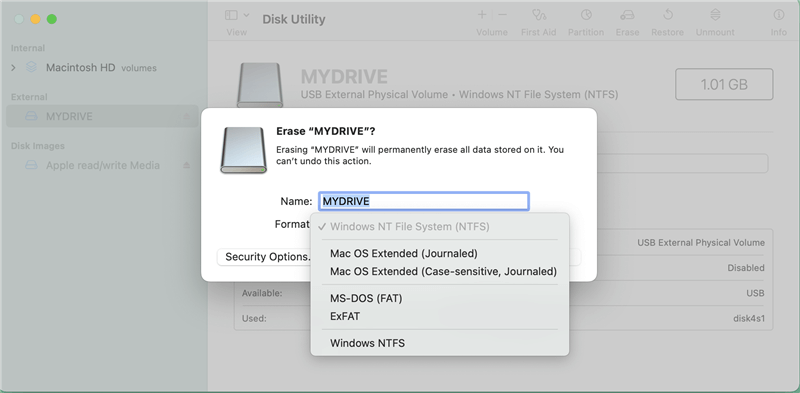
Go to Launch > Other > Disk Utility and open Disk Utility, a built-in disk management app in macOS. It can help you quickly format Samsung portable SSD T9 on Mac.
Step 1. Connect Samsung portable SSD T9 to your Mac, and open Disk Utility.
Step 2. Select the Samsung portable SSD T9, then click Erase.
Step 3. Choose a file system for the T9 SSD:
- Apple File System (APFS): Default file system for macOS 10.13 or later.
- Mac OS Extended: The file system used by macOS 10.12 or earlier.
- MS-DOS (FAT) and ExFAT: File systems that are compatible with Windows and macOS.
If you want to rename the drive, just give it a new name.
Step 4. Click Erase again to format the Samsung portable SSD T9. When it gets finished, click Done.
Method 2. Format Samsung portable SSD T9 on Mac with NTFS for Mac tool
As said above, if you want to use an NTFS Samsung portable SSD T9 on both Windows and Mac OS, you can install a third-party NTFS for Mac tool to help you grant full read-write access to the Samsung portable SSD T9.
NTFS for Mac tool also supports to format Samsung portable SSD T9 on Mac.
Step 1. Download and install DoYourData NTFS for Mac, then open it from Launchpad.
Step 2. Connect the Samsung portable SSD T9 to your Mac.
Step 3. Select the Samsung portable SSD T9 and click on Format button.

Method 3. Format Samsung portable SSD T9 with Data Eraser
DoYourData Super Eraser for Mac is a reliable disk management tool for macOS. It can help you format Samsung portable SSD T9 with only 1 click.
Step 1. Download and install DoYourData Super Eraser on your computer and open it.
Step 2. Choose Disk Manager tool, then select the Samsung portable SSD T9 and click Format.
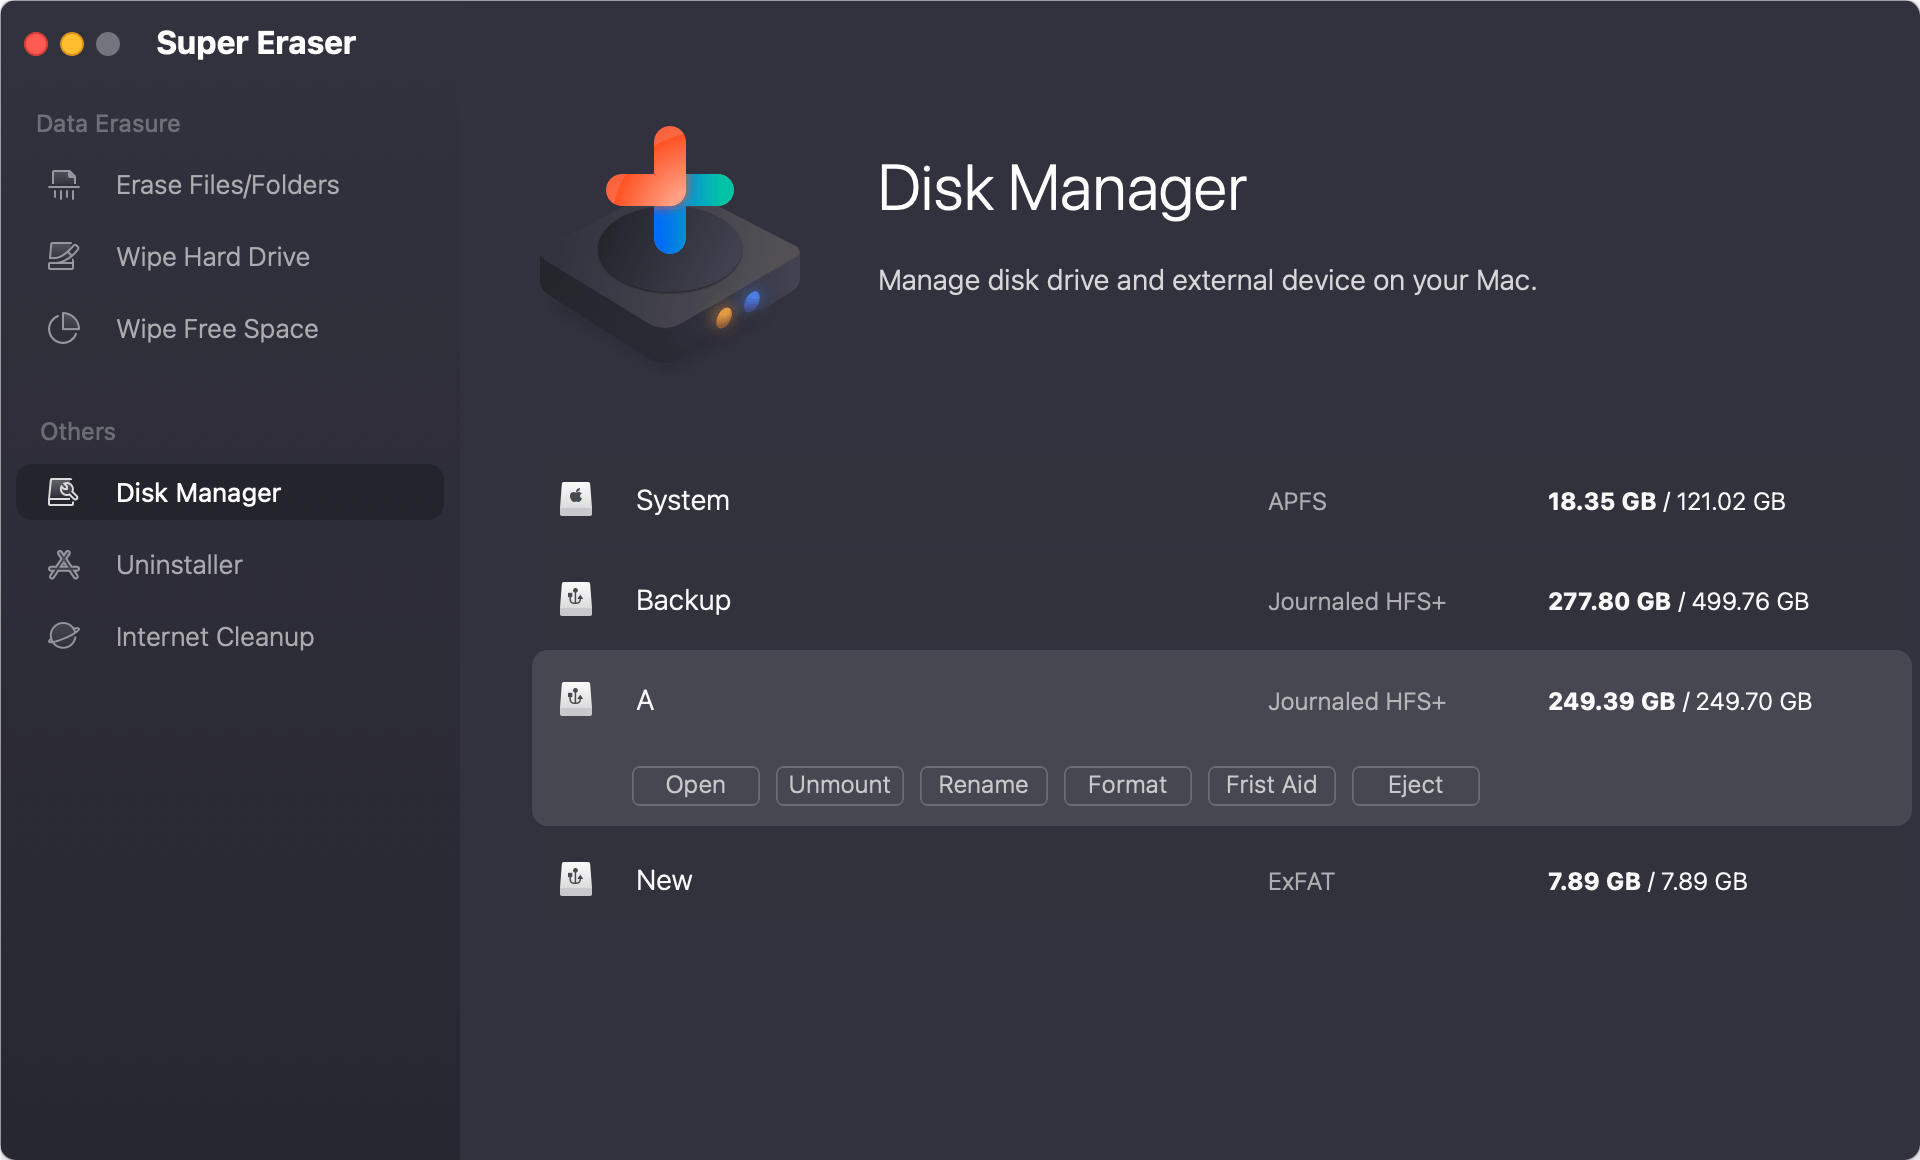
If you will sell or donate your Samsung portable SSD T9, you can use DoYourData Super Eraser to wipe the Samsung portable SSD T9 to permanently erase all data from it.
Just choose Wipe Hard Drive mode, select the Samsung portable SSD T9 and click on Wipe Now button. All data stored on the Samsung portable SSD T9 will be erased by this software, can not be recovered by any method.

FAQs about formatting Samsung portable SSD T9 on Mac
1. How to format Samsung portable SSD T9 for Mac?
- Connect the Samsung portable SSD T9 to your Mac.
- Open Disk Utility (Applications > Disk Utility).
- Select the Samsung portable SSD T9 and click Erase.
- Select a file system and click Erase again.
- Click Done.
2. It it possible to recover lost data from a formatted Samsung portable SSD T9?
Yes, if the Samsung portable SSD T9 has been formatted, stop using it. You can download and install a data recovery program on your Mac, then run it to scan the formatted Samsung portable SSD T9, find all lost files. Check full guide: recover lost data from a Samsung portable SSD T9 >>
3. How to use an NTFS Samsung portable SSD T9 on Mac without formatting?
- You can download and install DoYourData NTFS for Mac tool on your Mac, then open it.
- Select the Samsung portable SSD T9 drive under NTFS Disk.
- Click Enable Writable button.
- Then you can use the NTFS Samsung portable SSD T9 on your Mac without any limitation.
4. How to repair damaged Samsung portable SSD T9?
Disk Utility can help you repair damaged Samsung portable SSD T9 on Mac:
- Connect the Samsung portable SSD T9 to your Mac.
- Open Disk Utility.
- Select the Samsung portable SSD T9 and click Mount if the Samsung portable SSD T9 is unmounted.
- Click First Aid to repair the damaged Samsung portable SSD T9.
5. How to fix Samsung portable SSD T9 now showing up on Mac?
- Open a Finder and click Finder on Apple menu.
- Choose Settings to open Finder Settings.
- Click General and Sidebar.
- Select External disks.
If you still can not see the Samsung portable SSD T9 on your Mac, just open Disk Utility and run First Aid.
Final Words:
To use a Samsung portable SSD T9 on Mac, you should format it to Mac-compatible file system. Disk Utility can help you quickly format Samsung portable SSD T9 for Mac and reset it to factory settings. If you will sell, donate or dispose of an old Samsung portable SSD T9, you can use a data erasure tool - such as DoYourData Super Eraser for Mac to help you wipe the SSD and permanently erase all data.
Written & Updated by Justin Kenny
Justin Kenny is a writer & editor of DoYourData. He joined DoYourData in 2016 and focuses on writing articles about Windows data recovery, Mac data recovery, external device data recovery, hard drive clone, data erasure, Mac cleanup, computer issue fixes, etc. He is a super fan of Apple devices and is big on testing new digital device and system utility software.