Recover Lost Data from LaCie External Hard Drive
If you have lost data on your LaCie external hard drive due to disk repair or disk utility reformat, you can recover lost data from it with data recovery tool.
Quick Navigation:
Nowadays, it's impossible to imagine storing and transferring massive amounts of data without an external hard disk. When it comes to external storage options, LaCie is a well-known brand that provides drives that are both dependable and fast.
Yet, users may occasionally have a problem where their LaCie external hard drive becomes read-only on a Mac, which hinders their ability to edit or upload data. You shouldn't worry; you can take several troubleshooting steps to fix this annoying problem and get complete access to your LaCie external hard drive again.

Getting read-only access to the LaCie disk is possible due to improper or limited permission settings. You can't let users edit or add files to a drive if the permissions are set to read/write solely.
The external device can be mounted in read-only mode to avoid data corruption caused by file system failures or inconsistencies. Possible causes of these problems include improper ejection, unexpected power outages, or drive damage.
Suppose your Mac and LaCie external drive isn't compatible. In that case, you may only access the drive in read-only mode: the macOS version, incompatibility with other file systems, or out-of-date drivers.
The inability to access data from an external hard drive might also be caused by disk corruption or physical damage.
The external drive might mount as read-only due to a Mac OS X or LaCie particular software malfunction.
When the journaling feature - meant to record file system changes—hits a snag, the drive could go into read-only mode to avoid corruption or data loss.
If the LaCie external hard drive is a NTFS drive and you don’t want to format it, you can try third-party NTFS for Mac tool to enable NTFS read-write on your Mac. It is very simple:
Step 1. Download and install a NTFS for Mac tool - DoYourData NTFS for Mac on your Mac and connect the LaCie external hard drive to your Mac.
Step 2. Open DoYourData NTFS for Mac, click NTFS disk, then choose the LaCie external hard drive.
Step 3. Click Enable Writable to grant full read-write to NTFS LaCie external hard drive on your Mac.

To begin, check that your LaCie external drive's permissions are configured correctly:
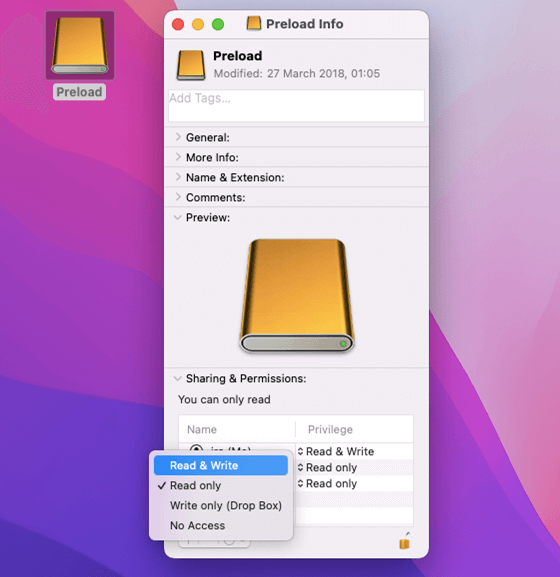
Go to the LaCie drive icon, right-click, and choose "Get Info."
Find the "Sharing & Permissions" section and check that your user account has "Read & Write" rights. If it isn't already, go to the settings, enter your password, and then click the lock symbol.

To resolve disk-related problems, you can use Disk Utility, a built-in macOS tool:
Tap on Applications, Utilities, and Disk Utility to launch the program.
Launch the "First Aid" utility after selecting the LaCie drive to scan for and fix disk issues.
After finishing, try reconnecting the drive to see if the problem still exists.
Certain system-related difficulties can be resolved by resetting Non-Volatile Random-Access Memory (NVRAM) or Parameter RAM (PRAM):
Turn off your Mac and turn it back on again.
When you hear the startup sound twice, press and hold the Option, Command, P, and R keys simultaneously.
When the Mac is ready to start up normally, let go of the keys.
Issues with read-only functionality could arise from incompatible drivers or outdated system software:
Look in the Mac App Store for any new macOS versions.
To ensure the drive's software and drivers are up-to-date, visit the LaCie website.
The read-write status of the drive and journaling, a data recovery mechanism, could clash at times:
Launch Disk Utility and choose the LaCie drive.
Press "File" then select "Disable Journaling."
Get the drive to become writable by verifying the activity.
To modify the permissions of a drive, advanced users can use the Terminal commands:
Navigate to Applications > Utilities > Terminal to launch the Terminal.
To change the flags for your LaCie drive, run the following command: sudo chflags -R nouchg /Volumes/YourDriveName, where "YourDriveName" is the name of your drive.
Think about creating a backup and reformatting the drive if everything else fails:
Launch Disk Utility and choose the LaCie drive.
For example, you can choose "Erase" and then choose "FAT32," "macOS Extended," or exFAT as your file system format.
Make sure that the drive is working properly before transferring any further data.
Recover Lost Data from LaCie External Hard Drive
If you have lost data on your LaCie external hard drive due to disk repair or disk utility reformat, you can recover lost data from it with data recovery tool.
To sum up, it's not fun when your LaCie external hard drive becomes read-only on a Mac, but luckily, there are a few ways to fix it. If it doesn't work, try resetting NVRAM or PRAM, updating software, checking permissions, and then looking into more complex solutions like turning off journaling or using Terminal commands.
When everything else fails, you may need to reformat the drive or contact LaCie directly to fix the problem and get full access to the important data on the external drive.
There is an easy method to fix NTFS LaCie external hard drive read-only on Mac. You just download and install an NTFS for Mac tool, then run it to enable writable for your NTFS LaCie external hard drive.
