Quick Navigation:
- How Mac Handles Deleted/Lost Files?
- Preparing for PDF File Recovery: Preliminary Steps
- Built-in Mac Tool: First Step for PDF File Recovery
- Third-Party Software: Advanced PDF file Recovery Option
- When All Else Fails: Seeking Expert Opinion
- Preventive Measures: Avoiding Future Data Loss
- Conclusion
Losing important PDF documents due to accidental erasure or drive formatting can be a frustrating and stressful experience, especially if those files contain crucial information like contracts, academic research, or personal data. Whether you're dealing with a mistakenly erased drive or a more complex issue involving corrupted data, understanding how to recover lost PDF files on a Mac is essential.
Fortunately, there are effective methods to help you retrieve these files, even if they seem lost forever. This article will guide you step-by-step through the process of recovering your lost PDF documents from an erased drive on your Mac, providing you with the knowledge and tools to maximize your chances of a successful recovery.
How Mac Handles Deleted/Lost Files?
To effectively recover lost PDF documents, it's crucial to understand how macOS handles file deletion and drive erasure. When a file is deleted or a drive is erased, the data isn't immediately destroyed. Instead, macOS marks the space occupied by those files as available for new data, but the actual content remains intact on the drive until it's overwritten. This is why it's often possible to recover files after they have been deleted, provided that the space hasn't been reused.
However, the key to a successful recovery is acting quickly. The more you use your Mac after the data loss, the higher the chances that the lost files will be overwritten. It's essential to stop using the affected drive immediately once you realize that important PDFs are missing.
Keep in mind that certain types of storage media, such as SSDs (Solid State Drives), are more prone to immediate data overwriting due to their TRIM functionality, which automatically clears unused space. Understanding these nuances can make a significant difference in your recovery efforts.
Preparing for PDF File Recovery: Preliminary Steps
Before diving into the recovery process, there are a few preliminary steps you should take to increase your chances of success:
- Stop Using the Affected Drive: As mentioned earlier, refrain from using the drive where the files were stored. This prevents new data from being written to the drive and overwriting the lost files.
- Check Other Storage Locations: Sometimes, files are misplaced rather than deleted. Double-check other drives, external storage devices, cloud backups, and email attachments to ensure the files aren't stored elsewhere.
- Gather Necessary Tools and Software: You'll need certain tools and software for the recovery process, including macOS's built-in utilities and third-party file recovery software. Make a list of the tools required and download them to a separate, unaffected drive.
These initial steps set the foundation for a successful recovery process and help ensure that you don't inadvertently make the situation worse.
Built-in Mac Tool: First Step for PDF File Recovery
Mac computers come with several built-in tools that can help you recover lost files without the need for third-party software. These should be your first stop in attempting a recovery:
If you have been regularly using Time Machine, macOS's built-in backup solution, there's a good chance you can recover your lost PDF files from a recent backup. Here's how to check:
- Connect the Time Machine Backup Drive: Ensure that the external hard drive or network drive where you store your Time Machine backups is connected to your Mac.
- Open Time Machine: Click on the Time Machine icon in the menu bar or go to "Browse Time Machine Backups" to continue the restore.
![recover lost PDF documents from formatted hard drive on Mac]()
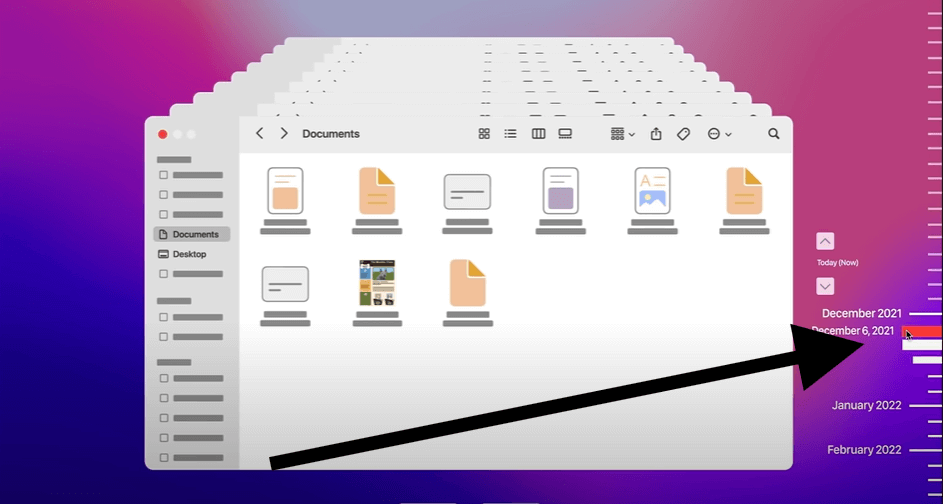
- Browse Backups: Use the timeline on the right side of the Time Machine window to navigate to the date and time when you believe the PDF documents were still available.
![recover lost PDF documents from formatted hard drive on Mac]()
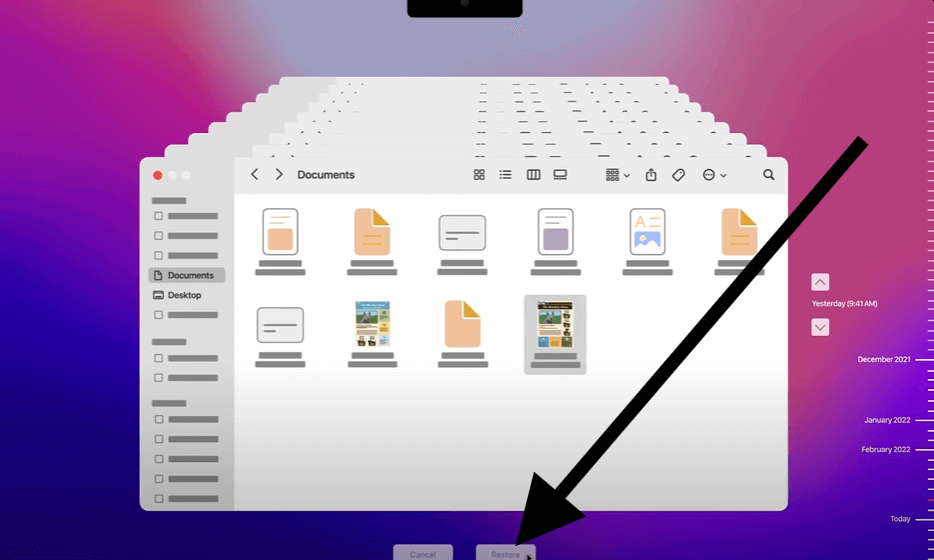
- Restore the Files: Select the PDF files you want to recover and click "Restore" button. The files will be restored to their original location.
![recover lost PDF documents from formatted hard drive on Mac]()
Third-Party Software: Advanced PDF file Recovery Option
If the built-in tools do not yield the desired results or you failed to back up the PDF files before, it's time to turn to third-party recovery software. These applications are designed to perform deep scans of your drive to locate and recover lost files.
Here we will recommend a standout and effective data recovery software for PDF file recovery on Mac - Do Your Data Recovery for Mac.
Do Your Data Recovery for Mac
- Data recovery for PDF and other files on Mac.
- High recovery success rate for erased drives.
- Intuitive interface with preview feature for files.
Do Your Data Recovery for Mac is known for its user-friendly interface and powerful recovery capabilities, The software supports a wide range of file formats, including PDF.
Also, this tool provides a comprehensive solution for data recovery with step-by-step guidance. It's very easy to use without more technical knowledge to use effectively. It supports recovery from various scenarios, including accidental deletion, formatting, and drive erasure.
Step-by-Step Recovery Process with Do Your Data Recovery
Once you've downloaded and installed the software on your Mac, follow these steps to recover your lost PDF files:
Step 1: Launch the Recovery Software
Open the recovery tool and allow it to access your storage drives. The software will automatically detect all connected drives. Choose the erased drive where the lost PDF files were originally stored.

Step 2: Begin the Scan Process
Start the scanning process by clicking on the "Scan" button. The software will begin scanning for lost files from the formatted drive. This process may take some time depending on the size and condition of the drive.

Step 3: Check Scan Results and Preview
Once the scan is complete, the software will display a list of recoverable files. Use the search function to filter out PDF files or navigate through the directory structure to locate the lost documents.

Step 4: Select and Recover the PDF Files
Preview the files to ensure they are intact and correct. Select the PDF files you want to recover and click the "Recover" button. Choose a different drive or partition to save the recovered files to avoid overwriting.
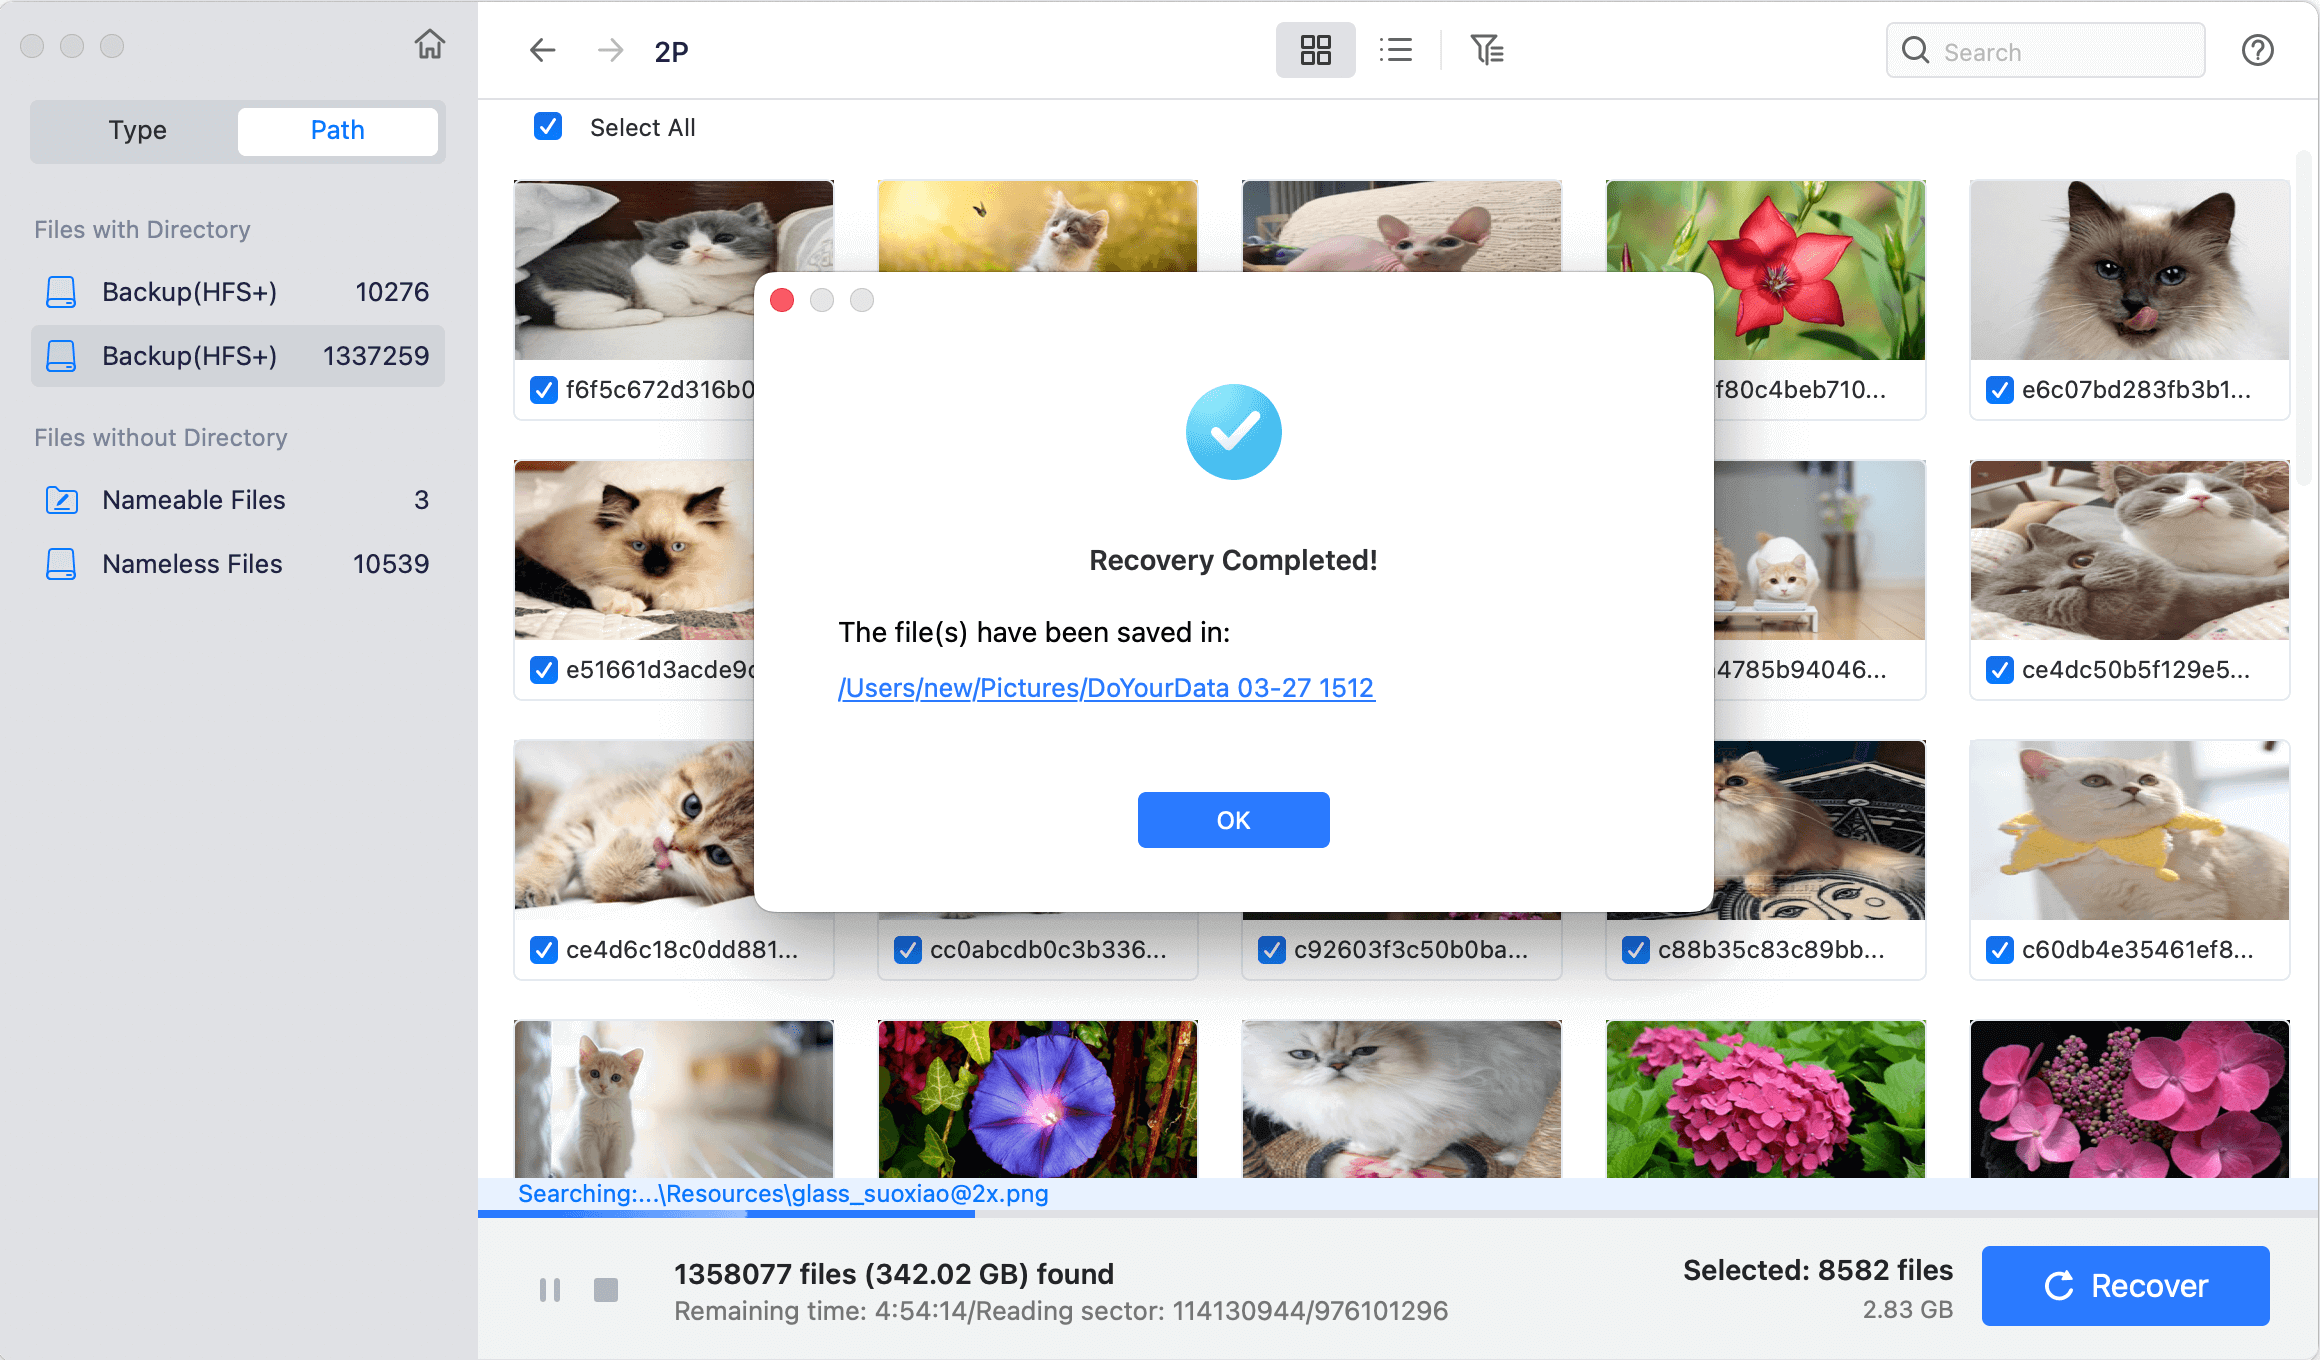
After recovery, verify that the files are fully functional and not corrupted. Open the PDF files to check if they display correctly and contain the expected content.
When All Else Fails: Seeking Expert Opinion
If all software methods fail, it might be time to consider professional data recovery services. These services are equipped with specialized tools and clean room environments to recover data from severely damaged or corrupted drives.
Signs You Need Professional Help
- The drive is physically damaged or making unusual noises.
- The files are partially recovered, corrupted, or inaccessible after multiple attempts.
- You suspect severe data corruption or malware infection.
Choosing a Reliable Data Recovery Service
When selecting a data recovery service, consider the following:
- Reputation and Reviews: Look for companies with positive reviews and a good reputation in the field.
- Data Privacy and Security: Ensure the service complies with data protection standards and maintains strict confidentiality.
- Cost and Time Estimates: Get a clear estimate of costs and the time required for recovery. Be wary of services that offer "guaranteed" recovery or charge exorbitant fees.
Preventive Measures: Avoiding Future Data Loss
Once you've successfully recovered your lost PDF files, it's essential to take steps to prevent future data loss. Here are some best practices:
Regular Backups with Time Machine
Regularly backing up your files with Time Machine or other backup solutions is crucial. Set up automatic backups to ensure your data is always protected.
Cloud Storage Solutions
Consider using cloud storage services like iCloud, Google Drive, or Dropbox for additional security. Cloud storage offers easy access to files from any device and provides an additional layer of protection against local drive failures.
Best Practices for Data Management
- Organize your files into clearly labeled folders to minimize the risk of accidental deletion.
- Use secure deletion tools if you need to delete files permanently to avoid confusion.
- Regularly update your macOS and recovery tools to protect against vulnerabilities and potential data loss.
Conclusion
Recovering lost PDF documents from an erased drive on a Mac may seem daunting, but with the right approach, tools, and knowledge, it is often possible. By understanding how macOS handles deleted files, using built-in tools like Time Machine, and employing third-party data recovery software, you can significantly increase your chances of successfully retrieving your lost data. Remember to act quickly, stop using the affected drive, and consider professional help if necessary. Finally, take proactive measures to prevent future data loss and safeguard your valuable information.
By following these steps, you can turn a potentially devastating situation into a manageable recovery process, ensuring that your important PDF documents are back where they belong.
Do Your Data Recovery for Mac
Do Your Data Recovery for Mac, one of the best Mac data recovery software, can help you easily and completely recover deleted, formatted or lost files from Mac HDD/SSD, external HDD/SDD, USB drive, memory card, digital camera, or other storage devices.

