Quick Navigation:
Formatting a portable hard drive, especially a Western Digital (WD) model, is a crucial process for users who want to ensure their storage devices are operating at peak efficiency. Whether you're preparing a brand-new hard drive for use or simply want to wipe your existing drive clean, understanding the full formatting process is essential. This article delves into the full format procedure on WD portable hard drives, including why it is necessary, how it differs from a quick format, and step-by-step instructions for different operating systems.
![reformat a WD Portable Hard Drive]()
Formatting: Full Format vs. Quick Format
Before reformatting the WD portable hard drive, it is essential to understand what formatting entails. Formatting a hard drive prepares it for data storage by organizing its data structure. The formatting process establishes a file system, such as NTFS, FAT32, or exFAT, allowing your computer to store and retrieve files efficiently.
Formatting comes in two types: full format and fast format. Quick formats remove the drive's file system structure, rendering the data unavailable but not completely erased. The process is fast because it does not scan the entire drive for bad sectors or overwrite the data. This is useful when you need to prepare a drive quickly, but it doesn't guarantee that your data is completely erased or that the drive is free of errors.
In contrast, a full format is more thorough. It not only deletes the file system structure but also scans the entire drive for bad sectors. This ensures that the drive is in good working condition and that any data previously stored on it is completely overwritten, making recovery virtually impossible. A full format is generally recommended when you're preparing a drive for a new operating system, transferring it to a new user, or ensuring that sensitive data is permanently deleted.
Why Perform a Full Format on WD Portable Hard Drive?
There are several reasons why you might choose to perform a full format on your WD portable hard drive:
- Thorough Data Erasure: If you need to ensure that all data is permanently erased, a full format is the best option. This is especially important when disposing of or selling your hard drive to prevent unauthorized data recovery.
- Checking for Bad Sectors: Over time, hard drives can develop bad sectors - areas of the disk that are damaged and cannot reliably store data. A full format scans the entire drive for these sectors, allowing you to identify potential problems before they lead to data loss.
- Reformatting for a Different File System: If you're switching between operating systems or need a different file system, a full format can help ensure that the new file system is correctly installed and that no remnants of the old system remain.
- Improving Drive Performance: While it won't necessarily make your drive faster, a full format can help clean up fragmented files and ensure that the drive is operating efficiently.
Preparing for a Full Format:
Before you begin the full format process, there are several steps you should take to ensure a smooth and successful operation:
- Backup Your Data: Formatting a drive will erase all data on it. If there is anything on the drive you want to keep, make sure to back it up to another storage device or cloud service before proceeding.
- Choose the Right File System: Depending on how you plan to use the drive, you'll need to choose the appropriate file system. For example, NTFS is commonly used for Windows systems, while exFAT is compatible with both Windows and macOS. FAT32 is also widely compatible but has a file size limit of 4GB, which may be restrictive for some users.
- Ensure the Drive is Connected Properly: Before formatting, ensure that your WD portable hard drive is correctly connected to your computer and recognized by the system. If you're having trouble, try using a different USB port or cable.
How to Reformat a WD Portable Hard Drive with Full Format Method?
Full Format on Windows:
If you're using a Windows operating system, formatting a WD portable hard drive is a straightforward process. Here's how to do it:
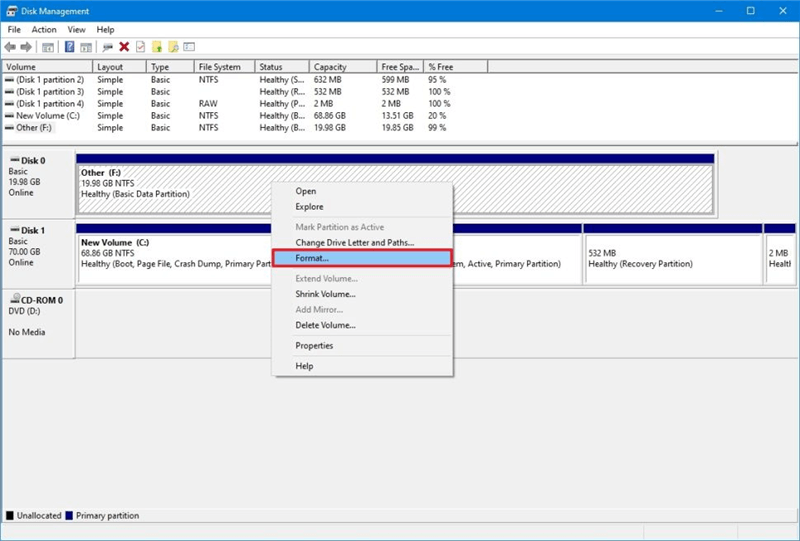
- Launch Disk Management: From the menu, choose "Disk Management" by performing a right-click on the Start button. By doing this, the Disk Management tool will launch and show you every drive that is attached to your computer.
- Choose Your WD Portable Hard Drive: Find your WD portable hard drive in the Disk Management window. Make sure you choose the right drive because formatting will remove all of the data from it.
- Right-Click and Format: From the context menu, choose "Format" after performing a right-click on the drive you wish to format. In doing so, the Format dialog box will open.
![reformat a WD Portable Hard Drive]()
- Select the File System and Allocation Unit Size: In the Format dialog box, pick the FAT32, exFAT, or NTFS file system, and then specify the allocation unit size. The default allocation unit size is suitable for the majority of users.
- Uncheck "Perform a Quick Format": Ticking this box will initiate a complete format. This guarantees that the disk is checked for damaged sectors and that the drive is completely formatted, with all data wiped.
- Begin the Formatting Process: Press "OK" to get the formatting started. The size of the drive and the speed of your computer will determine how long it takes to finish. After the procedure is complete, you can use your drive.
Full Format on macOS:
For macOS users, the process of formatting a WD portable hard drive is slightly different but equally simple:
- Open Disk Utility: To begin, open Disk Utility, which can be found in the Applications > Utilities folder. Alternatively, you can search for "Disk Utility" using Spotlight.
- Select Your WD Portable Hard Drive: Find your WD portable hard drive in the list on the left side of the Disk Utility window. Ensure to select the correct drive to avoid accidentally formatting the wrong one.
- Erase the Drive: With your drive selected, click the "Erase" button at the top of the window. This will open the Erase dialog box.
- Choose Format and Scheme: In the Erase dialog box, you'll need to choose the format (file system) and scheme for the drive. For most users, "Mac OS Extended (Journaled)" or "APFS" is recommended. The scheme should be "GUID Partition Map."
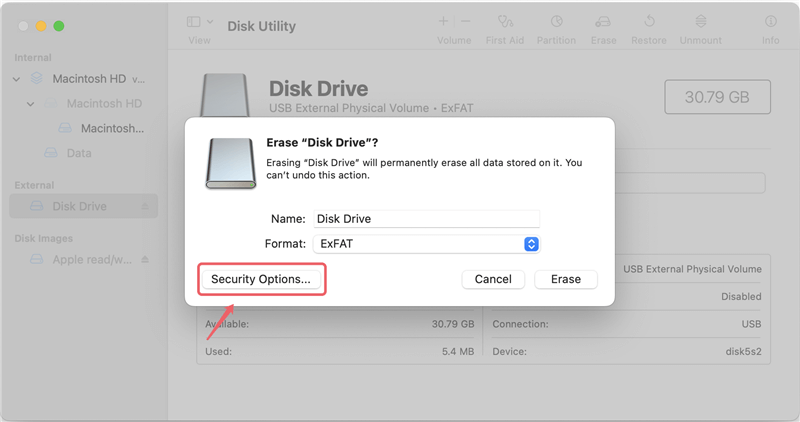
- Perform the Erase: To ensure a full format, click the "Security Options" button and select a level of security that overwrites the data. The more secure the option, the longer the process will take. Once you've made your selection, click "Erase" to begin formatting the drive.
![reformat a WD Portable Hard Drive on Mac]()
- Wait for Process Completion: Depending on the size of the drive and the security setting you chose; formatting could take a while. Once it's done, your drive will be formatted and ready for use.
Post-Format Considerations:
After completing the full format, there are a few additional steps you may want to take:
- Verify the Format: To ensure the format was successful, check the drive's properties in your operating system. Verify that the file system is correct and that the full capacity of the drive is available.
- Run a Disk Check: Even though a full format scans for bad sectors, it's a good idea to run a disk check to ensure the drive is in good health. On Windows, you can use the chkdsk utility, while macOS users can use the "First Aid" feature in Disk Utility. Linux users can use the fsck command.
- Reinstall Data: If you backed up data before formatting, you can now restore it to the drive. Be mindful of the file system you chose, as some systems have limitations on file size and compatibility with other operating systems.
- Enable Encryption: If you plan to store sensitive data on your WD portable hard drive, consider enabling encryption. Both Windows and macOS offer built-in encryption tools (BitLocker and FileVault, respectively), and there are several third-party options available for Linux.
- Safely Eject the Drive: After formatting and transferring data, always remember to safely eject your drive before disconnecting it. This helps prevent data corruption and ensures that all write operations are completed.
Troubleshooting Common Issues:
While the formatting process is generally straightforward, you may encounter some issues along the way. Here are a few common problems and how to address them:
- Drive Not Recognized: Try using a different cable or a different USB port to see whether your computer recognizes your WD portable hard drive. You may also need to install or update the drive's drivers.
- Format Fails to Complete: If the format process fails, it could be due to bad sectors on the drive. Try running a disk check to identify and repair these sectors, then attempt the format again.
- Unable to Format in Desired File System: Some operating systems have limitations on the file systems they can format. For example, Windows cannot format drives larger than 32GB as FAT32 without third-party tools. In such cases, you may need to use a different tool or operating system to achieve your desired format.
- Data Recovery After Full Format: If you accidentally perform a full format and lose important data, recovery is still possible but challenging. Although success is not assured, specialized data recovery tools might be able to recover all or some of the lost data. It's always best to back up data before formatting.
How to Recover Lost Data from Formatted WD Drive
Data Recovery software, such as Do Your Data Recovery, can recover lost data from a formatted WD drive within 3 steps.
How to Wipe WD Portable Hard Drive? [Data Unrecoverable]
Disk wipe program can help you securely wipe a WD portable hard drive and permanently erase all data from the drive.
Step 1. Download and install DoYourData Super Eraser on your computer and connect the WD portable hard drive to your computer.
Step 2. Open DoYourData Super Eraser, choose Wipe Hard Drive mode, select the WD portable hard drive, click on Wipe Now button.
![Wipe WD Portable Hard Drive]()
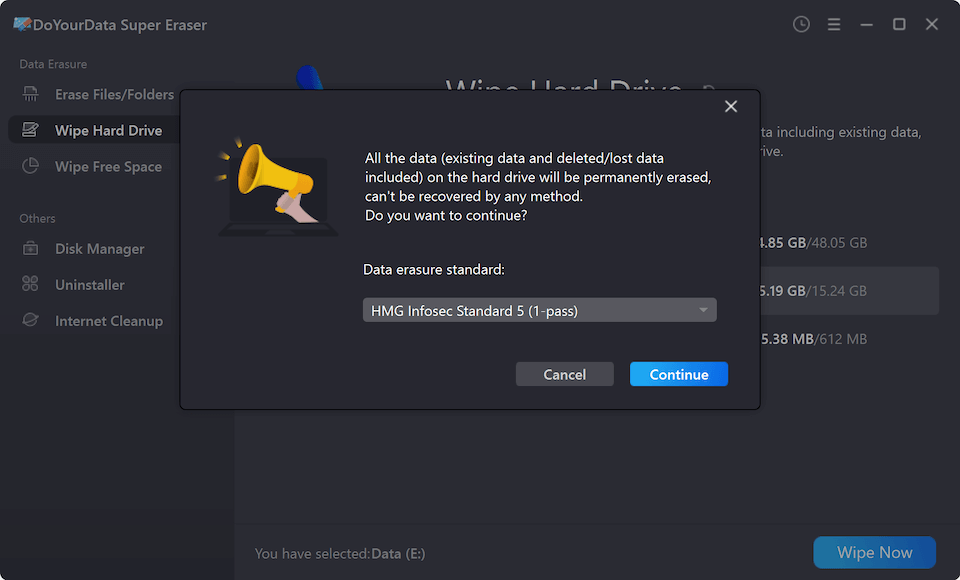
Step 3. Select a data erasure standard, click on Continue button.
![Wipe WD Portable Hard Drive]()
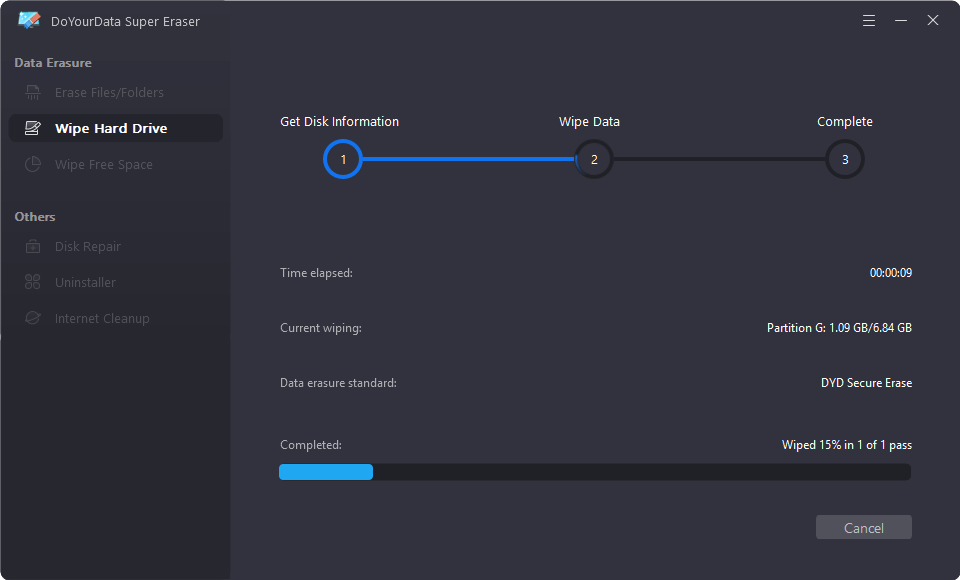
Step 4. It will format and wipe the WD portable hard drive and permanently erase all data from the drive.
![Wipe WD Portable Hard Drive]()
Note: Once the data is erased by DoYourData Super Eraser, the data is lost for good, cannot be recovered by any method.
Conclusion
Performing a full format on a WD portable hard drive is an essential skill for anyone who wants to maintain their storage devices in optimal condition. Whether you're preparing a new drive, switching file systems, or ensuring data security, a full format offers a thorough and reliable way to accomplish your goals. By using the procedures described in this manual, you can confidently format your WD portable hard drive on Windows and macOS and troubleshoot any issues that may arise. Remember to back up your data before formatting, choose the appropriate file system, and verify the format once it's complete. With these precautions in place, your WD portable hard drive will be ready to store your files securely and efficiently.
DoYourData Super Eraser
DoYourData Super Eraser, the award-winning data erasure software, offers certified data erasure standards including U.S. Army AR380-19, DoD 5220.22-M ECE to help you securely and permanently erase data from PC, Mac, HDD, SSD, USB drive, memory card or other device, make data be lost forever, unrecoverable!
