Quick Navigation:
- Formatting vs. Wiping – What's the Difference?
- Step-by-Step Guide to Formatting a Hard Drive
- Step-by-Step Guide to Wiping a Hard Drive
- Post-Process Considerations
- Conclusion
📝 Summary: This guide will show you how to format a hard drive with different tools on Windows and Mac computers, like using Disk Management, Disk Utility, command-line tools CHKDSK, Terminal, and also the professional data erasure software DoYourData Super Eraser.
Whether you're preparing to sell your computer, removing a stubborn virus, or simply repurposing an old hard drive, understanding how to format or wipe a hard drive on PC is essential. Both formatting and wiping a hard drive will remove the data stored on it, but they do so in different ways and for different reasons. In this guide, we'll explore the key differences between these two processes, walk you through the steps to perform each on various operating systems, and discuss important considerations before and after you complete the process.
Formatting vs. Wiping – What's the Difference?
Before moving to the how-to, it's beneficial to understand the difference between formatting and wiping a hard drive.
Formatting a Hard Drive
Formatting a hard drive is like clearing off your desk. It removes the index or "table of contents" that tells your computer where files are located on the drive, making the drive appear empty to the system. However, the actual data isn't immediately erased; it's just marked as "free space," meaning that new data can overwrite the old data at any time.
There are two types of formatting:
- Quick Format: This option removes the file system table and marks the space as available for new data. It's fast but less secure since the data can still be recovered with special software.
- Full Format: A full format does the same as a quick format but also checks for bad sectors on the drive and overwrites each sector with zeros, making it harder to recover data.
Wiping a Hard Drive
Wiping a hard drive goes beyond formatting by not just erasing the "table of contents" but also overwriting every bit of data on the drive, often multiple times. This process makes it nearly impossible to recover any of the original data. Wiping is especially important when you want to ensure that sensitive information is completely removed and cannot be retrieved by anyone else.
Wiping is usually the go-to method when security is a concern, such as when you're getting rid of an old computer or hard drive. The more passes or overwrites you perform, the more secure the wipe, though it will take more time.
Step-by-Step Guide to Formatting a Hard Drive
Formatting a hard drive is a straightforward process that varies slightly depending on your operating system. Below are the steps to format a hard drive on Windows, and macOS.
Formatting a Hard Drive on Windows
- Using File Explorer for a Quick Format:
- Open File Explorer by pressing Win + E.
- Find the drive you want to format in the list of available drives.
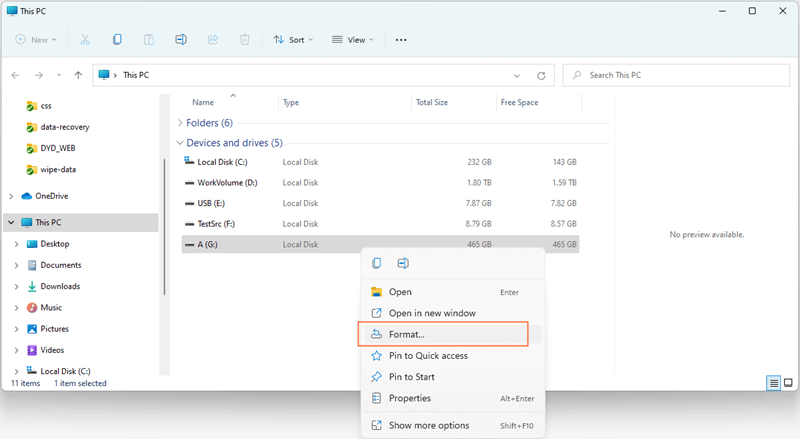
- Right-click on the drive and select Format.
![how to format hard drive on PC and avoid data recovery]()
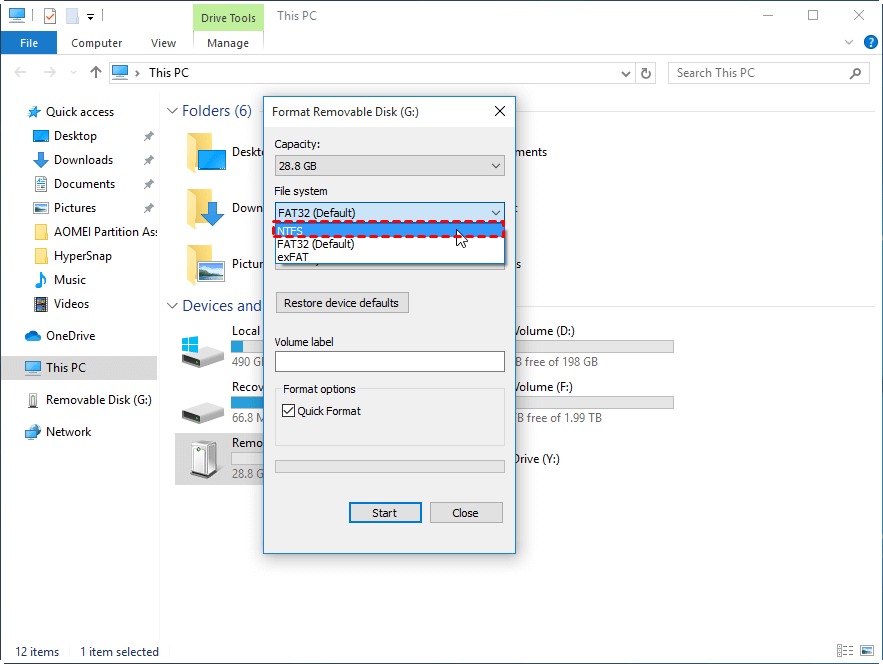
- In the Format window, choose the file system (e.g., NTFS, exFAT).
- Ensure that the Quick Format option is checked.
- Click Start to begin the process.
![how to format hard drive on PC and avoid data recovery]()
- Once the format is complete, you'll see a message confirming it.
- Using Disk Management for a More Detailed Format:
- Press Win + X and select "Disk Management".
- Find the drive you want to format in the list.
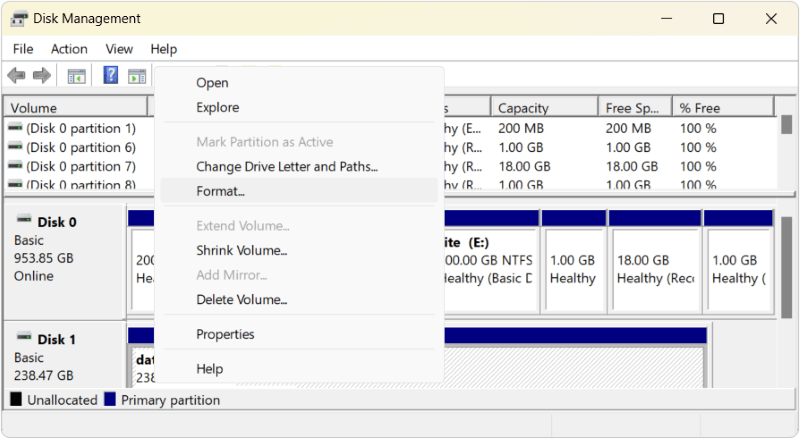
- Right-click on the drive or partition and choose Format.
![how to format hard drive on PC and avoid data recovery]()
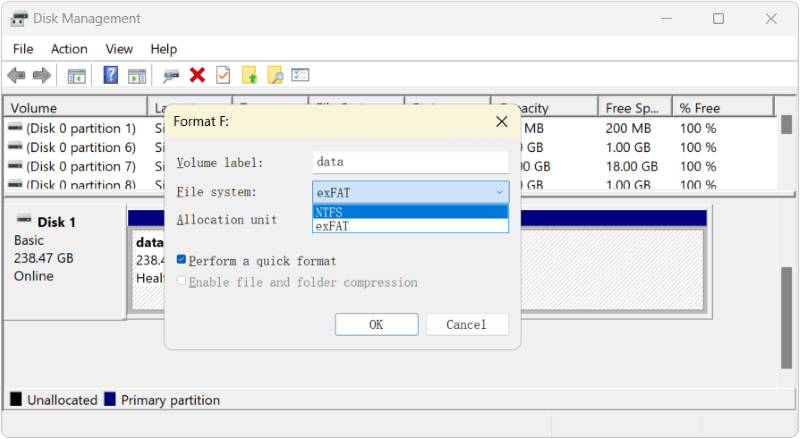
- Select the file system and allocation unit size.
- Choose whether to perform a quick format or a full format.
- Click OK to start the formatting process.
![how to format hard drive on PC and avoid data recovery]()
Wait for the format to complete, which may take some time, especially for larger drives.
Formatting a Hard Drive on macOS
- Using Disk Utility to Format a Drive:
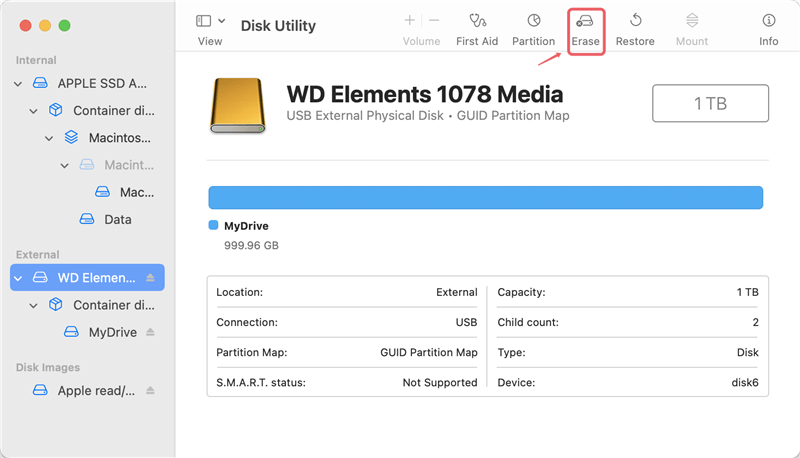
- Go to Applications > Utilities folder. Open the Disk Utility
- In the left-hand pane, select the drive you want to format.
- Click the Erase button at the top of the window.
![how to format hard drive on PC and avoid data recovery]()
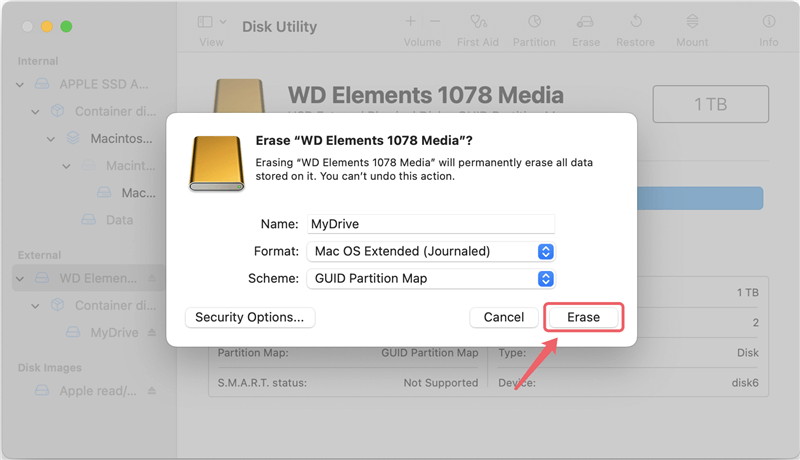
- In the Erase dialog, choose the file system (e.g., APFS, HFS+, exFAT).
- Name the drive and select the Erase option.
![how to format hard drive on PC and avoid data recovery]()
Disk Utility will format the drive and display a confirmation when it's done.
- Understanding File System Options:
Step-by-Step Guide to Wiping a Hard Drive
Wiping a hard drive is more thorough than formatting, and there are several methods to do this, depending on your operating system and the level of security you need.
Wiping a Hard Drive on Windows
- Using Diskpart to Wipe a Drive:
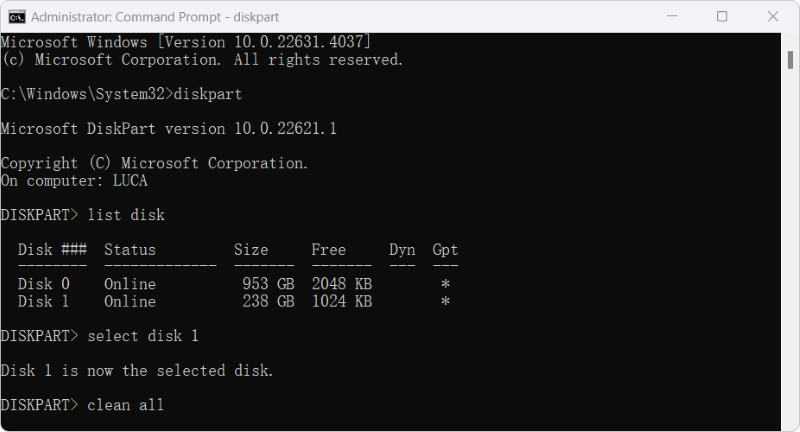
- Open the Command Prompt as an administrator.
- Type diskpart and press Enter.
- Type list disk to see all connected drives.
- Identify the disk you want to wipe and type select disk X, replacing X with the disk number.
- Type clean all to wipe the entire drive. This process overwrites every sector with zeros.
![how to format hard drive on PC and avoid data recovery]()
- Wait for the process to complete, which may take a while depending on the drive's size.
- Using BitLocker to Securely Wipe a Drive:
- Enable BitLocker on the drive you want to wipe.
- After encryption is complete, disable BitLocker and choose to delete the encryption key.
- This method encrypts the data before wiping it, adding an extra layer of security.
![how to format hard drive on PC and avoid data recovery]()
Wiping a Hard Drive on macOS
Using Disk Utility to Securely Wipe a Drive:
- Open Disk Utility from the Applications > Utilities folder.
- Select the drive you want to wipe.
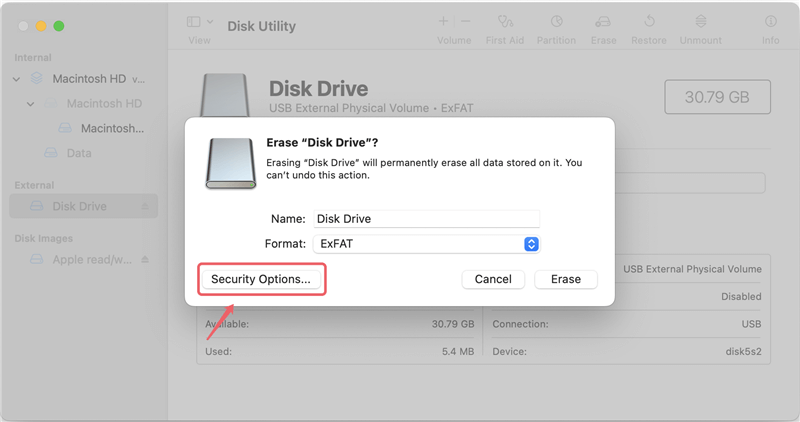
- Click the Erase button, and in the Erase dialog, click Security Options.
![how to format hard drive on PC and avoid data recovery]()
- Choose how securely you want to wipe the drive (the more passes, the more secure but the longer it takes).
![how to format hard drive on PC and avoid data recovery]()
- Click Erase to start the process.
Using Third-Party Software to Wipe a Hard Drive
If you want to make sure the data is securely wiped and no chance to recover the data in any way, it's highly suggest to wipe the hard drive with professional and third-party data wiping tools. With these tools, you can overwrite the hard drive multiple times. Also, these tools often use the internal data sanitation algorithms that can make sure the wiped data unrecoverable.
DoYourData Super Eraser is an excellent tool that can wipe the data from hard drive, SD card, USB flash drive or other devices. If you want to wipe your hard drive and make sure the data is gone forever, you can download and use this professional software.
DoYourData Super Eraser
- Best data erasure tool for hard drive, SSD, memory card, etc.
- Compatible with both Windows and macOS.
- Erase hard drive, free space, or specified files/folders.
To understand how to handle the software to wipe a hard drive smoothly, here we will show you the simple tutorial:
Step 1. Run the software and change to the Wipe Hard Drive mode. Select the drive you want to format and erased.

Step 2. Click Wipe Now button and then the tool will ask you to choose a data erasure standard to wipe the data from the drive.
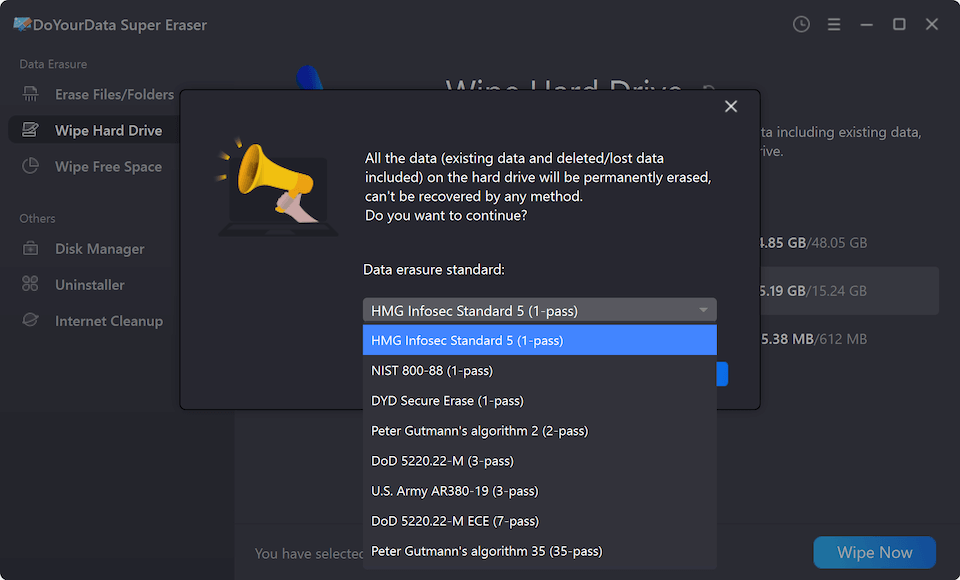
Step 3. At last, process the data wiping. It may take some time depending on the size of the drive and the algorithm you choose to wipe the data.
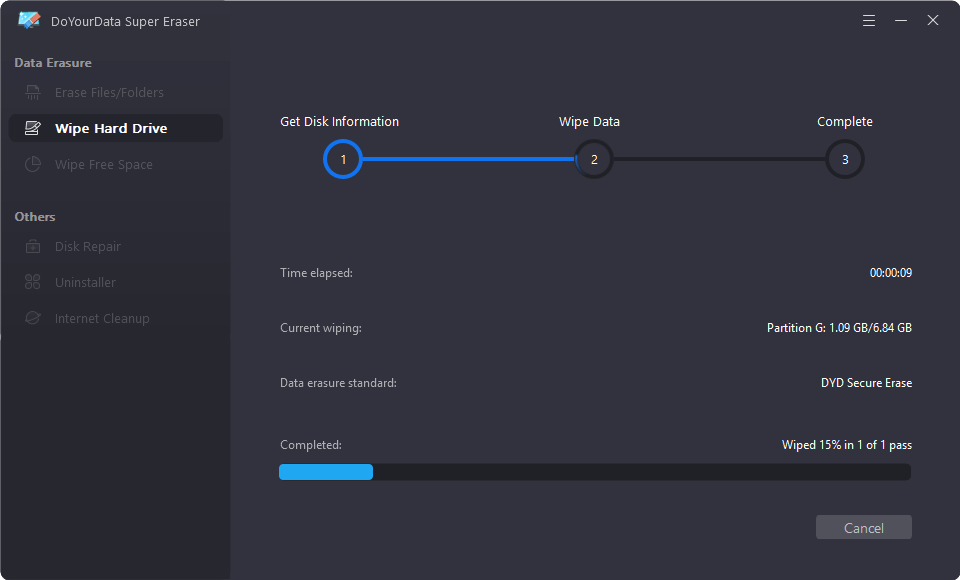
Once the wiping process is finished, the drive is reformatted and all data on the drive is gone for good, no software can recover the data. You can feel free to reuse it or transfer it to another hand.
Post-Process Considerations
After you've formatted or wiped your hard drive, there are a few things to keep in mind to ensure that your drive is ready for its next use or to confirm that your data has been securely erased.
Verifying the Wipe
- After wiping a drive, it's important to verify that all data has been completely erased. You can use specialized software like Do Your Data Recovery to scan the drive for any recoverable files. If nothing is found, you can be confident that the wipe was successful.
- For a more advanced check, you can use Hex Editor tools to manually inspect the drive's raw data. If the drive is truly wiped, you should see only zeros or random data.
Reusing the Drive
- If you plan to reuse the drive after formatting or wiping it, you may need to create new partitions. This can be done during the formatting process or afterward using tools like Disk Management (Windows), Disk Utility (macOS), or GParted (Linux).
- Once partitioned, the drive can be used to store data, or you can install a new operating system on it.
Conclusion
Formatting or wiping a hard drive is a critical process that can be done easily with the right knowledge and tools. Whether you're preparing to sell your computer, repurposing an old drive, or ensuring that sensitive data is securely erased, it's important to choose the method that best suits your needs.
By understanding the difference between formatting and wiping, preparing adequately, following the correct steps for your operating system, and taking post-process precautions, you can confidently manage your hard drives without worrying about data loss or security risks.
Remember, data security is an ongoing responsibility. Regularly backing up your data, securely wiping drives when they are no longer needed, and responsibly disposing of hardware are all essential practices in today's digital world. By following these steps, you can protect your information and maintain the integrity of your data across all your devices.
DoYourData Super Eraser
DoYourData Super Eraser, the award-winning data erasure software, offers certified data erasure standards including U.S. Army AR380-19, DoD 5220.22-M ECE to help you securely and permanently erase data from PC, Mac, HDD, SSD, USB drive, memory card or other device, make data be lost forever, unrecoverable!
