How to Create A Bootable Clone Backup for M2-chip Mac?
Create a bootable clone for macOS Ventura as a full backup and the cloned macOS can be used to boot up Mac in emergency cases. With the software DoYourClone for Mac, it's easy to create a bootable copy for macOS Ventura. The guide also introduce the steps to create a bootable USB installer for macOS Ventura.
![]() Updated by Darren on February 20, 2025
Updated by Darren on February 20, 2025
🎯 Summary: How to back up data on M2-chip Mac? That would be simple. Using disk utility, you can clone your M2 Mac's data to an external device. And more, you can download a disk cloning application to help you clone hard drive, create disk image and make a bootable clone backup for your M2 Mac such as M2 MacBook Air, M2 MacBook Pro, etc.
Quick Navigation:
- 1. Why should your M2 Mac be backed up?
- 2. How should your external drive be set up?
- 3. How do you use Time Machine to backup your Mac?
- 4. Create a bootable clone backup for M2 Mac using DoYourClone
- 5. Conclusion:
The significance of backing up your data cannot be overstated. On your new M2 Mac gadget (such as M2 MacBook Air, MacBook Pro), you'd have numerous significant data and papers stored. Unfortunately, data on the M2 Mac gadget might be lost if a tragedy strikes without warning.

When you have the chance to backup your data, it won't be justified to suffer these types of consequences. You may keep your data on an external hard drive by using a backup technique. If something causes data loss on your Mac, you may easily recover the lost information.
There are many different forms of backup, and why look elsewhere when you have a built-in utility in the form of a Time Machine?
For Mac users who want to back up their M2 Mac data, this is the ideal option. Additionally, Time Machine is undoubtedly the tool that makes backing up data the easiest; guess what?
Why should your M2 Mac be backed up?
- In order to prevent your data from being destroyed, backing up your Mac is thought to be a relatively effective method.
- You should backup your device for a variety of reasons. The list below includes some of the most important justifications for backing up your device. Since you won't be able to recover your data without a backup, backups let you secure your data from unforeseen data loss scenarios.
- Additionally, if your hard disk is destroyed, you will only be able to restore your data if a backup copy was made of it.
- After installing macOS, you might be able to restore your data using backups.
- Suppose your data is lost due to a catastrophic disk failure. Backups will come to your aid in that situation by retrieving your lost data.
- Via backups, you may retrieve old versions of files and documents.
Make sure the hard drive you're generating the backup on has enough capacity before choosing to utilize Time Machine to back up your hard drive.
It wouldn't be a good idea to set aside a major hard disk partition just to back up the data. Your major goal should be to safeguard your data from unforeseen data loss. Your goal won't be achieved if you create the backup on the same device where you kept the original data.
Consequently, you have to select a USB-attached hard disk. Only when you typically generate the backup will you need to connect the hard disk to your computer. After you've finished backing up your data, you may remove the USB hard drive.
But let's say you wish to activate the automatic backup. In such situation, you'll need to connect the USB hard drive constantly so that it can automatically back up your data.
How should your external drive be set up?
You must initially prepare the external hard disk if you wish to backup the data on your M2 Mac to it. You must make sure that the hard disk has enough capacity for any necessary data backups. You must also make sure that the hard disk has the proper format.
You can format the hard drive first if the format is not proper. Note that the formatting process will remove the files on the drive. If there are important files, ensure to back up or move to another place first. To format the hard disk so that Mac OS will recognize it, go to the instructions below.
Step 1: First, you must attach the external hard drive to the M2 Mac.
Step 2: Navigate to Launchpad and Disk Utility in step two. Then, from the main interface, pick your external hard drive.
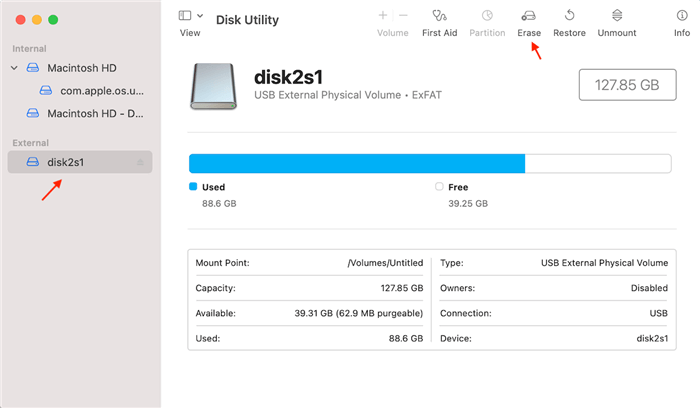
Step 3: After clicking the Erase option, you must input your drive's name and pick the format. You should thus choose the APFS or Mac OS Extended format. We recommend APFS file system.
Once you've confirmed the action by tapping the Erase button, you'll need to press the Done icon to finish it.
After formatting the external hard drive with a proper file system, you can then use it to hold backup data from M2-chip Mac.
How do you use Time Machine to backup your Mac?
You must begin backing up M2 Mac using Time Machine after making sure the external hard drive is compatible with macOS and has enough storage.
The procedure to backup your data is outlined here.
Step 1: Connect your Mac to the external hard drive.

Step 2: The Mac will prompt you to choose whether to utilize the hard drive to back up your data using Time Machine once you connect the storage device. It is advised that you choose to encrypt your backup. The next step is to choose Use as Backup Disk.
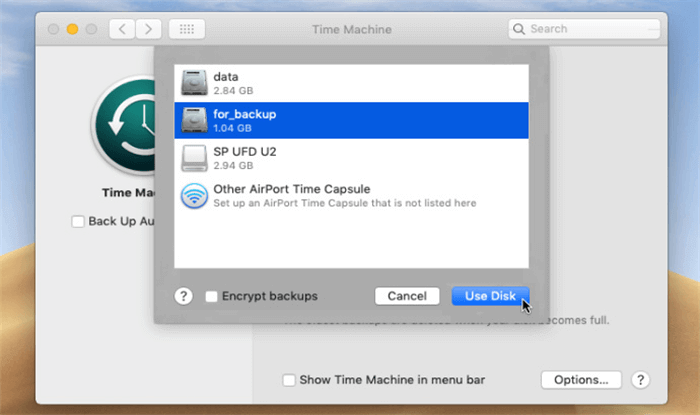
Let's say your Mac doesn't instantly identify your hard disk. If so, you may access Time Machine options and manually attach the drive.
Step 3: Time Machine will start producing a backup when you choose the drive. The length of the operation will depend on how many files you choose to backup.
When you're finished, you may use the external hard drive to backup your important files.
Create a bootable clone backup for M2 Mac using DoYourClone
DoYourClone for Mac is a powerful, safe and easy-to-use disk cloning application. If you want to make a full clone backup for your M2 Macs, this software is a good choice.
DoYourClone for Mac
- Create a bootable clone backup for M2 Mac.
- Clone any type of hard drive or device on M2 Mac.
- Create disk image for M2 Mac.
The software is easy to use with simple interface. It's not hard to handle and create disk copy with DoYourClone for Mac. Also, the professional quality can ensure the software to create bootable copy of M2-chip or any other Mac machines.
First, download the software and install it on your Mac. Then you can follow the steps below to create a bootable clone backup for M2-chip Mac:
Step 1. Opoen DoYourClone for Mac on your M2 Mac and connect an external hard drive to the M2 Mac. Choose Clone OS mode, select the external hard drive as the destination drive.
📍 Note: Ensure to use an empty external hard drive for cloning as the process will overwrite the external drive.
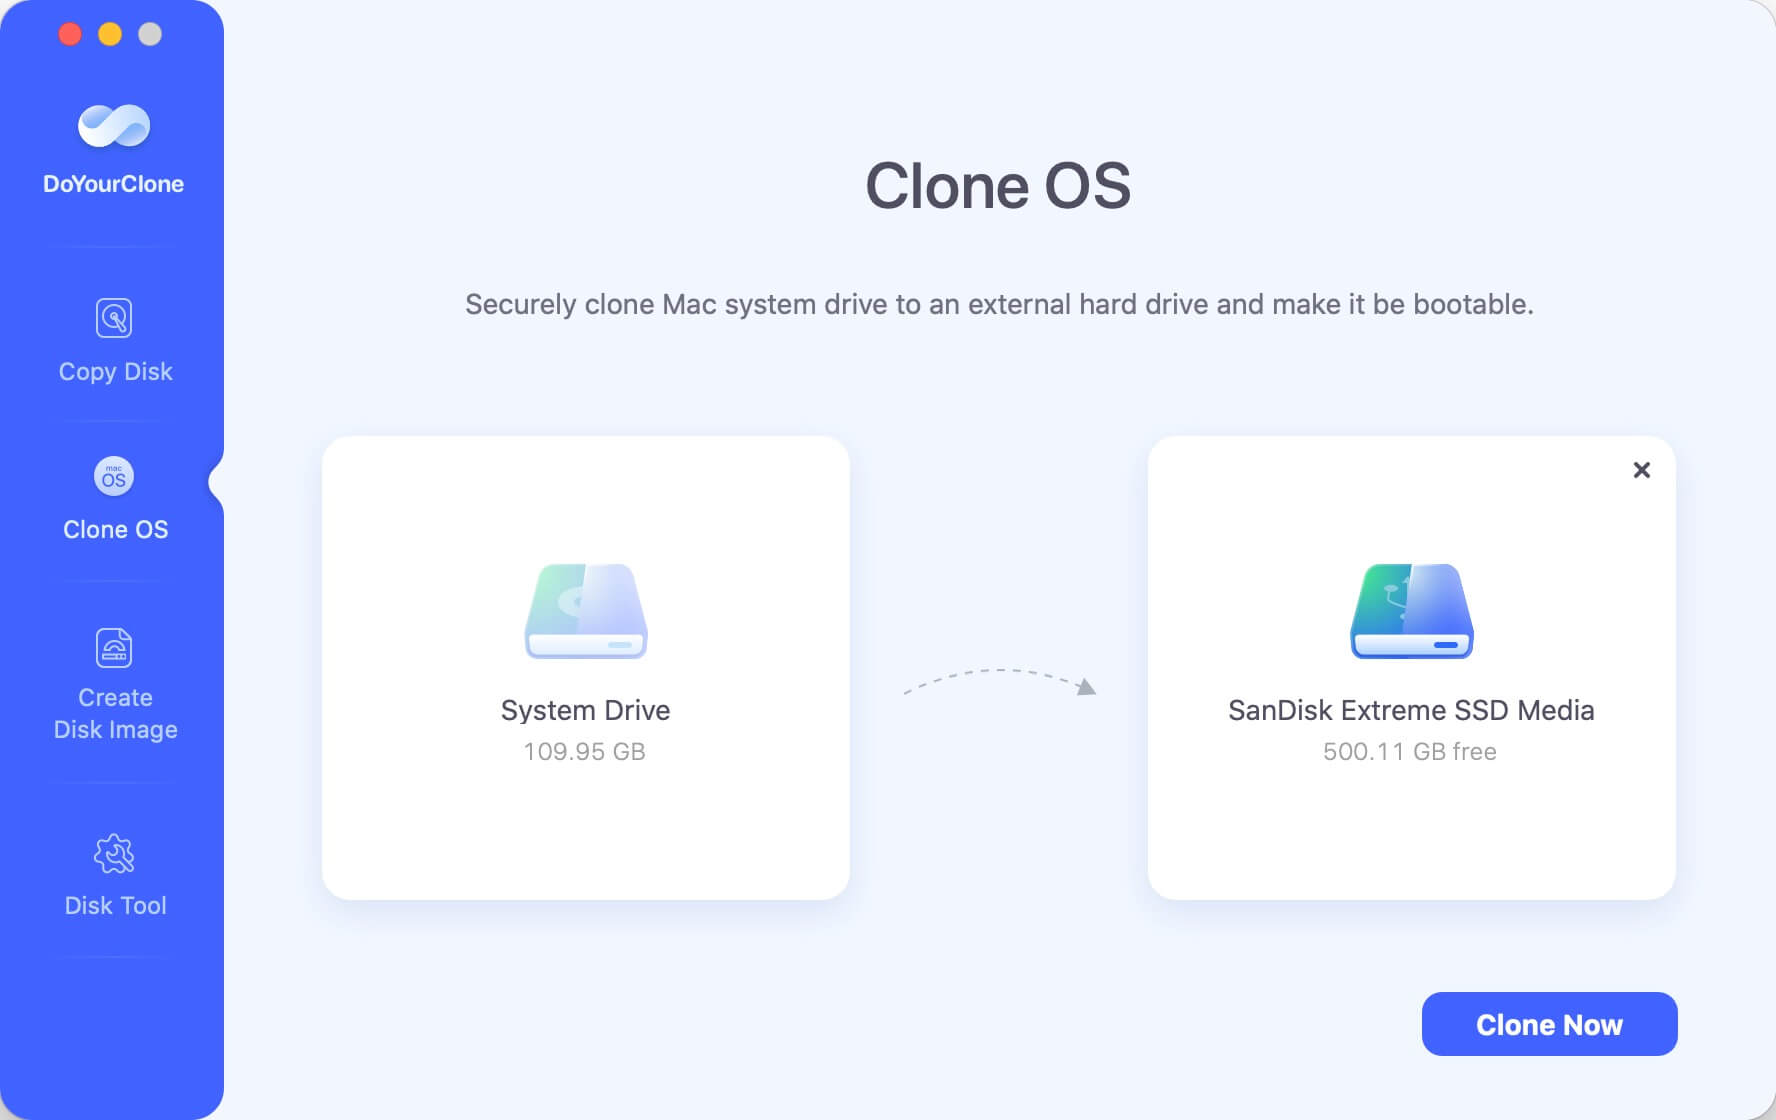
Step 2. Click on Clone Now button to securely clone all data from the M2 Mac's startup disk to the external hard drive.

All data including macOS data, user files, settings, apps and other files will be cloned to the external hard drive. Once the process gets finished, you can use the external hard drive as a backup drive or a bootable disk.
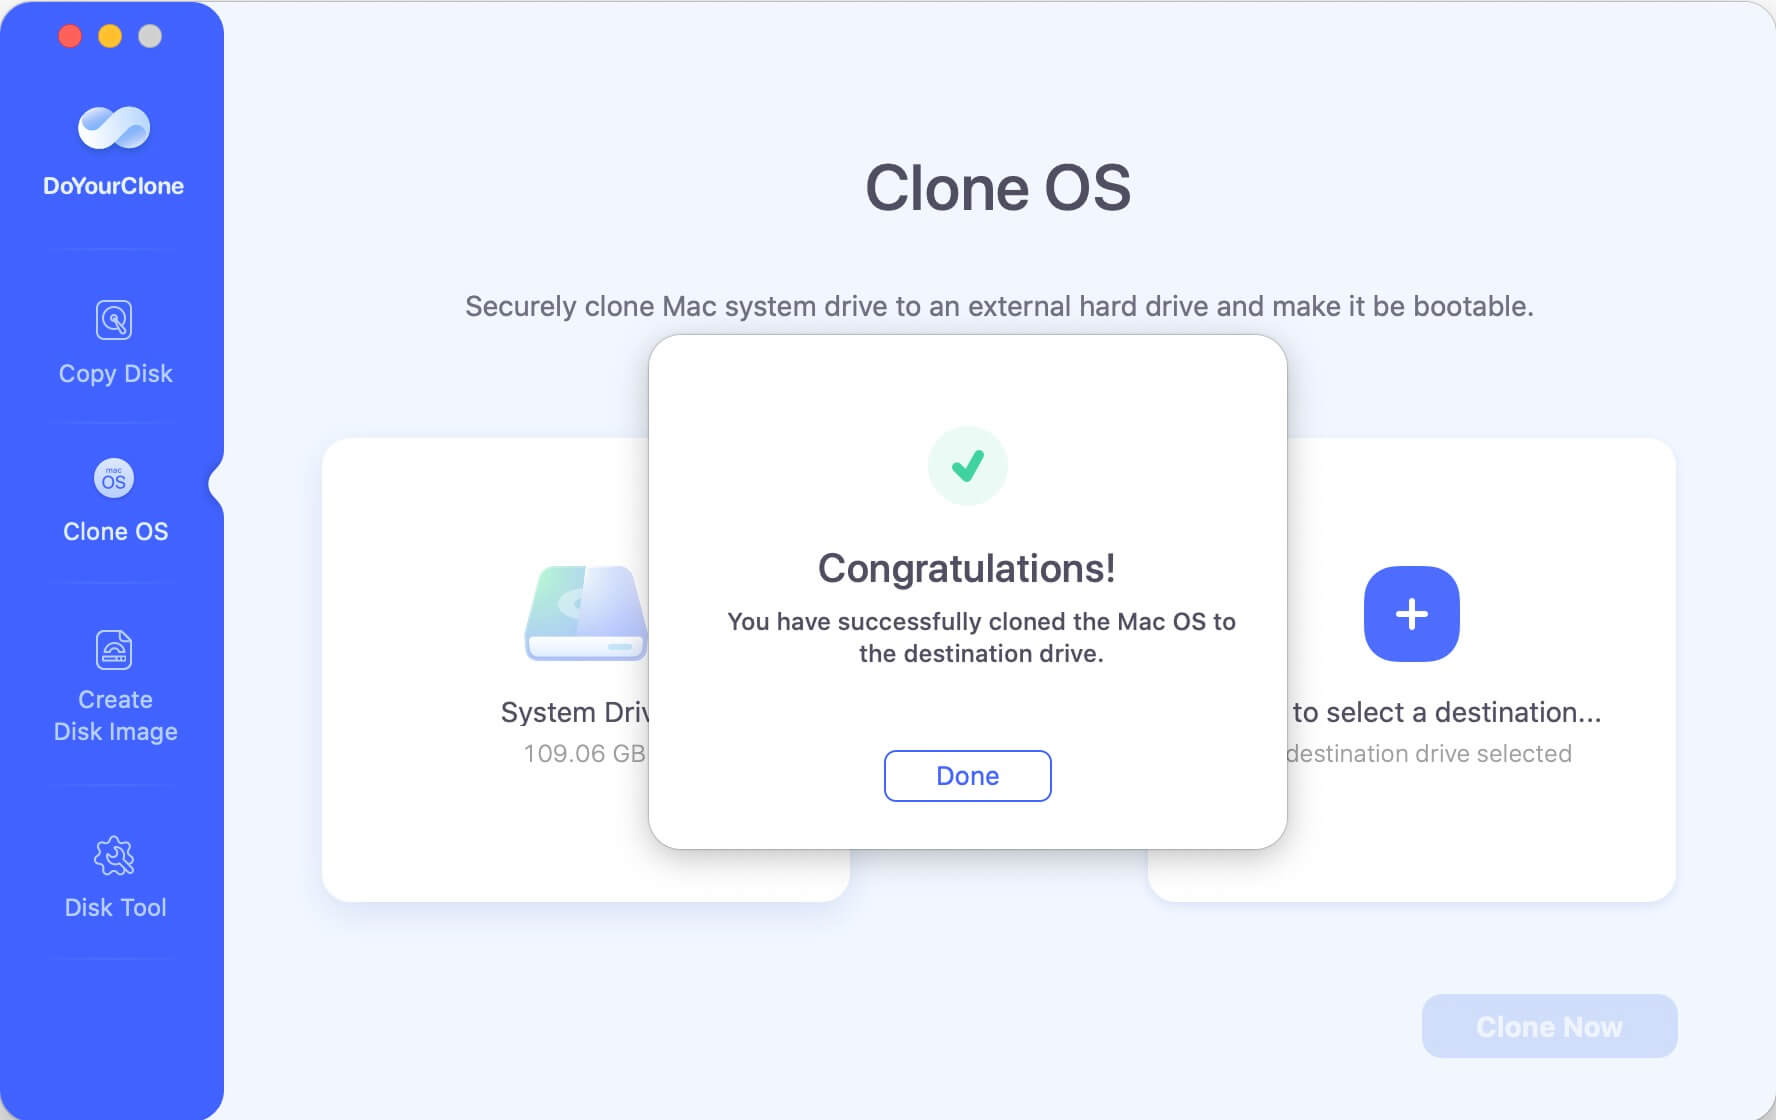
You can also verify if the cloned external hard drive is bootable after cloning with the software. First, reboot the Mac and immediately press an hold Power key when the Mac is booting. Release the key until you see the startup disk list. Choose the cloned external hard drive and boot from it. If it's cloned successfully, the Mac will sure to boot normally from the drive.
DoYourClone for Mac also can help you clone hard drive, upgrade disk or create disk image on Apple Silicon Mac or Intel-based Mac.
📍 Note: If you lose important data on M2 Mac and don't have a backup, you can try Mac data recovery software to quickly get lost files back. Check this guide: M2 chip Mac data recovery >>
Conclusion:
Creating bootable backup for M2-chip or any other Mac is necessary to keep a safe copy of macOS and data. By cloning the entire system drive on Mac, it's able to create a full and bootable backup for the macOS.
With macOS built-in tool Time Machine or the third-party disk cloning software DoYourClone for Mac, it's easy to create bootable and complete backup for M2-chip Mac or other Mac machines by following this guide.
DoYourClone for Mac
DoYourClone for Mac, one of the best Mac disk cloning software, can help you clone HDD, SSD, external storage device on Mac, upgrade HDD to SSD, create full disk image backup, etc. It also can clone everything from your Mac to an external HDD/SSD and create a full bootable clone backup. 100% safe and easy-to-use.
Written & Updated by Darren
Darren is an senior editor at DoYourData. Since 2021, Darren has written 100+ articles about data recovery, Mac file recovery, disk management, disk clone, computer issue fixes, etc. He helps lost of users to recover important data, get the reliable data backup solution, find optimization for PCs and Macs.