Quick Navigation:
- Understanding NTFS and macOS Compatibility
- How to Enable Writable Access to Fully Use NTFS on macOS Sequoia?
- Method 1: Using Third-Party Software
- Method 2. ReFormat the NTFS drive
- Method 3. Enable NTFS writable access using Terminal
- Considerations and Best Practices
- Conclusion
- FAQs About Fully Use for NTFS Drive on macOS Sequoia
It can be hard to figure out which file systems work with each other, especially for macOS users who use want to use NTFS drives. Like earlier versions, macOS Sequoia can read NTFS files but not write to them natively, which can be unpleasant for people who switch between Windows and macOS.
You need to be able to write to NTFS drives on macOS if you want to move files or manage data between systems. There are, thankfully, a number of ways to get around this, ranging from third-party tools to Terminal commands. In order to fully use NTFS drive on macOS Sequoia, this guide will show you the best ways to proceed.
Understanding NTFS and macOS Compatibility
You need to know why NTFS isn't fully compatible with macOS before you can look at the options. Microsoft made the NTFS (New Technology File System) for Windows. It has protection for files at the file level, compression, and support for large files.
The HFS+ and APFS file systems, on the other hand, are designed for Apple's ecosystem and are used by macOS. Because of this, macOS can read NTFS files but not write to them, which keeps data from getting corrupted and keeps the system stable.
In such a case, it's not able to fully use NTFS drive on macOS Sequoia without writable access. You can read NTFS drive files or copy data from NTFS drive without problem.
How to Enable Writable Access to Fully Use NTFS on macOS Sequoia?
There are several methods that can help you get full performance of NTS drive on macOS Sequoia. For instance, you can use third-party software to do the job quickly and easily. If you are familiar with command line, Terminal is a free method to do the job. Now we will introduce some reliable methods in detail.
Method 1: Using Third-Party Software
Third-party software is one of the best ways to give macOS Sequoia full read and write access to NTFS drives. Several trustworthy programs make it easy for macOS users to read from and write to NTFS drives.
There are many types of Microsoft NTFS for Mac tools on the market, and all of them claim to be professional. However, they are very different in how well they work, how safe they are, how much they cost, and other ways.
DoYourData NTFS for Mac stands out from the rest. This NTFS mounter, which Apple recommends, is easy to use. As soon as you install it on your Mac, it can mount and enable any NTFS external hard drives, USB drives, or other storage devices that are connected in full read-write mode. You can get DoYourData NTFS for Mac for free and put it on your Mac.
After installing the software, you can then quickly enable the writable access with only a few clicks:
Step 1. Plug in the NTFS drive to the Mac and start up this NTFS for Mac application.
Step 2. Select the NTFS drive in the left side, then click the Enable Writable button. You can then get to the NTFS drive to read and write.

Method 2: ReFormat the NTFS drive
If you don't want to use additional tool or software to enable writable access to the hard drive on Mac, maybe the easiest thing to do is to reformat the drive with a different file system. But this will delete everything on the drive, so make sure you back up any important things first.
1. Reformatting to exFAT
exFAT is a cross-platform file system that works with both macOS and Windows. If you need to be able to use your files on both, this is the best option.
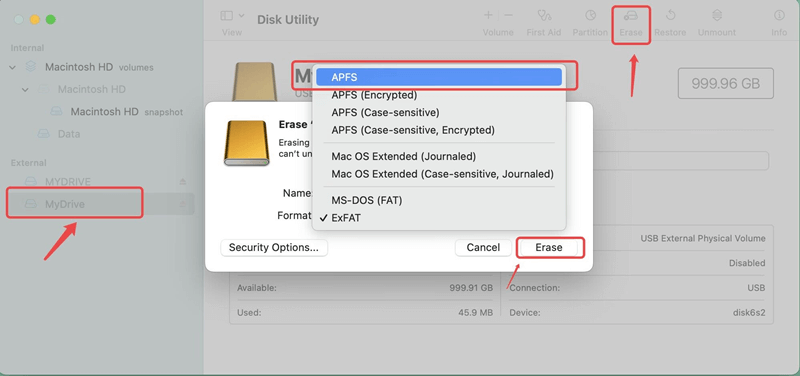
Step 1: Go to Applications > Utilities and open Disk Utility.
Step 2: From the list on the left, pick the NTFS drive.
Step 3: At the top of the box, click Erase.
Step 4: Choose "exFAT" from the Format drop-down box.
Step 5: To format the drive, click on Erase button.

Then it will format the hard drive to exFAT. You can also format the hard drive to exFAT on Windows in Disk Management. Then you can read and write to the drive in both Windows and macOS Sequoia or other Mac machines.
2. Reformatting to APFS
APFS, or Apple File System, is designed to work best with macOS and offers benefits such as better data security, speed, and space efficiency. It is a good choice if you only use the drive with MacOS.
Follow the same steps as before, but this time, choose "APFS" from the Format drop-down box.
After reformatting, the drive will work perfectly with macOS Sequoia, but Windows computers will not be able to read it without extra software.
Method 3: Enable NTFS writable access using Terminal
If you are a skilled user and familiar with the command line, you can try to enable the NTFS writable access natively with commands in Terminal. Here's how:
Step 1. Open Finder, click Applications > Utilities > Terminal.
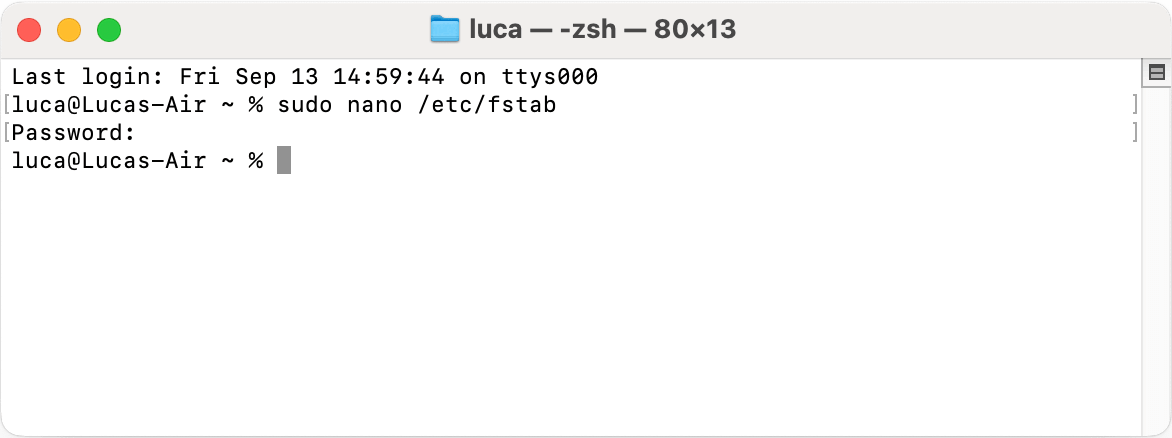
Step 2. Open the file /etc/fstab with nano editor using the following command:
sudo nano /etc/fstab
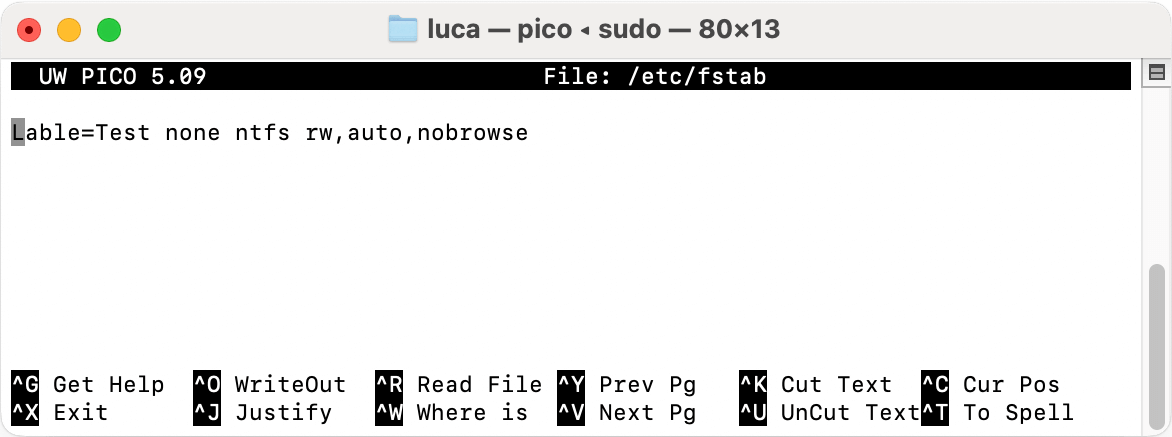
Step 3. Enter the following command in the file:
Lable=Test none ntfs rw,auto,nobrowse
Ensure to replace the Test to the lable (or name) of your own NTFS drive. After that, click Control + X keys to save it. Then you can go to NTFS drive and check if you can write data to it.
Considerations and Best Practices
It's important to think about the pros and cons of each way when working with NTFS drives on macOS. Here are some best practices to keep things running smoothly and keep your info safe:
- ♾️ Back-Up Data Regularly: No matter what method you use, back up your important files before you change the file system on your drive or install new software.
- 🕵️ Monitor Performance: Performance may be affected in some ways, especially for those using third-party drivers or experimental features. Test your setup to make sure that it works without slowing it down or making it less reliable.
- 🔄 Stay Updated: If you use third-party tools, drivers, or features of macOS, keep your software up to date. Updates usually fix bugs and add new features that make things work better and are compatible with other programs.
- 🛠️ Avoid Critical Operations: Do not do important things on NTFS drives if you are using experimental or less stable ways. If you don't want to lose important info, use them for less important data.
- 👨🔧 Consider Reformatting for Simplicity: Reformatting to a native file system can save you time, run with full performance, and make problems less likely if all you need is support with macOS.
Conclusion:
If you do things the right way, using an NTFS drive on macOS Sequoia should be easy. There are many ways to get around macOS's limits, such as using advanced methods to allow write access or reformatting the drive to make it work with more systems. There are pros and cons to each choice, so think about your wants and how important it is to keep your data safe before making your decision.
By following the steps in this guide, you'll be able to handle NTFS drives on macOS Sequoia without any problems. It will make it easier to move files between platforms and work with them.
FAQs About Fully Use for NTFS Drive on macOS Sequoia
1. How to make NTFS writable on macOS Sequoia?
To make NTFS writable on macOS Sequoia quickly and easily, you can use the software DoYourData NTFS for Mac, the do as follows to enable writable access:
- Connect the NTFS drive to macOS Sequoia machine.
- Launch the software and select the NTFS drive.
- Click on Enable Writable button.
2. Top 5 NTFS for Mac software
- DoYourData NTFS for Mac
- Paragon NTFS for Mac
- Tuxera NTFS for Mac
- Donemax NTFS for Mac
- Mounty NTFS for Mac
3. Alternative approaches for NTFS write access.
Besides the ones already stated, there are other ways to get NTFS write access that won't put your data at risk or damage its integrity. These options are:
- 🛜 Network sharing: You can share files between macOS and Windows computers over the network if you have a Windows PC. With this method, you don't have to reset the drive or add any extra software to your Mac.
- ☁️ Cloud storage: Managing files on different platforms can also be easier if you use cloud storage services like Google Drive, Dropbox, or OneDrive. This method completely eliminates file system compatibility problems, but it might not work for big files or private information.
- ➿ Dual-boot systems: If you frequently use both macOS and Windows, you might want to set up a dual-boot machine with virtualization software or Boot Camp. This lets you run Windows directly on your Mac, with full NTFS support that doesn't require extra setup.
DoYourData NTFS for Mac
DoYourData NTFS for Mac is a safe, powerful and easy-to-use NTFS for Mac tool. It allows macOS to read & write files on NTFS drives without any limitation. It is also a comprehensive disk management tool for Mac to mount/unmount disk, format disk, repair disk, read-write disk...on Mac.
Hot Articles
- Fix External Hard Drive Read-Only Issue on Mac
- How to Wipe Trash Bin on Mac?
- Recover Lost Data from WD (Western Digital) External Hard Drive on Mac
- Fix External Hard Drive Not Showing Up on Mac
- How to Wipe SD Card on Mac?
- Mount and Unmount the External Hard Drive on the Mac
- Run First Aid on Mac to Repair Disks
- Fix Can't Save Files to An External Hard Drive on Mac
- (Solved) External SSD Not Detected in Disk Utility on Mac
- Why Can't Format A Hard Drive To NTFS on Mac? Can We Fix It?