Quick Navigation:
- Understanding File Deletion
- Built-in Tools for File Shredding from USB Drive on Mac
- Third-Party Tool for Shredding Files from USB Drive on Mac
- Additional Considerations
- Conclusion
Data safety is more important than ever in this modern world. Whether selling or giving away your USB drive, permanently shredding files is important, or you want to ensure that private information can't be recovered. Even if you delete files normally, they can be recovered with special data recovery software.
This guide will show you how to use built-in tools and third-party apps to delete files from a USB drive on a Mac permanently. You will learn everything you need to know about deleting files, from the basics to advanced methods and best practices, to ensure that all your data is safely and completely gone. To keep your private data safe, you must first know how to delete files correctly and permanently.
Understanding File Deletion
It takes a while for a file to disappear after you delete it from a USB drive. Instead, the system marks the place in the file as free for new information. Data recovery software can still return the original file until new data overwrites the old data. But shredding replaces the file with random data, making it impossible to return.
Why Permanent Deletion Matters?
Before we talk about the ways to do it, it's important to know why permanent elimination is important:
- Sensitive Data Protection: The strictest protection is needed for personal data, financial records, and business data that must be kept secret.
- Preventing Data Recovery: Some data recovery tools can retrieve deleted files even after formatting the drive.
- Regulations: Many fields have strict data protection rules requiring safe data deletion.
Built-in Tools for File Shredding from USB Drive on Mac
There are some macOS built-in utilities which can be used to erase data from USB drive on Mac. These tools are free to use for Mac users. However, if you want advanced data wiping solutions due to higher security level requirements, you can use the third-party and professional data erasure tools instead. Here we will introduce the system built-in utilities first.
1. Disk Utility
With Disk Utility, you can safely erase a whole USB drive. That is helpful if you want to ensure all the data on the USB drive is gone for good.
How to use Disk Utility to erase a USB drive safely:
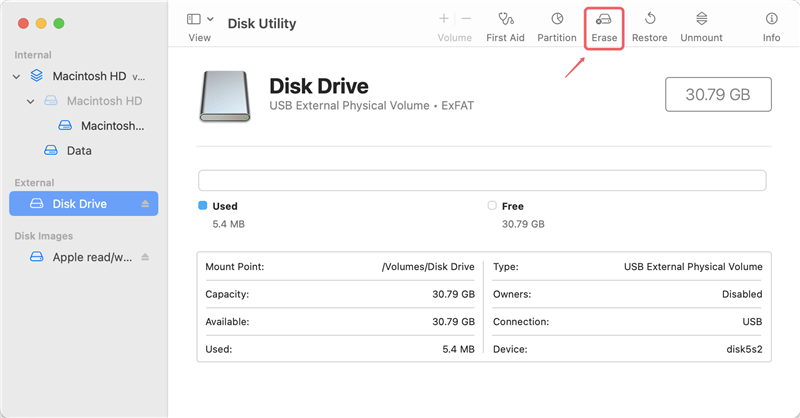
- Open Disk Utility: Go to "Applications" > "Utilities" > "Disk Utility".
![shred files from USB drive on Mac]()
- Select the USB Drive: Pick out the USB drive you want to delete from the list of drives. Press the "Erase" button.
![shred files from USB drive on Mac]()
- Select File System: If you want, you can change the files system to a different one, such as APFS, exFAT. Otherwise, you can just keep the same as it was.
![shred files from USB drive on Mac]()
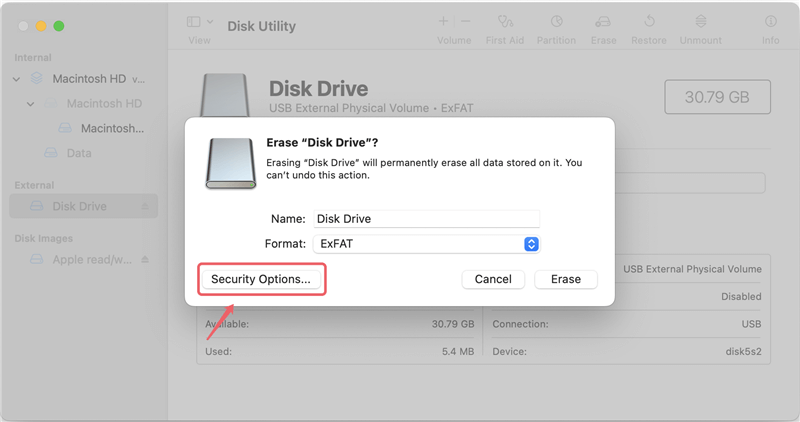
- Security Options: Click "Security Options" and pick the amount of deleted security you want.
![shred files from USB drive on Mac]()
The "Most Secure" choice erases the data seven times and it will take more time to finish.
💡 Note: If you choose "Fastest" in Security Options, it will just format the drive but not overwrite the data on the USB drive.
![shred files from USB drive on Mac]()
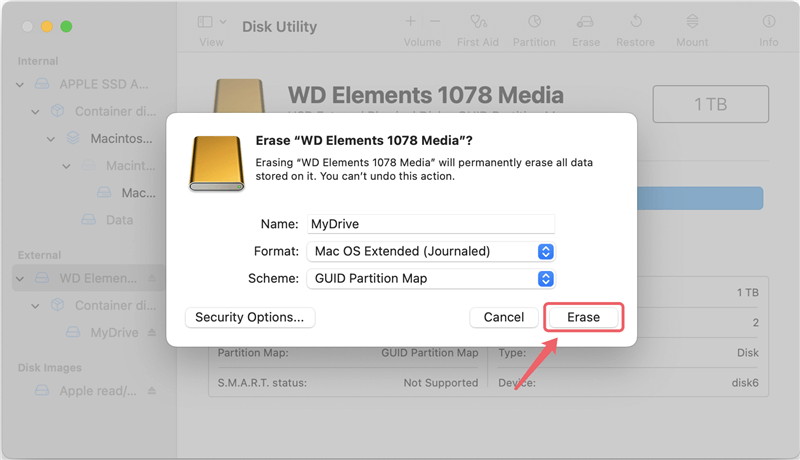
- Erase: Press "Erase" to start the erasing.
![shred files from USB drive on Mac]()
After it's done, you can then check if the data is wiped permanently by scanning the USB drive with a data recovery software, like Do Your Data Recovery for Mac.
2. Terminal
For the customers who are familiar with commands, Terminal is also a good choice to wipe USB drive data on Mac. However, it's necessary to be careful when using this tool and avoid choosing a wrong drive to erase. Here are the steps:
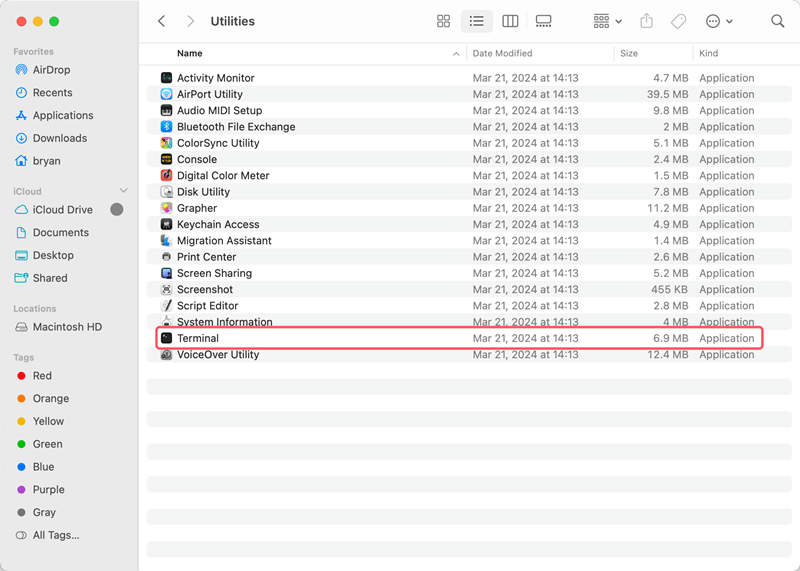
- Start Terminal: Open "Finder" and find "Applications", then "Utilities" folder, open "Terminal".
![shred files from USB drive on Mac]()
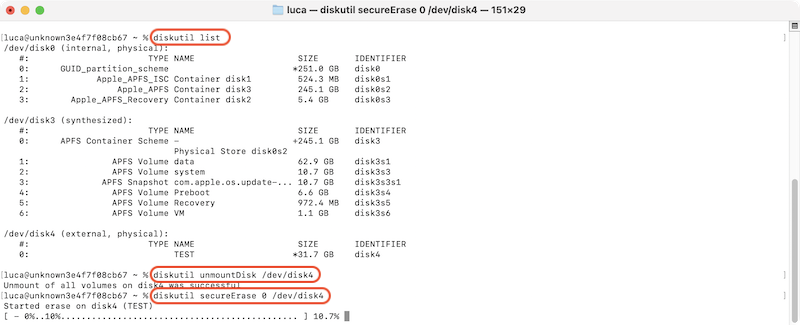
- List the connected drives: Enter the command to list drives: diskutil list
- Locate and unmount the USB drive: Check and find the disk information for your USB drive. Unmount the drive before you erase data from it: diskutil unmountDisk /device/diskX (replace X with the right disk number of USB drive which you want to erase)
- Secure erase the drive: To erase the drive data, using the following command: diskutil secureEraser 0 /device/diskX (the number 0 can be replaced with 1, 2, 3, 4 for more secure wiping)
![shred files from USB drive on Mac]()
Third-Party Tool for Shredding Files from USB Drive on Mac:
Using Disk Utility and Terminal is no longer considered safe. Modern devices have wear-leveling, block-sparing, and possibly-persistent cache hardware, which cannot be completely erased by these methods and commands. The modern solution for quickly and securely erasing your data is using a reliable data erasure software.
A solid disk management tool is the safest way to erase a USB flash drive. With DoYourData Erasure for Mac, you can delete data from an external hard drive easily, preventing information from being lost or recovered.
DoYourData Super Eraser for Mac
- Most effective data erasure tool for macOS.
- Permanently shred files from USB drive and avoid recovery.
- Data erasure for SSD, HDD, Pen drive, SD card, etc.
It's easy to get DoYourData Super Eraser for Mac and install it on your Mac. Then, connect your hard drive to your Mac. You can now use the software to delete things from your USB external hard drive. When you open DoYourData Super Eraser for Mac, you'll see that it gives you three ways to delete files from USB drive.
Shred individual files from USB drive
To shred specified files, you can use "Erase Files/Folders" option. Here are the steps:
Step 1. Run the software and select Erase Files/Folders mode. With this mode, you can only select individual files or folders to remove permanently without affecting the other files on the USB Drive.
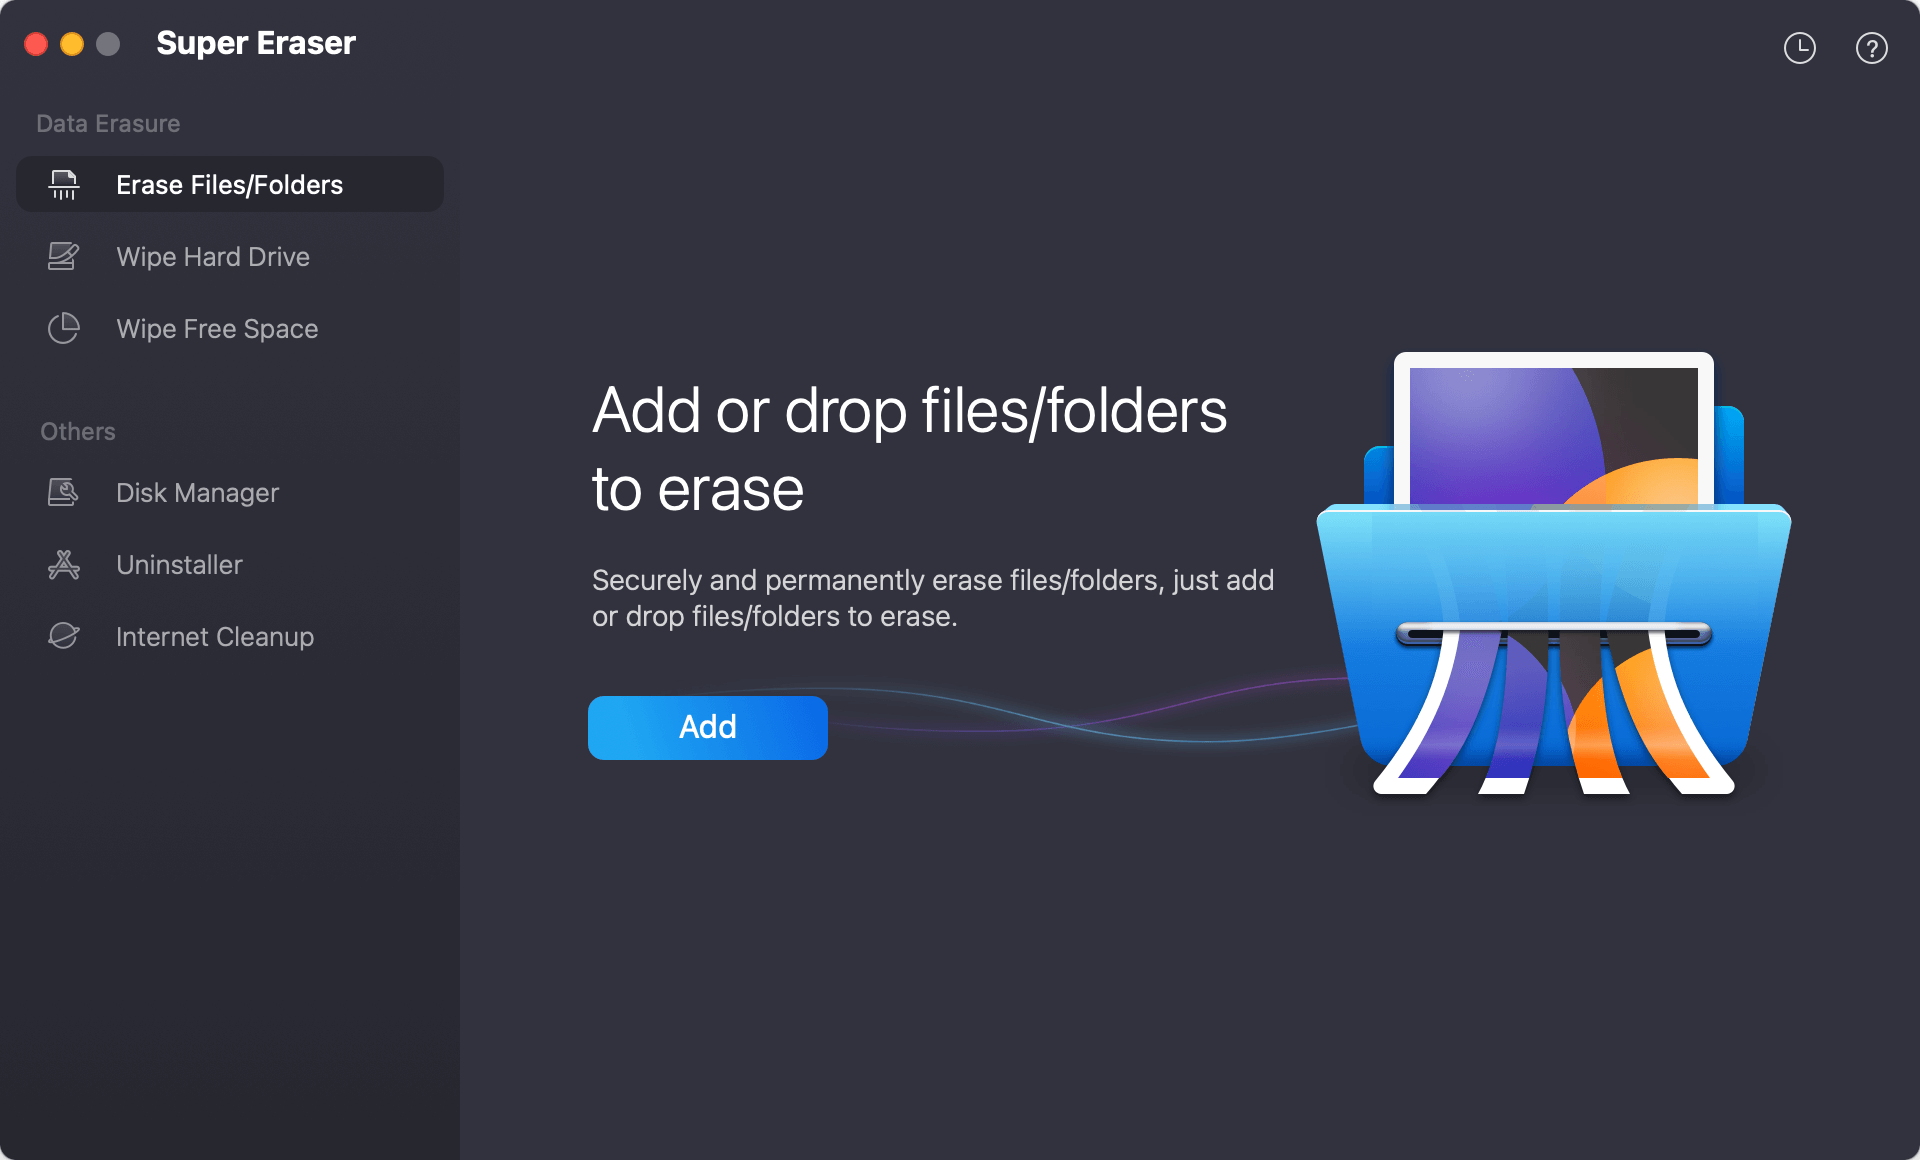
Step 2. Click Add button and select the files or folders you want to shred. You can also drag the files/folder to the software to add them to the list.
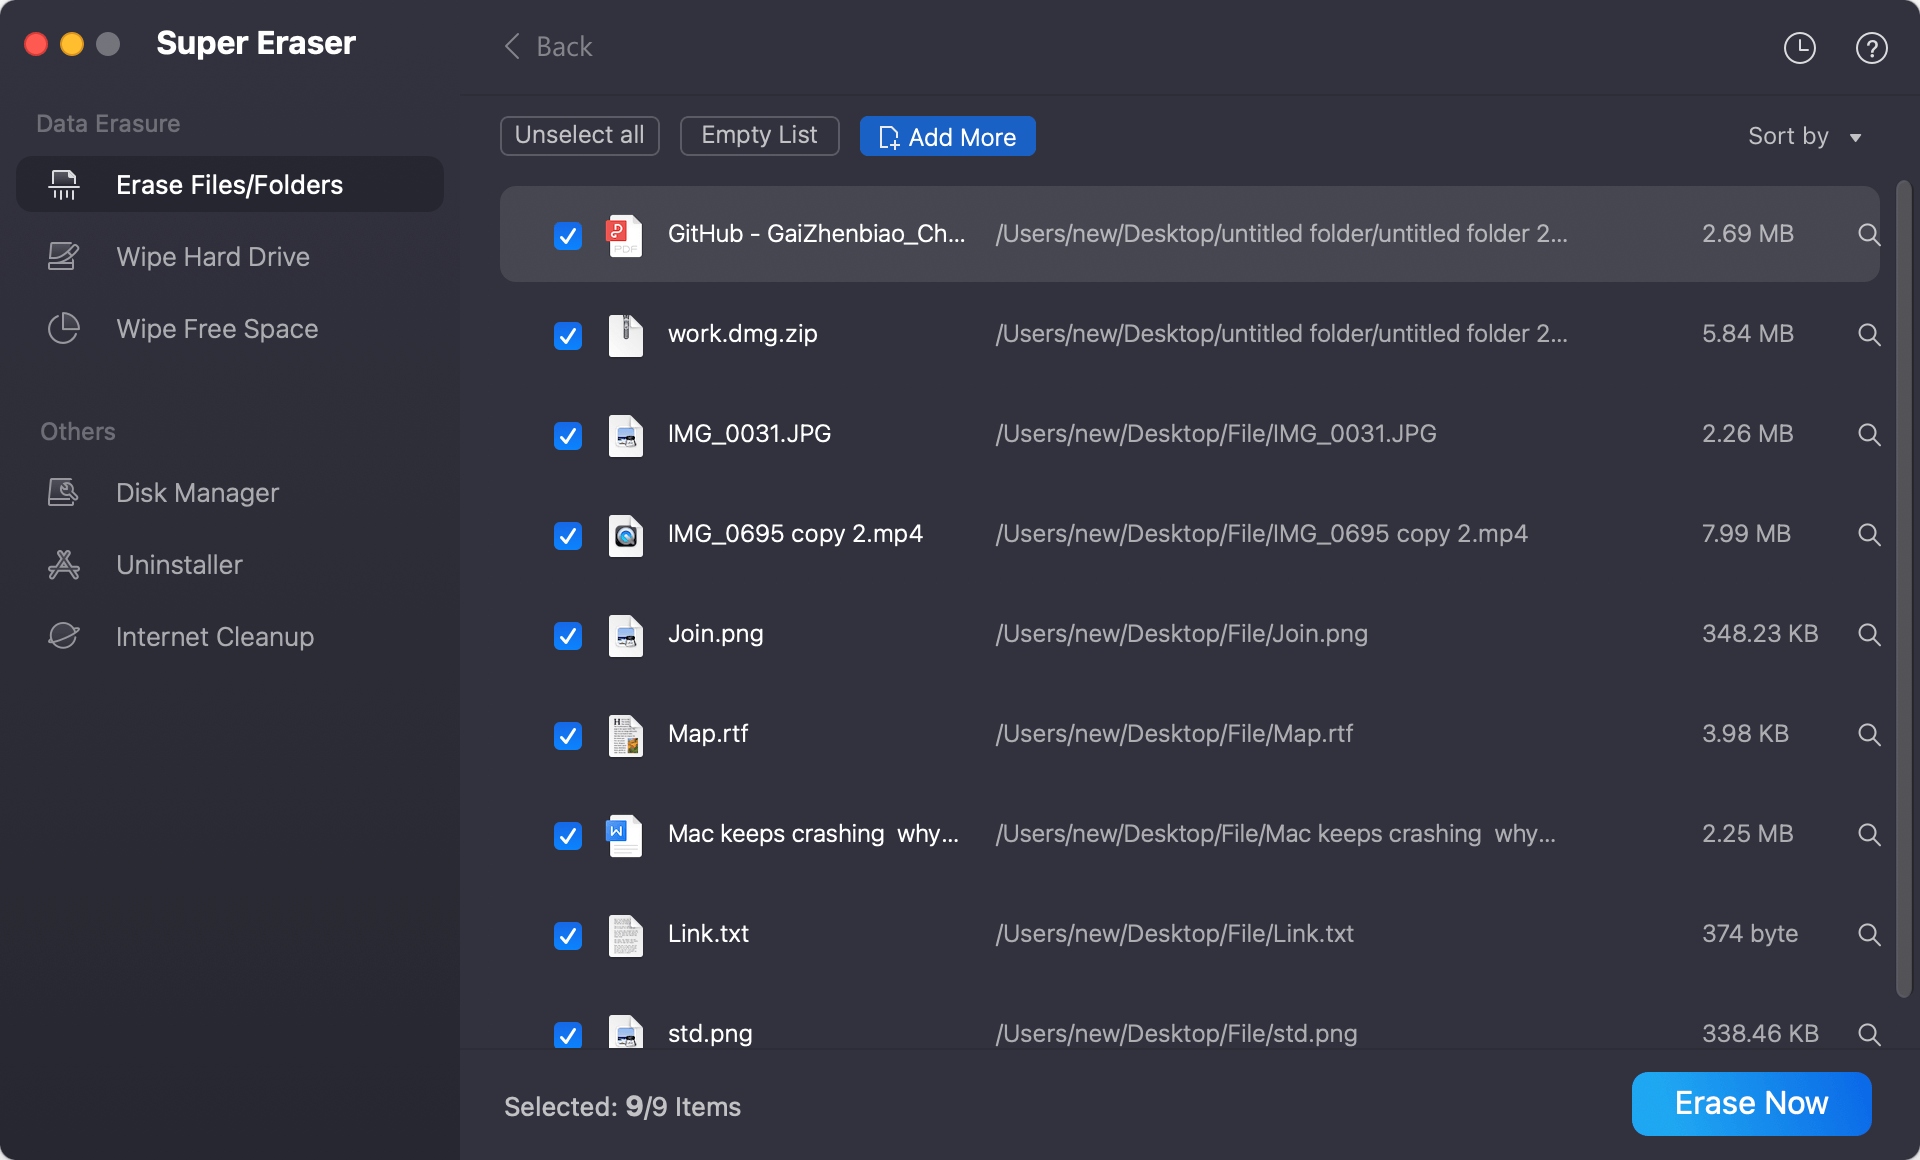
Step 3. After confirming all the right files/folder are selected, click Erase Now button to continue. Then you will be asked to select a data sanitation algorithm to shred the files completely.
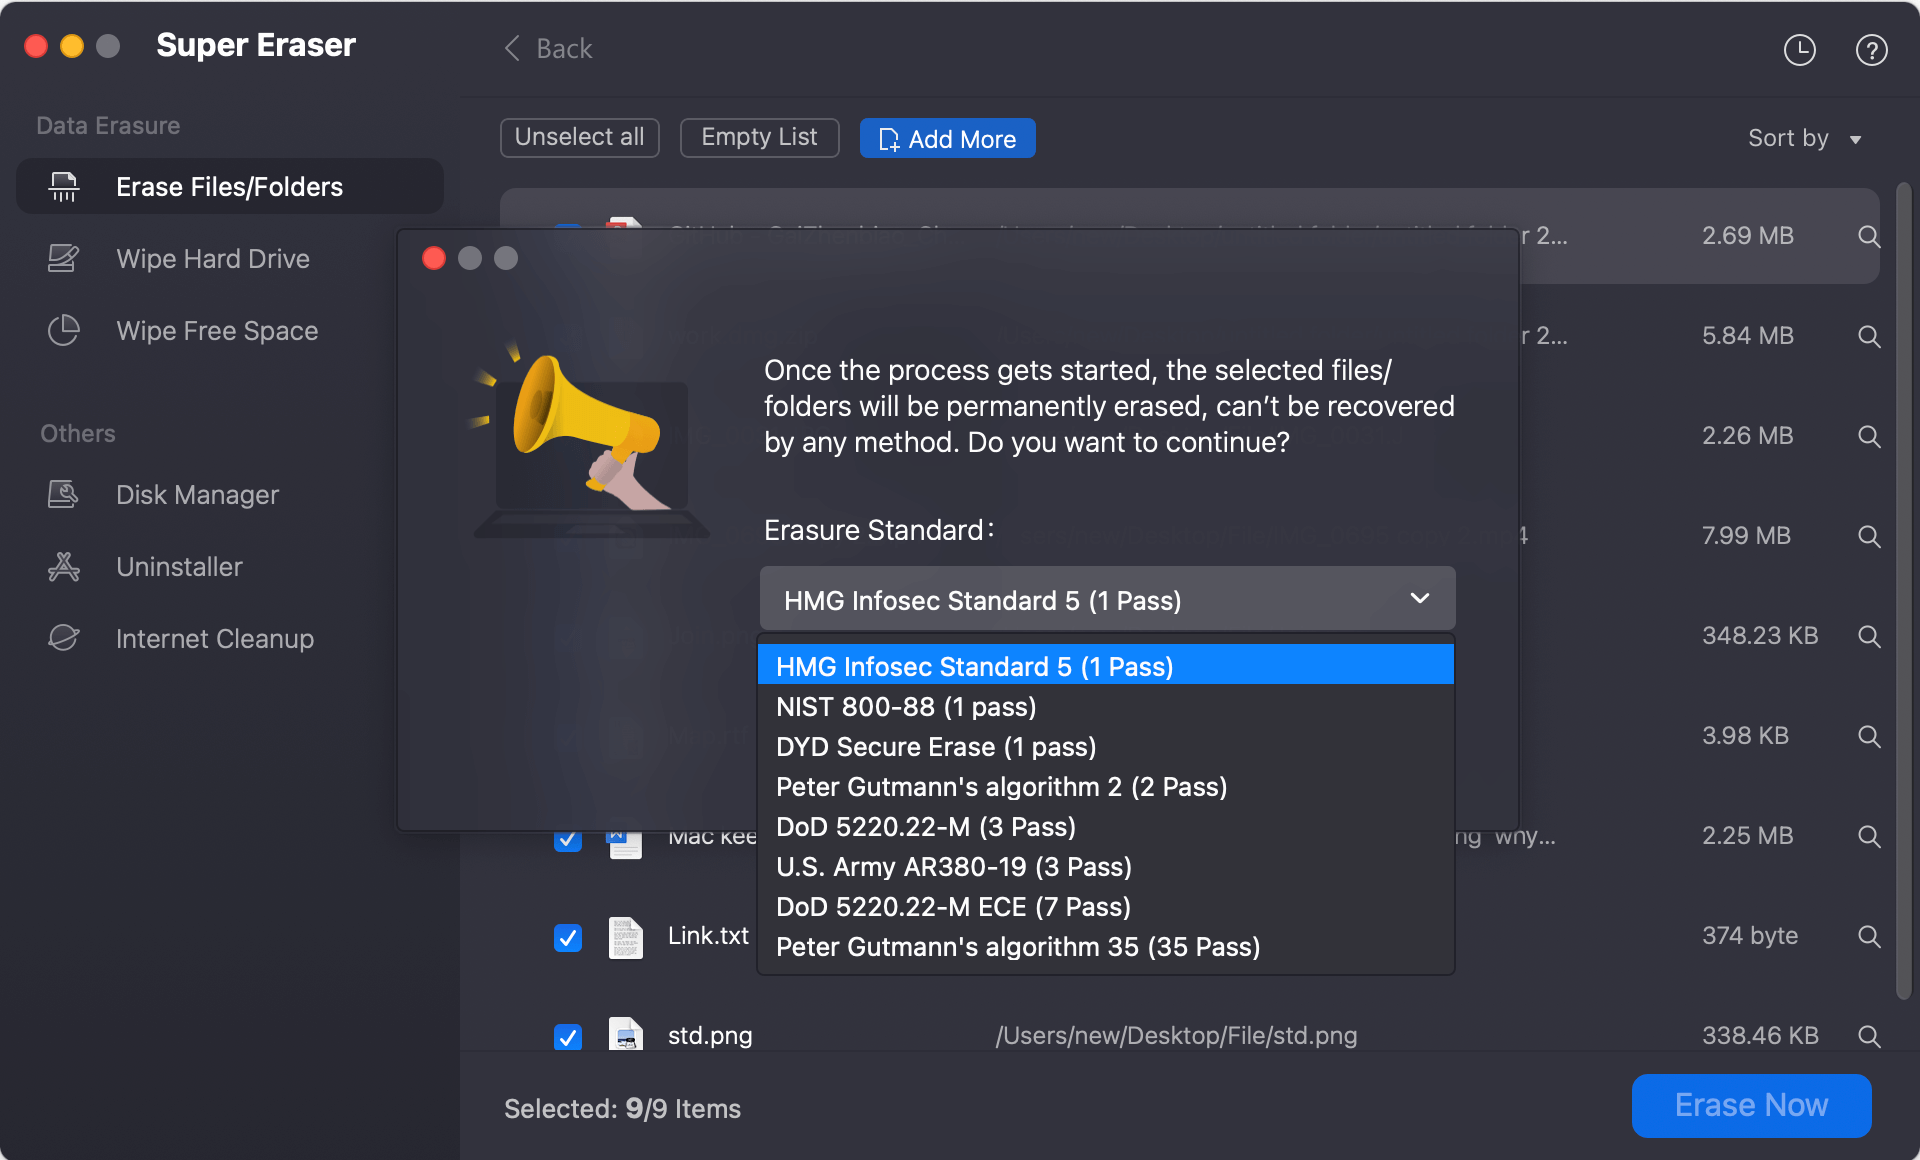
Step 4. Click the Continue button and the software will start to shred all the selected files in the list.
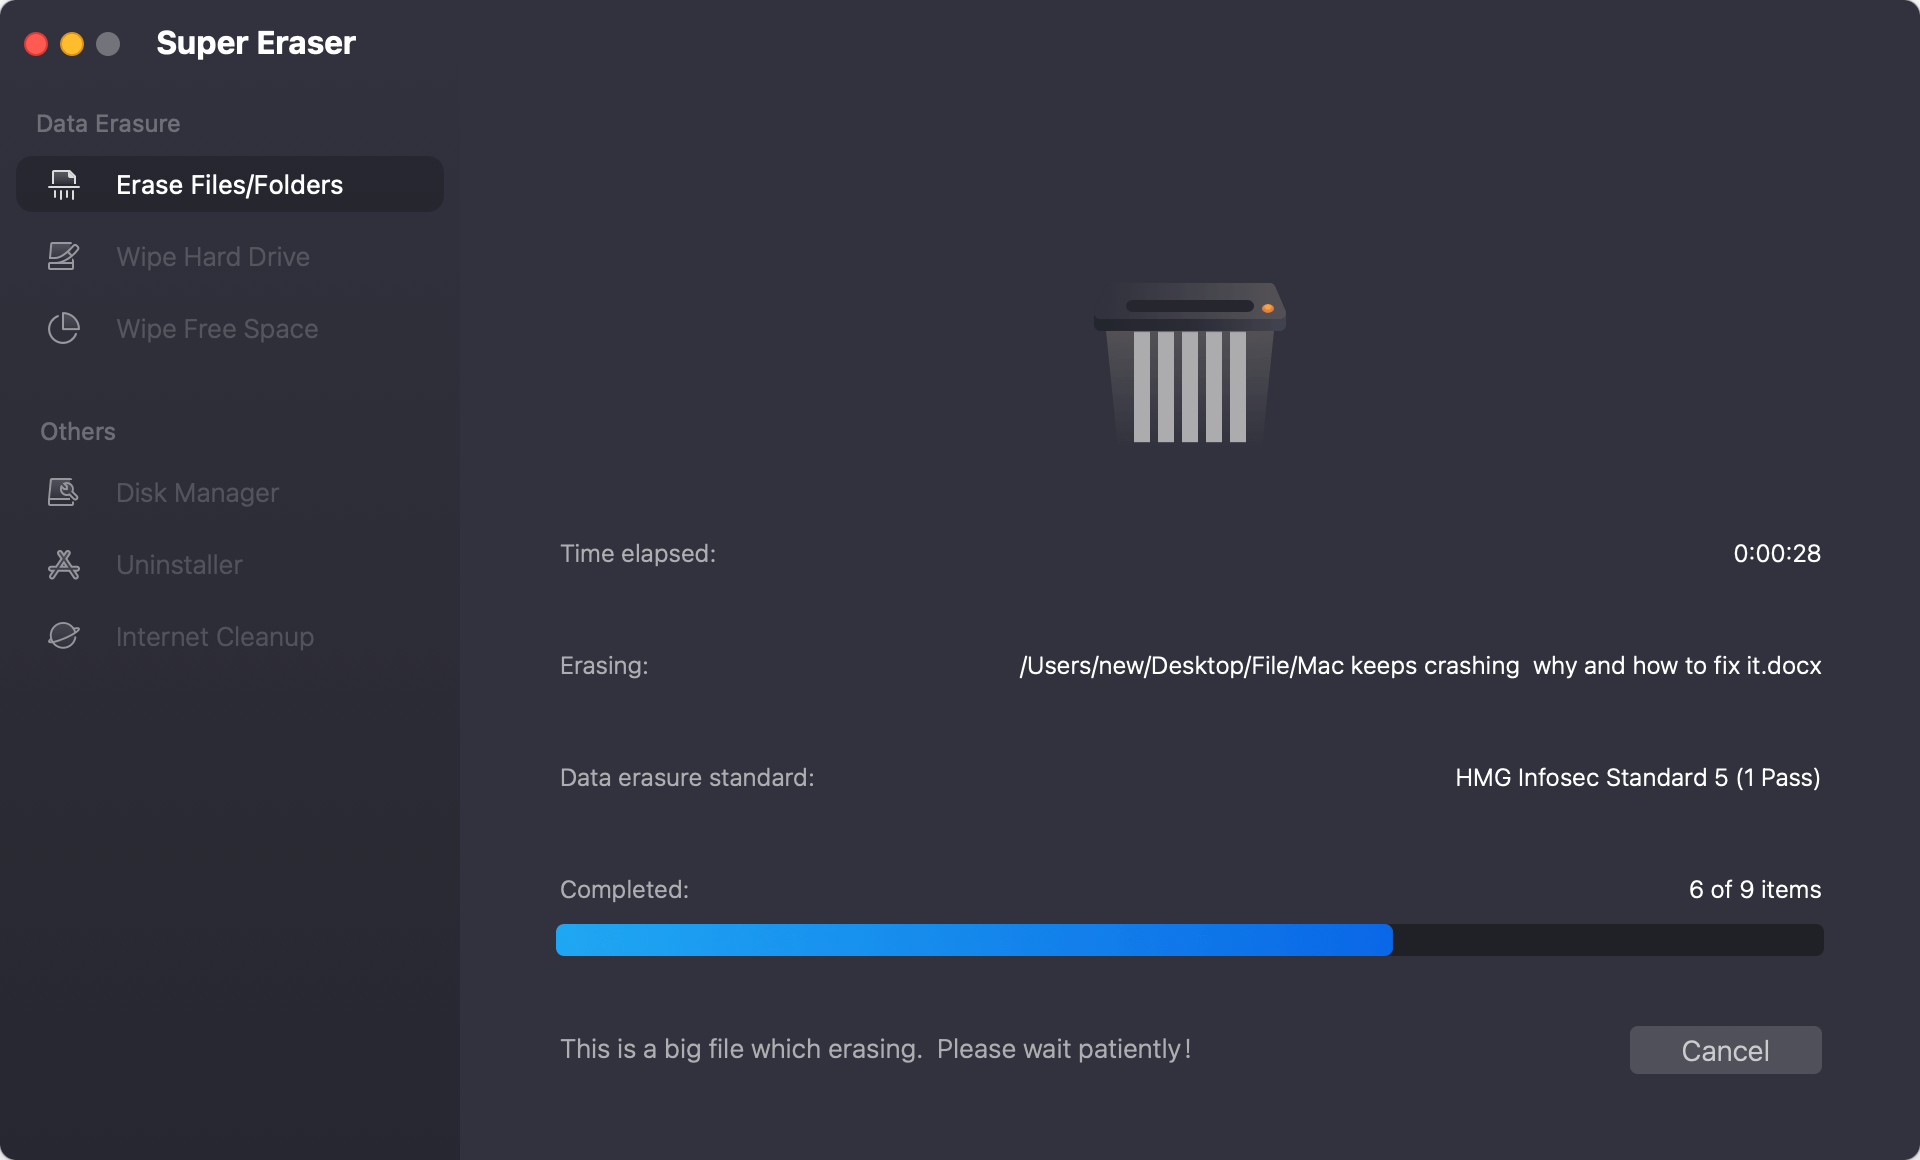
Delete all the files from USB hard drive
This choice "Wipe Hard Drive" will delete all the files on the external hard drive and remove the whole drive. That lets you know that all data and records will be lost forever.

Erasing the USB drive removes all the data and folders on it. After you delete all the data on your USB drive, only free space is left and also it's formatted. If you want to use the USB flash drive again, you can just reuse it without reformatting. You can also reformat it in Disk Manager option in the software to change the files system if necessary.
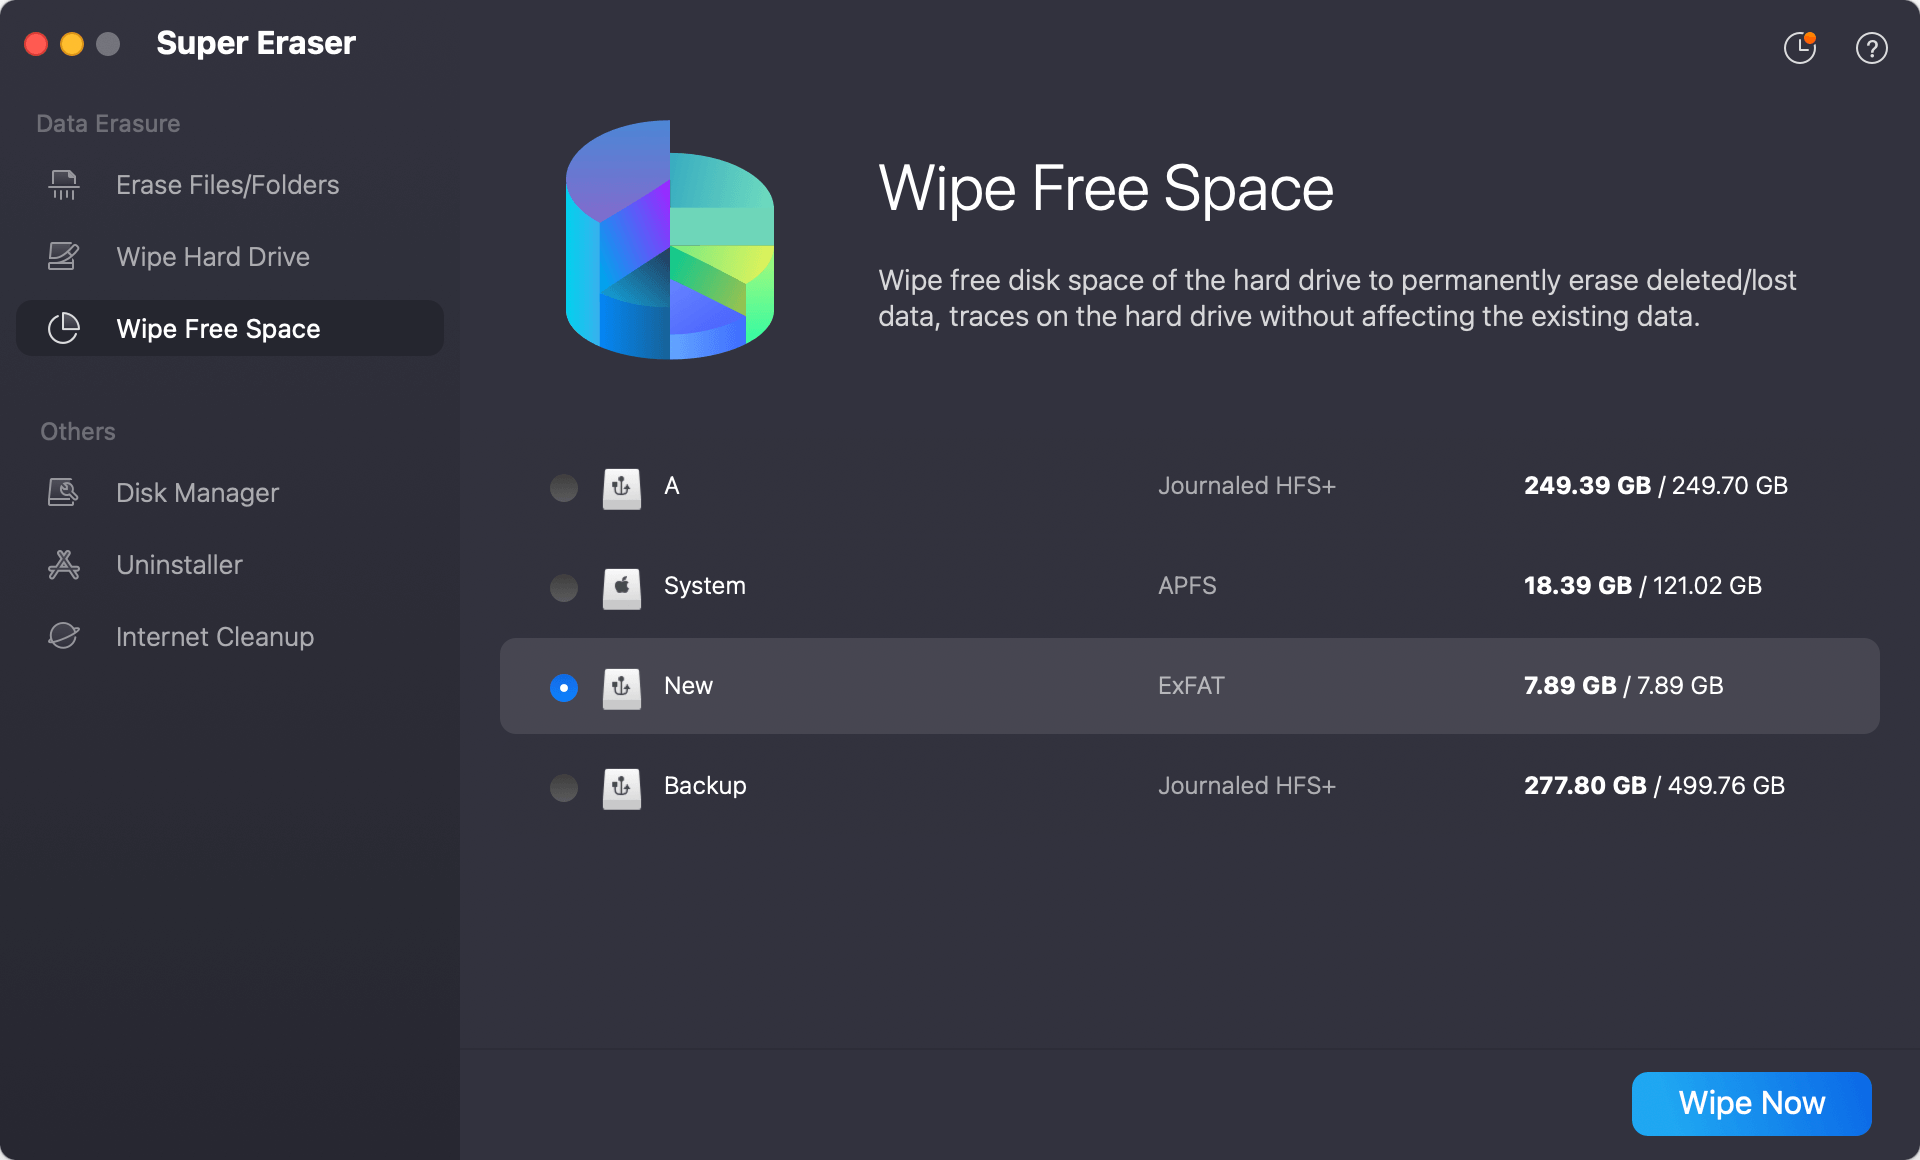
Wipe delete things from USB drive
"Wipe Free Space" option is the best way to shred items that have already been deleted or lost on an external hard drive. It only shreds files on your device that have already been removed or lost and it will not affect the exiting files on the USB drive.
Additional Considerations
- Verify Data Destruction: Some software has choices to ensure data has been successfully erased.
- Physical Destruction: After shredding the data on a USB drive, you should destroy it directly for the highest level of security.
- Regular Backups: Before removing files, you should make regular copies of important data.
Beyond Data Shredding: Protecting Your Data
Shredding data is very important, but it's not the only way to keep data safe. Take these other steps into account:
- Strong Passwords: To protect your Mac and USB drives, use passwords that are hard to guess. Strongly-encrypted data can be instantly "erased" by destroying (or losing) the key (password), because this renders your data irretrievable in practical terms. Consider using APFS encryption (FileVault).
- Protection: Before putting private information on a USB drive, encrypt it.
- Regular updates for software: Operating system and security tools should always be current.
- Watch out for Phishing and Malware: Keep bad people from getting into your system.
Conclusion
For security reasons, permanently deleting files from a USB drive on a Mac permanently is very important. Using third-party data erasure tool and built-in tools ensures no one can get your data back. Command-line tools let advanced users delete things in powerful ways.
You can keep your data safe by following best practices like making regular backups, encrypting it, and updating your software. By following this guide, you can successfully protect your data, ensuring that your files are deleted permanently and cannot be recovered by anyone else.

DoYourData Super Eraser for Mac
DoYourData Super Eraser for Mac is a 100% safe, powerful and easy-to-use data erasure program. It offers certified data erasure standards including Peter Gutmann, U.S. Army AR380-19, DoD 5220.22-M ECE to permanently erase data from Macs and external devices, making data recovery be impossible.

