How to Recover Deleted or Formatted Data from SD Card
Data recovery software can deeply scan the SD card and quickly restore all deleted or formatted data including images and videos.
DoYourData Super Eraser for Mac, one of the most powerful Mac data erasure applications, can help you securely and permanently erase data from SD card on Mac. It can shred files, wipe entire SD card, erase deleted/lost data, etc. Once the data stored on the SD card is erased by DoYourData Super Eraser for Mac, the data is lost for good, cannot be recovered by any data recovery software.
![]() Updated by Shirly Chen on August 1, 2024
Updated by Shirly Chen on August 1, 2024
Quick Navigation:
In today's digital age, the need for data security has never been more crucial. Whether you're disposing of old technology or simply ensuring sensitive information is not accessible to others, securely deleting data is an essential practice. This article will guide you through the process of permanently deleting data from an SD card on a Mac, highlighting various methods and tools to ensure your data is thoroughly erased.
Before deleting data from an SD card, it's important to understand what happens to data when it's deleted. Simply removing files or formatting a storage device does not guarantee that the data is irretrievable. When you delete files from an SD card, the operating system marks the space occupied by those files as available for new data. However, the original data remains on the card until it is overwritten by new data. This means that with the right tools and techniques, deleted files can often be recovered.
How to Recover Deleted or Formatted Data from SD Card
Data recovery software can deeply scan the SD card and quickly restore all deleted or formatted data including images and videos.
To truly erase data from an SD card, you need to employ methods that overwrite the existing data multiple times or physically destroy the storage medium. Let's explore various approaches to ensure your data is permanently deleted.
Before you proceed with any data deletion methods, it's important to prepare your SD card. This involves backing up any important data you may have and ensuring the SD card is properly connected to your Mac.
DoYourData Super Eraser for Mac is a powerful Mac data erasure application. It can securely and permanently erase data from Mac-based HDD/SSD, USB flash drive, external disk, SD card, digital camera, etc.
This Mac data eraser offers three modes to help you permanently erase data from SD card on Mac:
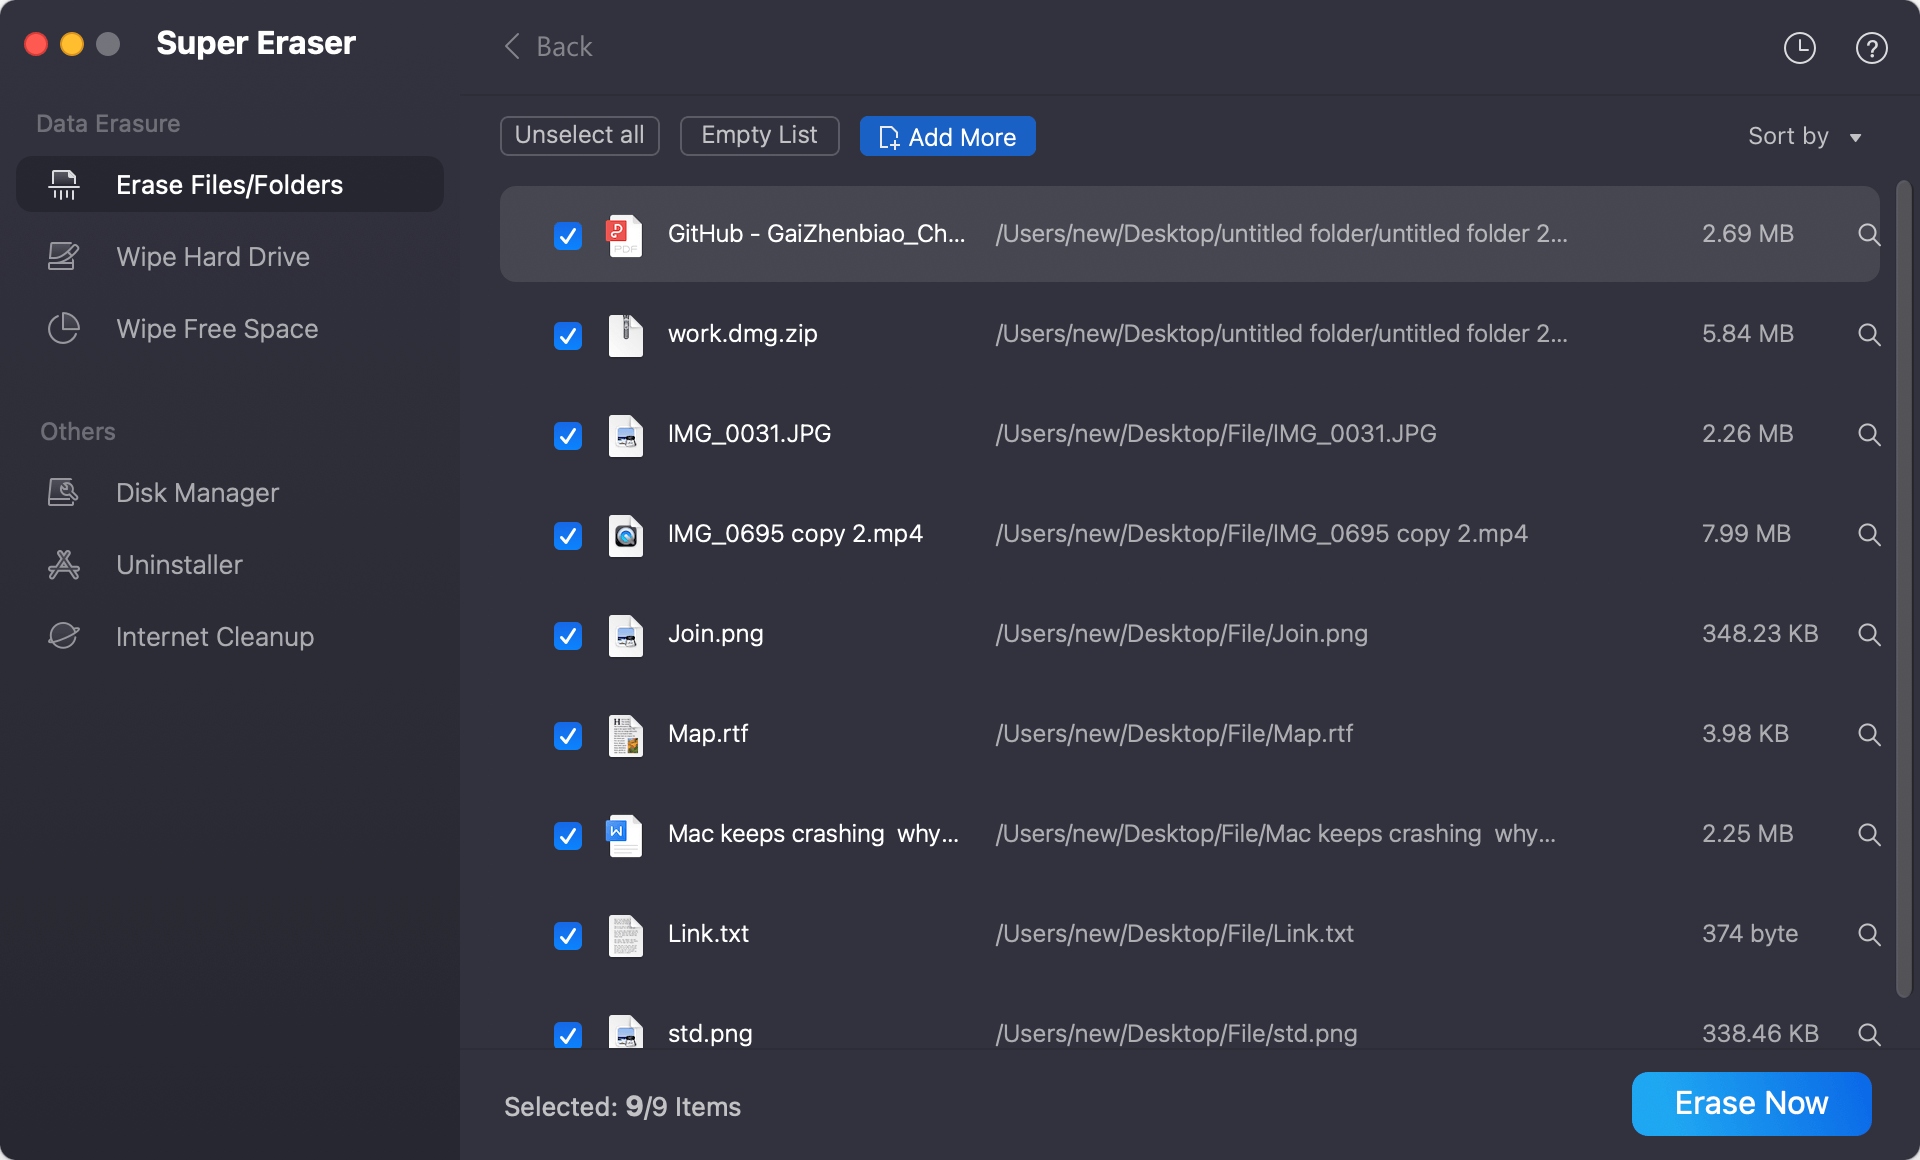
This mode can help you permanently delete files/folders from SD card under Mac OS. Just select the files/folders from the SD card, then click on "Erase Now" button to permanently erase the selected files/folders.
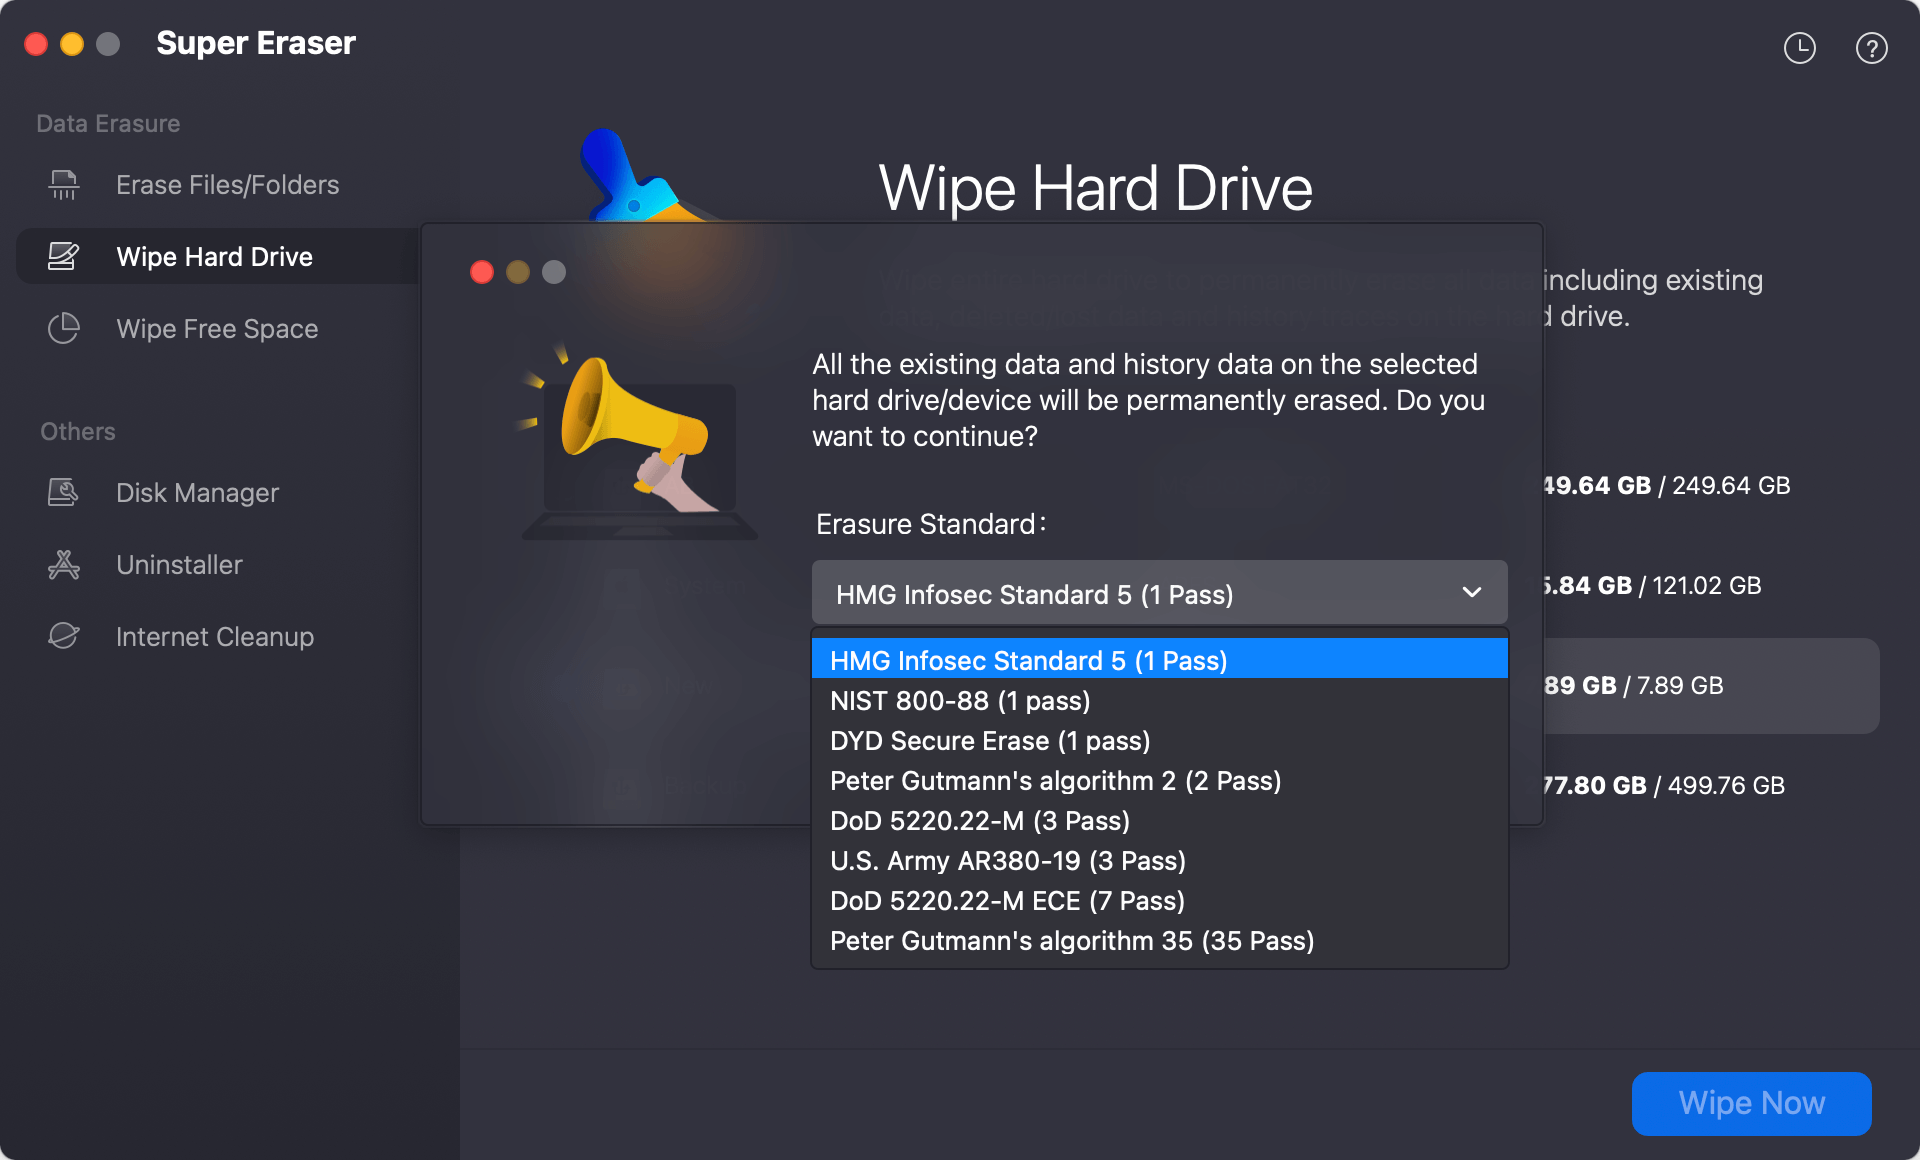
Wipe Hard Drive mode is able to securely and completely wipe the SD card. It will erase all data (existing data, deleted/formatted/lost data included) from the SD card.
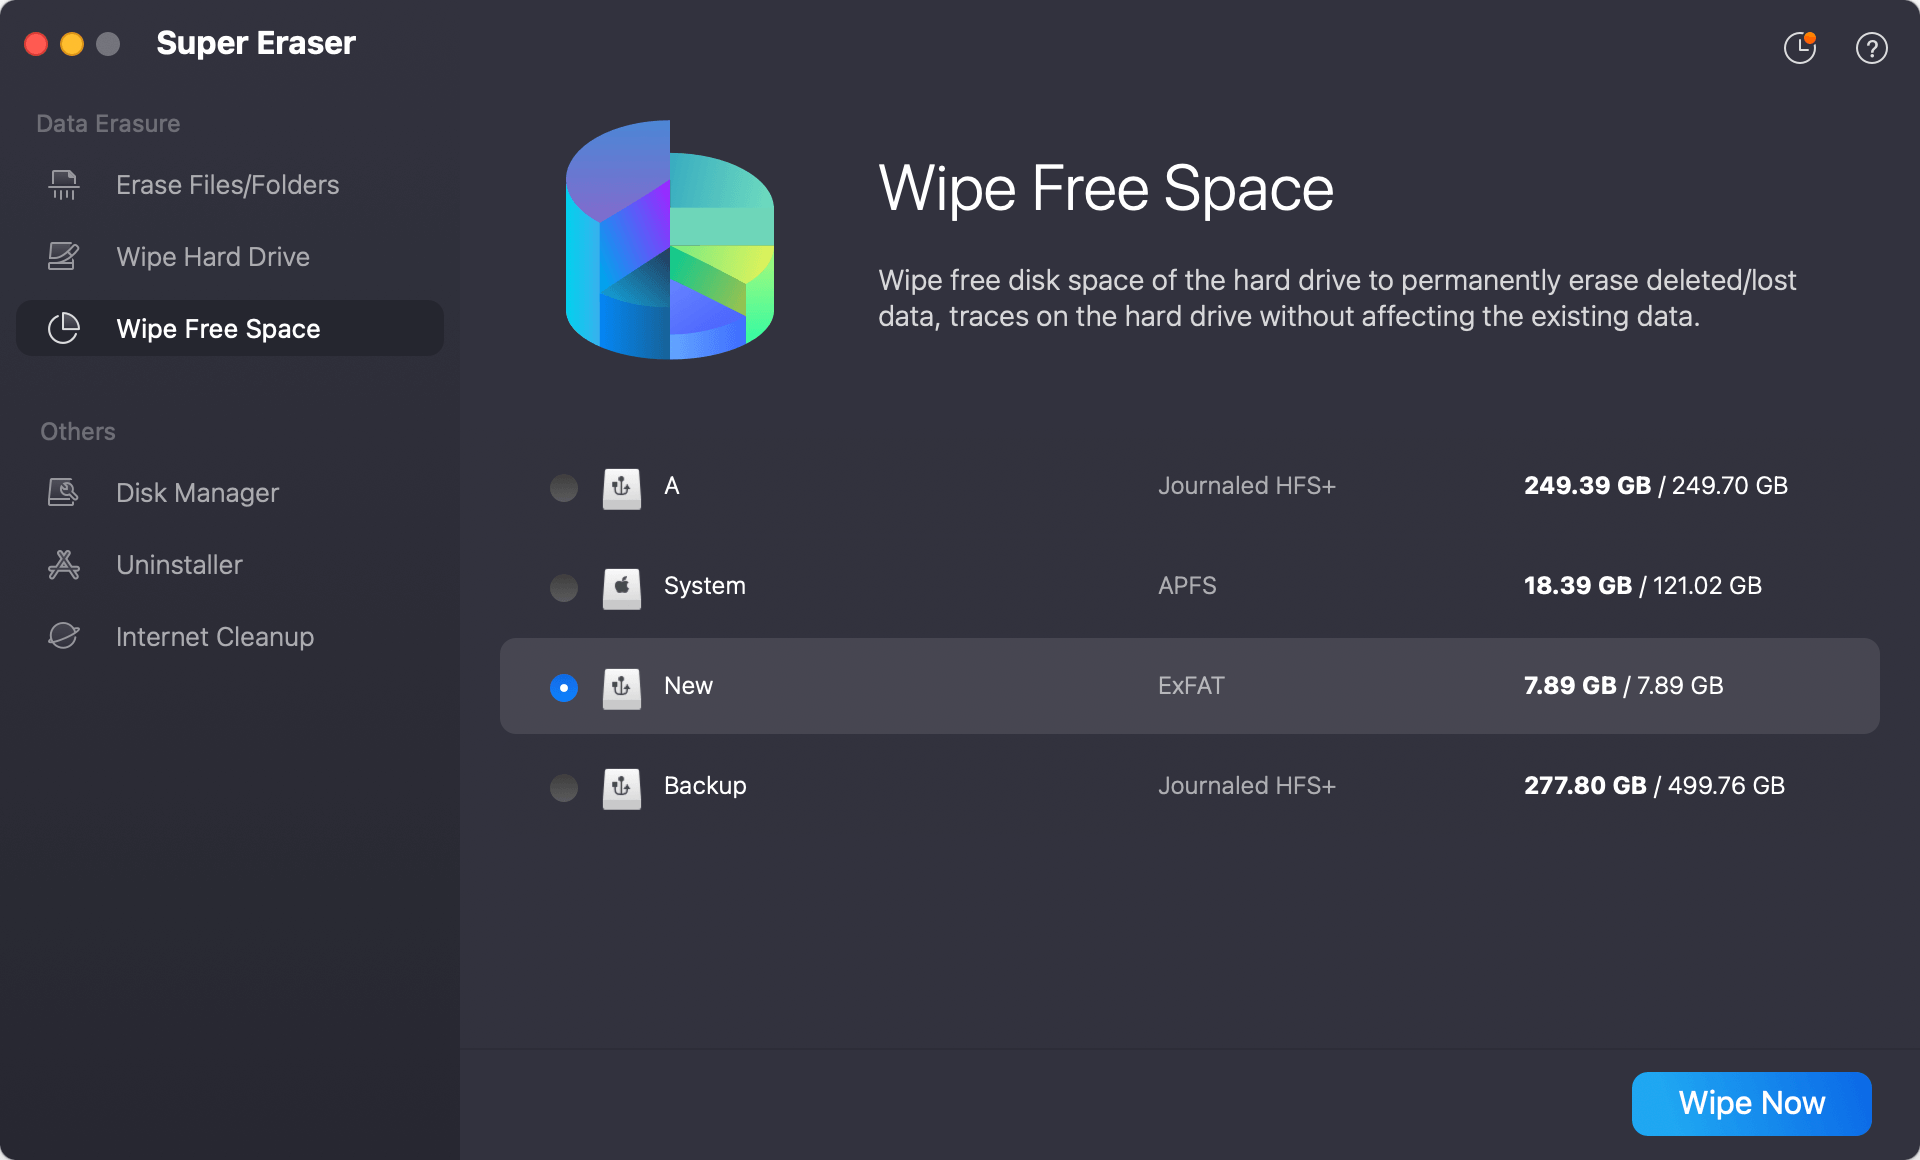
If you only want to permanently erase already deleted/lost data on the SD card, you can wipe the free disk space of the SD card. All the deleted/lost data will be permanently erased. It will not affect the existing data.
Note: Once the data stored on your SD card is erased or deleted by DoYourData Super Eraser for Mac, the data is lost for good, cannot be recovered by any method.
macOS offers built-in tools that can be used to erase data from an SD card. Here's how you can use these tools to securely delete data.
Another approach for deleting files from an SD card on a Mac is using the Disk Utility feature. This method functions more like a formatting process rather than just a simple deletion. While files deleted through this method might still be recoverable, it also ensures that the SD card is free from errors and ready for use with any device. To permanently erase the SD card, follow these steps. Disk Utility is a versatile tool included with macOS that allows you to manage and format storage devices. To erase an SD card using Disk Utility:
Step 1. Open Disk Utility: You can find Disk Utility by searching for it in Spotlight or navigating to Applications > Utilities > Disk Utility.
Step 2. Select the SD Card: In Disk Utility, select the SD card from the list of available drives on the left side of the window. Make sure to select the correct drive to avoid accidentally erasing the wrong data.
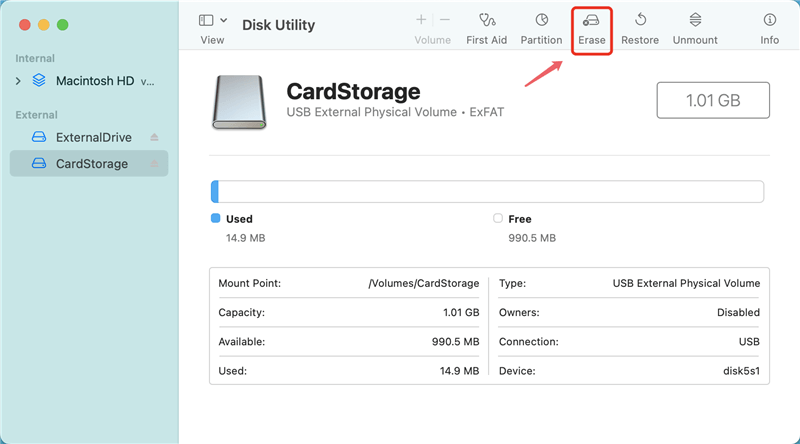
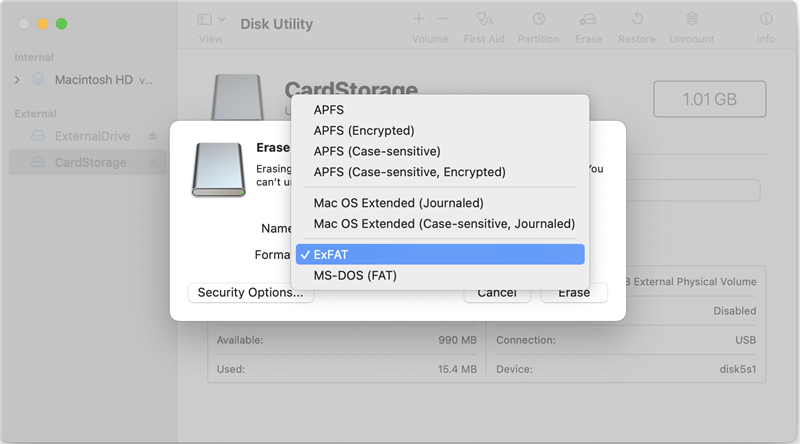
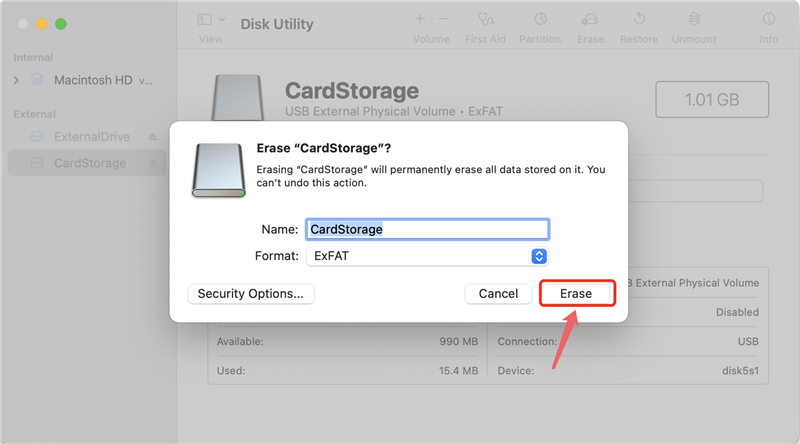
Step 3. Erase the SD Card: Click the Erase button at the top of the Disk Utility window. In the dialog box that appears, choose a name for the SD card and select a format such as ExFAT or MS-DOS (FAT).
You'll be notified when the formatting process is complete, allowing you to easily remove the SD card from your Mac. Formatting is the process of preparing storage media for use by changing its file system. It involves three key concepts:
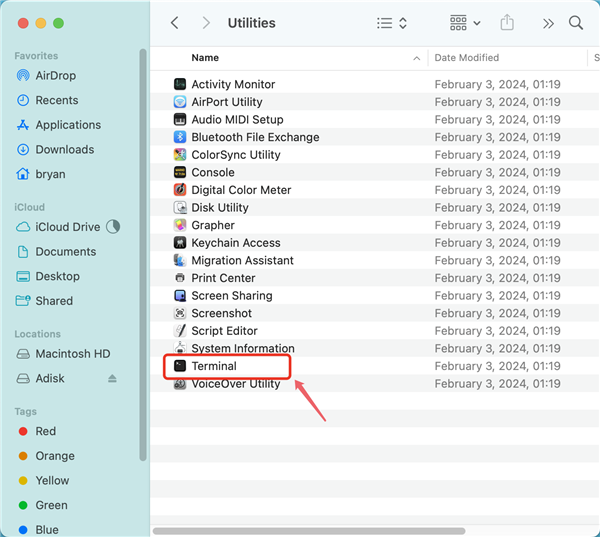
For those who are comfortable using the command line, macOS's Terminal provides powerful commands for securely erasing data. One such command is diskutil, which can be used to erase and format the SD card.
Open Terminal: Navigate to Applications > Utilities > Terminal.
Identify the SD Card: Use the following command to list all connected drives:
diskutil list
Locate your SD card from the list and note its identifier (e.g., disk2).Erase the SD Card: To securely erase the SD card, use the following command:
sudo diskutil eraseDisk FREE SPACE /dev/diskX
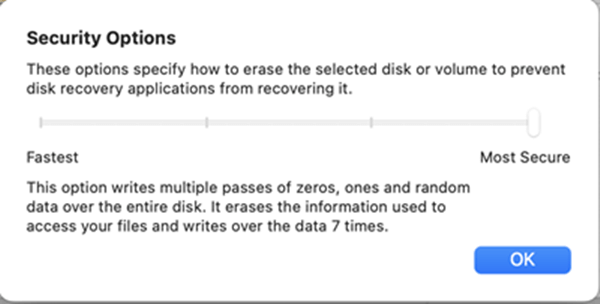
Replace diskX with the identifier of your SD card. The FREE SPACE option overwrites the disk with zeros. For more secure options, you might use:
sudo diskutil secureErase 0 /dev/diskX
The number 0 represents a single pass of overwriting. You can change this number for more passes if desired.
In addition to DoYourData Super Eraser for Mac and macOS's built-in tools, there are several other applications designed for secure data deletion. These applications often offer advanced features and additional security options.
Choosing a Reliable Application
When selecting a third-party data erasure tool, consider the following factors:
Popular Data Erasure Tools
To use a third-party application, follow the instructions provided by the tool. Generally, the process involves selecting the SD card, choosing the level of security or number of passes, and initiating the erasure.
After you’ve erased the data from your SD card, it’s important to verify that the data has been completely removed. Here are some methods to check if your data has been permanently deleted:
Permanently deleting data from an SD card on a Mac is crucial for ensuring your sensitive information remains secure. By understanding the different methods available and choosing the right approach, you can effectively erase data and protect your privacy.
Whether you use macOS’s built-in tools like Disk Utility and Terminal, or opt for third-party applications (such as DoYourData Super Eraer for Mac), the key is to select a method that aligns with your security needs. Always remember to back up any important data before beginning the deletion process, and verify the results to ensure that your data has been completely removed.
Secure data deletion is an important step in managing digital privacy, and by following the steps outlined in this article, you can confidently ensure that your SD card is free of any recoverable information.

DoYourData Super Eraser for Mac
DoYourData Super Eraser for Mac is a 100% safe, powerful and easy-to-use data erasure program. It offers certified data erasure standards including Peter Gutmann, U.S. Army AR380-19, DoD 5220.22-M ECE to permanently erase data from Macs and external devices, making data recovery be impossible.
Written & Updated by Shirly Chen
Shirly Chen has been writing data recovery, data erasure articles for DoYourData over 4 years. She has been working as a professional website content writer & editor for quite a long time. She also writes articles about disk clone, Mac optimization, disk backup, etc.