How to recover reformatted drive on Mac?
After formatting a hard drive on Mac, there is still a great chance to get back the lost data with recovery tool.
Quick Navigation:
Data privacy and security are very important in this modern world. Knowing how to properly shred files and wipe an APFS (Apple File System) drive is important to delete private files safely or get your Mac ready to sell. When you shred files, they are erased and can't be recovered. It keeps your private information safe from possible risks.
If you wipe an APFS drive, you delete all the data and format it, which is important for keeping your Mac safe and running smoothly. This detailed guide will show you how to safely delete files and wipe an APFS drive using built-in macOS tools and third-party data wiping programs. It will keep your data safe and ensure your Mac works at its best.
Before getting into the how-to, it's important to know why it's important to delete files and wipe drives permanently:
On the APFS disk, you store your pictures, files, videos, movies, and other things. When you press the "Erase" button and accept the action, all the files on the APFS volume will be erased. After that, the container will have an empty APFS volume.
When you erase an APFS volume, the contents on the volume are deleted from the drive. Erase an AFPS volume, on the other hand, only deletes the contents; you can still add new content to an erased APFS volume inside an APFS container.
Please note that if you use the default settings in Disk Utility to erase the APFS drive, it will just reformat it and the data on the drive is not gone forever until the drive is overwritten or reused by new data. Which means the data on the formatted drive is still recoverable by data recovery software.
How to recover reformatted drive on Mac?
After formatting a hard drive on Mac, there is still a great chance to get back the lost data with recovery tool.
If you want to securely wiped the data permanently from APFS drive, you need to change the security settings when erasing drive in Disk Utility. Or you can use other professional methods or software to permanently destroy the sensitive data on APFS drive.
Let's begin with the easy-to-use and professional solution. You can use third-party data wiping tool to shred files or wipe entire drive. Mostly, the third-party applications offers more features and advanced data sanitation algorithms.
To wipe data permanently on Mac, we recommend DoYourData Super Eraser for Mac. With this software, you can delete files permanently on your own easily.With trusted data erasure algorithms, the software can guarantee the data be wiped permanently and no recovery method can get back the wiped files successfully.
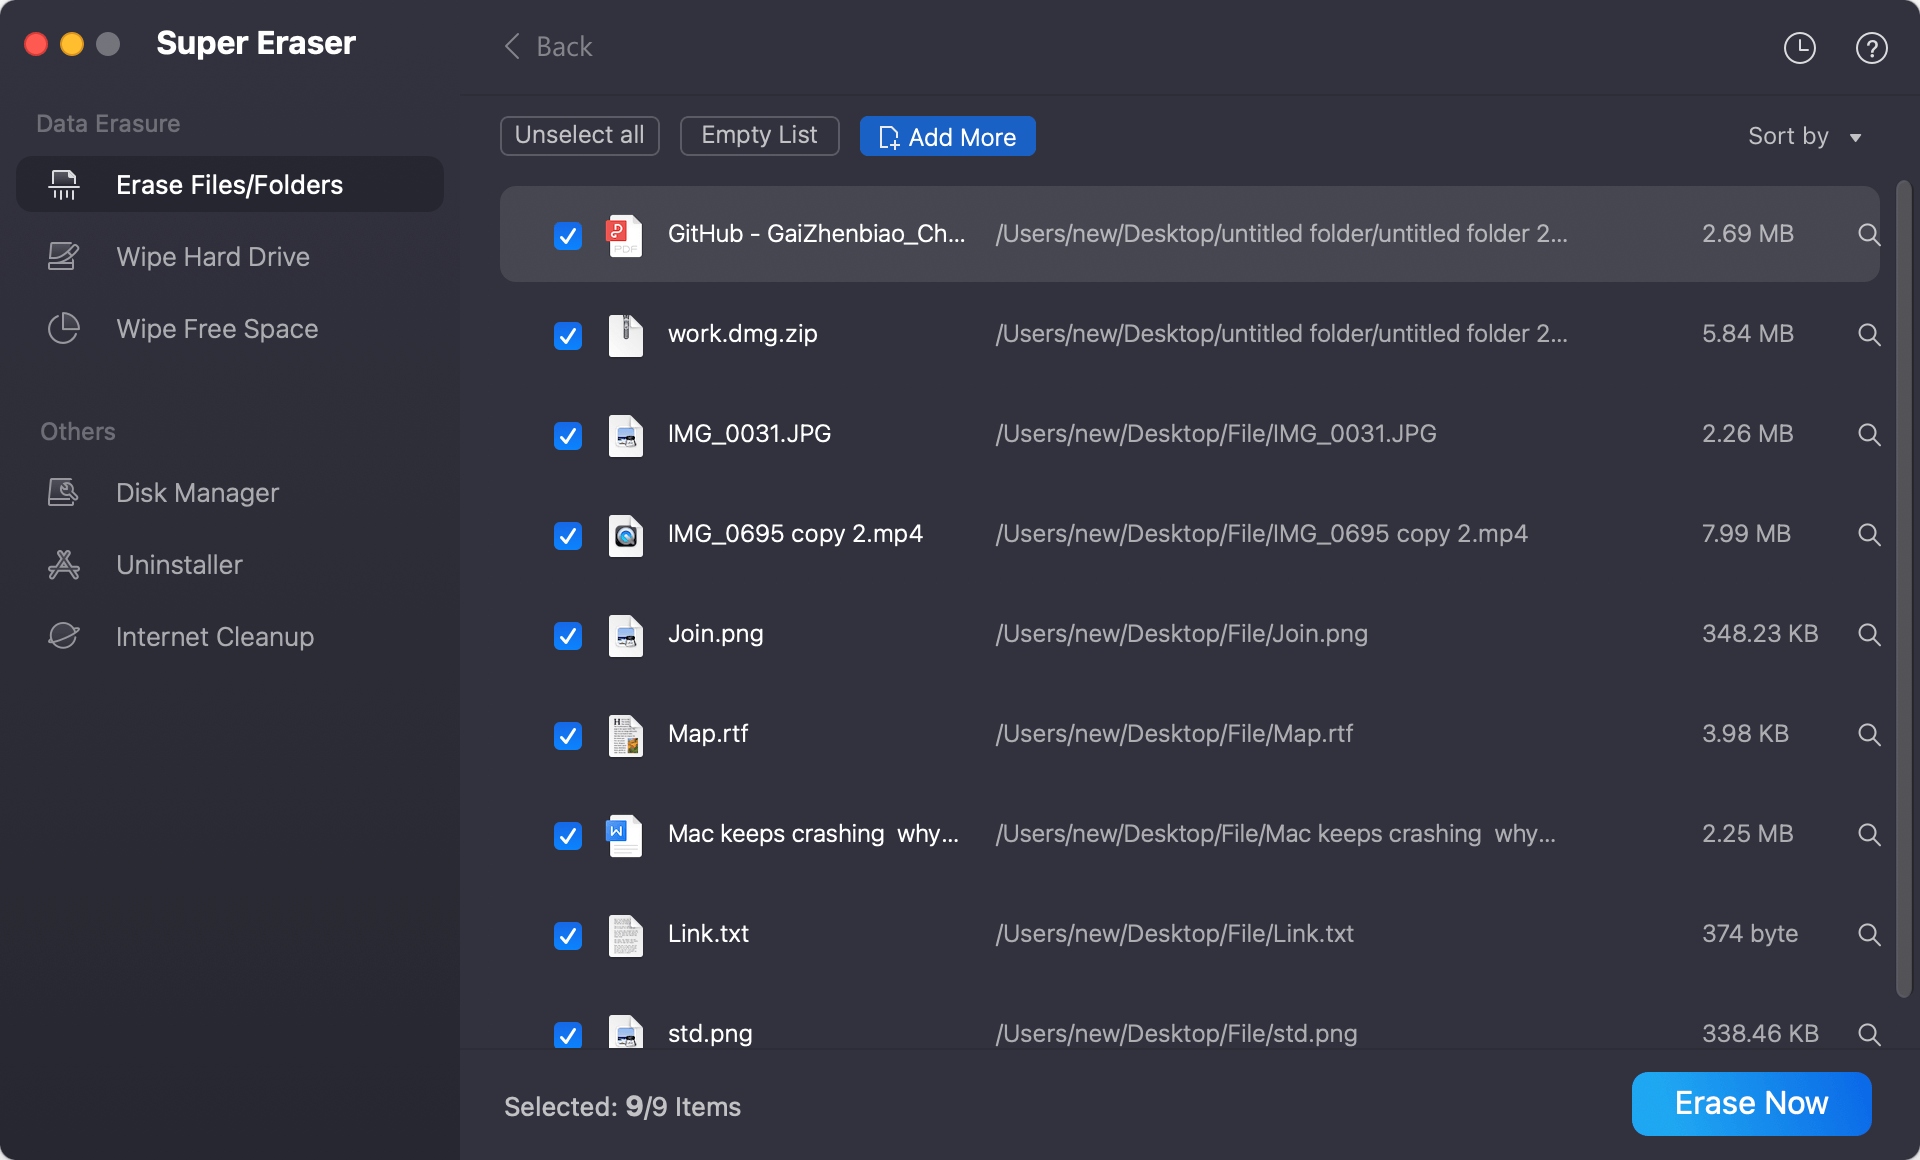
There are three ways to erase data: Shred individual files or folder, wipe all data from a drive, only wipe deleted files on free space of the APFS drive.
Mode 1: Shred only certain files and folders
Start DoYourData Super Eraser for Mac and choose the "Erase Files/Folders" mode for file shredding. Select the files or folders you want to delete for good. Then
click the "Erase Now" button to remove the files and folders permanently from your drive.
Mode 2: APFS disk wipe.
The whole APFS hard drive will be erased in the mode "Wipe Hard Drive." On the APFS hard drive, all the data will be erased for good by erasing the drive.

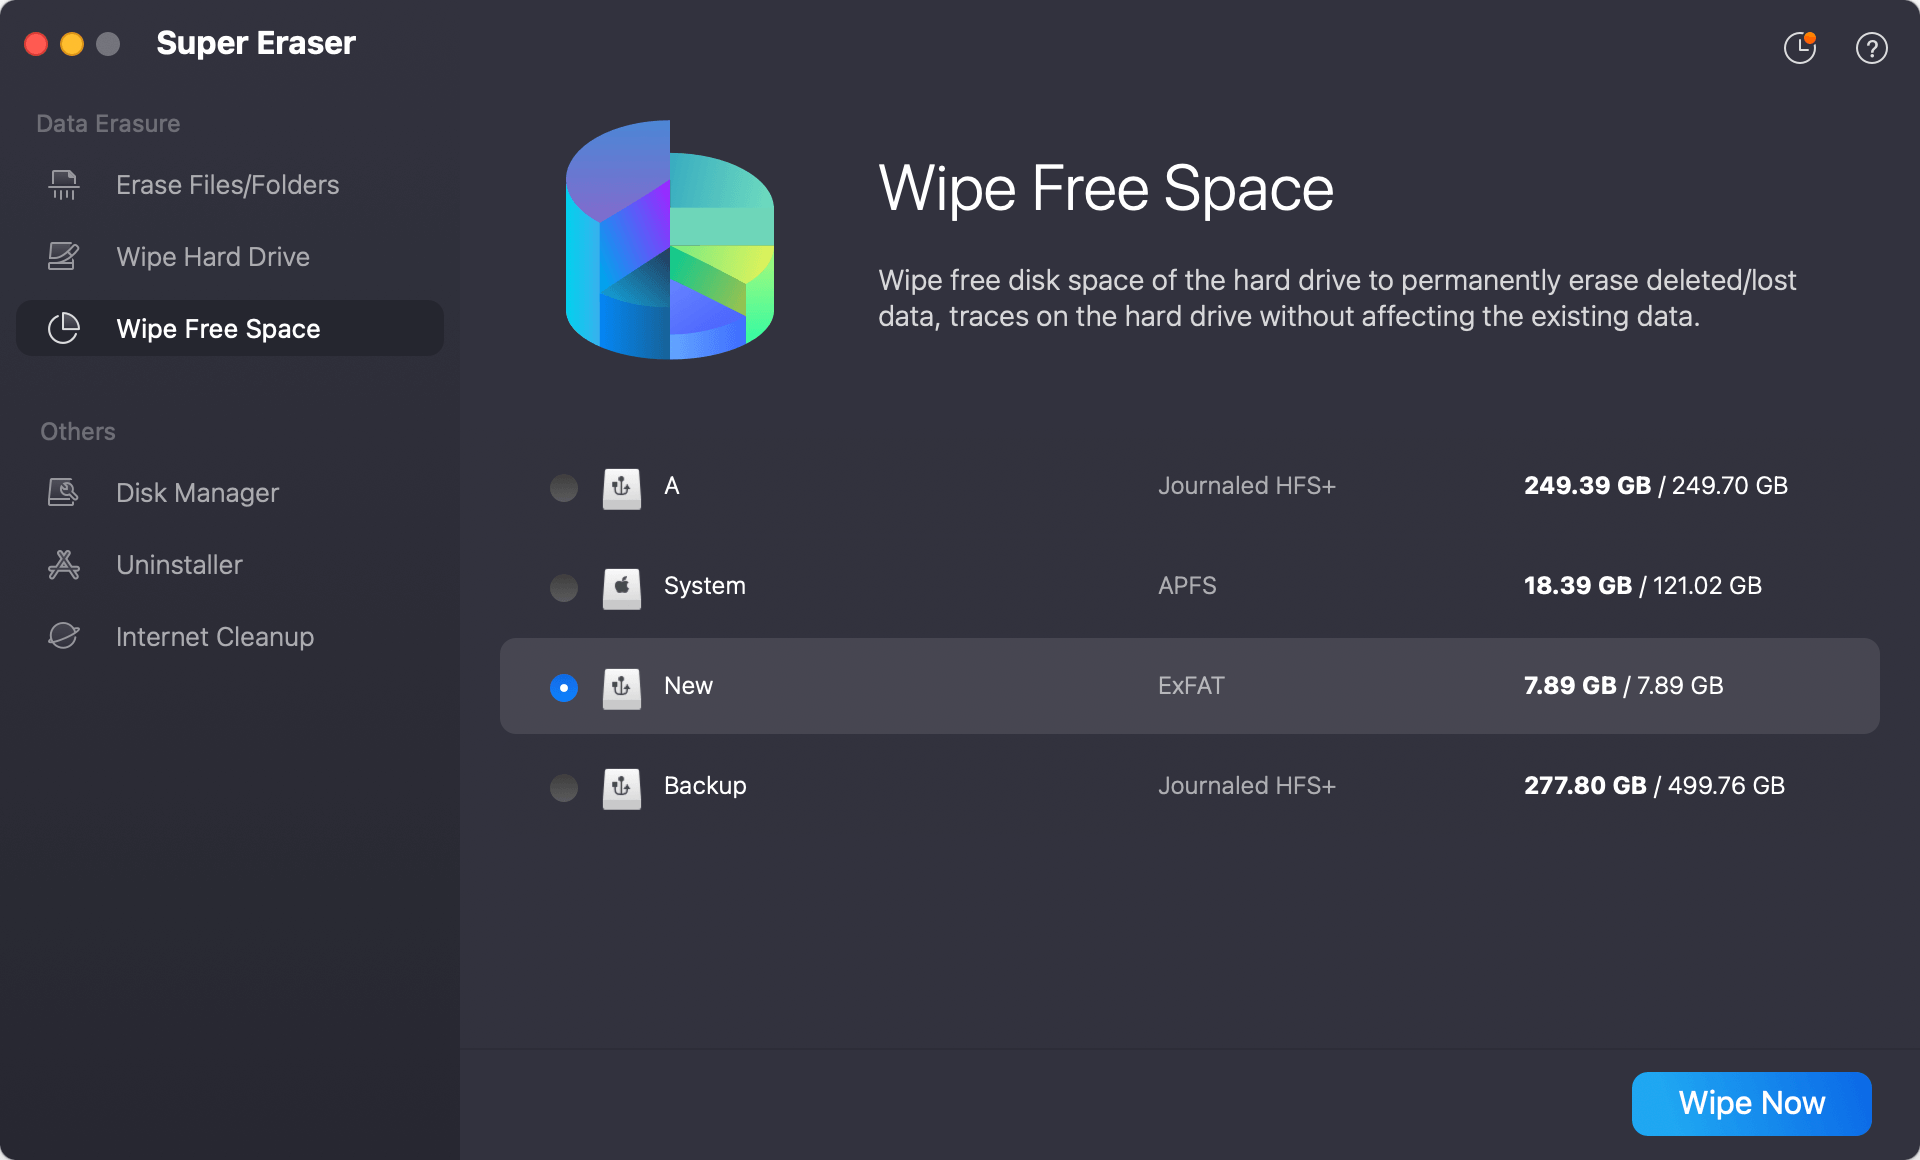
Mode 3: Wipe deleted files from an APFS hard drive.
The lost info can still be found with data recovery software. To remove deleted files, you must delete the free room on the hard drive with "Wipe Free Space" mode. Then, the lost or removed data on the hard drive will be gone permanently.
📌 Note: As the wiped data is gone forever and can't be recovered in any way, ensure to select the right files/folders or drives to wipe. Otherwise, you will lost important data for good.
macOS has a built-in disk tool called Disk Utility. Mac users can use Disk Utility manage internal and external hard drives, including erase data permanently from APFS drive. Here are the steps to erase an APFS drive in Disk Utility:
1. In Finder, go to "Applications", "Utilities", and "Disk Utility". The Disk Utility tool will open when you double-click it.

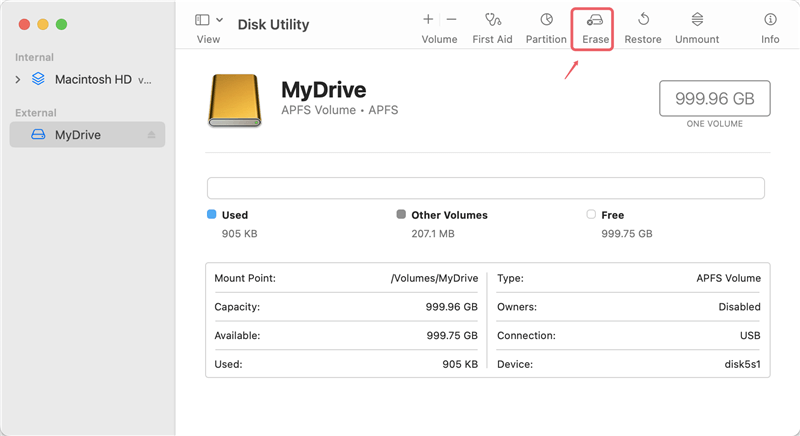
2. When you open the tool, a list of all the internal and external drives found will appear on the left sidebar. Find and click on the AFPS drive you want to wipe, click the Erase button at the top of the window.
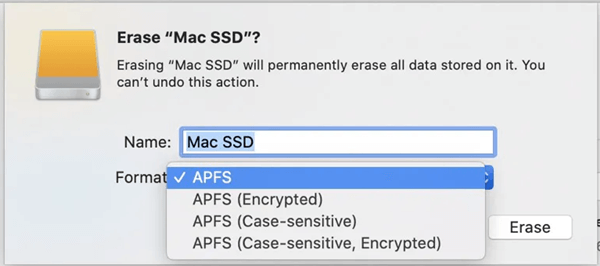
3. If you need to, select an APFS file, such as APFS, APFS(Encrypted), APFS(Case-sensitive), or APFS(Case-sensitive, Encrypted).
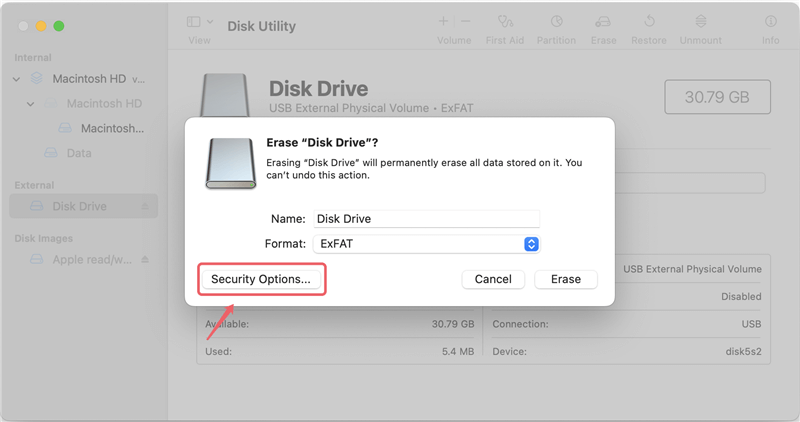
4. To add more safety and wipe the data from the APFS drive, click Security Options button to continue.
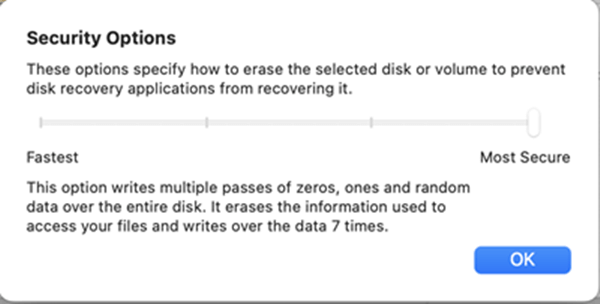
5. Pick the amount of secure erasure you want:
6. Click Erase button and then the APFS drive will be reformatted and all data on the drive will be wiped based on the security options you configured.

📌 Tips: It's better to disconnect all the other external drives when you trying to wipe an APFS drive. It can help avoid selecting the wrong drive to wipe and causing data loss.
If you are familiar with Terminal and commands, when you wipe a drive, you can also use Terminal to do this. Here are the steps:
1. Open Terminal from "Utilities" folder under "Applications."
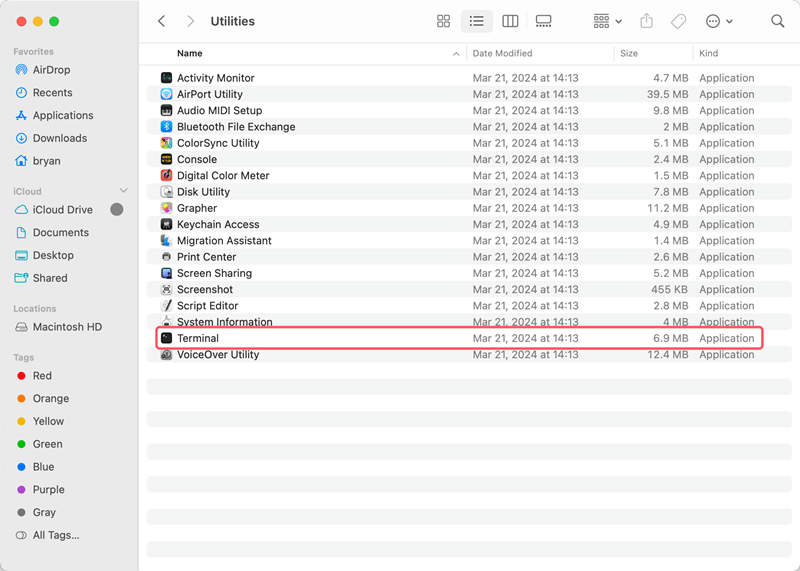
2. Securely erase data from the APFS drive with the following commands:
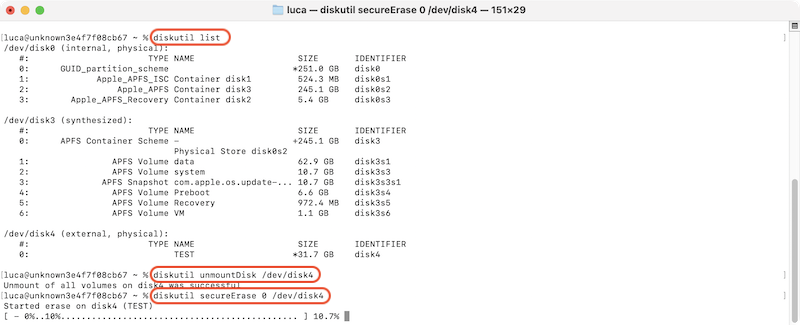
If you only want to free space of the drive to erase deleted data, you can use the command: diskutil secureErase freespace 4 /device/diskX (ensure to add the parameter freespace, otherwise, all data on the drive will be wiped.)

📌 Note: Be careful to locate the right drive by the size or other drive information. Type the commands correctly to wipe data smoothly. If you find it's hard to use this method, it's highly suggested to use other easily methods.
It is very important to keep your Mac info safe and private. You can keep your device running at its best and protect private information by learning how to shred files and wipe APFS drives. If you use these ways, whether you use macOS's built-in tools or trusted third-party data destruction app, your data will be deleted forever.
Regularly Doing these things makes your Mac safer and more efficient. Following this guide, you can feel good about managing your data, keeping your information safe, and keeping your Mac running smoothly. Put data security first to keep your digital record safe and stop people from getting in without permission.

DoYourData Super Eraser for Mac
DoYourData Super Eraser for Mac is a 100% safe, powerful and easy-to-use data erasure program. It offers certified data erasure standards including Peter Gutmann, U.S. Army AR380-19, DoD 5220.22-M ECE to permanently erase data from Macs and external devices, making data recovery be impossible.
