How to Format SDHC/SDXC Card on Mac?
Disk Utility can help you securely and easily format SDHC/SDXC card on Mac. If you will sell, donate or dispose of an old SDHC/SDXC card, you can use DoYourData Super Eraser for Mac to format & wipe it and permanently erase all data from it, leaving no trace for data recovery. Select the right file system for your SDHC/SDXC card and format it with Disk Utility or other disk formatting tools.
![]() Updated by Shirly Chen on August 7, 2024
Updated by Shirly Chen on August 7, 2024
Quick Navigation:
- Differences Between SDHC and SDXC
- Why Formatting SDHC/SDXC Card Is Necessary Before Use?
- Preparation Before Formatting Your SDHC/SDXC Card on Mac
- Step-by-Step Guide to Formatting SDHC/SDXC Cards on Mac
- How to Wipe SDHC/SDXC Card on Mac Before Selling or Throwing Out?
- Best Practices for Maintaining SDHC/SDXC Cards
- Conclusion
- FAQs About Format SDHC/SDXC Card on Mac
SDHC (Secure Digital High Capacity) and SDXC (Secure Digital eXtended Capacity) cards are widely used storage devices, popular for their compact size and substantial storage capacity. These cards are essential for various devices such as cameras, smartphones, and tablets, providing a convenient way to store and transfer data. However, to ensure their optimal performance and compatibility, it is crucial to format them correctly.
Formatting an SDHC or SDXC card prepares it for use, optimizing its performance and ensuring that it is free of errors. Proper formatting can help avoid issues such as data corruption and improve the card's efficiency and lifespan.
Differences Between SDHC and SDXC
| Feature | SDHC (Secure Digital High Capacity) | SDXC (Secure Digital eXtended Capacity) |
|---|---|---|
| Storage Capacity | 4GB to 32GB | 64GB to 2TB |
| File System | FAT32 | exFAT |
| Compatibility | Widely compatible with older devices | Requires newer devices and OS versions |
| Typical Use Cases | Cameras, smartphones, tablets | High-definition video recording, large file storage |
| Performance | Standard speed for moderate data use | Higher speed for large data transfers |
SDHC and SDXC cards are commonly used in devices that require high storage capacity and fast data transfer rates. These include digital cameras, camcorders, smartphones, tablets, and even some laptops. Their high capacity and speed make them ideal for storing large files such as high-resolution photos, videos, and extensive music libraries.
Why Formatting SDHC/SDXC Card Is Necessary Before Use?
Formatting an SD card ensures that it is properly set up for use with your specific device and operating system. It helps in organizing the card's storage, removing any existing data, and resolving any file system errors. This process not only enhances the card's performance but also minimizes the risk of data corruption and extends the card's lifespan.
Preparation Before Formatting Your SDHC/SDXC Card on Mac
Before you begin the formatting process, it is essential to take a few preparatory steps to ensure a smooth and successful operation.
Backing Up Existing Data on the Card
The first and most crucial step is to back up any important data on your SDHC or SDXC card. Formatting will erase all existing data on the card, so it's vital to ensure you have copies of any files you want to keep. You can transfer these files to your Mac or another storage device. To do this, insert the card into your Mac, open Finder, and drag the files from the card to a folder on your Mac.
Ensuring Compatibility with Your Mac
Next, ensure that your Mac is compatible with the SDHC or SDXC card you are using. Most modern Macs have built-in SD card slots that support both SDHC and SDXC cards. If your Mac does not have an SD card slot, you can use an external card reader. Additionally, make sure your Mac's operating system is up to date, as older versions of macOS may have compatibility issues with newer SDXC cards.
Checking for Any Card Errors or Issues
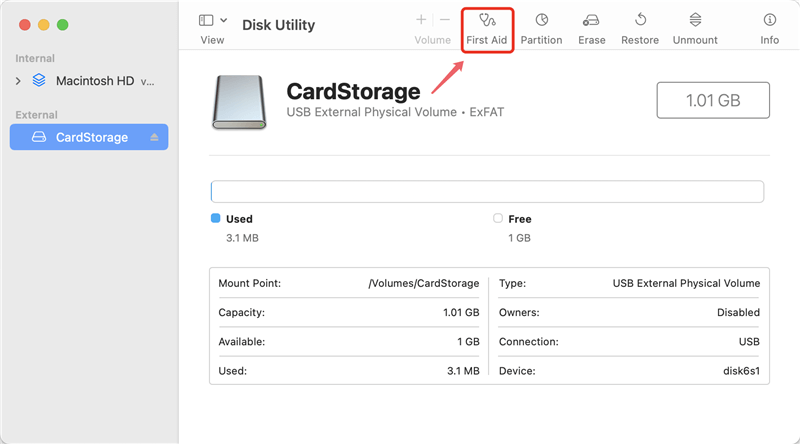
Before formatting, it's a good idea to check the SD card for any errors or issues that might affect the formatting process. You can do this by using the Disk Utility application on your Mac. Insert the SD card into your Mac, open Disk Utility, select the SD card from the sidebar, and click on "First Aid." This tool will scan the card for errors and attempt to repair any issues it finds. If the card has severe errors that cannot be fixed, you may need to replace it.
Step-by-Step Guide to Formatting SDHC/SDXC Cards on Mac
Formatting an SDHC or SDXC card on a Mac is a straightforward process. Follow these steps to ensure your card is formatted correctly:
Step 1. Inserting the SD Card into Your Mac: Locate the SD card slot on your Mac. If your Mac does not have a built-in SD card slot, use an external card reader. Insert the SDHC or SDXC card into the slot or reader.
Step 2. Open Disk Utility: Launch the Disk Utility application. You can find it by going to Finder > Applications > Utilities > Disk Utility, or by using Spotlight search (press Command + Space and type "Disk Utility").
Step 3. Select the SD Card: In the Disk Utility window, you will see a list of drives on the left sidebar. Locate your SDHC or SDXC card in this list. It will usually appear under the "External" section and may be labeled with the card's capacity or brand name. Click on the SD card to select it.
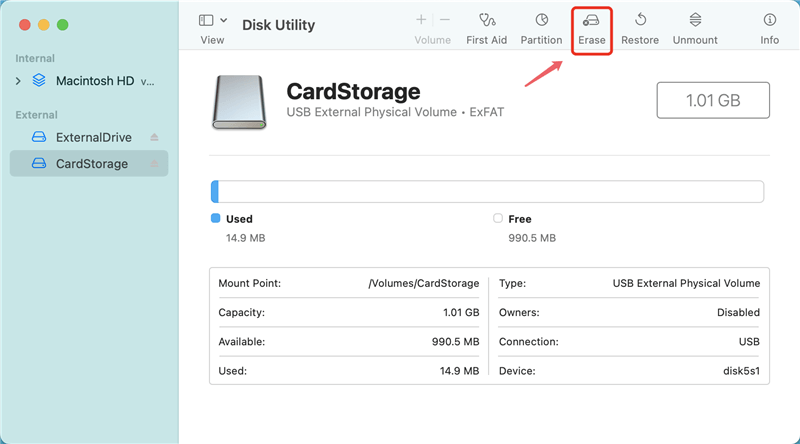
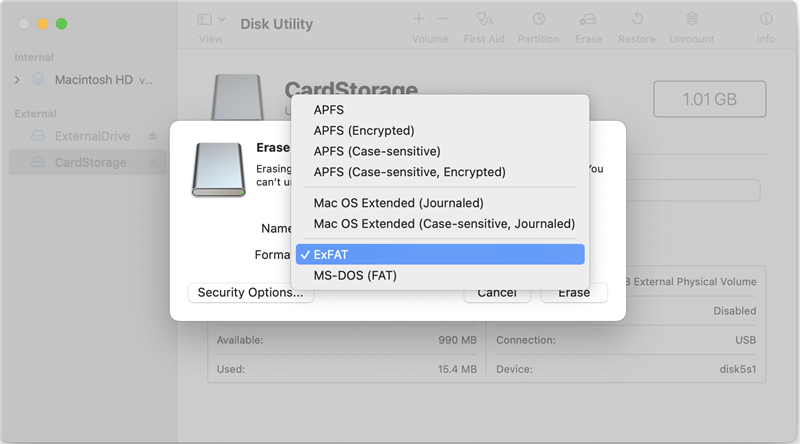
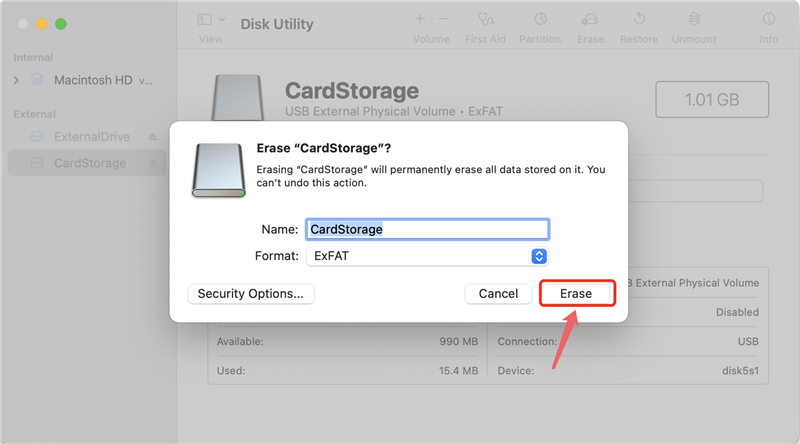
Step 4. Choose the File System: With the SD card selected, click on the "Erase" button at the top of the Disk Utility window. A new window will appear with options for formatting.
- For SDHC cards (4GB to 32GB), choose the "MS-DOS (FAT)" or "FAT32" format.
- For SDXC cards (64GB and larger), choose the "ExFAT" format.
Step 5. Name the Card: In the same window, you can enter a name for your SD card in the "Name" field. Choose a name that will help you easily identify the card later.
Step 6. Start the Format Process: Once you have selected the appropriate file system and entered a name, click on the "Erase" button to start the formatting process. Disk Utility will begin formatting the card. This process may take a few minutes.
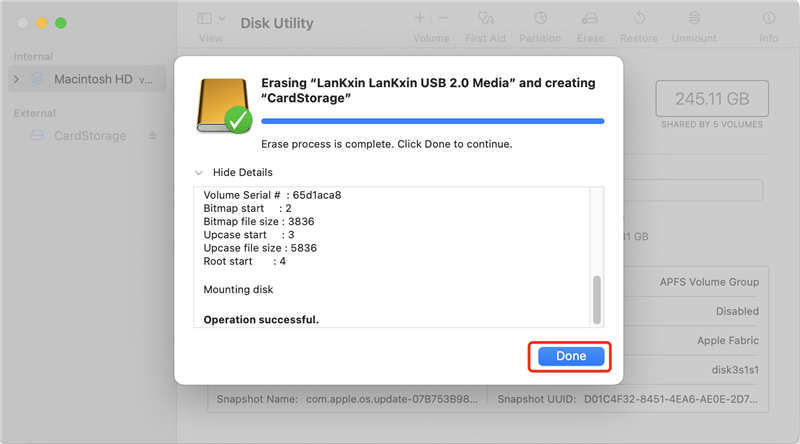
Step 7. Completion: After the formatting process is complete, Disk Utility will display a confirmation message. Your SD card is now formatted and ready for use.
What to Do if the SDHC/SDXC Card is Not Recognized by the Mac:
- Check the Connection: Ensure that the SD card is properly inserted into the SD card slot or external card reader. If using an external card reader, try a different USB port on your Mac.
- Try a Different Card Reader: If the SD card is still not recognized, try using a different card reader. Sometimes, the issue lies with the card reader rather than the SD card.
- Restart Your Mac: Restarting your Mac can resolve many minor issues, including recognition problems with external devices.
- Check Finder Preferences: Open Finder, go to Finder > Preferences or Settings > Sidebar, and ensure that "External disks" is checked. This ensures that external drives, including SD cards, are displayed in Finder.
- Update macOS: Ensure that your Mac is running the latest version of macOS, as updates often include fixes for hardware compatibility issues.
Resolving Errors During the Formatting Process:
- Use Disk Utility’s First Aid: If you encounter errors during formatting, open Disk Utility and select the SD card. Click on "First Aid" to check and repair any issues with the card.
- Reattempt Formatting: After running First Aid, try formatting the card again. Ensure you follow the correct steps and select the appropriate file system.
- Format on a Different Device: If Disk Utility continues to show errors, try formatting the SD card on a different device, such as a Windows PC or a camera, and then attempt to format it again on your Mac.
Steps to Take if the Card is Still Not Functioning Properly After Formatting:
- Test in Another Device: Insert the SD card into another device, such as a camera or another computer, to see if it functions correctly there. This helps determine if the issue is with the card or the Mac.
- Reformat Using a Different File System: If the card is still problematic, try formatting it with a different file system. For SDHC cards, use FAT32; for SDXC cards, use exFAT.
- Replace the Card: If the SD card continues to malfunction after trying the above steps, it might be faulty. Consider replacing the card with a new one.
How to Wipe SDHC/SDXC Card on Mac Before Selling or Throwing Out?
The lost data which is erased from SDHC/SDXC card is not lost for good and can be recovered by data recovery software. If you will sell, donate or dispose of your old SDHC/SDXC card, you should permanently erase all data from the card. DoYourData Super Eraser for Mac is a powerful Mac disk wipe software, it can help you securely wipe HDD, SSD, memory card, digital camera, USB drive, etc.
DoYourData Super Eraser for Mac
- Securely and permanently erase all data from SDHC/SDXC card.
- 100% safe disk wipe software.
- Certified data erasure standards such as NIST 800-88, Peter Gutmann, etc.
Follow the steps below to wipe SDHC/SDXC card on Mac:
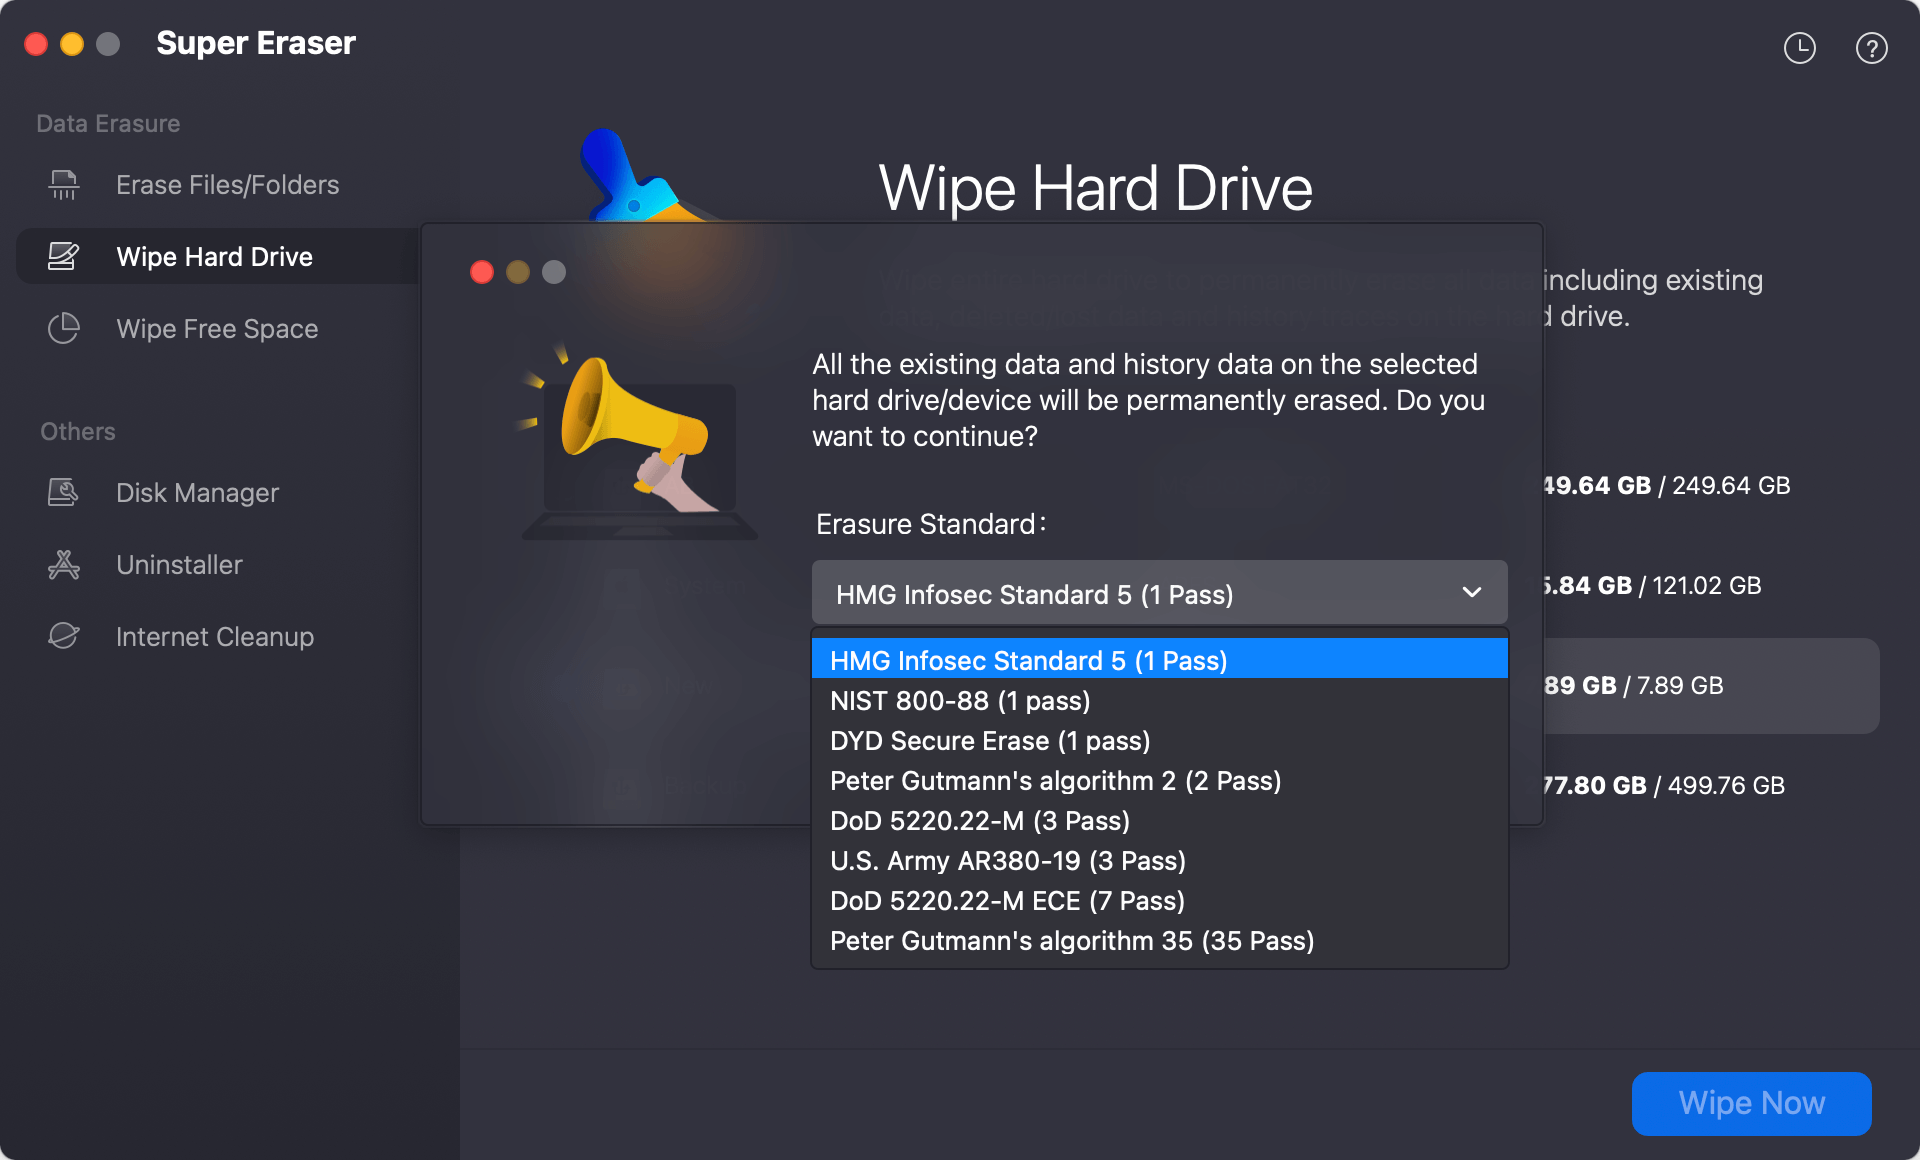
Step 1. Download and install DoYourData Super Eraser for Mac, then open it on your Mac, choose Wipe Hard Drive mode, select the SDHC/SDXC card, click o Wipe Now button.

Step 2. Select a data erasure standard, click on Continue button to securely wipe your SDHC/SDXC card and permanently erase all data from it.
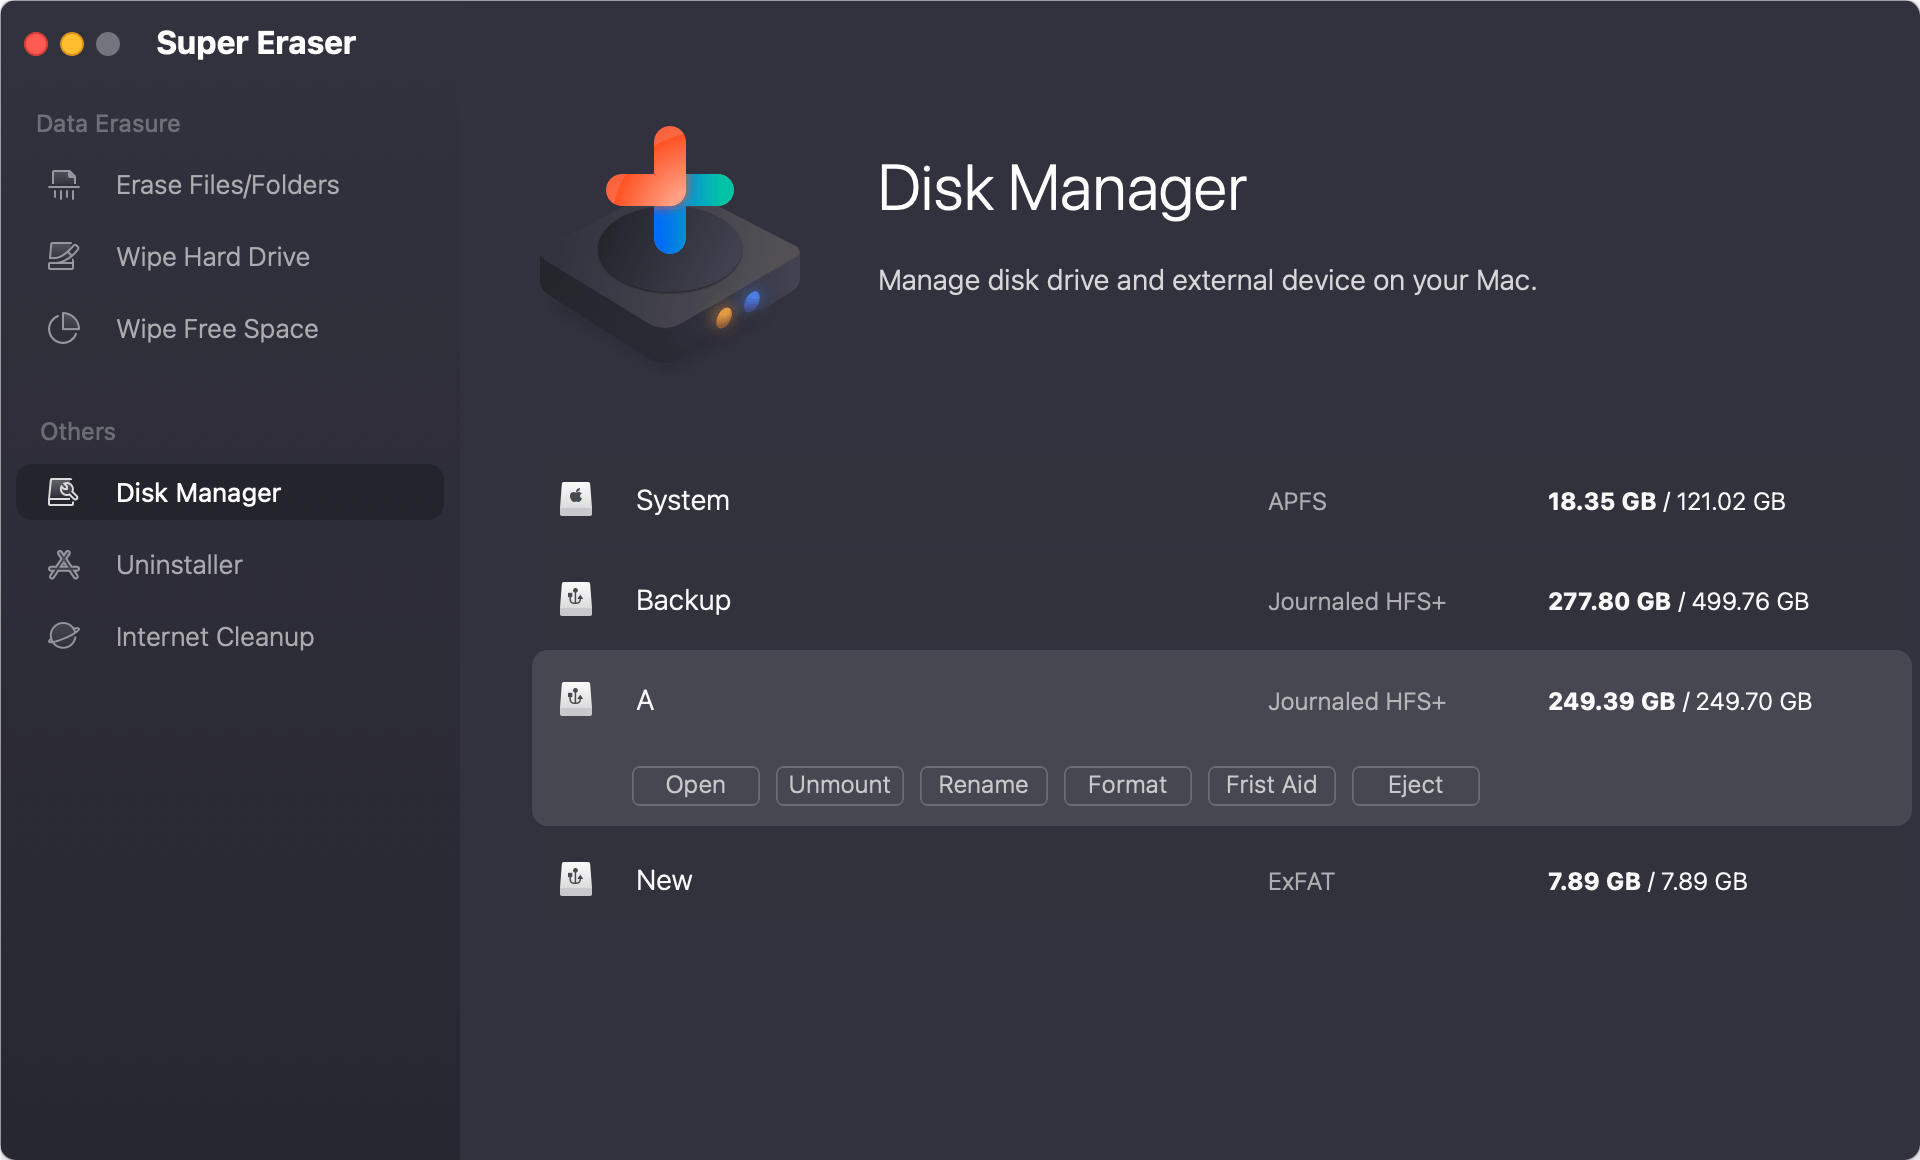
DoYourData Super Eraser for Mac also can help you format SDHC/SDXC card to FAT32/ExFAT/APFS, mount SDHC/SDXC card on Mac, repair damaged SDHC/SDXC card on Mac, etc.
Best Practices for Maintaining SDHC/SDXC Cards
To ensure the longevity and reliability of your SDHC and SDXC cards, it’s essential to follow some best practices for their maintenance and care. Here are some key tips:
Regularly Backing Up Important Data:
- Frequent Backups: Regularly back up the data on your SDHC or SDXC cards to another storage device, such as an external hard drive or cloud storage. This ensures that you won't lose important files if the card becomes corrupted or damaged.
- Automate Backups: Use software or built-in features on your devices to automate the backup process, making it easier to keep your data safe without having to remember to do it manually.
Properly Ejecting the Card from Devices:
- Safe Ejection: Always use the proper ejection process to remove the SD card from your devices. On a Mac, right-click the card in Finder and select "Eject," or drag the card icon to the Trash. This prevents data corruption and ensures all files are properly saved before removal.
- Wait for Notifications: Make sure any notifications or lights on your device indicating data transfer have stopped before ejecting the card. This ensures that all read/write processes are complete.
Avoiding Physical Damage and Exposure to Extreme Conditions:
- Handle with Care: Handle SD cards gently and avoid bending, dropping, or exposing them to excessive force. Physical damage can render the card unusable.
- Protect from Elements: Keep SD cards away from extreme temperatures, humidity, and direct sunlight. Store them in protective cases when not in use to shield them from dust and moisture.
- Avoid Static Electricity: When handling SD cards, be cautious of static electricity, which can damage the card's internal circuitry. Discharge static buildup by touching a grounded metal object before handling the card.
Conclusion
It is easy to format a SDHC/SDXC card on Mac. Disk Utility or third-party tool such as DoYourData Super Eraser for Mac can help you easily erase SDHC/SDXC card on Mac. Select the right file system, then format the card with ease.
Maintaining your SDHC and SDXC cards through regular backups, proper ejection practices, and careful handling will help ensure their longevity and reliability. By following these best practices, you can prevent data loss, avoid physical damage, and keep your cards functioning optimally. Proper care and maintenance of your SD cards will save you time and frustration, ensuring that your data remains safe and accessible for years to come.
FAQs About Format SDHC/SDXC Card on Mac
1. How to format a SDHC/SDXC card on Mac?
Connect the SDHC/SDXC card to your Mac, then use Disk Utility to format it:
- Open Disk Utility.
- Select the SDHC/SDXC card, click Erase.
- Select ExFAT or MS-DOS (FAT) as the file system.
- Click Erase again.
- Format the SDHC/SDXC card.
Note: The formatted data is not lost forever and can be recovered by data recovery software.
2. How to unformat a SDHC/SDXC card on Mac?
Data recovery software, such as Do Your Data Recovery for Mac, can help you unformat the SDHC/SDXC card and get all lost data back:
- Download and install the reliable Mac data recovery software - Do Your Data Recovery for Mac.
- Open this Mac data recovery software, select your SDHC/SDXC card to start data recovery.
- Click on Scan button to deeply scan the formatted SDHC/SDXC card.
- Preview and recover lost files after scanning.
3. How to wipe a SDHC/SDXC card on Mac?
To permanently wipe all data from the SDHC/SDXC card, just try data erasure software:
- Download and install DoYourData Super Eraser on your Mac, then open it.
- Choose Wipe Hard Drive mode, then select the SDHC/SDXC card.
- Click on Wipe Now button.
- Format and wipe the SDHC/SDXC card.
4. What is the best SDHC/SDXC card formatting tool?
Here is the list of top 5 SDHC/SDXC card formatting tools:
- Disk Utility
- Terminal
- DoYourData Super Eraser for Mac
- AweEraser for Mac
- DoYourData NTFS for Mac
5. Is it possible to format a SDHC/SDXC card to NTFS file system on Mac?
Yes, DoYourData NTFS for Mac can help you force format a SDHC/SDXC card to NTFS:
- Download and install DoYourData NTFS for Mac tool on Mac, open it.
- Select the SDHC/SDXC card, click on Format button.
- Select NTFS file system, then click on Continue button.
- Format the SDHC/SDXC card to NTFS.


DoYourData Super Eraser for Mac
DoYourData Super Eraser for Mac is a 100% safe, powerful and easy-to-use data erasure program. It offers certified data erasure standards including Peter Gutmann, U.S. Army AR380-19, DoD 5220.22-M ECE to permanently erase data from Macs and external devices, making data recovery be impossible.
Written & Updated by Shirly Chen
Shirly Chen has been writing data recovery, data erasure articles for DoYourData over 4 years. She has been working as a professional website content writer & editor for quite a long time. She also writes articles about disk clone, Mac optimization, disk backup, etc.