APFS Data Recovery on Mac
Mac data recovery software can help you recover permanently deleted files in APFS file system. Just download and install Do Your Data Recovery for Mac, the best APFS data recovery software, on your Mac, then run it to scan the internal SSD or external storage device to find all recoverable files. It will find all existing files, deleted/lost files, you just need to select the wanted files and save them by clicking on Recover button.
![]() Updated by Justin Kenny on June 1, 2024
Updated by Justin Kenny on June 1, 2024
Quick Navigation:
- About APFS File System
- Recover Lost Data from APFS Internal HDD/SSD on Mac
- Other Methods for APFS Data Recovery on Mac
- Conclusion
- FAQs About APFS Data Recovery on Mac
The Apple File System (APFS) came with macOS High Sierra in 2017 and has advanced features like strong encryption, sharing space, quick directory sizing, and better information handling. Even with these improvements, data loss can still happen because of things like formatting a disk by mistake, system crashes, hardware failures, and malware attacks.
This complete guide talks about APFS data recovery on Mac. It talks about the main features of APFS, common reasons why people lose data, and different ways to get it back, such as Time Machine backups, APFS snapshots, data recovery tools, macOS Recovery Mode, and professional data recovery services.

By learning how APFS works and following the right recovery steps, you can make it more likely that you can get your data back and stop yourself from losing it in the future.
About APFS File System
Key Features of APFS:
- Space Sharing: APFS lets multiple file systems share the same storage area within a container. That means the storage space is given dynamically, making it more flexible and efficient.
- Snapshots: APFS lets you create snapshots, copies of the file system that can only be read at a certain time. Snapshots are great for backing up and recovering systems because they make returning to a previous state easy.
- Encryption: APFS has strong encryption that can be used for both single-key and multi-key encryption of files and information, ensuring that data is safe.
- Improved Metadata Handling: APFS makes handling information easier, speeds up file access, and improves overall performance.
- Cloning: APFS lets you make copies of files and directories without adding extra room immediately. This helps you keep track of versions, make backups, and handle storage well.
Structure of APFS:
Overall, APFS is meant to make storage on Apple products faster and more reliable. Its structure is made up of:
- Container: A container is the top level of the APFS structure and can hold more than one volume. Each container shares its room with the volumes it holds on the fly.
- Volume: A volume is like a partition but more adaptable because it can share room with other volumes in the same container.
- Objects: Nodes, extents, and inodes are basic parts of APFS that control how files are stored and retrieved.

Recover Lost Data from APFS Internal HDD/SSD on Mac
macOS 10.13, 10.14, 10.15 and later macOS is using the new file system - Apple File System (APFS). It doesn't allow any application to access to the system drive (the drive where the macOS is installed). So, no data recovery software can directly scan the system drive (also called startup disk, boot drive, Macintosh HD, Apple SSD, etc) under macOS 10.13 High Sierra or later macOS. If you want to recover lost data from the system hard drive in APFS, you should change the Security level in macOS Recovery mode first.
Follow the steps below to recover lost data from Mac Internal SSD/HDD in APFS file system:
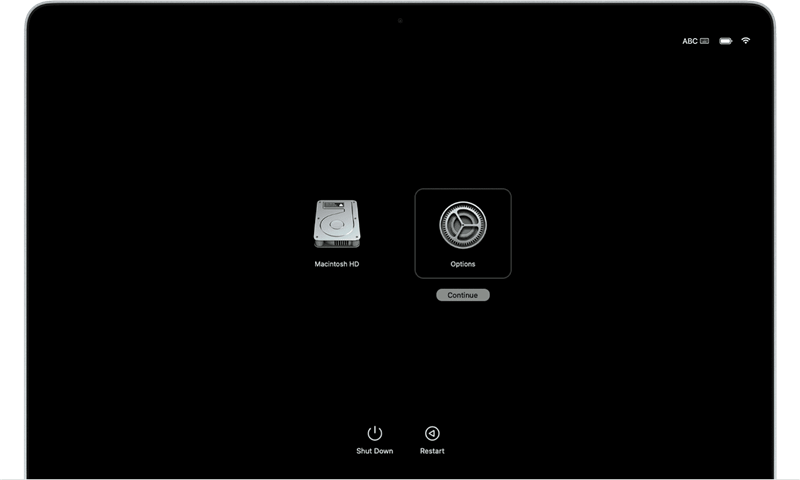
Step 1. Click on Apple menu, choose Restart. When the Mac restarts, press and hold Power button (if your Mac is an Intel-based Mac, press and hold Command+R keys) to enter in to macOS Recovery mode. Then choose Options and click on Continue button.
Step 2. Under Utilities, select Startup Security Utility.

Step 3. Choose the startup disk by clicking it, then click Security Policy...

Step 4. Select Reduced Security and Allow user management of kernel extensions from identified developers then click on OK button to save the settings.

Step 5. Restart the Mac in normal mode, then download and install Do Your Data Recovery for Mac on your Mac.
Do Your Data Recovery for Mac
- Recover permanently deleted files on Mac.
- Recover lost data from erased drive on Mac.
- Recover lost data from Mac HDD/SSD, external USB drive, SD card, digital camera, etc.
Step 6. Open Do Your Data Recovery for Mac from Launchpad, then select the internal disk (startup disk) to start data recovery.

Step 7. Click on Scan button to deeply scan the internal disk and find all recoverable files.

Step 8. Select the wanted files, then click on Recover button to save these files.

Note: If you want to recover lost data from an external APFS HDD/SSD, USB drive, memory card or other device, you don’t need to change the Security level, just run Do Your Data Recovery for Mac to scan the target drive to find all recoverable files.
Other Methods for APFS Data Recovery on Mac
You also can try these methods to recover lost data from APFS drive on Mac:
Method 1: Check Trash and Put Back the Deleted Files
- Open Trash.
- Find the wanted files and select them.
- Right-click the wanted files, choose Put Back.
- Restore the deleted files.
Method 2: Restore File via Time Machine Backup
Time Machine is built into macOS and automatically backs up your whole system every night. To get back info from Time Machine, do the following:
- Connect the Backup Drive: Ensure the Time Machine backup drive is linked to your Mac.
- Enter Time Machine: In the menu bar, click the Time Machine button and choose "Enter Time Machine."
- Navigate to the Data: Find the date of the last backup before the data loss using the timeline on the right.
- Select and Restore: Select the folders or files you want to return and click "Restore."
Method 3: Use APFS Snapshots
APFS snapshots are copies of the file system taken at a certain time. You can use snapshots to get back files if they are available:
- List Snapshots: To see a list of accessible snapshots in the Terminal, type the following command:
tmutil listlocalsnapshots / - Restore from Snapshot: Find the snapshot you want to recover and use these commands:
tmutil restore /path/to/snapshot /path/to/restore/location
Conclusion:
Apple File System (APFS) data recovery on a Mac can be tricky. But if you know how APFS works and what recovery methods to use, you can greatly improve your chances of recovering your data. Remember to act quickly, not write new data, and use snapshots and copies as much as possible.
Professional data recovery services can help you regain important data or fix serious tech problems. You can protect your data and lower the chance of losing it by taking preventative steps.
FAQs About APFS Data Recovery on Mac
1. How to use data recovery software for APFS data recovery on Mac?
Several third-party tools can be used to recover APFS data. Do Your Data Recovery for Mac, Disk Drill, Donemax Data Recovery, and Stellar Data Recovery are all well-known choices. Here is a general outline of how to use this kind of software:
Install the Software:
Get the data recovery software and put it on a different drive or folder so that it doesn't overwrite the lost data.
Scan the Drive:
Start the program and pick the APFS drive or volume to look for data that can be recovered.
Preview and Recover:
Once the check is done, look over the files that can be recovered you want to bring back. Put them on a different drive.
How to Pick the Best Data Recovery Software:
Choosing the right data recovery software is very important to recover your lost files. Here are some things to think about:
- Compatibility: Ensure the program can recover files from the APFS file system.
- Features: Deep scans, file previews, and support for different file types are all good things to look for.
- Success Rate: Look at the software's image and read reviews from other users to get an idea of its performance.
- Ease of Use: If you're not tech-savvy, pick a program with an easy-to-use layout.
- Cost: Compare the costs of different software and pick the one that fits your budget. Most programs allow you to try them out for free or get your money back to see how well they work before committing.
Steps to Recover Deleted Files from APFS Drive:
Step 1: Get Do Your Data Recovery for Mac and install it on your Mac.
If your Mac's hard drive has more than one partition, put the data recovery software in the section that doesn't have any lost data. Then, give permissions, finish the installation, and run the software following the on-screen directions.
Step 2: Choose the APFS volume to scan.
Select where the data was lost, then click Scan to begin the search.
Step 3: Search and preview lost APFS files.
The software now has a global automatic scan, including the old quick and deep scans. When the search for lost data on your Mac is over, it will show you a list of all the data it found, broken down by Type and Path. The file you want can be chosen and shown in the left window.
Step 4: Recover files from disk.
Just select the files you want to recover, then click on Recover button to save these files.
2. What is the best APFS data recovery software for Mac?
Here is the list of top 5 APFS data recovery software for Mac:
- Do Your Data Recovery for Mac
- Disk Drill
- Donemax Data Recovery for Mac
- iBoysoft Data Recovery for Mac
- Stellar Data Recovery for Mac
3. How to recover formatted APFS drive on Mac?
Do Your Data Recovery for Mac can help you unformat any drive on Mac:
- Download and install Do Your Data Recovery for Mac on Mac.
- Open Do Your Data Recovery for Mac, select the formatted drive.
- Click on Scan button to deeply scan the formatted drive.
- Preview and recover lost files.
Do Your Data Recovery for Mac
Do Your Data Recovery for Mac, one of the best Mac data recovery software, can help you easily and completely recover deleted, formatted or lost files from Mac HDD/SSD, external HDD/SDD, USB drive, memory card, digital camera, or other storage devices.
Written & Updated by Justin Kenny
Justin Kenny is a writer & editor of DoYourData. He joined DoYourData in 2016 and focuses on writing articles about Windows data recovery, Mac data recovery, external device data recovery, hard drive clone, data erasure, Mac cleanup, computer issue fixes, etc. He is a super fan of Apple devices and is big on testing new digital device and system utility software.